AWS S3 Create plugin (deprecated) for Jitterbit cloud and private agent groups
Introduction
The AWS S3 Create plugin uploads a file to Amazon AWS S3 as a target in an operation.
This plugin is available by default on Jitterbit cloud agent groups and can also be associated with private agent groups.
This page details the steps to use the AWS S3 Create plugin:
- Download and add the plugin
- Associate the plugin with an agent group
- Assign the plugin to a target
- Set global variables for the plugin
- Complete operation setup
Important
Plugins provided by Jitterbit are deprecated. See Deprecation and support in Plugins.
Encryption
The AWS S3 Create plugin passes your provided AWS S3 access key ID and secret access key (described below in Set global variables for the plugin) to Amazon. Security is handled by Amazon as described in Amazon's documentation on AWS Security Credentials.
Version 1.0.1.0 of the Jitterbit AWS S3 Create plugin supports S3 buckets that use one of these encryption options:
- None: No encryption
- AES-256: Server-Side Encryption with Amazon S3-Managed Keys (SSE-S3)
- AWS-KMS: Server-Side Encryption with AWS KMS-Managed Keys (SSE-KMS)
Version 1.0.0.0 of the Jitterbit AWS S3 Create plugin supports using no encryption or AES-256. KMS encryption is not supported with this version.
Usage
The AWS S3 Create plugin can be used whenever you need to upload files to AWS.
In one common use case, this plugin can be used to move large amounts of data into a Snowflake data warehouse when used with Snowpipe. To use this recommended setup, follow Snowflake's Snowpipe documentation, then configure the AWS S3 Create plugin as described on this page.
Note
Using Snowpipe and the AWS S3 Create plugin is recommended for increased performance in place of using Snowflake's JDBC driver, although it is also possible to install the Snowflake JDBC driver and then use Snowflake as a database target in Design Studio.
Additional functionality
In addition, these options offer additional functionality beyond the AWS S3 Create plugin:
-
AWS S3 Get: AWS S3 get is a Jitterbit-provided plugin used to read, rename, or delete a file from Amazon AWS S3. A file that is read can then be used as a source of data within an operation (see Create an operation in Design Studio.
-
AWS REST API: The AWS REST API can be accessed through an HTTP source or HTTP target in Design Studio. During configuration, it may be necessary to use the HMAC-SHA256 generator plugin depending on your method of authentication. If you need assistance, please contact support.
Download and add the plugin
The AWS S3 Create plugin is a standard Jitterbit plugin that is already available in the Management Console Plugins page and does not need to be downloaded or added to the organization.
If directed by support, this plugin can be downloaded at the links provided below and added to the organization.
-
Jitterbit AWS S3 Create 1.0.1.0 (ZIP)
(Encryption: AES-256, KMS, or None) -
Jitterbit AWS S3 Create 1.0.0.0 (ZIP)
(Encryption: AES-256 or None)
Associate the plugin with an agent group
Both versions of the AWS S3 Create plugin are associated with Jitterbit cloud agent groups by default. We recommend using version 1.0.1.0.
If using a private agent group, before you can use the plugin you must associate it with the private agent group to make the plugin available on all agents in the group.
The plugins are listed in the Management Console Plugins page with these display names:
-
Jitterbit_AWS_S3_Create (version 1.0.1.0)
-
Jitterbit AWS S3 Create (version 1.0.0.0)
Assign the plugin to a target
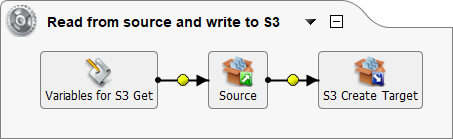
In a Design Studio project, you must assign the plugin to a target within an operation (see Create an operation. An example operation setup is provided at the end of this page.
Within the project:
-
Create an operation. Any operation using a target may be used.
-
Create a dummy target that the plugin will be assigned to. This target is used as a placeholder and will not actually be written to. We recommend using a file-type source such as Temporary Storage, local file, or FTP site and providing a Filename(s) value of
[file].[ext]. This will ensure that the file has the same name and extension as that coming from the source.Note
A global variable target can also be used if you are writing a single file to S3.
-
Assign the plugin to the target. To do this, right-click on the source and select Plugin. In the popup, under Available plugins, select "Jitterbit AWS S3 Get" and click Assign. Then click OK.
Tip
Detailed documentation on assigning plugins is available in Applying pipeline plug-ins.
Set global variables for the plugin
In order for a plugin assigned to a target to be functional, any global variables required by the plugin must be set. These variables are set in a script, which should be placed before the target in the operation so that the variables can be initialized. Scripts are often set before the source in an operation, which is also before the target.
To add a script before the source and target in the operation:
-
Right-click on the source in the operation and select Insert Before This > Script.
-
Create a new Jitterbit Script that sets variables used by the plugin to authenticate with your S3 bucket and upload any files you specify. A script template for required variables is provided below, followed by documentation on all possible variables that may be included within the script.
AWS S3 Create Script<trans> $AWS.S3.BUCKET_NAME="<YOUR_BUCKET_NAME>"; $AWS.S3.ACCESS_KEY_ID="<YOUR_ACCESS_KEY>"; $AWS.S3.SECRET_ACCESS_KEY="<YOUR_SECRET_KEY>"; </trans>
| Name | Type | Required | Description |
|---|---|---|---|
AWS.S3.ENDPOINT | String | Optional | The URL of the Amazon AWS S3 endpoint. Defaults to "s3.amazonaws.com" if not set. Valid endpoint names by region are provided in Amazon's documentation AWS Regions and Endpoints. |
AWS.S3.BUCKET_NAME | String | Required | The name of the S3 target bucket. To write to an existing folder inside the bucket, add the folder name after a forward slash (e.g. "my_bucket/folder"). The folder must already exist. |
AWS.S3.ACCESS_KEY_ID | String | Required | The S3 access key (e.g. "ABCDEFGHI1JK2LM3NOPQ"). |
AWS.S3.SECRET_ACCESS_KEY | String | Required | The S3 secret access key (e.g. "1aBCd2e/F34gH56IJ7Kl/Mno8pqRsTUvw9x0yzzz"). |
AWS.S3.REGION | String | Optional | The S3 region. Defaults to "DEFAULT_REGION" if not set (not recommended). Current region names are provided in Amazon's documentation AWS Regions and Endpoints. |
AWS.S3.OBJECT_KEY | String | Optional | The S3 object key to be written. This is the name of the specific file you are uploading, such as "myfile.txt". If this variable is not included in the script, only one file in the bucket and folder (if specified) will be returned. Specifying multiple files or using wildcards is not supported. |
Complete operation setup
The plugin portion of the operation setup is complete after you have (1) the script defining the variables to be used with the plugin and (2) the plugin assigned to a target in the operation.
To complete your operation setup, define a source from which the data is coming from, or add both a source and a transformation if you want to transform your data prior to reaching the S3 bucket. If writing a single file to S3, the operation setup is complete.
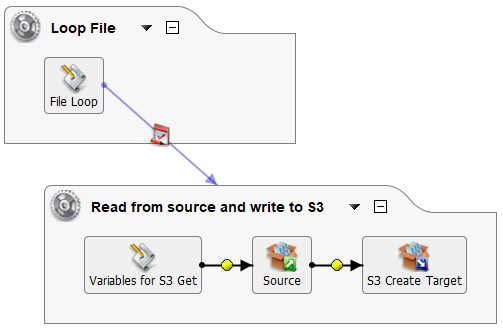
If you want to write multiple files to S3, you can manually create an additional script to loop through the files in your S3 bucket. Make sure that you have not set any values in the AWS.S3.OBJECT_KEY variable.
Since only one file is returned with the plugin, you can run each file separately through the operation. For example, using a combination of the FileList, While, and RunOperation and a newly defined global variable SingleFile, this script picks up each file and then runs the operation with the plugin:
<trans>
Files = FileList("<TAG>Sources/All Files</TAG>");
i = 0;
while(i< length(Files),
$SingleFile = Files[i];
RunOperation("<TAG>Operations/Read from source and write to S3</TAG>");

i++;
)

</trans>
For use with the above script, you will want to reference the new global variable [SingleFile] in the Get Files of your file-type source. This example may be adjusted for use with other configurations.