OASIS Web Service Security plugin (deprecated) for Jitterbit cloud and private agent groups
Introduction
Jitterbit's OASIS Web Service Security plugin is used to append an OASIS Web Services Security (WSS) security header to a web service request. The header includes a UserNameToken element. Optionally, the header can include a Timestamp element.
This page details the steps to use the OASIS Web Service Security plugin:
- Download and add the plugin
- Associate the plugin with an agent group
- Assign the plugin The plugin can be assigned to any of these Design Studio project items or Integration Studio project components:
- Design Studio web service call using a web service method
- Design Studio web service call using a Workday endpoint
- Integration Studio SOAP activity
- Set global variables for the plugin
- Complete operation setup
Important
Plugins provided by Jitterbit are deprecated. See Deprecation and support in Plugins.
Versions and upgrading
There are three versions of this plugin available:
-
OASIS Web Service Security 1.0.0.0
This version is deprecated and shouldn't be used. -
OASIS Web Service Security 1.2.0.0
This version contains basic functionality, but does not include support for Web Services Addressing. -
OASIS Web Service Security 1.3.0.0
This version contains all the same functionality as version 1.2.0.0, and also includes partial support for Web Services Addressing, with the addition of these global variables:WSA.Action,WSA.To, andWSA.ToMustUnderstand. This is the current recommended version.
If you are currently using a lower plugin version and want to upgrade to a higher version, the upgrade process is manual. That is, you must unassign the older plugin from any project items you have it assigned to, and then assign the newer plugin. Each plugin version is independent.
Download and add the plugin
The OASIS Web Service Security plugin must be downloaded at the link provided below and added to the organization (see Add new plugins in Customizations > Plug-ins).
Associate the plugin with an agent group
If using a cloud agent group, you can skip this step, as all versions of the OASIS Web Service Security plugin are already associated with Jitterbit's cloud agent groups by default. We recommend using version 1.3.0.0.
If using a private agent group, you must associate this Jitterbit-provided plugin with a private agent group. This will make the plugin available on all private agents within the private agent group. To associate the plugin:
- Log in to the Harmony portal and go to the Management Console. Then use the menu in the top left to navigate to Customizations > Plug-ins.
- In the table, locate the row "OASIS Web Service Security," with attention to the version number. The highest version is recommended. On the far right, use the Action dropdown to select Associate Agent Group.
- In the popup, select a private agent group and click Save.
Tip
Detailed documentation on associating plugins is available in Customizations > Plug-ins.
Assign the plugin
This plugin can be assigned to any of these Design Studio project items or Integration Studio project components:
- Design Studio web service call using a web service method
- Design Studio web service call using a Workday endpoint
- Integration Studio SOAP activity
Note
When connecting to Workday, the OASIS plugin is required using the Design Studio Workday connector only. The Integration Studio Workday connector has built-in functionality for OASIS headers using the username and password provided during configuration of the connection.
To assign this plugin in Design Studio:
- Create a web service call operation.
- Within the operation, right-click on the web service call and select Plugin. In the popup, under Available plugins, select "OASIS Web Service Security" and click Assign. Then click OK.
To assign this plugin in Integration Studio:
- Add a SOAP activity to an operation.
- Configure the SOAP activity. On the last step of configuration, below the display of data schemas, click Add Plugin(s) to expand this section and select the checkbox next to "OASIS Web Service Security." Then click Finished.
Tip
Detailed documentation on assigning plugins is available in Applying pipeline plug-ins (Design Studio) or Plugins added to an activity (Integration Studio).
Set global variables for the plugin
In order for a plugin assigned to a web service call or SOAP activity to be functional, any global variables required by the plugin must be set. These variables are set in a script, which should be placed before the web service call or SOAP activity in the operation so that the variables can be initialized.
Tip
For more information, see these pages:
- Script as a project item in Creating a script (Design Studio)
- Global variables (Design Studio)
- Script as a project component in Script types and creation (Integration Studio)
- Global variables (Integration Studio)
A script template is provided below, followed by documentation on the variables that can be used with this plugin:
<trans>
$WSS.User = "user@example.com";
$WSS.Password = "mypassword";
$WSS.IncludeTimestamp = true;
$WSS.TimeToLive = 10;
$WSS.UsePasswordDigest = true;
$WSS.IncludeNonce = false;
$WSS.IncludeCreated = false;
$WSS.UseMilliSecondPrecision = false;
$WSS.MustUnderstand = false;
$WSA.Action = "http://example.com/examples-apply/ExampleRequest";
$WSA.To = "http://www.example.com/sys2/example-apply-v2-0";
$WSA.ToMustUnderstand = false;
</trans>
| Name | Type | Required | Description |
|---|---|---|---|
WSS.User | String | Required | The username that will allow access to the web service. |
WSS.Password | String | Required | The password associated with the username that will allow access to the web service. |
WSS.IncludeTimestamp | Boolean | Required | If set to true or not set, the created header will include a wsu:Timestamp element. If set to false, the Timestamp element will not be included. |
WSS.TimeToLive | Integer | Required | The lifetime of the request, in seconds. This value is ignored if the IncludeTimestamp element is false. |
WSS.UsePasswordDigest | Boolean | Required | If set to false or not set, #PasswordText is used as the value of the Type attribute in the Password element by default. Set to true to use #PasswordDigest. |
WSS.IncludeNonce | Boolean | Optional | If set to true or not set, the UserNameToken element contains a Nonce element by default. Set to false to suppress the Nonce element. |
WSS.IncludeCreated | Boolean | Optional | If set to true or not set, the UserNameToken element contains a Created element by default. Set to false to suppress the Created element. |
WSS.UseMilliSecondPrecision | Boolean | Optional | If set to false or not set, the generated timestamp in the Created element will use a precision of 10-2 (0.01) seconds. Set to true to use millisecond precision (Some web service implementations do not accept this.). |
WSS.MustUnderstand | Boolean | Optional | If set to true or not set, the value of the mustUnderstand attribute in the WSS security header that is inserted into the SOAP envelope is set to true. Set to false to suppress this element. |
WSA.Action | String | Optional | The wsa:Action element value in the header.Note This variable is supported only in plugin version 1.3.0.0 or higher. |
WSA.To | String | Optional | The wsa:To element value in the header.Note This variable is supported only in plugin version 1.3.0.0 or higher. |
WSA.ToMustUnderstand | Boolean | Optional | If set to false or not set, the value of the wsa:To element mustUnderstand attribute in the header that is inserted into the SOAP envelope is set to false. Set to true to require the recipient to process the wsa:To header entry.Note This variable is supported only in plugin version 1.3.0.0 or higher. |
Complete operation setup
The plugin portion of the operation setup is complete after you have (1) the script defining the variables to be used with the plugin and (2) the plugin assigned to a web service call (Design Studio) or SOAP activity (Integration Studio) in the operation.
To complete the operation setup, configure the web service request and response transformations, along with any additional sources or targets for the operation.
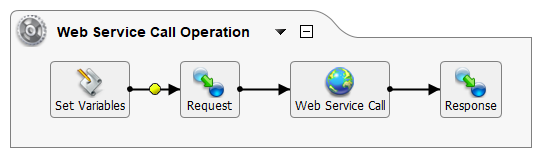
A complete operation in Design Studio:
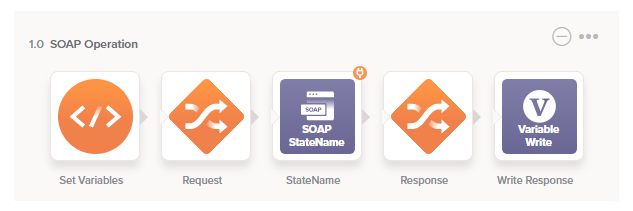
A complete operation in Integration Studio:
Tip
For details about completing the operation, see Create an operation (Design Studio) or Operation creation and configuration (Integration Studio).