XSL Transform plugin (deprecated) for Jitterbit private agent groups
Introduction
The XSL Transform plugin applies an XSL Transform (XSLT) stylesheet to an input file as it passes from the source to the target. The plugin uses the Saxon XSLT processor, which supports XSLT 2.0.
This plugin can be associated only with private agent groups and is not available on the Jitterbit cloud agent groups.
Important
Plugins provided by Jitterbit are deprecated. See Deprecation and support in Plugins.
Download and add the plugin
The XSL Transform plugin is a standard Jitterbit plugin that is already available in the Management Console Plugins page and does not need to be downloaded or added to the organization.
If directed by support, this plugin can be downloaded at the link provided below and added to the organization (see Add new plugins in Customizations > Plug-ins).
Associate the plugin with an agent group
The XSL Transform plugin must be associated with a private agent group to make the plugin available on all agents in the group (see Associate agent groups in Customizations > Plug-ins).
The plugin is listed in the Management Console Plugins page with a display name of Jitterbit XSL Transform.
Set variables and use the plugin in a project
Refer to these topics for information about using plugins in a project:
The XSL Transform plugin uses these variables:
| Name | Type | Required | Description |
|---|---|---|---|
XSLT.stylesheet | String | Optional | XSLT stylesheet in plain text. |
XSLT.stylesheet_filename | String | Optional | Name of a file containing the XSLT stylesheet to apply. The value can be an absolute path or a path relative to the plugin install directory. |
Example
A typical example is to fetch data from one web service and feed the data to a second web service. In this example, the data fetched from the source web service has namespaces (ns1). However, the target web service does not need the namespaces. Using the XSL Transform plugin, the namespaces will be removed from the source web service data prior to calling the target web service.
These steps outline how to use the XSL Transform plugin to remove the namespaces from the source web service data and then call the target web service. The steps use Design Studio as an example; you may use this plugin in Integration Studio using similar steps.
-
Access the XSL Transform plugin's manifest file through the Management Console Plugins page (see View manifest files in Customizations > Plug-ins).
-
Read the manifest to find the location where the plugin expects Java to be installed. Verify Java is installed at that location. If Java is in a different location on the private agent, you must perform these steps on each agent in the group:
- Stop the private agent.
- Browse to the plugin folder on the private agent.
- Edit the manifest file to point to the correct location of Java.
- Restart the private agent.
-
In Design Studio, create a new script to strip off the namespaces as shown in this example script:
<trans>
$XSLT.stylesheet = '<xsl:stylesheet xmlns:xsl="http://www.w3.org/1999/XSL/Transform" version="1.0"
xmlns:ns1="urn:microsoft-dynamics-nav/xmlports/x50001" exclude-result-prefixes="ns1">
<xsl:output method="xml" encoding="utf-8" indent="yes"/>
<xsl:strip-space elements="*"/
<xsl:template match="ns1:*">
<xsl:element name="{local-name()}" namespace="urn:microsoft-dynamics-nav/xmlports/x50001">
<xsl:apply-templates select="node() | @*"/>
</xsl:element>
</xsl:template>
<xsl:template match="node() | @*">
<xsl:copy>
<xsl:apply-templates select="node() | @*"/>
</xsl:copy>
</xsl:template>
</xsl:stylesheet> ';
</trans>
Note
The variable name in the script above is important. You need to use the same variable name that the plugin looks for. The plugin looks specifically for
XSLT.stylesheetand uses the value assigned to it in the script. -
Create an operation and use the script anywhere in the operation flow. In the operation shown below, the script is named XSLT Code.
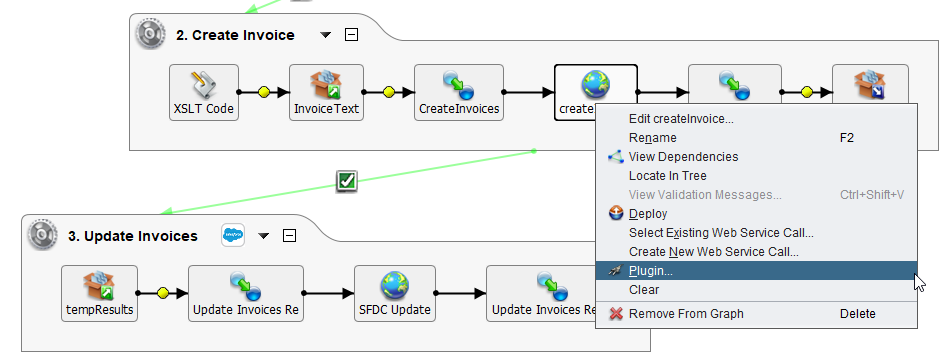
-
Apply the plugin at the point where the web service is called. In the example operation above, the web service is named createInvoice. To open the Pipeline Plugins dialog, right-click the web service and select Plugin from the menu:
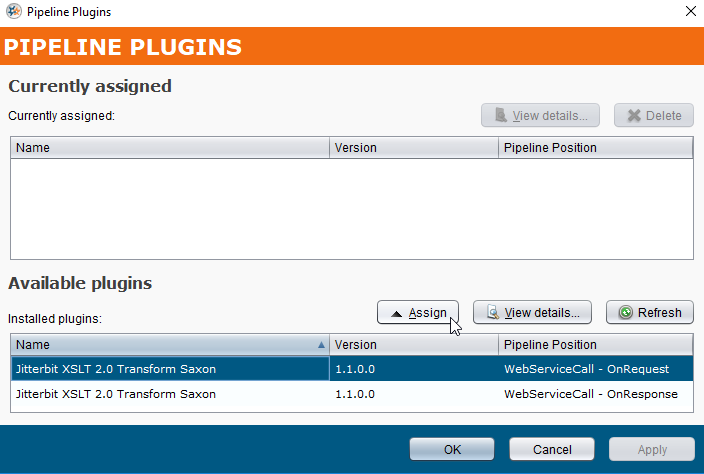
- The plugin has been assigned to the private agent in previous steps, thereby allowing the Design Studio to see and display the plugin in the Available Plugins section within the bottom half of the dialog. If the plugin does not immediately display, click the Refresh button in the dialog.
- You must select the Pipeline Position. In this example, the plugin is called when the input is sent, which occurs while making the request to the web service. The WebServiceCall - OnRequest option is selected.
- Click the Assign button.
-
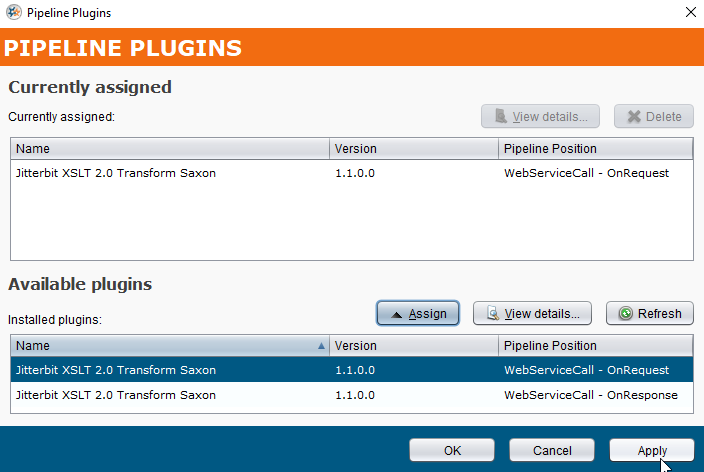
The XSL Transform plugin now displays in the Currently Assigned section of the dialog. Click the Apply button to assign the plugin and click OK to close the dialog:
-
Save and deploy the operation. The operation is complete and is ready to test.