Connect to SFTP with SSH keys on Jitterbit private agents
Introduction
SSH client keys are used to authenticate Jitterbit with external resources such as SFTP servers. This page describes how to use SSL client keys specifically for SFTP connections (used with Integration Studio FTP endpoints or Design Studio FTP sources or targets), and how to convert keys to an appropriate format for Jitterbit private agents.
Note
Connecting to SFTP with SSH keys requires using a Jitterbit private agent.
Tip
If you are looking to use SSL certificates to connect with HTTPS sources/targets or SOAP web services, you can manage SSL certificates from the Customizations > Client Certificates page of the Management Console.
You can use public/private key authentication for SFTP connections. In order to use key authentication, you must have the appropriate keys in an OpenSSH format. If your keys are not in an OpenSSH format, see these instructions below for how to convert keys to the required format.
Private agents support all OpenSSL-supported cipher suites for SFTP connections. This applies to both inbound and outbound operations.
Configure private agent to use SSH keys
Once you have public and private keys in an OpenSSH format, you can specify that the keys are to be used in the Jitterbit configuration file.
This can be done either remotely via the Management Console or manually in the private agent configuration file as described in edit the configuration file (jitterbit.conf).
Under the [SSH] section, the configuration should be edited to include the paths of the public and private keys and, if applicable, the passphrase. These keys will then be used for SSH by default. For example, on Windows:
PublicKeyFile='C:/keys/pubkey.dat'
PrivateKeyFile='C:/keys/privkey.dat'
PrivateKeyPassphrase='password'
Important
All paths in the jitterbit.conf file use forward slashes, even when specifying Windows locations.
Multiple sets of keys can be included and configured by using Jitterbit variables to override the default keys. For example, you can set these source or target variables equal to a string in a Jitterbit script that is part of an operation:
$jitterbit.source.sftp.ssh_key_id="RSA";

$jitterbit.target.sftp.ssh_key_id="RSA";
Then, you provide matching entries using that ID as a suffix in the Jitterbit configuration file. For example, using the above ID of RSA:
PublicKeyFileRSA='/usr/local/ssh/id_dsa.pub'
PrivateKeyFileRSA='/usr/local/ssh/id_dsa'
PrivateKeyPassphraseRSA='secretpp'
These entries would then be used for SSH when required.
To return to using the default SSH keys, reset the appropriate variables back to empty strings:
$jitterbit.source.sftp.ssh_key_id="";

$jitterbit.target.sftp.ssh_key_id="";
Caution
When editing the configuration file, note that a line that is commented out with '#' must not be left blank, or the next line will be read as a comment even if it does not begin with '#'.
After making configuration changes, always restart the Jitterbit agent in order for the changes to take effect. See Edit the configuration file (jitterbit.conf) for additional information.
Configure an SFTP connection in studio
Now you are ready to configure your SFTP connection in the Studio project design application.
Integration Studio
To configure an SFTP connection in Integration Studio, follow FTP connection as described, with these fields specified:
- Host: The servername or IP address of the SFTP server. (Required.)
- Port: The default port for SFTP is 22. If the server is configured for a different port for SFTP, clear the Use Default Port checkbox and specify the port. (Required.)
- Security Options: Use the dropdown to select SFTP.
- Username: Enter the login name for the server.
- Password: Since keys are being used for authentication, leave empty to pass a blank password.
Then follow FTP Read activity or FTP Write activity to specify the path(s) to read from or write to.
Add any additional settings and specifications that are required to configure the connection or activity for your requirements.
Design Studio
To configure an SFTP connection in Design Studio, follow FTP site source or target as described, with these fields specified:
-
Host: The servername or IP address of the SFTP server. (Required.)
-
Port: The default for SFTP is 22. If the server is configured for a different port for SFTP, specify the Port by deselecting the Use default port checkbox.
-
Path: Enter the path(s) to read files from, if your account on the SFTP server is not set to switch automatically to the desired location.
-
Login: Enter the login name for the server. (Required.)
-
Password: Since keys are being used for authentication, leave empty to pass a blank password.
-
Get Files: Enter the desired names for the source file(s). Wildcards and variables may be used in this field. (Required.)
-
Options: Expand the Options. Under Security Options, select SFTP.
Add any additional settings and specifications that are required to configure the source or target for your requirements.
Convert a key to OpenSSH format
Prerequisites
- PuTTYgen is recommended as the application to use to generate SSH keys for use in Jitterbit. On the Windows OS, it comes with a GUI interface.
- The private key to be used to create a public key in an OpenSSH format. The private key file may have a .ppk or a .crt extension.
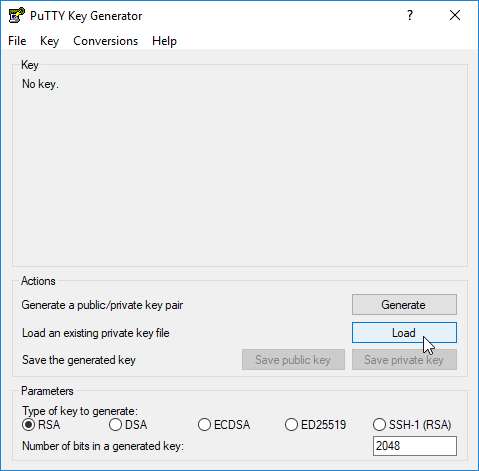
Step 1 – Load the private key
Open PuTTYgen application. Either use the menu File > Load private key or click the Load button, and select the private key file that's to be converted:
Step 2 – Open the private key
Once the private key file has been loaded, enter its key passphrase—if required—in the dialog. A passphrase is not required.

Step 3 – Convert and save the private key
To create—from the private key—a private key in the OpenSSH format, use the menu Conversions > Export OpenSSH key.
The public key file data in the OpenSSH format is in the text box labeled "Public key for pasting into OpenSSH authorized_keys file:"
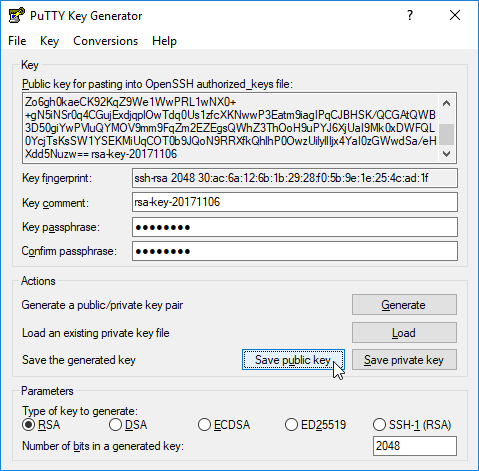
Step 4 – Save the public key
To save the public key to a file, either use the menus File > Save public key or click the Save public key button.
The files created can then be used as described above on the Jitterbit private agent with the private key. The public key would be placed on the SFTP server and used for authentication.