Enable local file location on Jitterbit private agents
Introduction
By default, using local files is disabled for Jitterbit private agents. This includes using an Integration Studio Local Storage endpoint or a Design Studio Local File source or target, as well as using trigger files or success/error folders that are configured on other endpoints or sources/targets.
You can enable local file locations if you need to work with a specific local directory or local files, or use the trigger file or success/error folder options.
Local file locations can be enabled only for private agents and cannot be enabled on Jitterbit cloud agents.
Note that independent of this setting, Integration Studio Temporary Storage endpoints and Design Studio Temporary Storage sources and targets are always available, both for private and cloud agents.
Determine if local file location is disabled
As local file locations are disabled by default on private agents, if you have not yet configured your private agents to enable local file location, then upon testing the connection to an Integration Studio Local Storage endpoint or Design Studio Local File source or target, this error message will be displayed:
Using local files as a source/target, trigger file, or success/error folders is disabled by default.
Set EnableLocalFileLocation=true in the [Settings] section of jitterbit.conf and restart the Jitterbit Apache service to enable it.
Local file location is disabled on the cloud agent group, so the same error message will appear if you are using cloud agents. It is not possible to enable local file location for cloud agents.
Enable local file location in a private agent
To enable local files, you need to edit the private agent's configuration file and then restart all Jitterbit services.
There are two ways to change the configuration file: remotely or manually. Remotely is simpler (especially with multiple agents in an agent group), but manually may be preferable in certain scenarios.
Remotely modify the private agent configuration file
These abbreviated steps show how to enable local file storage remotely using the Management Console. For further instructions, see edit the configuration file (jitterbit.conf).
-
Log in to the Harmony portal and select Management Console. Use the menu to navigate to Agents > Agent Groups.
-
In the table, select the private agent group and use its Action dropdown to select Jitterbit Conf.
-
In the Config tab, click Edit. Scroll until you have reached the Settings row, as shown in the left column Configuration.
-
For the Keys row labeled
EnableLocalFileLocation, set the Value totrue.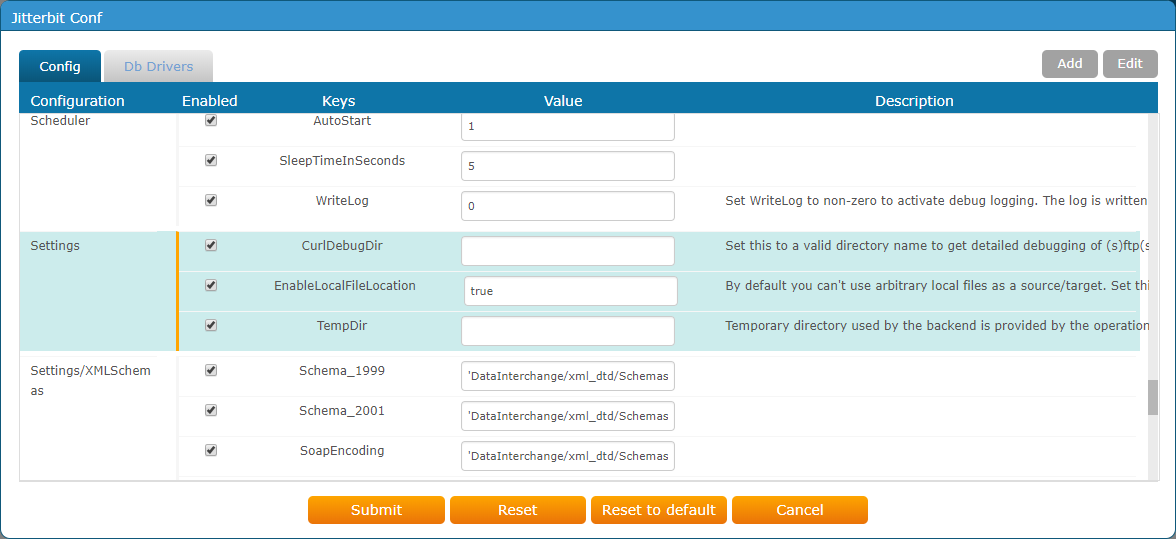
-
Click Submit to complete the configuration change.
Manually modify the private agent configuration file
These abbreviated steps show how to enable local file storage by manually editing the configuration file. For further instructions, see Edit the configuration file (jitterbit.conf).
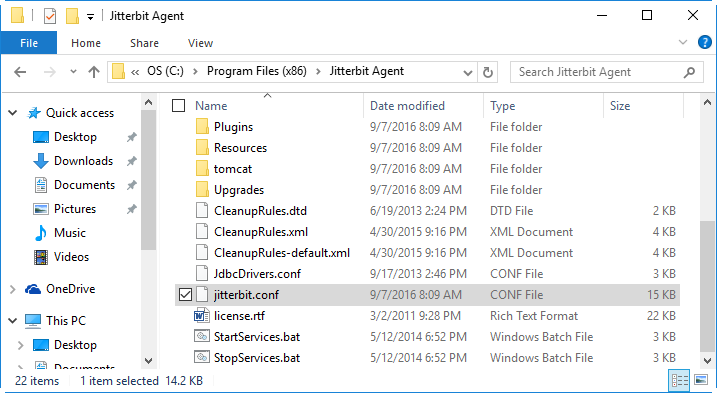
On each machine where the private agent is installed, navigate to the agent's configuration file. This will be located in its installation directory, usually in one of these locations:
-
Windows (Harmony):
C:\Program Files (x86)\Jitterbit Agent\jitterbit.conf -
Windows (Jitterbit v5.x):
C:\Program Files (x86)\Jitterbit Integration Server\jitterbit.conf -
Linux:
/opt/jitterbit/jitterbit.conf
For example, on a Windows OS:
-
Open the
jitterbit.conffile in a text editor. -
Under the
[Settings]section of the file, find the entryEnableLocalFileLocation: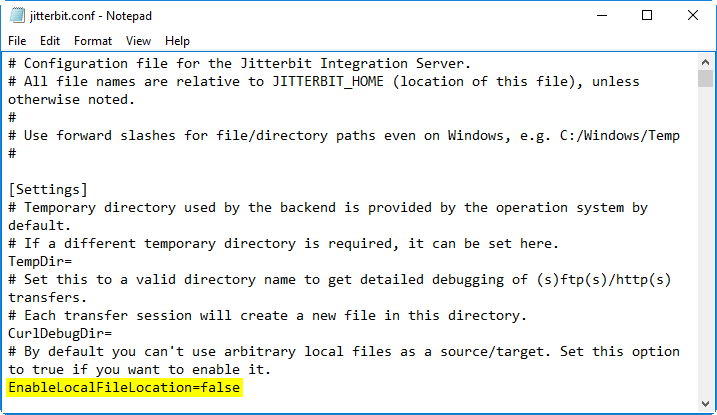
Change the line shown above in yellow to read:
EnableLocalFileLocation=true -
Save and close the config file.
Restart the private agent for the changes to take effect
All Jitterbit services must be restarted in order for the config change to take place. On each machine where the private agent is installed, first stop the services, then restart them, using the appropriate procedure for the operating system:
| OS | Procedure | Menu Items or Commands |
|---|---|---|
| Windows | Run the applications | "Stop Jitterbit Services" "Start Jitterbit Services" |
| Linux | Use the commands | $ sudo jitterbit stop$ sudo jitterbit start |
Check the private agent
To check that the private agent has restarted successfully, go to the Management Console and view the agent. The status of the private agent should be "Running." The new configuration will now be in effect. For example:

Confirm local file location is enabled
These steps show how to confirm that local file locations are enabled. Even if you do not intend to use a Local Storage endpoint or Local File source/target, you can use this procedure to confirm that a trigger file or a success/error folder will now be accessible on a certain agent or agent group.
-
Check that you are using an environment that uses the private agent you configured in the above steps.
-
Confirm that you can now use local file locations in Integration Studio or Design Studio:
-
Integration Studio: Create a new Local Storage connection, specifying a local folder path. Click the Test button. A message should be displayed indicating the connection was successful.
-
Design Studio: Create a new Local File source or target, specifying a local folder path and files. After your specific parameters are listed, click Test Connection. A message should be displayed indicating the connection was successful and display the local files.
Note
If you are using a cloud agent (or a different private agent), you will receive the same error message as before, either because enabling local files is not possible using a cloud agent or because you have the wrong agent or agent group.
-