Install a private agent group in Kubernetes using Helm
Introduction
A group of Harmony private agents can be configured to be auto-registering and autoscaling by using Kubernetes. This page describes how to configure a group of private agents using Kubernetes and Helm.
Reference: The values YAML file
The agent group is configured using a specific values.yaml file. These are the attributes and definitions in the file, based on the register.json defined for the agent group (original in the Jitterbit charts GitHub repository):
Important
Agent registration access tokens require agents version 10.83 / 11.21 or later.
| Attribute | Example Values | Description |
|---|---|---|
nameOverride | private-agent-group | Used to name Kubernetes resources; by default the name of the chart (agent-group) is used but can be overridden with this |
image: | Image mapping | |
repository | jitterbit/agent | |
tag | latest | Unless specifically required, use latest |
agent: | Agent's register.jsonmapping | |
registerjson: | ||
cloudURL | https://na-east.jitterbit.com | URL of your Harmony region; see example register.jsonfor the region list |
token | jb_a1b23c45-d6ef-789a-b0cd-e12fabcd3e4f | Agent registration access token |
agentGroupId | 346591 | Agent group ID |
agentNamePrefix | "%host%" | A prefix added to the UTC timestamp of agent creation to form the agent name |
deregisterAgentOnDrainStop | true | Performs agent deregistration upon agent drainstop |
hpa: | Horizontal Pod Autoscaler mapping | |
minReplicas | 2 | Minimum number of replicas |
maxReplicas | 3 | Maximum number of replicas |
replicas | 3 | Initial number of replicas; a safeguard is to set this equal to the maxReplicas |
Important
If using agents version 10.83 / 11.21 or later, we recommend using Agent registration access tokens over encrypted Agent Installer user credentials. Agent Registration access tokens do not expire and can be managed in the Management Console at any time.
| Attribute | Example Values | Description |
|---|---|---|
nameOverride | private-agent-group | Used to name Kubernetes resources; by default the name of the chart (agent-group) is used but can be overridden with this |
image: | Image mapping | |
repository | jitterbit/agent | |
tag | latest | Unless specifically required, use latest |
agent: | Agent's register.jsonmapping | |
registerjson: | ||
cloudURL | https://na-east.jitterbit.com | URL of your Harmony region; see example register.jsonfor the region list |
username | $00+LongEncryptedAndHashedUsername== | Encrypted and hashed username from generating the agent group's register.json |
password | $00LongEncryptedAndHashedPassword= | Encrypted and hashed password from generating the agent group's register.json |
agentGroupId | 346591 | Agent group ID |
agentNamePrefix | "%host%" | A prefix added to the UTC timestamp of agent creation to form the agent name |
deregisterAgentOnDrainStop | true | Performs agent deregistration upon agent drainstop |
hpa: | Horizontal Pod Autoscaler mapping | |
minReplicas | 2 | Minimum number of replicas |
maxReplicas | 3 | Maximum number of replicas |
replicas | 3 | Initial number of replicas; a safeguard is to set this equal to the maxReplicas |
Install and run the agent group
Follow these steps to install and run an agent group in Kubernetes using Helm:
-
Ensure that your Kubernetes cluster is up and running and that your Helm client is configured properly to use the cluster along with Jitterbit's public Helm repository.
-
Generate the agent group's
register.jsonfile, if you haven't already. Instructions on this are at Agent automatic registration and autoscaling. -
Create your agent group's
values.yamlfile. Note that as YAML is a superset of JSON, you can assignagent.registerjsonto yourregister.json's JSON object. Here's an examplevalues.yamlfile created using theregister.jsonfile from the previous step. It was converted into YAML by placing it underagent.registerjson:Important
Agent registration access tokens require agents version 10.83 / 11.21 or later.
nameOverride: private-agent-group
image:
  repository: jitterbit/agent
  tag: latest
agent:
  registerjson:
    cloudUrl: https://na-east.jitterbit.com
    token: jb_a1b23c45-d6ef-789a-b0cd-e12fabcd3e4f
    agentGroupId: 346591
    agentNamePrefix: "%host%"
    deregisterAgentOnDrainstop: true
hpa:
  minReplicas: 2
  maxReplicas: 3
replicas: 3
Important
If using agents version 10.83 / 11.21 or later, we recommend using Agent registration access tokens over encrypted Agent Installer user credentials. Agent Registration access tokens do not expire and can be managed in the Management Console at any time.
nameOverride: private-agent-group
image:
  repository: jitterbit/agent
  tag: latest
agent:
  registerjson:
    cloudUrl: https://na-east.jitterbit.com
    username: $00+LongEncryptedAndHashedUsername==
    password: $00LongEncryptedAndHashedPassword=
    agentGroupId: 346591
    agentNamePrefix: "%host%"
    deregisterAgentOnDrainstop: true
hpa:
  minReplicas: 2
  maxReplicas: 3
replicas: 3
Warning
If you are using a Windows operating system, make sure that the
values.yamlfile has the UNIX line endings\ninstead of DOS's\r\n. -
Check that your Docker runtime has sufficient resources allocated to it to accommodate the maximum number of replicas you have specified. Each Docker private agent requires 0.25 cores and 2 GB memory:
Resource Value Calculation Value Not to Exceed Cores 0.25 cores x maxReplicas(number of CPUs) x (number of cores/CPU) Memory 2 GB x maxReplicasAvailable memory allocated to the Kubernetes cluster -
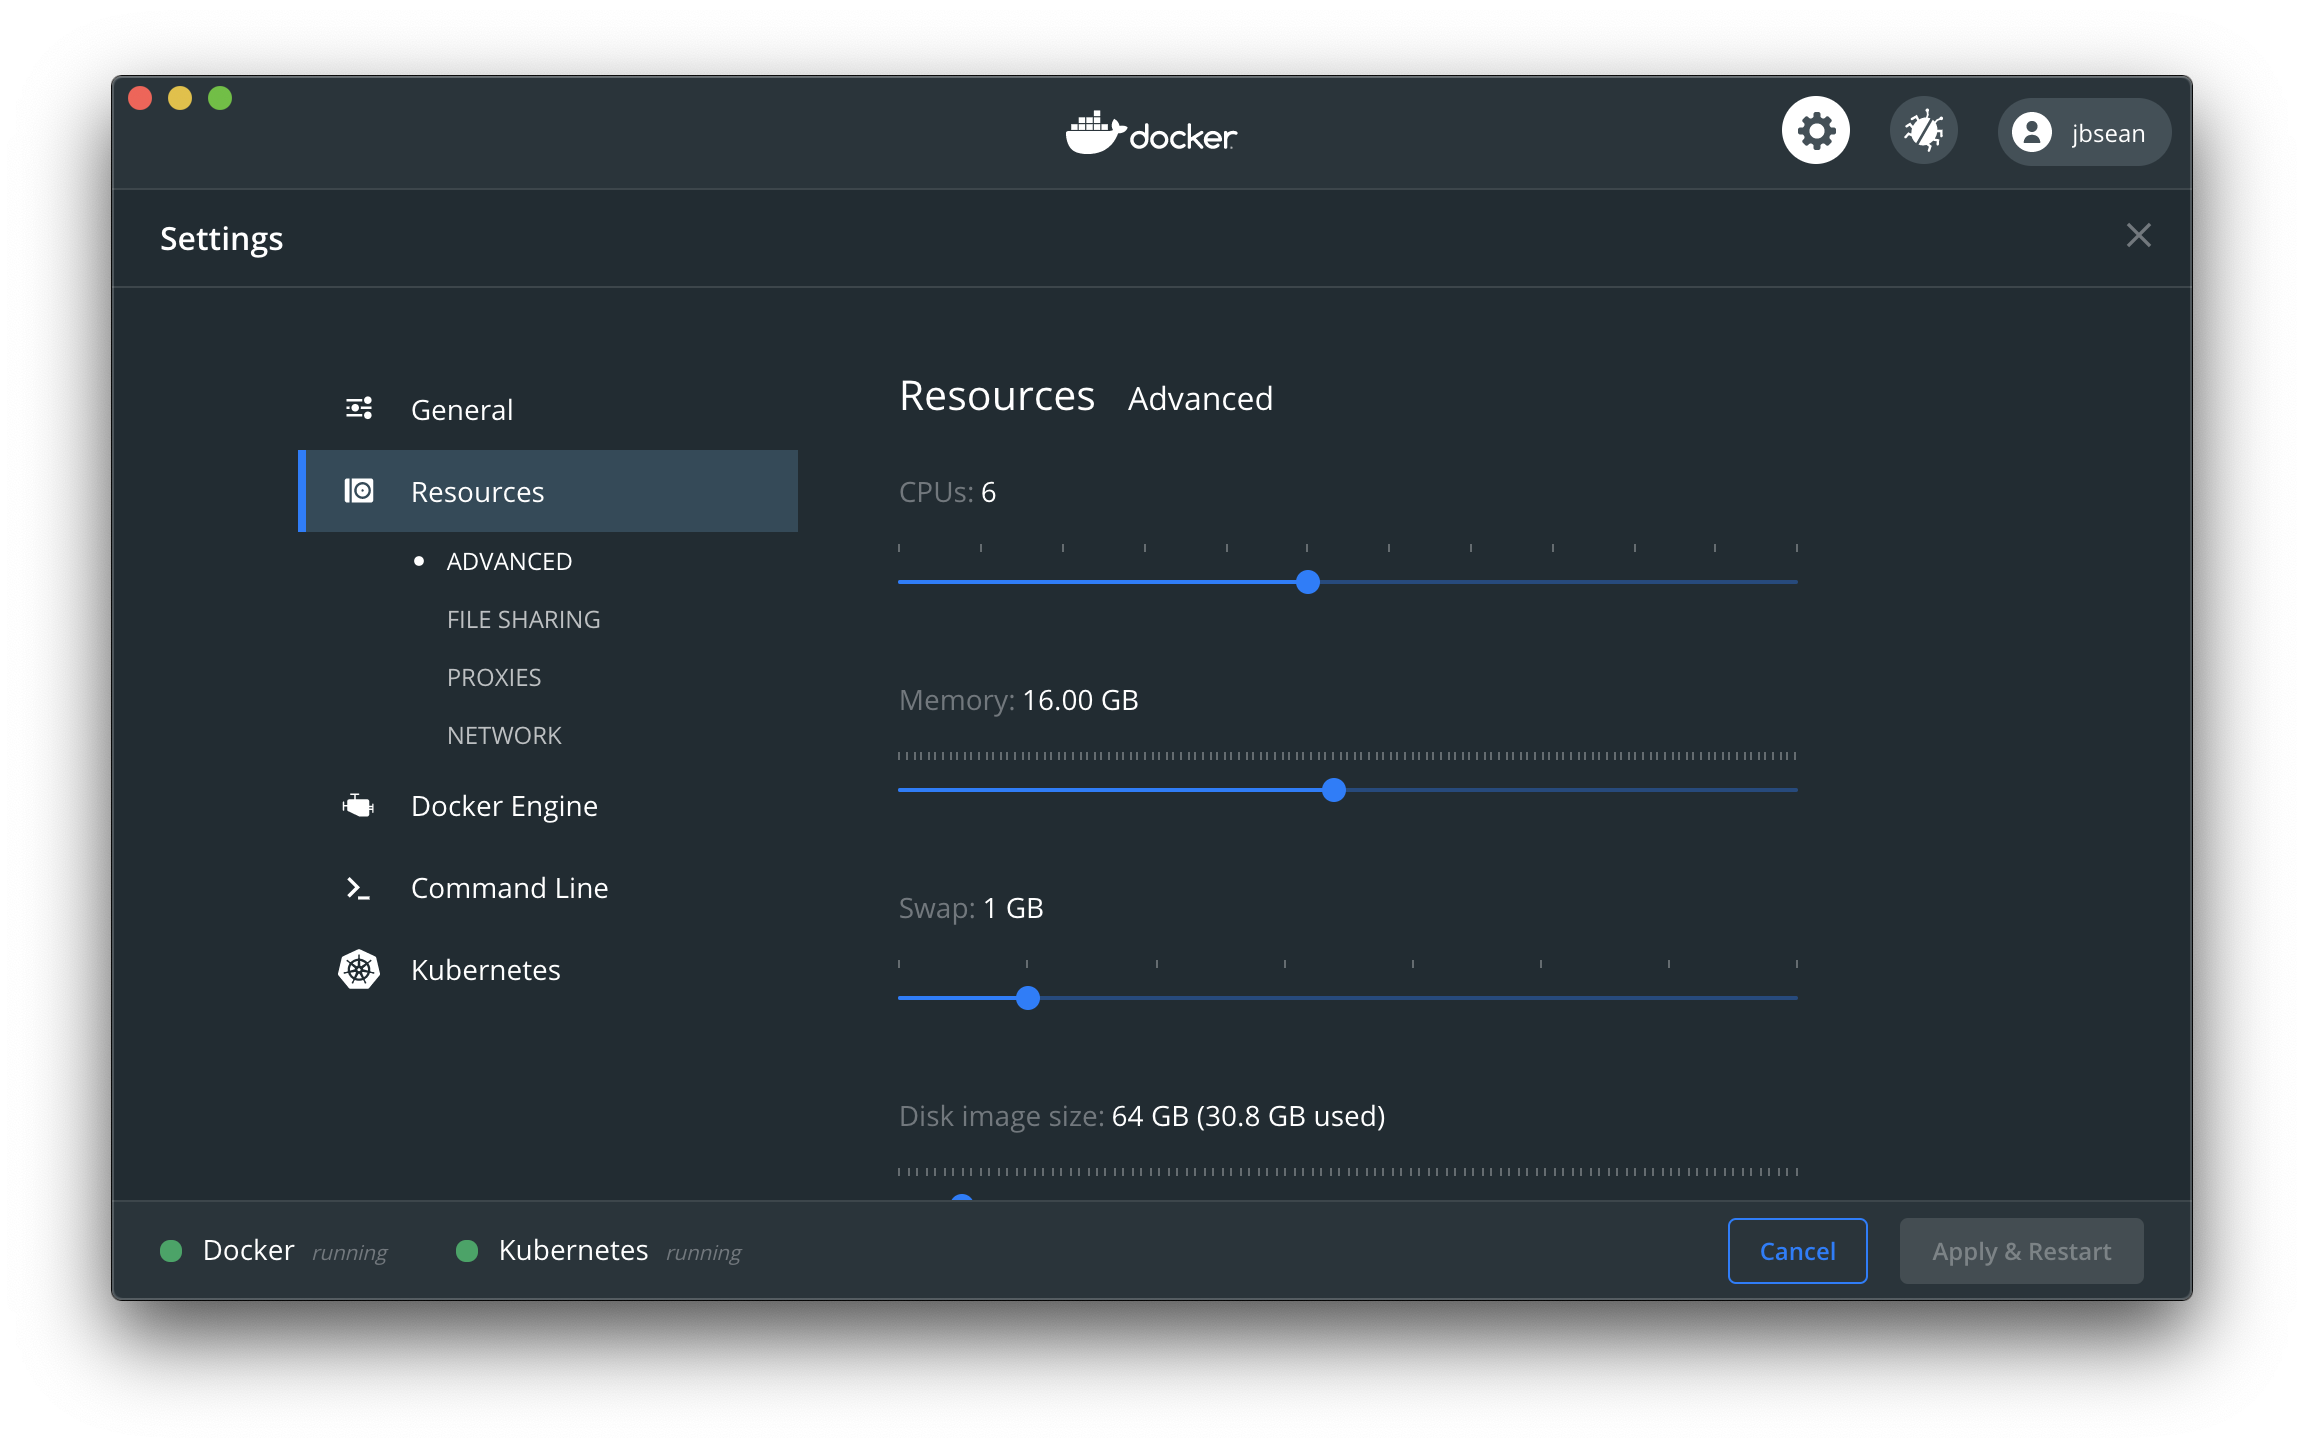
In the example Docker Kubernetes system shown below (a macOS computer with 6 cores—labelled CPUs in the Docker UI—and 16 GB of memory allocated to Docker) you could run at most 7 Docker private agents. Eight agents would require 2 cores and 16 GB of memory, using all the available memory. However, as Kubernetes itself runs some containers on the same Docker runtime (known as Kubernetes in Docker), allow at minimum headroom of one core and a portion of the memory rather than dedicating all of the resources available to the agent group:
-
Add Jitterbit's public Helm chart repository to your client. No credentials are required:
helm repo add jitterbit https://jitterbit.github.io/charts # "jitterbit" has been added to your repositories -
Update your Helm client's local cache of repositories (recommended). This will ensure that you are using the latest version of the Helm chart:
helm repo update -
Install your agent group's Helm release:
helm upgrade --install --force --atomic --timeout 1h -f ./values.yaml private-agent-group jitterbit/agent-group -
Wait for each agent pod to spin up and monitor using the Harmony Management Console:
watch kubectl get pods
Access an individual agent
If you need to access one of the agents, you can execute a Bash shell in its container using the following code, replacing private-agent-group-0 with the Docker name of the particular agent you need to access:
kubectl exec -it private-agent-group-0 bash
Agent group teardown
When you are ready to tear down the agent group, uninstall the Helm release:
helm uninstall private-agent-group