Export and import APIs in Jitterbit API Manager
Introduction
From the My APIs page, you can export or import a single custom API, OData service, or proxy API, or a group of APIs:
- Export: Allows you to export a single API or a group of APIs to an APK file.
- Import: Allows you to import a single API or a group of APIs using an APK file that was previously exported in API Manager.
Together, the export and import functionalities allow you to migrate APIs into other environments or organizations as needed.
Note
The supporting projects, operations, and entities must exist in the destination environment for the APIs to function properly.
Export APIs
When exporting APIs, you can export a single API or a group of APIs.
Export a single API
You can export a single custom API, OData service, or proxy API from these locations:
-
In tile view on the My APIs page, hover over the API tile, click the actions menu icon, and select Export:
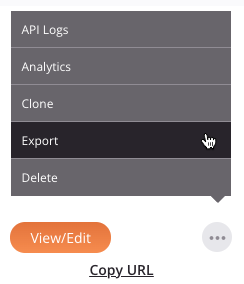
-
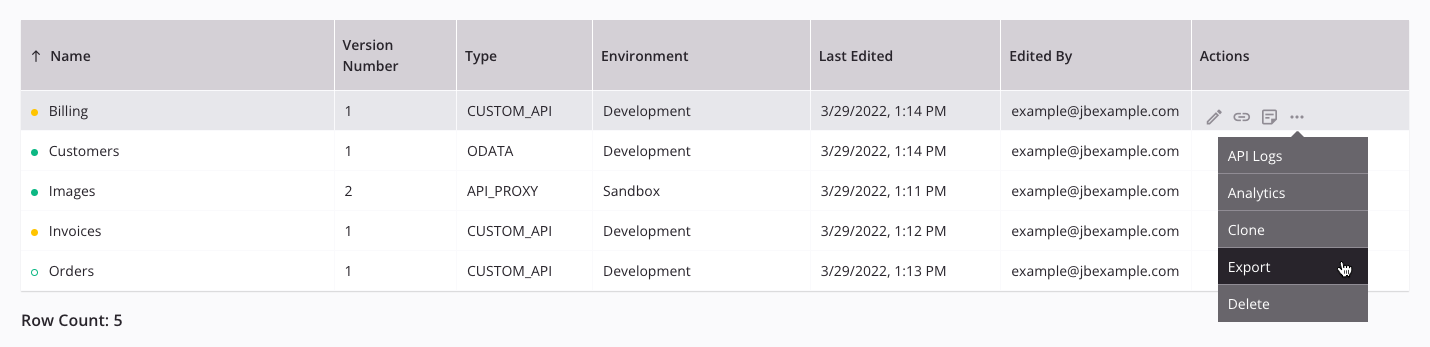
In list view on the My APIs page, hover over the API row, click the actions menu icon in the Actions column, and select Export:
-
During API configuration, click Export at the bottom of step 4:

Selecting Export initiates a download of the API to a file named apis-export.apk.
Export a group of APIs
To export a group of APIs, click Export API from the My APIs page:

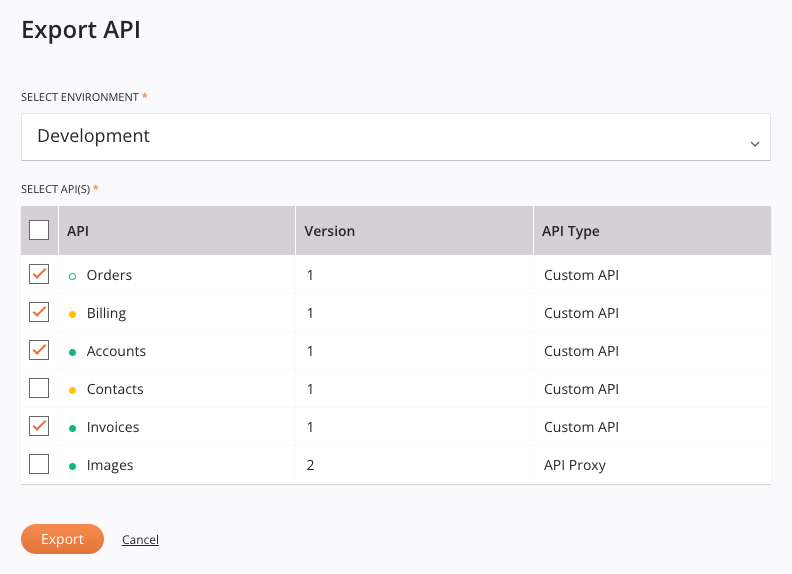
After clicking Export API, the Export API screen opens:
-
Select Environment: Use the menu to select the environment of the APIs to be exported. You can type any part of the environment name into the menu to filter the list of environments. The menu results are filtered in real time with each keystroke.
-
Select APIs: Once an environment has been selected, a list of all APIs within that environment is populated:
-
Select: Select the APIs to export. The checkbox in the header column can be used to add all APIs at once.
-
API: Displays the name of the API. The color of the icon to the left of the API name indicates the category of the API status:
Icon Color Category 
Green The API is published. 
Yellow The API is published with a draft. 
Open Green The API is a draft. -
Version: Displays the version of the API, as entered during API configuration.
-
API Type: Displays the type of API, either custom (
CUSTOM API), OData (ODATA), or proxy (API PROXY).
-
-
Export: Click to initiate a download of the selected APIs to a file named
apis-export.apk. A dialog indicates if the export was successful and displays a list of the APIs successfully exported: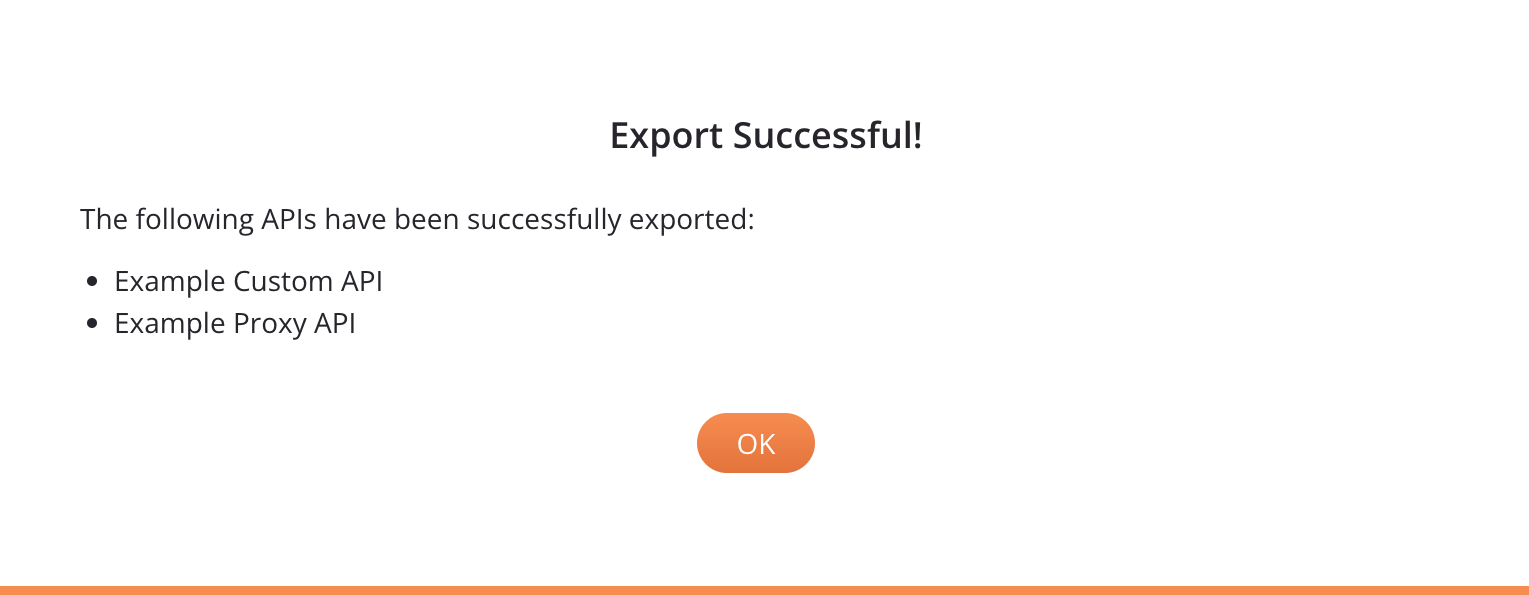
-
Cancel: Click to cancel the export and return to the My APIs page.
Import APIs
When importing APIs, you can select one or more APIs from a previously exported APK file to be imported into another environment.
To import APIs, click Import API from the My APIs page:

After clicking Import API, follow these steps to import APIs:
Step 1: Select APIs and environment
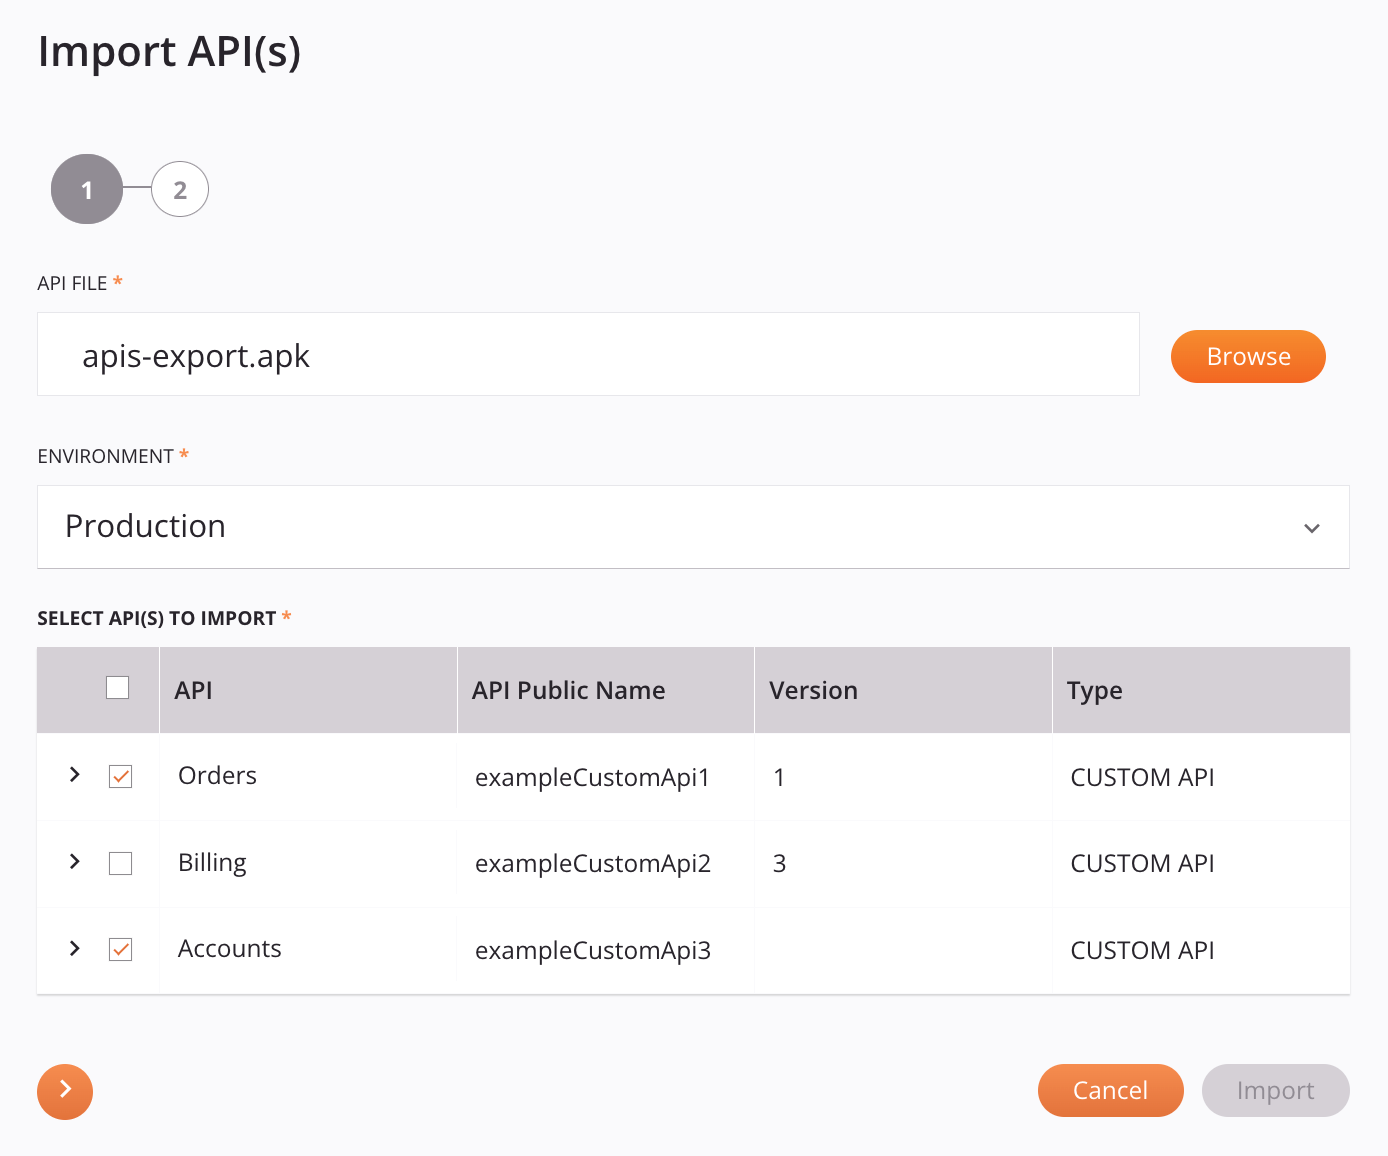
-
API file: Click Browse to browse to an APK file that has been previously exported from API Manager.
-
Environment: Use the menu to select the environment you want to import the APIs into. You can type any part of the environment name into the menu to filter the list of environments. The menu results are filtered in real time with each keystroke.
-
Select API(s) to import: Select the APIs to be imported into the selected environment.
-
Select: Select the APIs to import. The checkbox in the header column can be used to select all APIs at once.
-
API: The name of the API.
Note
An error icon is displayed next to the name of the API when the combination of API Public Name and Version already exists in the destination environment. If an API with an error is selected for import, the Next button is disabled. To resolve, edit one or both of those values in the additional settings (described below).
-
API Public Name: The Service Root of the API service URL.
-
Version: The version of the API.
-
Type: The type of API, one of custom (
CUSTOM API), OData (ODATA), or proxy (API PROXY). -
Additional Settings: Click the disclosure triangle
 to view additional settings for the API:
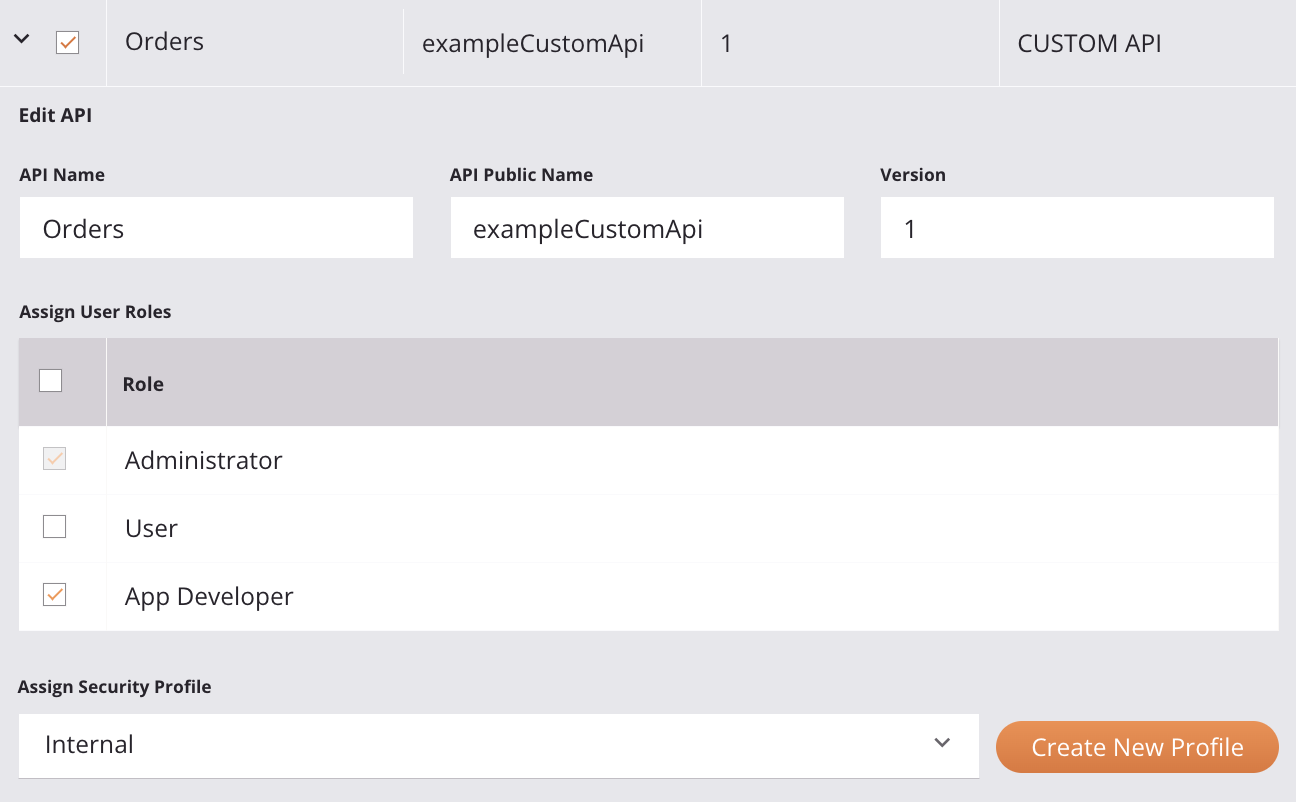
-
API Name: Displays the current name of the API. Use the text box to change the name of the API.
-
API Public Name: Displays the current Service Root of the API service URL. Use the text box to change the Service Root to be used for the API. These special characters are allowed:
._~()$;/?:@=&'!*,+- -
Version: Displays the current version of the API. Use the text box to change the version to be used for the API.
-
Assign Users Roles: Select the organization roles whose members will have access to the API from within the API Manager pages listed below. The roles to choose from are those defined on the Roles tab of the User Management page.
This setting determines access to this specific API from these pages:
- My APIs
- Portal Manager, including generation of API documentation
- Portal
- API Logs
- Analytics
Access to the Security Profiles page and access to consume the API are unaffected by this selection. (Access to consume an API is controlled by security profiles.)
Any defined user roles with the Admin permission always have full access to all APIs and therefore cannot be cleared from selection. (In the example screenshot shown above, the Administrator role cannot be cleared for that reason.)
-
Assign Security Profile: Optionally, use the menu to select an existing security profile that will be used to restrict access for consumption of the API. You can type any part of the security profile name into the menu to filter the list of security profiles. The menu results are filtered in real time with each keystroke. If no security profile is selected, anonymous authentication is used. A security profile may be required to be assigned in order to save the API, depending on the Harmony organization's policies.
Note
When importing an API, only a single security profile can be assigned to that API. Once the API is imported, you can edit the API to assign additional security profiles.
- Create New Profile: Click to open the security profile configuration screen. Once the new profile has been created, it will be available to be selected in the Assign Security Profile menu.
-
-
-
Next: Once an API is selected to be imported, click the next button to move to the next screen.
-
Cancel: Click to return to the My APIs page.
-
Import: This button is disabled until Step 2: Select APIs to be published is completed.
Step 2: Select APIs to be published
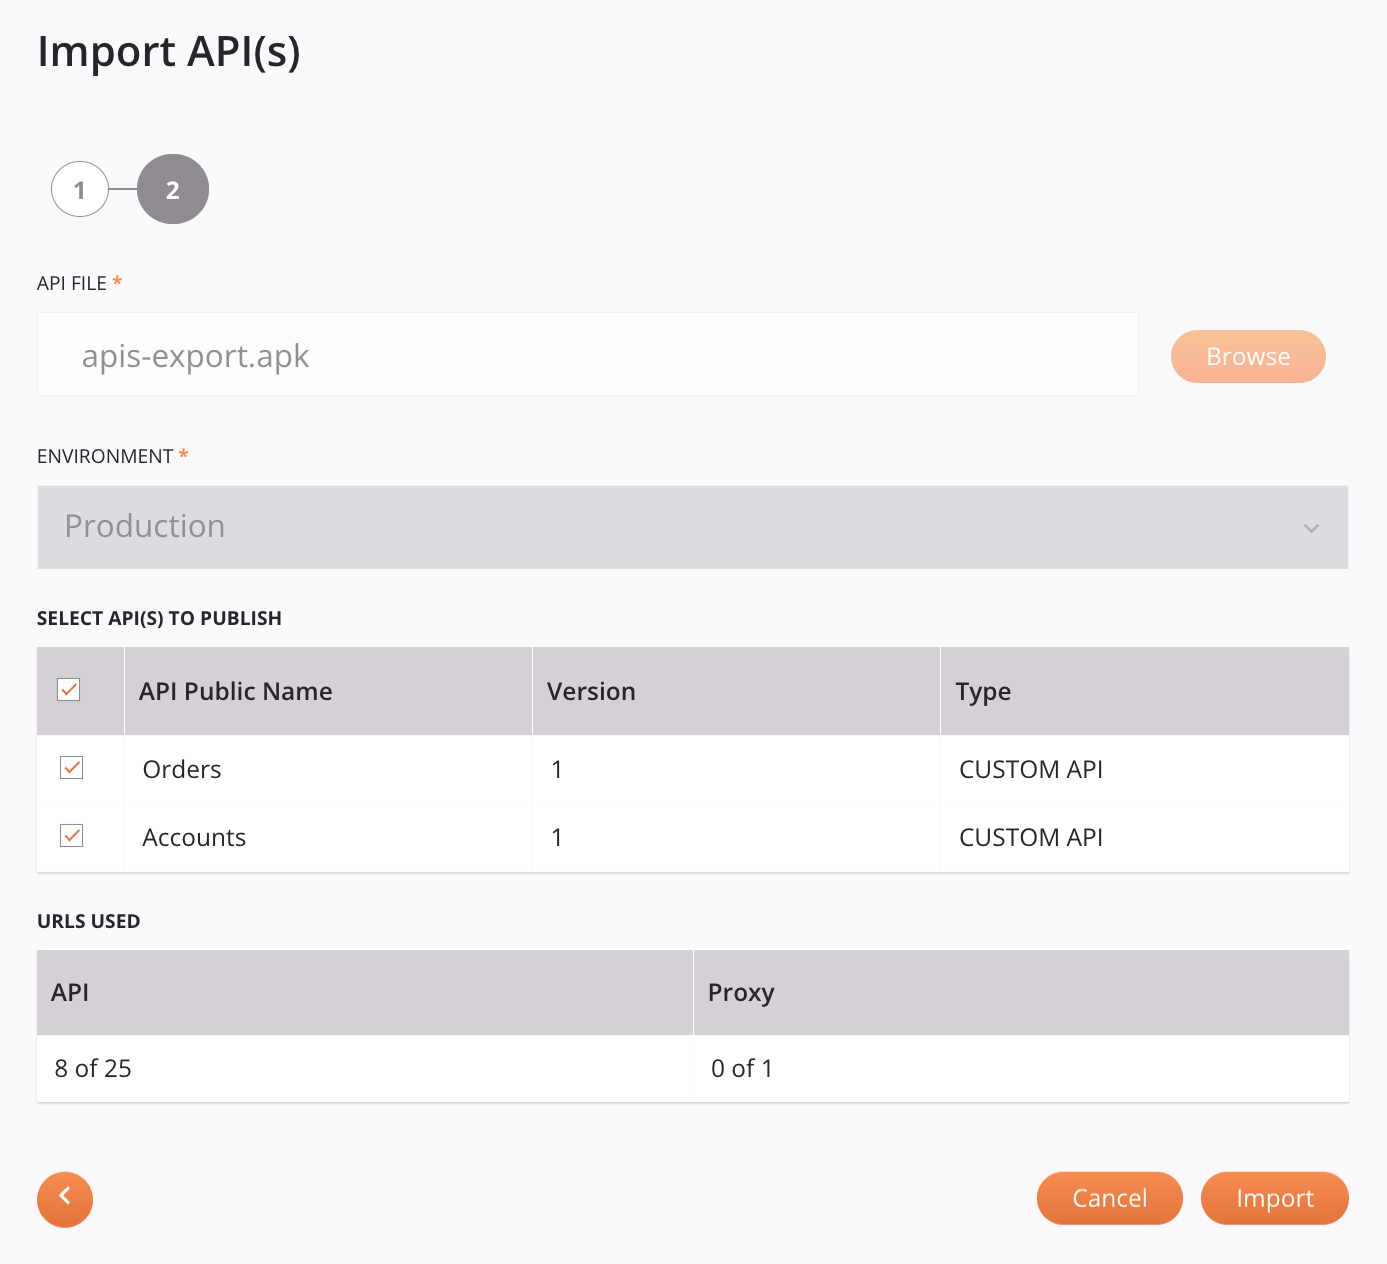
-
API file: This field is disabled in this step of the configuration. To make changes, return to step 1 of the configuration.
-
Environment: This field is disabled in this step in this step of the configuration. To make changes, return to step 1 of the configuration.
-
Select APIs to publish: The APIs previously selected to be imported are displayed:
-
Select: Optionally, select the APIs to be published when imported. Unselected APIs are saved as draft APIs. The checkbox in the header column can be used to select all APIs at once. As APIs are selected, the values under URLs used is updated accordingly.
-
API Public Name: The name of the API.
-
Version: The version of the API, as entered during API configuration.
-
Type: The type of API, one of custom (
CUSTOM API), OData (ODATA), or proxy (API PROXY).
-
-
URLs used: The number of published API URLs that will be counted against your Harmony subscription allowance once the import is completed.
-
API: Reflects the number of API URLs that will be in use (after the import is completed) out of the total number of API URLs allowed by the organization's subscription. Currently used API URLs consist of those used by published custom and OData service APIs and their published clones. Draft APIs do not count as in-use API URLs.
-
Proxy: Reflects the number of proxy API URLs that will be in use (after the import is completed) out of the total number of proxy API URLs allowed by the organization's subscription. Currently used proxy API URLs consist of those used by published proxy APIs and their published clones. Draft APIs do not count as in-use proxy API URLs.
-
-
Back: Click the back button to return to step 1 of the configuration.
-
Cancel: Click to return to the My APIs page.
-
Import: Click to import the APIs.
Note
The supporting projects, operations, and entities must exist in the destination environment for the APIs to function properly.
On clicking Import, a message indicates the APIs were successfully imported:

Note
The APIs selected in step 2 are published in the new environment and are immediately accessible. The APIs that were not selected to be published are saved in the new environment as drafts. The draft APIs are not accessible in the new environment until they are individually published.
If the associated projects, operations, and entities are missing from the destination environment, an error message will appear:
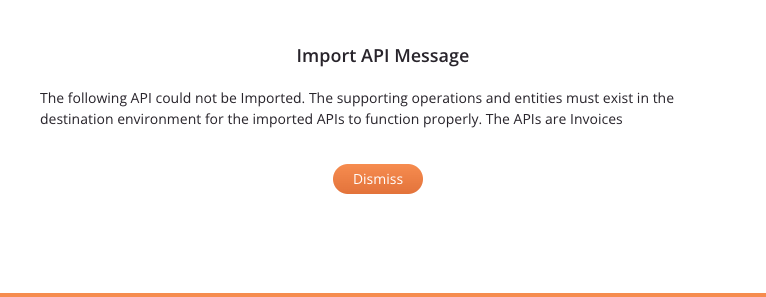
- Dismiss: Click to return to the My APIs page.