OData service configuration in Jitterbit API Manager
Introduction
This page describes how to create and configure an OData service from the My APIs page of Jitterbit API Manager. An OData service is one of the three types of APIs configured through API Manager. For the two other types — custom API and proxy API — see Custom API configuration or Proxy API configuration.
Note
When published, each OData service counts as an API URL against your Harmony subscription allowance.
Prerequisites
As an OData service exposes a Jitterbit iPaaS API entity operation for consumption, such an operation must first be created and deployed. The operation that an OData service triggers must be a Design Studio API entity operation. The existing API entity operation is then referenced during the configuration of the OData service. On this page, the word API is used to refer to an OData service.
For information on creating and deploying an API entity operation in Design Studio, see these resources:
Create a new OData service
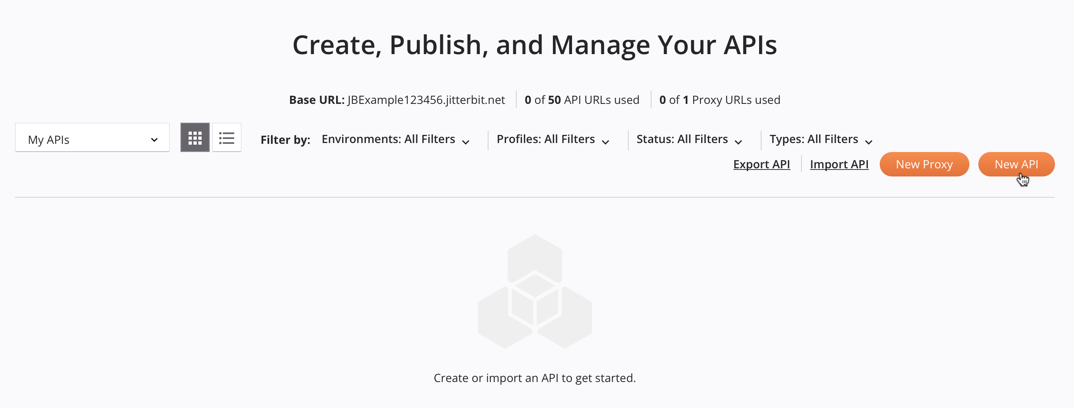
When you access the API Manager My APIs page, if no custom APIs, OData services, or proxy APIs exist in the selected organization, this screen is blank.
To create a new OData service, click New API:
On clicking New API, the OData service configuration screen opens. Details on configuring a new OData service are provided in Configure an OData service below.
Configure an OData service
The configuration screen includes four configuration steps, each covered below:
- Step 1: Settings
- Step 2: Select service type and assign operations
- Step 3: Assign user roles and security profiles
- Step 4: Summary and confirmation
An API's service URL is the URL used to consume the API using a configured authentication method. The parts of an API's service URL are described under API Manager get started in API service URL.
The Service URL is displayed along the top of each step:

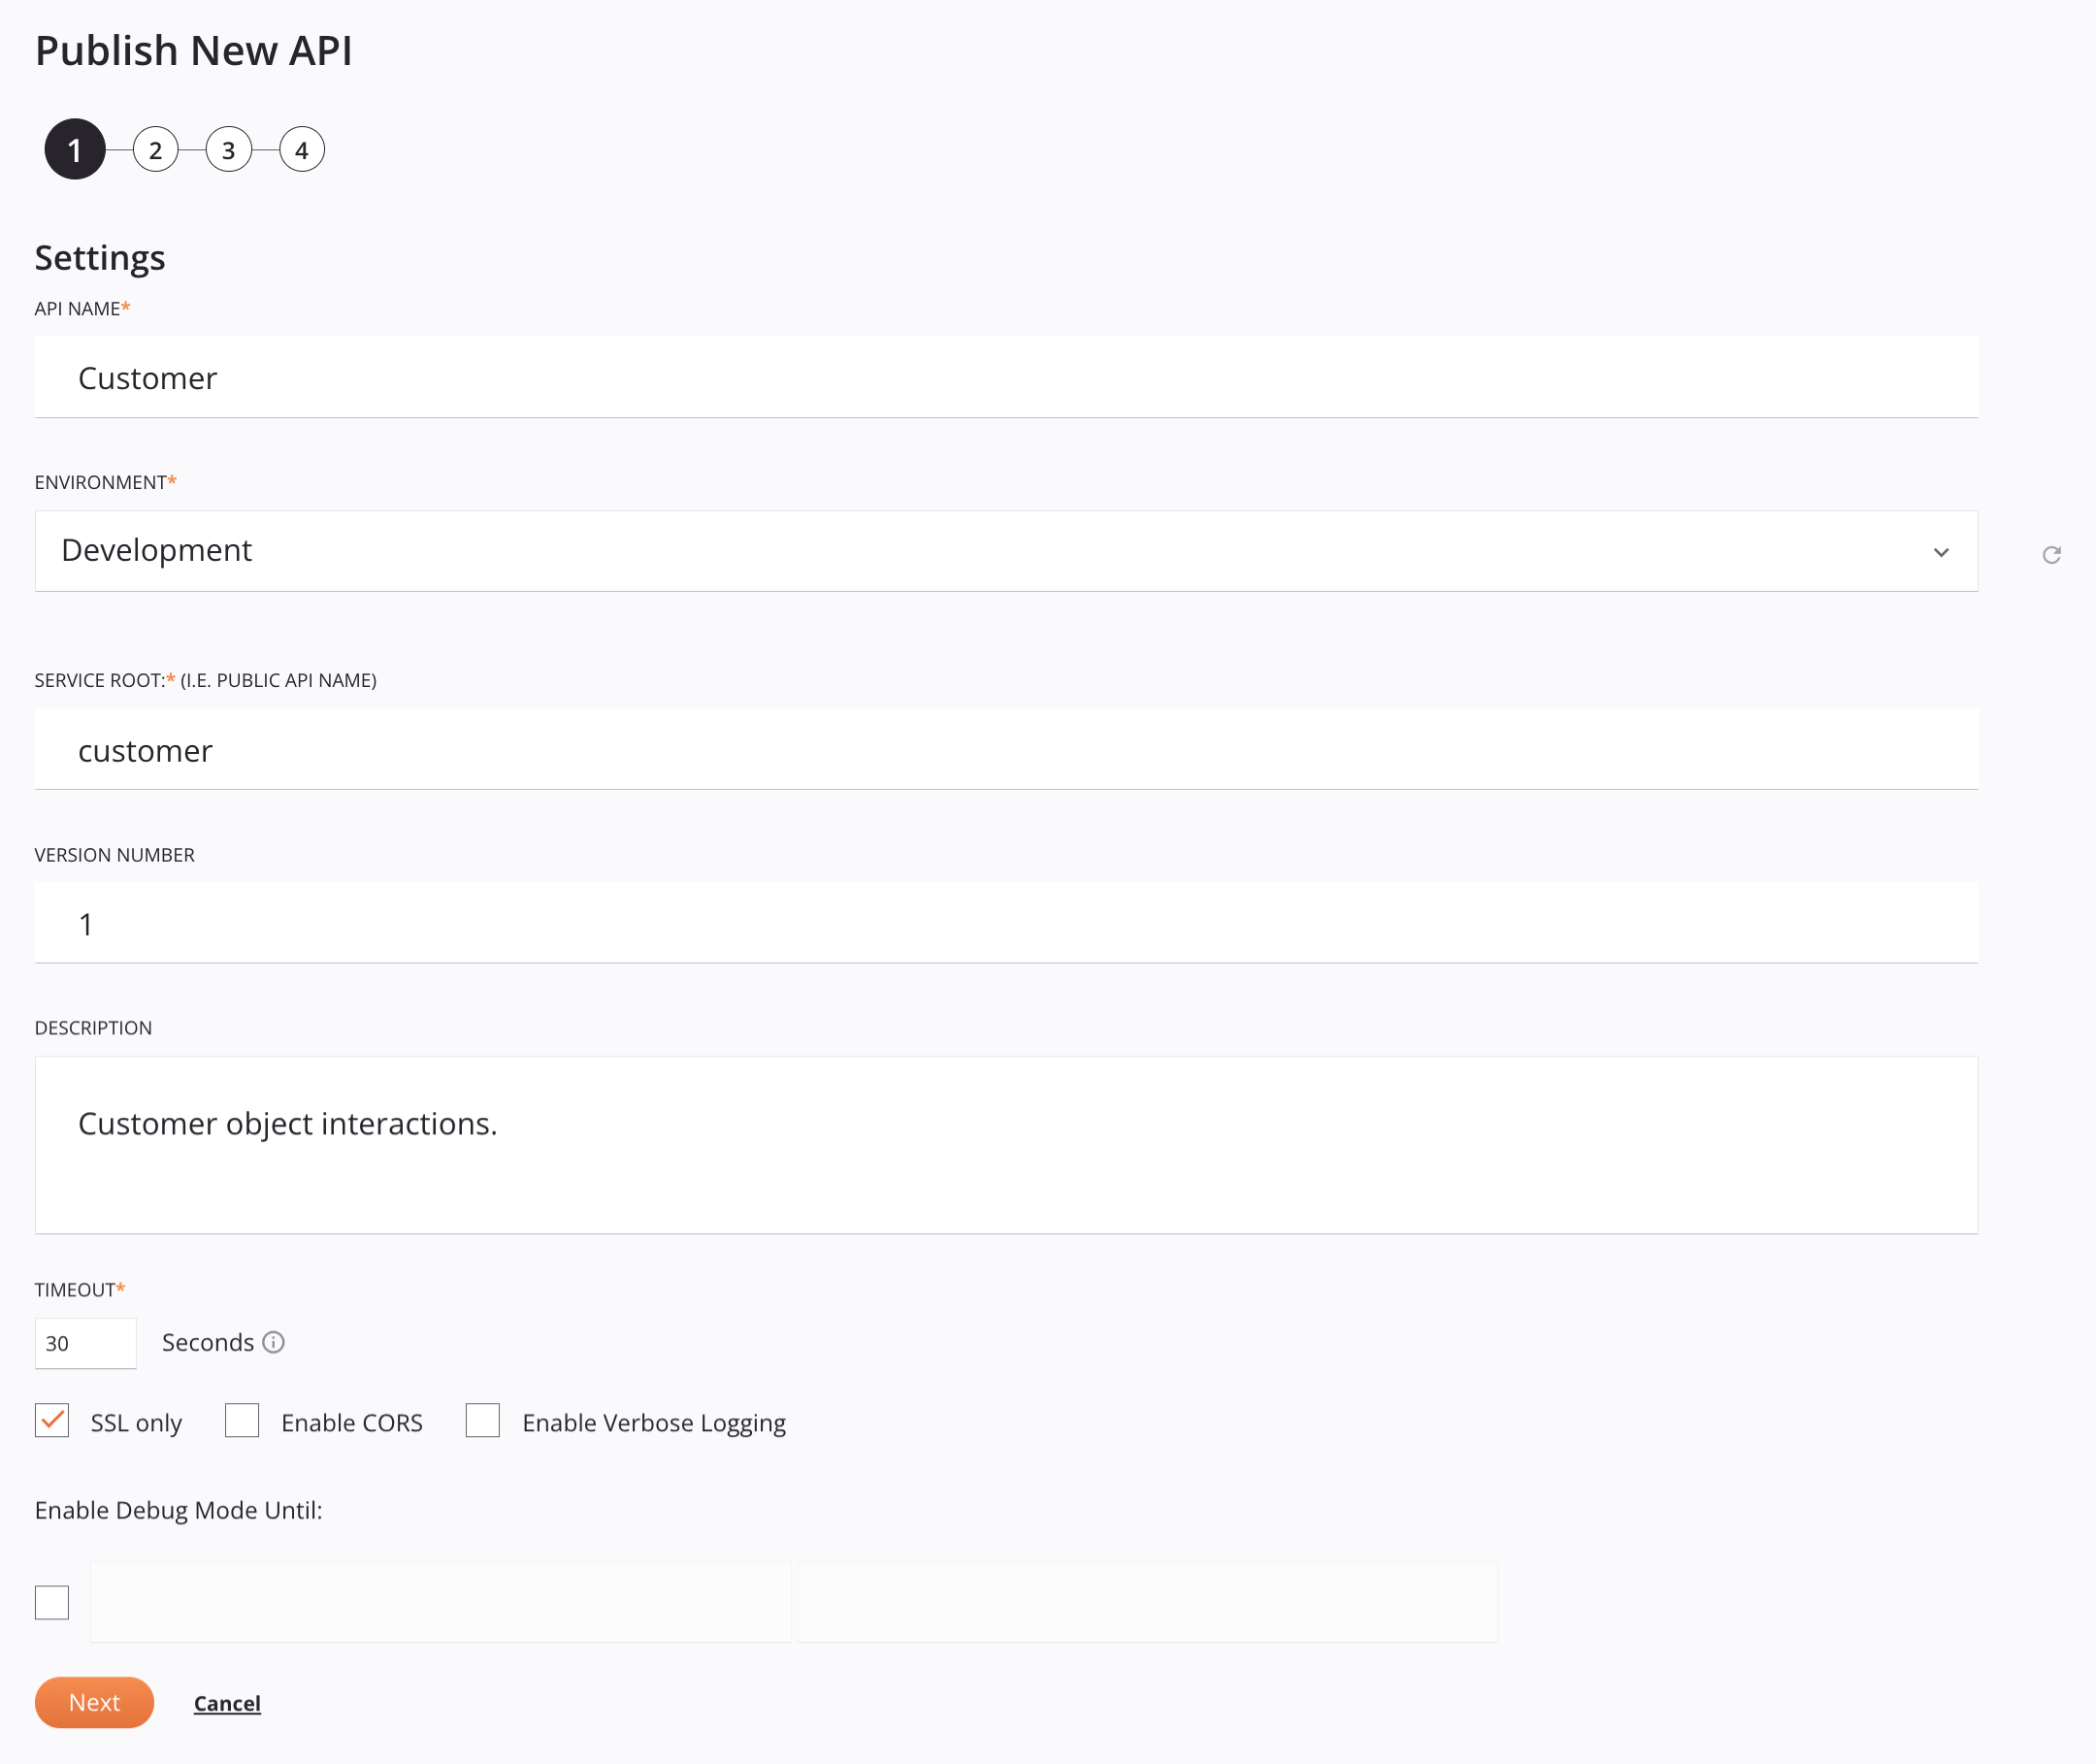
Step 1: Settings
-
API name: Enter a name for the API to use for internal identification purposes. These special characters are allowed:
()-_ -
Environment: Use the menu to select the environment where the API will reside. You can type any part of the environment name into the menu to filter the list of environments. The menu results are filtered in real time with each keystroke.
Note
After API creation, the environment cannot be changed. To move an API between environments, you can clone the API or export and import the API in another environment.
-
Service Root: The public name of the API to use as part of the API's service URL. By default, this field is populated with the API name converted to camel case. This field does not allow spaces or certain special characters. Using special characters other than an underscore (
_) is not recommended. These special characters are allowed:._~()$;/?:@=&'!*,+- -
Version: Enter an optional version to use as part of the API's service URL. This field allows a maximum of 48 characters and does not allow spaces or certain special characters. Using special characters other than a period (
.) or a hyphen (-) is not recommended. Common naming conventions include incrementing versions, such asv1.0,v1.1,v1.2, or using a date that the API was published, such as2021-08-28. -
Description: Enter an optional description for the API.
-
Timeout: Enter the number of seconds before the API will time out. The default is 30 seconds. The maximum is 180 seconds.
Note
This setting is independent of the operation timeout setting in Integration Studio or Design Studio. Operation timeout settings are not used unless a private agent is used and the
EnableAPITimeoutsetting in the private agent configuration file is enabled. -
SSL Only: When selected (default), data is encrypted through SSL and HTTPS is enforced for all API requests and responses (recommended).
When unselected, data passed through API requests and responses is not encrypted and can be intercepted and viewed by others. This could potentially expose sensitive information.
-
Enable CORS: Select to enable Cross-Origin Resource Sharing (CORS) (not recommended). Enable CORS is selected by default.
Warning
Enabling CORS causes operations using the
OPTIONSmethod to run without authentication. -
Enable Verbose Logging: Select to enable verbose logging. Verbose logging for APIs includes request and response data in each API log to help monitor incoming and outgoing data and facilitate debugging. As this can create large log files, the default is that verbose logging is disabled.
-
Enable Debug Mode Until: Select to enable debug mode and enable entering a corresponding date and time on which debug mode will be disabled. The maximum length of enablement is two weeks. Debug mode enables full tracing for every request received through the API's service URL. When enabled, the system retains complete content of each API request and response for up to 24 hours from the time the API call was received and applies to all operations triggered by the API.
Note
Traversing through the event data may become difficult with large volumes (load testing, pre-production testing, etc.). The increase in retained data may result in storage space and security concerns. We do not recommend using debug mode in a production environment.
-
Next: Click to temporarily store the configuration for this step and to continue to the next step.
-
Save Changes: Click to save the configuration for this step and to navigate to Step 4: Summary and confirmation.
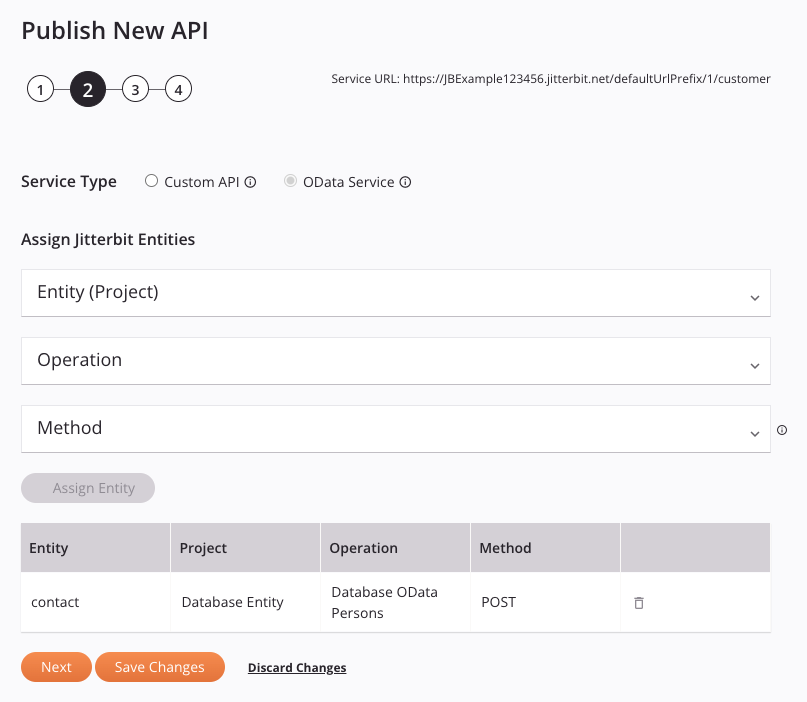
Step 2: Select service type and assign operations
-
Service Type: Select OData service.
-
Assign Jitterbit Entities: Use the dropdowns to select an Entity (Project), Operation, and Method for the OData service:
- Entity (Project): Select from the deployed projects that contain a Design Studio API entity operation in the environment where the API is being configured.
-
Operation: Select from the deployed Design Studio API entity operations in the selected Entity (Project). Only one operation using each method can be assigned.
Important
By default, successful operations configured for an OData service are not included in the operation logs unless one of these settings is enabled:
- Cloud agents: For API operations on a cloud agent, operation debug logging must be enabled on the operation.
- Private agents: For API operations on a private agent, either operation debug logging must be enabled on the operation or you must set
EnableLogging=truein the[APIOperation]section of the private agent configuration file.
-
Method: Select from one of
GET,PUT,POST,DELETE,PATCH,MERGE, orALLthe method to be created for the selected Operation. SelectingALLwill create separateGET,PUT,POST,DELETE,PATCH, andMERGEmethods for the selected Operation.
-
Assign Entity: Once all dropdowns are completed, click Assign Entity to add the entity to the table below. At least one entity must be added to enable the Next button.
Note
After clicking Assign Entity, you will no longer be able to change the Service Type.
-
Assigned Entities: A table displays all entities that have been assigned. To remove an assigned entity, click the remove icon.
-
Next: Click to temporarily store the configuration for this step and continue to the next step.
-
Save Changes: Click to save the configuration for this step and navigate to Step 4: Summary and confirmation.
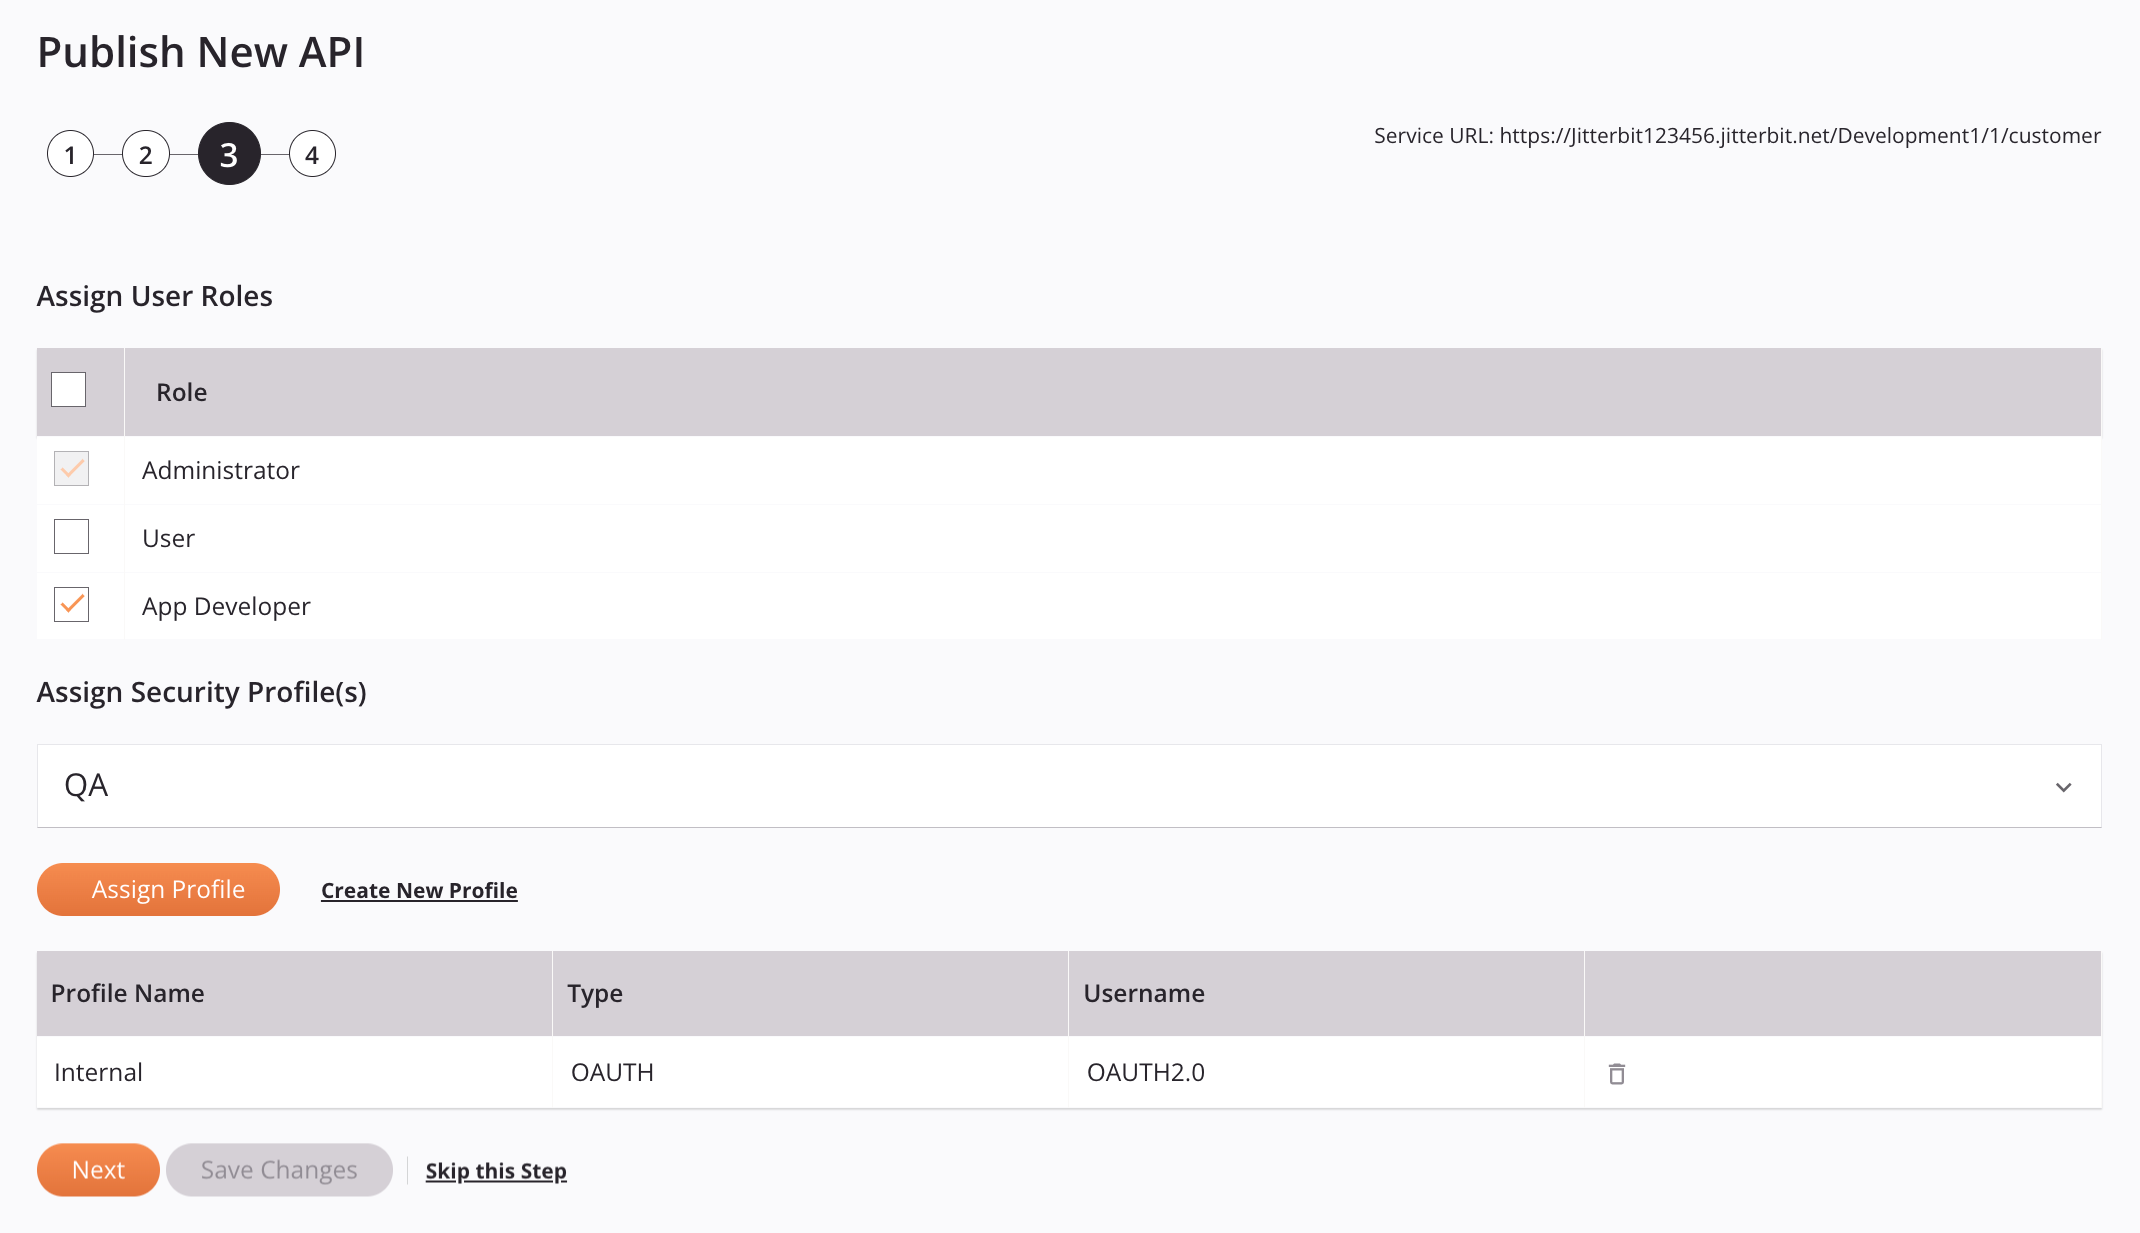
Step 3: Assign user roles and security profiles
-
Assign User Roles: Select the organization roles whose members will have access to the API from within the API Manager pages listed below. The roles to choose from are those defined within the Management Console User Management page.
This determines access to this specific API from these pages:
- My APIs
- Portal Manager, including generation of API documentation
- Portal
- API Logs
- Analytics
Access to the Security Profiles page and access to consume the API are unaffected by this selection. (Access to consume an API is controlled by security profiles.)
Any defined user roles with the Admin permission always have full access to all APIs and therefore cannot be cleared from selection. (In the example screenshot shown above, the Administrator and Operations roles cannot be cleared for that reason.)
Note
APIs created prior to Harmony 10.22 have all user roles selected by default to ensure continued access for all users.
-
Assign Security Profile(s): Use the dropdown to select an existing security profile that will be used to restrict access for consumption of the API. You can type any part of the security profile name into the menu to filter the list of security profiles. The menu results are filtered in real time with each keystroke. A security profile may be required to be assigned in order to save the API, depending on the Harmony organization's policies.
-
Assign Profile: Click to assign a selected security profile to the API. Assigned security profiles are listed in the table with the Profile Name and Type as configured for the security profile in Security profile configuration. If the Type is Basic, the Username column displays the Username provided during configuration. If the Type is any other type, the Username column displays the same value as the Type. To remove an assigned profile, click the remove icon.
-
Create New Profile: Click to create a new security profile. For instructions, see Security profile configuration.
-
-
Next: Click to temporarily store the configuration for this step and continue to the next step. If the API is not assigned a required security profile, this option is disabled.
-
Save Changes: If enabled, click to save the configuration for this step. If the API is not assigned a required security profile, this option is disabled.
-
Skip This Step: If present, click to continue to the next step without storing the configuration for this step. If the API is not assigned a required security profile, this option is not present.
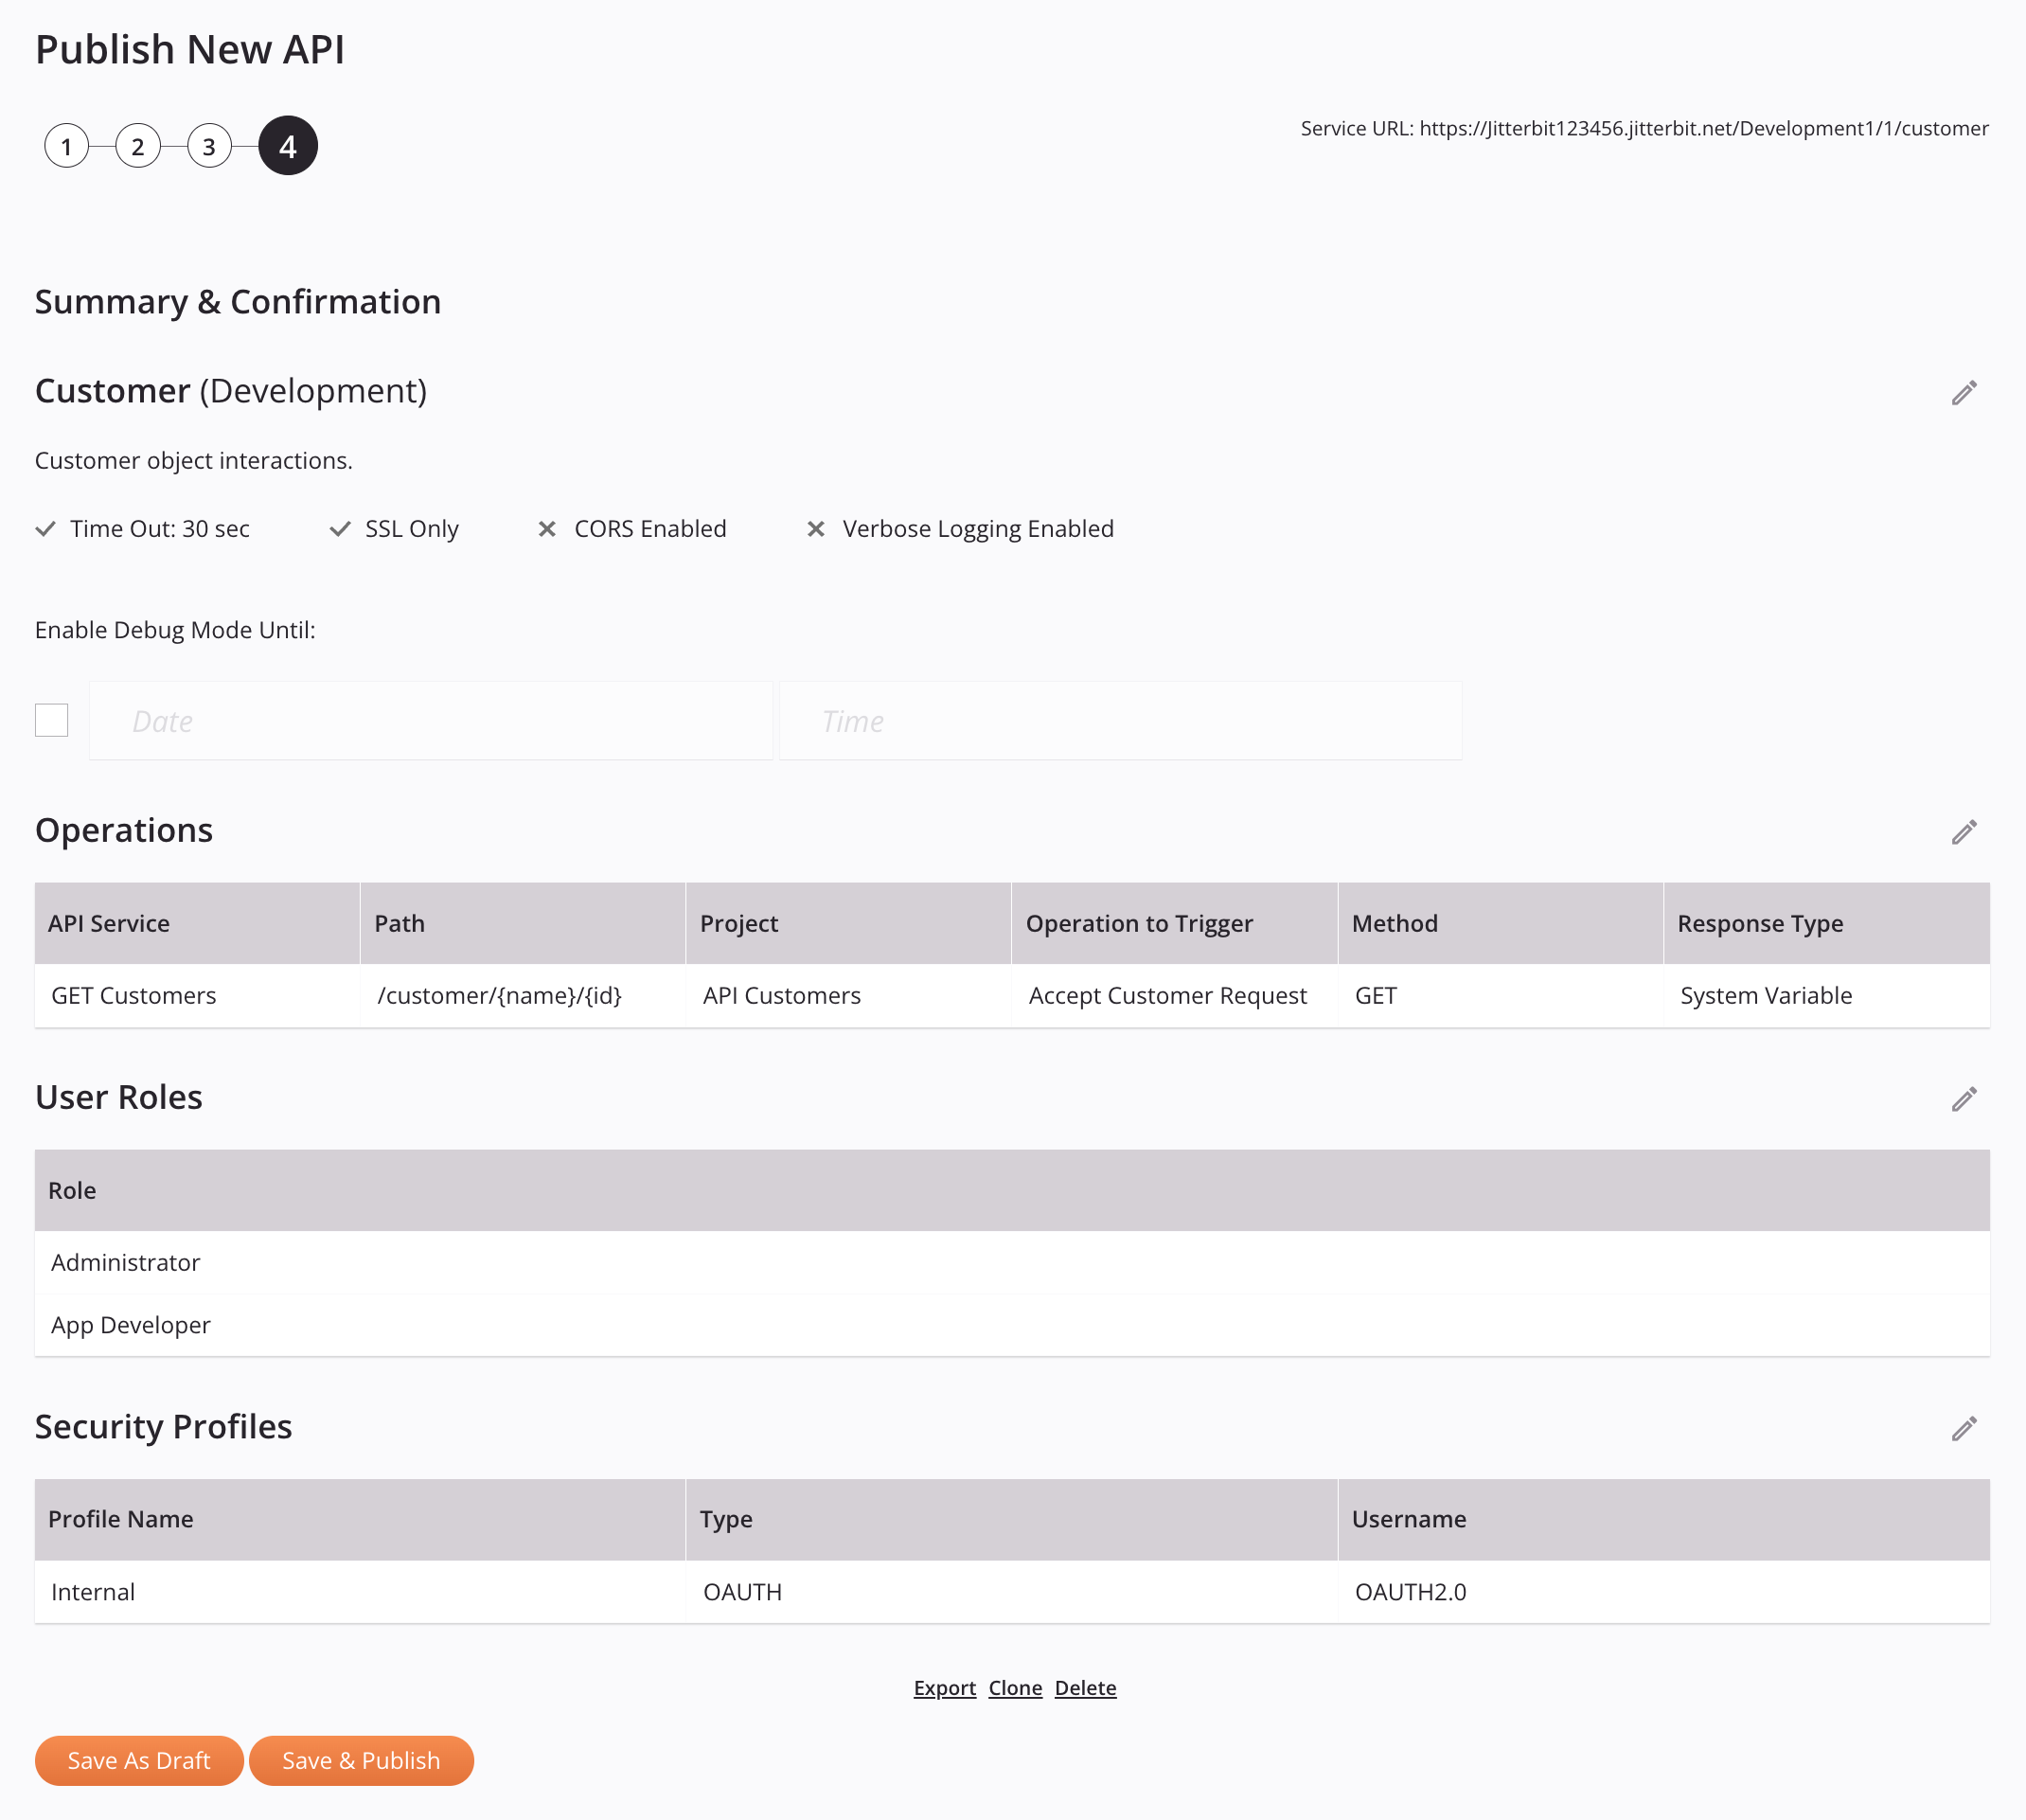
Step 4: Summary and confirmation
-
API name and Environment: The API name followed by the environment enclosed in parentheses, as configured in Step 1: Settings.
- Description, Timeout, SSL Only, CORS Enabled, and Verbose Logging Enabled: The API description and other settings that are enabled () or disabled (). To make changes to those settings, click the edit icon to return to Step 1: Settings.
- Enable Debug Mode Until: This option is the same as that described in Step 1: Settings. You can change this setting directly from this step rather than be required to return to the first step.
-
Operations: The operations assigned in Step 2: Select service type and assign operations with the corresponding information for the selected service type. To make changes, click the edit icon to return to Step 2: Select service type and assign operations.
-
User Roles and Security Profiles: The roles and security profiles assigned in Step 3: Assign user roles and security profiles. To make changes, click the edit icon to return to Step 3: Assign user roles and security profiles.
-
Export: Generates and initiates a download of an APK file (
apis-export.apk) containing an export of the API (see Exporting and importing APIs). -
Clone: Creates a copy of an existing API. In the API copy, the API name is prepended with Copy of, the Service Root is prepended with Copyof, and the Version is appended with -2. The API copy is immediately opened at its own Step 4: Summary and confirmation.
-
Delete: Permanently deletes the API and closes the configuration. A dialog asks you to confirm you want to delete the API.
Note
If the API's status was Published or Published with Draft at the time of deletion, it is also removed from the number of API URLs used against your subscription limit. If the API's status was Draft at the time of deletion, the number of API URLs used against your subscription limit does not change, as the API was not accessible while in Draft status.
-
Save as Draft: Saves the API in Draft status or Published with Draft status:
- Draft: A new API or an API whose status was Draft at the time Save as Draft was used. Drafts do not count against your API URL subscription limit.
-
Published with Draft: An API whose status was Published at the time Save as Draft is used. An API that is published with a draft counts against your API URL subscription limit, as the API is accessible though its draft is not.
-
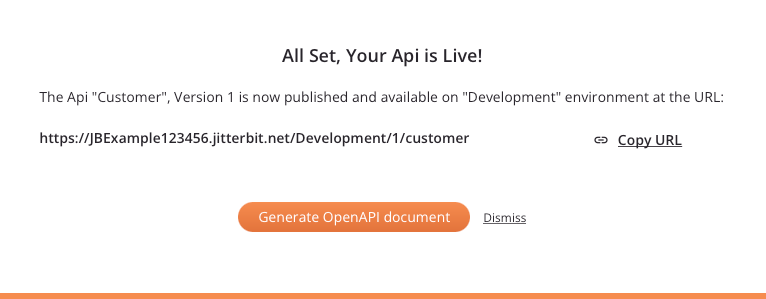
Save and Publish: Saves the API in Published status. The API is live and accessible within five minutes. A published API counts against your API URL subscription limit, as the API is accessible. A dialog indicates the API is live:
-
Copy URL: Copies the API's service URL (see API service URL).
- Generate OpenAPI Document: Opens the Portal Manager page, where you can generate API documentation for the Portal page. Though this link appears for OData services, OpenAPI documentation can be generated for custom APIs only.
- Dismiss: Closes the dialog.
OData service queries
Depending on the database, you can filter the data being returned by appending OData query parameters (such as $count, $inlinecount, and $filter) to an OData service URL.
Note
When no data matches an $inlinecount or $count system query, the OData service returns an error by default. When using agent version 11.32 or later, you can set $noErrorOnZeroCount to true to return 0 (instead of an error) for $count system queries.