Proxy API configuration in Jitterbit API Manager
Introduction
This page describes how to create and configure a proxy API from the My APIs page of Jitterbit API Manager. A proxy API is one of three types of APIs configured through API Manager. For the two other types — custom API and OData service — see Custom API configuration and OData service configuration.
Note
Once published, each proxy API counts as a Proxy URL against your Harmony subscription allowance.
Prerequisites
Unlike a custom API or OData service, which exposes a Harmony operation for consumption, a proxy API is used with an existing API. Proxied APIs are not routed through Jitterbit agents. The API being proxied must be accessible to the gateway processing the API:
- Cloud API gateway: If using the cloud API gateway (hosted by Jitterbit) the existing API must be accessible publicly, even if secured. That is, the API you are trying to proxy cannot be behind a firewall. To allowlist the cloud API gateway IP addresses to allow the gateway access to the API being proxied, see Allowlist information and navigate to
https://services.jitterbitfor your region. - Private API gateway: If using a private API gateway (hosted on a private network) the existing API must be accessible by the private API gateway.
Even though each proxy API allows multiple services to be assigned to a unique URL, the base proxy URL is consuming the entitlement.
Note
Hits across all services on a proxy URL are totaled and count against the hits per month and hits per minute entitlement, provided in the Jitterbit license agreement. For information on entitlements and rate limiting with security profiles, see Use rate limits on API Manager security.
Create a new proxy API
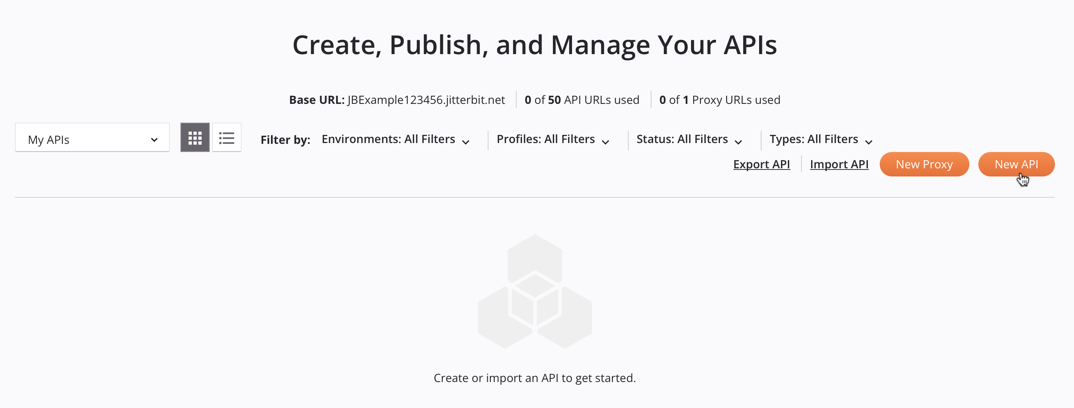
When you access the API Manager My APIs page, if no custom API, OData service, or proxy API exist in the selected organization, this screen is blank.
To create a new proxy API, click New Proxy:
On clicking New Proxy, the proxy API configuration screen opens. Details on configuring a new proxy API are provided in Configure a proxy API below.
Configure a proxy API
The proxy API configuration screen includes five configuration steps, each covered below:
An API's service URL is the URL used to consume the API using the configured authentication method. The parts of an API's service URL are described under API Manager get started in API service URL.
The Service URL is displayed along the top of each step:

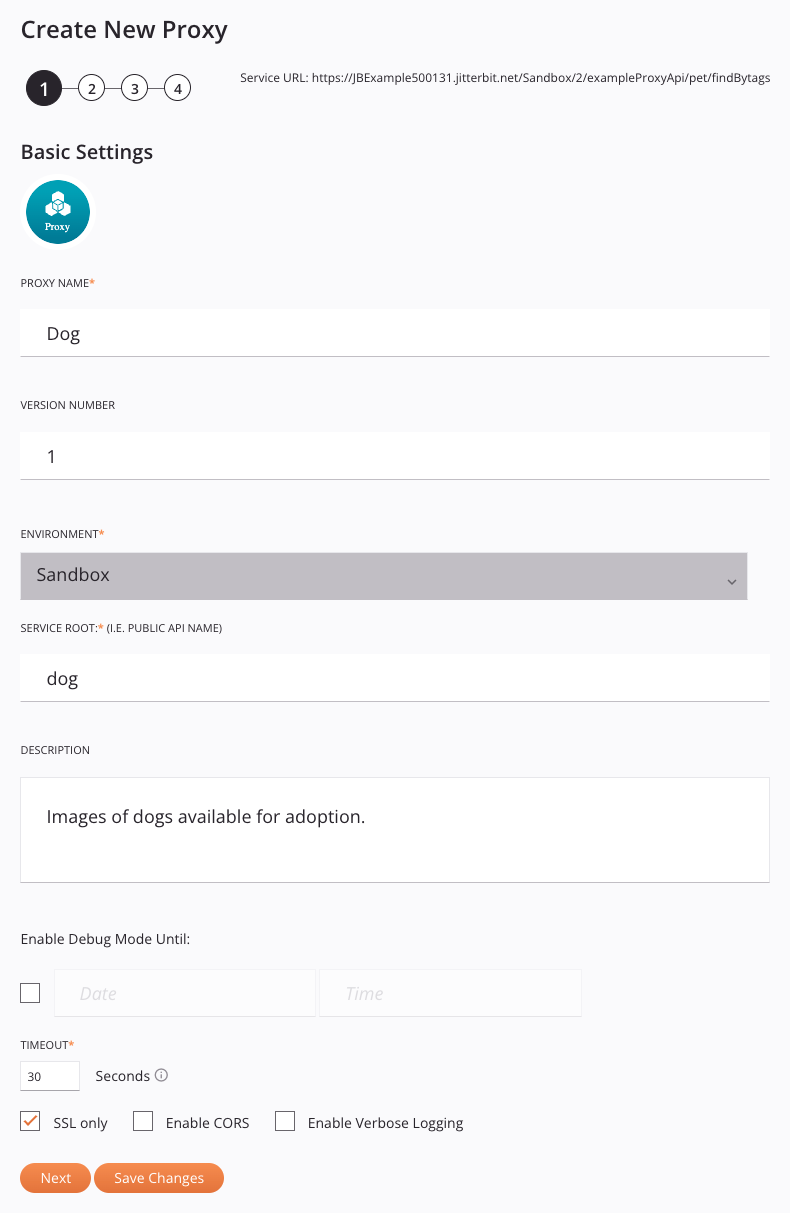
Step 1: Basic settings
-
Proxy name: Enter a name for the proxy API to use for internal identification purposes. These special characters are allowed:
()-_ -
Version number: Enter an optional version to use as part of the API's service URL. This field allows a maximum of 48 characters and does not allow spaces or certain special characters. Using special characters other than a period (
.) or hyphen (-) is not recommended. Example naming conventions include incrementing versions, such asv1.0,v1.1,v1.2, etc., or using a date that the API was published, such as2021-08-28. -
Environment: Use the menu to select the environment where the API will reside. You can type any part of the environment name into the menu to filter the list of environments. The menu results are filtered in real time with each keystroke.
Note
After API creation, the environment cannot be changed. To move an API between environments, you can clone the API or export and import the API in another environment.
-
Service root: The public name of the API to use as part of the API's service URL. By default, this field is populated with the Proxy name converted to camel case. This field does not allow spaces or certain special characters. Using special characters other than an underscore (
_) is not recommended. These special characters are allowed:._~()$;/?:@=&'!*,+- -
Description: Enter an optional description for the API.
-
Enable Debug Mode Until: Select to enable debug mode and enable entering a corresponding date and time on which debug mode will be disabled. The maximum length of enablement is two weeks. Debug mode enables full tracing for every request received through the API's service URL. When enabled, the system retains complete content of each API request and response for up to 24 hours from the time the API call was received and applies to all operations triggered by the API.
Note
Traversing through the event data may become difficult with large volumes (load testing, pre-production testing, etc.). The increase in retained data may result in storage space and security concerns. We do not recommend using debug mode in a production environment.
-
Time out: Enter the number of seconds before the API will time out. The default is 30 seconds. The maximum is 180 seconds.
Note
This setting is independent of the operation timeout setting in Integration Studio or Design Studio. Operation timeout settings are not used unless the
EnableAPITimeoutsetting in the private agent configuration file is enabled. -
SSL Only: When selected (default), data is encrypted through SSL and HTTPS is enforced for all API requests and responses (recommended).
When unselected, data passed through API requests and responses is not encrypted and can be intercepted and viewed by others. This could potentially expose sensitive information.
-
Enable CORS: Select to enable enable Cross-Origin Resource Sharing (CORS) (not recommended). The default is unselected.
Warning
Enabling CORS causes operations using the
OPTIONSmethod to run without authentication. -
Enable Verbose Logging: Select to enable verbose logging. Verbose logging for APIs includes request and response data in each API log to help monitor incoming and outgoing data and facilitate debugging. The default is unselected.
-
Next: Click to temporarily store the configuration for this step and to continue to the next step.
-
Save Changes: If enabled, click to save the configuration for this step and to navigate to Step 5: Summary and confirmation.
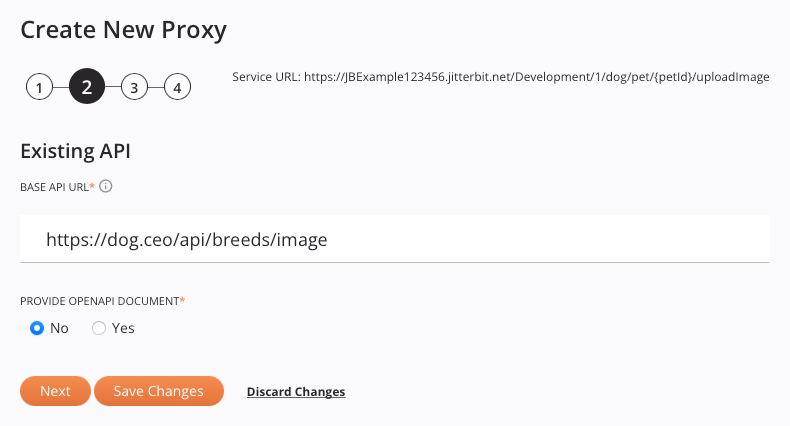
Step 2: Existing API
-
Base API URL: Enter the base URL of the API to proxy.
Note
If the API provides a single service, you can enter the complete API URL, including the service path. Additional service paths are defined in Step 3: Define services and methods.
-
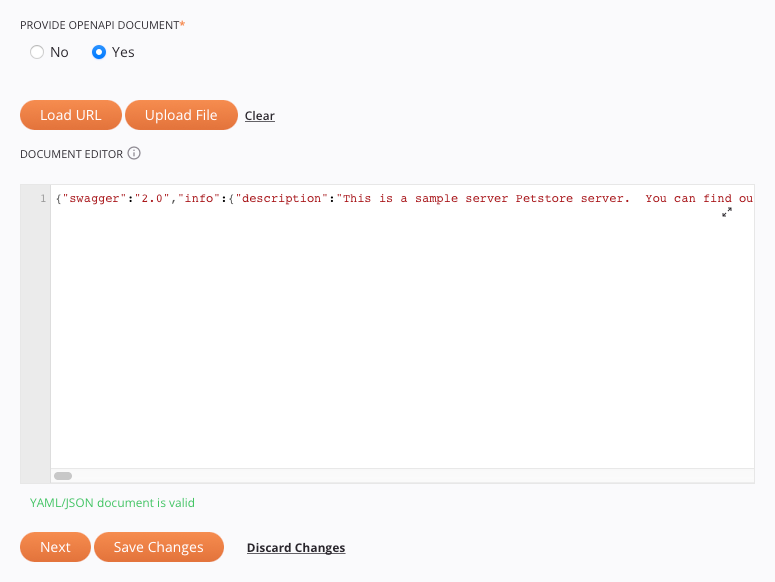
Provide OpenAPI document: If an OpenAPI document is provided, it will be used to auto-discover the API's services. Select No to skip or Yes to expand an additional area for providing the OpenAPI document:
-
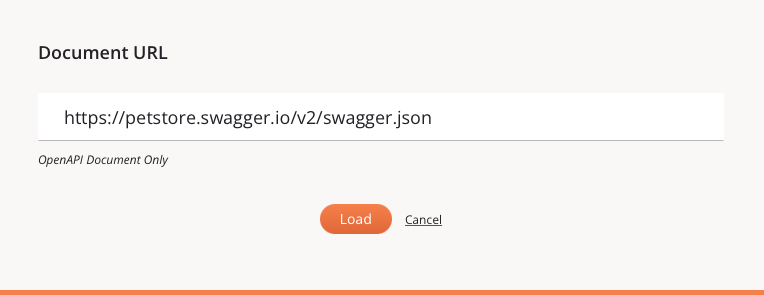
Load URL: Opens a dialog to load an OpenAPI document in YAML or JSON format from a URL:
-
Upload File: Opens a dialog to upload an OpenAPI document in YAML or JSON format after using Browse to select the file:
-
Clear: Clears an OpenAPI document that has already been provided and changes the Provide OpenAPI Document selection to No.
-
Document editor: Allows viewing and editing of a provided OpenAPI document. You can also provide an OpenAPI document by entering it here directly. To view and edit the OpenAPI document in a larger area, click the popout icon (after opening that area, click the return icon to come back to this screen).
-
-
Next: Click to temporarily store the configuration for this step and continue to the next step.
-
Save Changes: If enabled, click to save the configuration for this step and navigate to Step 5: Summary and confirmation.
-
Discard Changes: After making changes, click to close the configuration without saving changes made to any step. A message asks you to confirm that you want to discard changes.
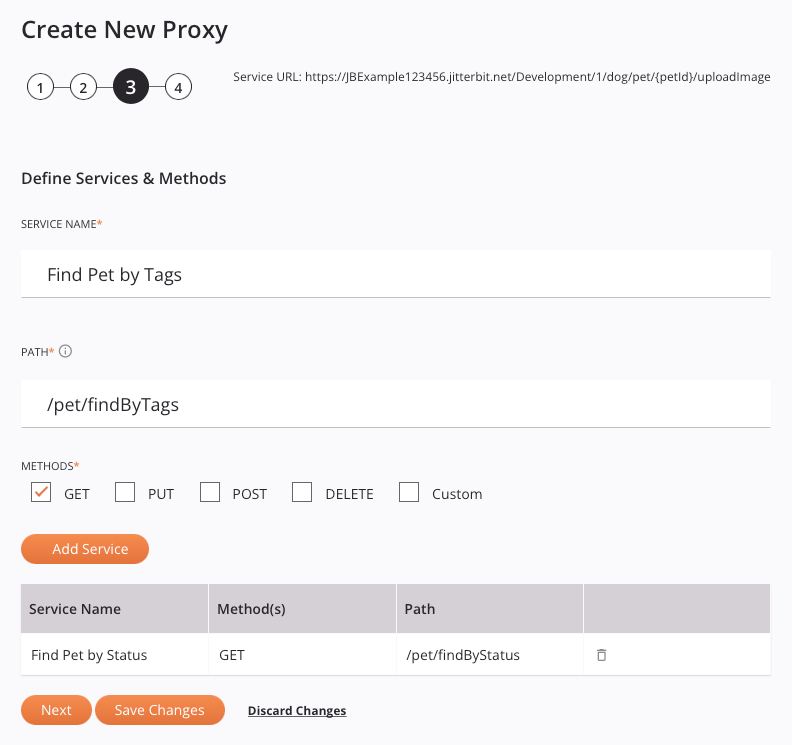
Step 3: Define services and methods
The way in which services and methods are defined depends on whether the selection in Step 2: Existing API for Provide OpenAPI Document was No or Yes:
- No: If an OpenAPI document was not provided, services and methods must be defined manually (see Manual definition below).
- Yes: If an OpenAPI document was provided, services and methods are auto-discovered from the OpenAPI document and are then selected (see OpenAPI document auto-discovery below).
Manual definition
-
Define Services and Methods: When an OpenAPI document was not provided in Step 2: Existing API, you must define its services and methods manually using these fields:
-
Service name: Enter a name to identify the service.
-
Path: Enter a path for the service. If the API does not have a service path, enter a forward slash (
/).Note
Using characters such as curly brackets (
{}) in a service path is not possible when manually defining services. To use unallowed characters in a service path, instead provide an OpenAPI document defining the path in Step 2: Existing API. -
Methods: Select each method to be created for the service, selecting from
GET,PUT,POST,DELETE, and Custom. When Custom is selected, enter one or more custom methods separated by a comma into the text box that appears below: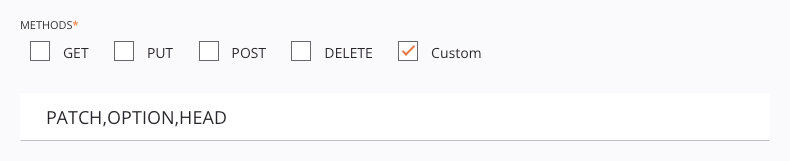
-
-
Add Service: Once all fields are completed, click Add Service to add the service to the table below. At least one service must be added to enable the Next button.
-
Added Services: A table displays all services that have been added. To remove an added service, click the remove icon.
-
Next: Click to temporarily store the configuration for this step and continue to the next step.
-
Save Changes: If enabled, click to save the configuration for this step and navigate to Step 5: Summary and confirmation.
OpenAPI document auto-discovery
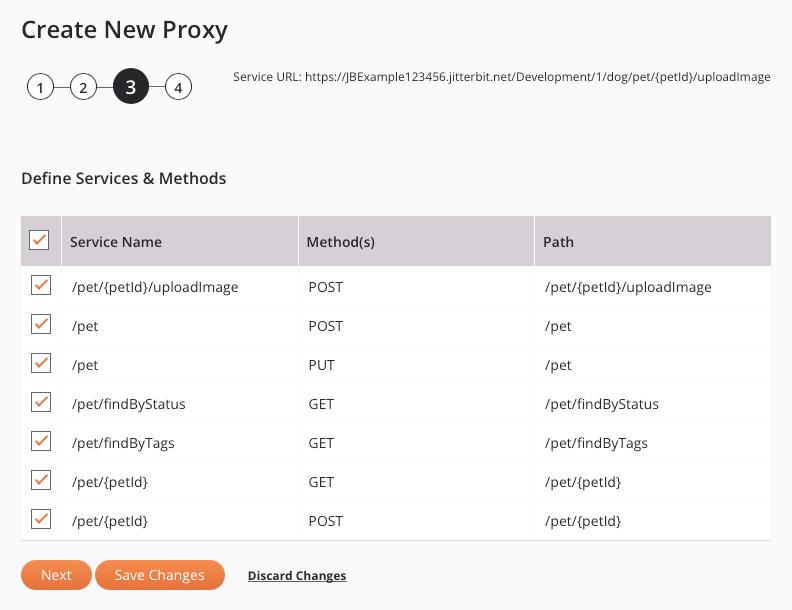
- Define Services and Methods: When an OpenAPI document was provided in Step 2: Existing API, its services are automatically discovered from the OpenAPI document and listed in a table with these columns:
- Select: Select the services to add to the proxy API. The checkbox in the header column can be used to add all available services at once.
- Service Name: The name used to identify the service.
- Method(s): The methods that apply to the service.
- Path: The path of the service.
- Next: Click to temporarily store the configuration for this step and to continue to the next step.
- Save Changes: If enabled, click to save the configuration for this step and to navigate to Step 5: Summary and confirmation.
- Discard Changes: After making changes, click to close the configuration without saving changes made to any step. A message asks you to confirm that you want to discard changes.
Step 4: Assign security profiles and request headers
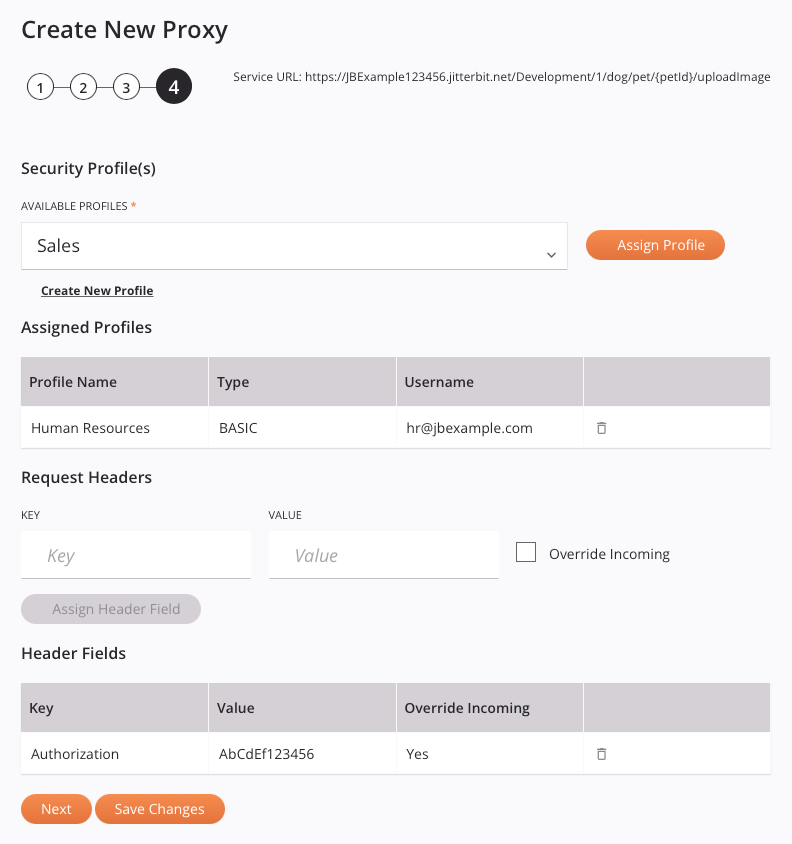
-
Security Profile(s): Security profiles are used to restrict access for consumption of the API. You can type any part of the security profile name into the menu to filter the list of security profiles. The menu results are filtered in real time with each keystroke. A security profile may be required to be assigned in order to save the API, depending on the Harmony organization's policies.
-
Available profiles: Use the dropdown to select an existing security profile.
-
Assign Profile: Click to assign a selected security profile to the API.
-
Create New Profile: Click to create a new security profile. For instructions, see Security profile configuration.
-
-
Assigned Profiles: A table lists the assigned security profiles. To remove an assigned profile, click the remove icon.
-
Request Headers: New request headers can be added or existing request headers can be overridden using the following settings.
Note
By default, the request header
disable-hyphen-replacementis set totruefor all new proxy APIs. Once the proxy API is published, the request header can be set tofalseto replace hyphens (-) with underscores (_) in request headers (except for the request headersContent-Type,Content-Length,Accept-Encoding, andTransfer-Encoding).-
Key: Enter a key for the request header.
-
Value: Enter a value for the request header.
-
Override Incoming: Select to override an existing request header that uses the same Key. The default is unselected.
-
Assign Header Field: Once a Key and Value have been entered, click to assign the request header to the API.
-
-
Header Fields: Header fields assigned above in the Request Headers section are displayed in a table. To remove an assigned header field, click the remove icon.
-
Next: Click to temporarily store the configuration for this step and continue to the next step. If the API is not assigned a required security profile, this option is disabled.
-
Save Changes: If enabled, click to save the configuration for this step and navigate to Step 5: Summary and confirmation. If the API is not assigned a required security profile, this option is disabled.
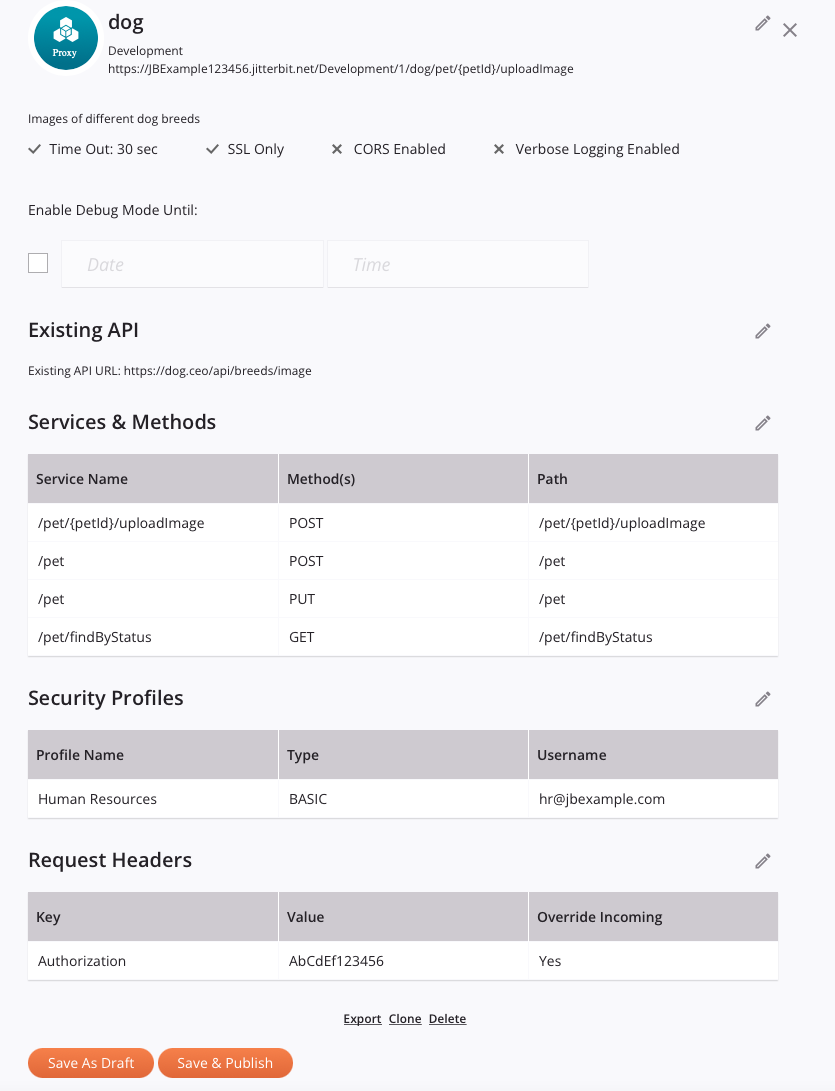
Step 5: Summary and confirmation
-
Proxy name and Environment: The API name and environment, as configured in Step 1: Basic settings.
-
Description, Timeout, SSL Only, CORS Enabled, and Verbose Logging Enabled: The API description and other settings that are enabled () or disabled (). To make changes to those settings, click the edit icon to return to Step 1: Basic settings.
- Enable Debug Mode Until: This option is the same as that described in Step 1: Basic settings. You can change this setting directly from this step rather than be required to return to the first step.
-
Existing API: The Base API URL provided in Step 2: Existing API. To make changes, click the edit icon to return to Step 2: Existing API.
-
Services and Methods: The services defined in Step 3: Define services and methods. To make changes, click the edit icon to return to Step 3: Define services and methods.
-
Security Profiles and Request Headers: The security profiles and request headers assigned in Step 4: Assign security profiles and request headers. To make changes, click the edit icon to return to Step 4: Assign security profiles and request headers.
-
Export: Generates and initiates a download of an APK file (
apis-export.apk) containing an export of the API (see Exporting and importing APIs). -
Clone: Creates a copy of an existing API. In the API copy, the Proxy Name is prepended with Copy of, the Service Root is prepended with Copyof, and the Version is appended with -2. The API copy is immediately opened at its own Step 5: Summary and confirmation.
-
Delete: Permanently deletes the API and closes the configuration. A dialog asks you to confirm you want to delete the API.
Note
If the API's status was Published or Published with Draft at the time of deletion, it is also removed from the number of Proxy URLs used against your subscription limit. If the API's status was Draft at the time of deletion, the number of Proxy URLs used against your subscription limit does not change, as the API was not accessible while in Draft status.
-
Save as Draft: Saves the API in Draft status or Published with Draft status:
- Draft: A new API or an API whose status was Draft at the time Save as Draft was used. Drafts do not count against your Proxy URL subscription limit.
- Published with Draft: An API whose status was Published at the time Save as Draft is used. An API that is published with a draft counts against your Proxy URL subscription limit, as the API is accessible though its draft is not.
-
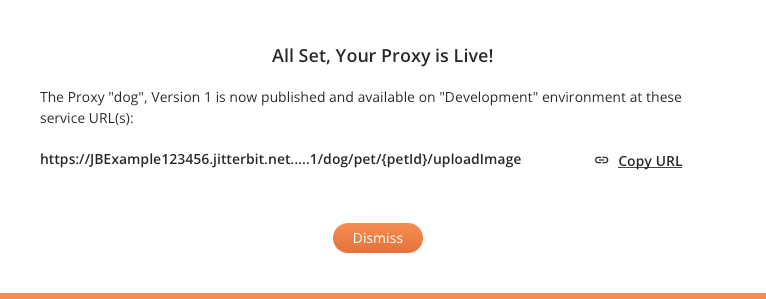
Save and Publish: Saves the API in Published status. The API is live and accessible within five minutes. A published API counts against your Proxy URL subscription limit, as the API is accessible. A dialog indicates the API is live. Click Copy URL to copy the API's service URL (see API service URL):