Security profile configuration
Overview
This page describes how to create and configure a security profile from the Security Profiles page of Harmony API Manager.
After creating a security profile, it can be assigned to one or more APIs in the environment the security profile belongs to. For more information on assigning security profiles to an API, see these resources:
Note
Security profiles are cached on the API gateway, so changes to the security profiles of an already-active API can take several minutes to take effect.
Configure a security profile
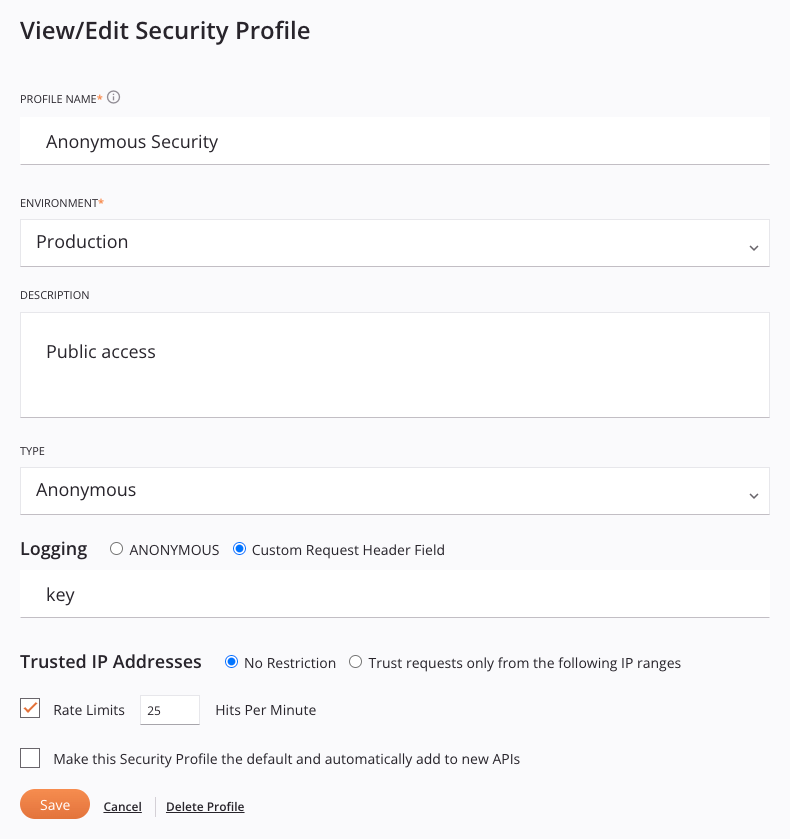
The security profile configuration screen includes these fields and actions:
-
Profile name: Enter a name to use to identify the security profile. The name must not start or end with a space.
Caution
If configuring the security profile with a Type of OAuth 2.0 and using Azure AD or Google as the OAuth 2.0 identity provider (configured below), the Profile name must not contain any spaces. If the Profile name contains spaces, you will receive an error when attempting to access an API to which the security profile is assigned.
-
Environment: Use the dropdown to select an existing environment where the security profile can be assigned. To learn more about the relationship of environments to security profiles, see Use multiple security profiles in an environment in API Manager security.
-
Description: Enter an optional description of the security profile.
-
Type: Use the dropdown to select an authentication type for the security profile. See Authentication types below for details.
-
Logging: In the Logging field, select the value that will be sent in the API request header to indicate the type of authorization through which an API assigned this security profile is being accessed. For each hit on the API, this value is identified in the API log in the User set to field.

-
One of Anonymous, Same As Username, OAuth, or API Key: The label of the first radio button corresponds with the authorization Type configured for the security profile:
- Anonymous: Sends the value Anonymous. Available only with the Anonymous authentication type.
- Same As Username: Sends the value of the Username field (as defined above). Available only with the Basic authentication type.
- OAuth: Sends the value OAuth2.0. Available only with the OAuth 2.0 authentication type.
- API Key: Sends the value APIKEY. Available only with the API Key authentication type.
-
Custom Request Header Field: Sends the value entered in the text box:

-
-
Trusted IP Addresses: Select whether to restrict access to the APIs within the security profile to consumers from a single IP address or a range of IP addresses. See Trusted IP addresses below for details.
-
Rate Limits and Hits per Minute: Select Rate Limits to enforce a shared maximum number of API hits per minute that can be made across all APIs to which this security profile is assigned. When this option is selected, you must enter a maximum number of Hits per Minute.
When enabled, calls over the set maximum are rejected. As such, calls to APIs assigned this security profile may experience an increased number of rejects. For more information, see Use rate limits in API Manager security.

-
Make this Security Profile the default and automatically add to new APIs: Select to make this security profile the default for the selected environment. The default security profile will be preselected when a new API is created. Only one default security profile can be selected in each environment. Once a default security profile has been specified for an environment, selecting a different security profile as the default will replace the existing default security profile selection. Selecting or changing the default security profile will not change the security profile assigned to existing APIs.

-
Save: Click to save and close the security profile configuration.
-
Cancel: Click to close the configuration without saving.
-
Delete Profile: Permanently deletes the security profile. A message asks you to confirm that you want to delete the security profile. If the security profile is assigned to any APIs, it must first be unassigned or replaced prior to deleting it.
Authentication types
Once you use the Type menu to select the authentication type, additional fields become available to configure, described in this section for each type:
Anonymous
Select the Anonymous authentication type if no HTTP authentication is required.

Note
If you do not assign a security profile to an API, then anonymous authentication is also used. However, you may want to use an anonymous security profile (rather than no security profile) to be able to set additional security options for Logging, Trusted IP Ranges, or Rate Limits, as described in subsequent bullets.
Basic
Select the Basic authentication type to use basic HTTP authentication to access an API assigned this security profile. When this type is selected, these fields are used to create the required credentials:
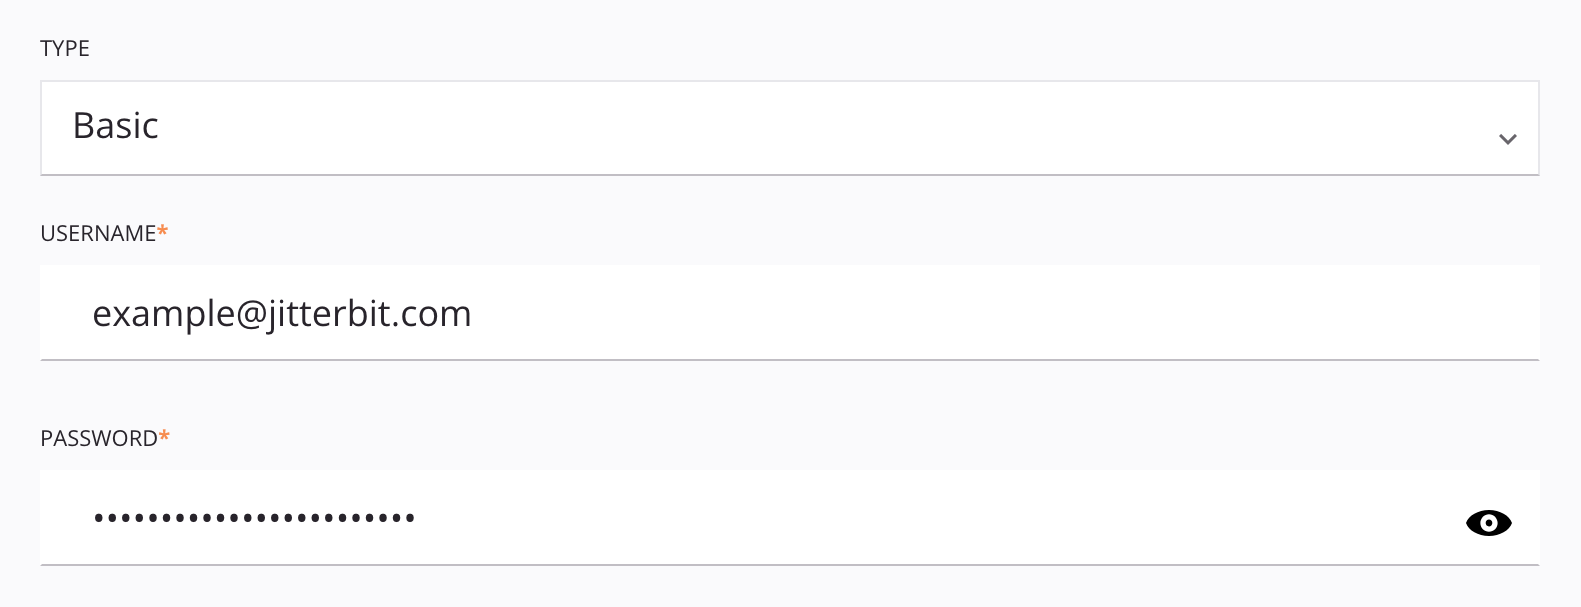
-
Username: Enter a username to create for accessing the API. The username is case-sensitive and should not contain a colon (
:) if you intend to use the credentials in an HTTP header when calling the API. -
Password: Enter a password to create for accessing the API.
Tip
To use the credentials in an HTTP header when calling an API assigned this security profile, provide a Base64-encoded string of the username and password combined with a single colon. For example, using the Jitterbit function Base64Encode:
Base64Encode("exampleuser"+":"+"examplepassword")
OAuth 2.0
Select the OAuth 2.0 authentication type to use an OAuth 2.0 authorization token to access an API assigned this security profile. When this type is selected, these fields are used to create the required credentials:

-
OAuth provider: Use the dropdown to select a supported identity provider: Azure AD, Google, Okta, or Salesforce.
-
OAuth redirect URL: This field is prepopulated and cannot be edited. This value is required as input when obtaining the client ID and client secret for Azure AD, Google, Okta, or Salesforce.
-
2-legged OAuth Flow: By default, 3-legged OAuth is used for all identity providers, requiring manual interaction to authenticate when accessing an API assigned this security profile. The 2-legged OAuth Flow option, available only for Azure AD and Okta, allows you to configure a scope and an audience to eliminate that manual step.
Note
Those using a private API gateway must be using a gateway version 10.48 or later for this option to take effect. If the gateway is not 10.48 or later, 3-legged OAuth is used even if 2-legged OAuth is configured. If you are not using a private API gateway, this option has no version requirements.
When this option is selected, these fields become available to configure:
- OAuth scope: Enter the scope to be used for 2-legged OAuth. Refer to the instructions for Azure AD or Okta.
- OpenID discovery URL: This field is prepopulated with standard default values from the identity provider. These values must be edited with values that are specific to the Azure AD or Okta instance. Refer to instructions for Azure AD or Okta.
- Audience: Enter the audience to be used for 2-legged OAuth. Refer to the instructions for Azure AD or Okta.
-
Authorized domain(s): Enter domain names separated by commas to restrict access to allowlisted domains. Leave blank for unrestricted access.
-
OAuth client ID and OAuth client secret: Enter the client ID and client secret obtained from the identity provider. Refer to instructions for obtaining the client ID and client secret for Azure AD, Google, Okta, or Salesforce.
-
OAuth authorization URL, OAuth token URL, and User info URL: These fields are prepopulated with standard default values from the identity provider. They may need to be edited depending on the identity provider:
-
Google or Salesforce: Normally, these values normally should not need to be edited. If you are using a custom implementation and need to override the default values, you can edit them here. For further assistance, contact Jitterbit support.
-
Azure AD or Okta: These values must be edited with values that are specific to the Azure AD or Okta instance. Refer to instructions for Azure AD or Okta.
-
-
Add this redirect URL to your OAuth account: This field is prepopulated and cannot be edited. This value is required as input when obtaining the client ID and client secret for Azure AD, Google, Okta, or Salesforce.
-
Test Client ID + Secret: Click to verify connectivity with the identity provider using the provided configuration. The resulting behavior depends on whether the 2-legged OAuth Flow option is being used:
- 2-legged OAuth: For Azure AD and Okta when 2-legged OAuth Flow is being used, the API gateway fetches the access token and authentication takes place automatically. You are then redirected to API Manager with a message indicating the results of the test.
- 3-legged OAuth: For Google and Salesforce, and for Azure AD and Okta when 2-legged OAuth Flow is not being used, a new browser tab displays the native login interface for the identity provider. After providing your credentials for the identity provider, you are redirected to API Manager with a message indicating the results of the test.
API key
Select the API Key authentication type to use an API key and value pair to access an API assigned this security profile. When this type is selected, these fields are used to create the required credentials:
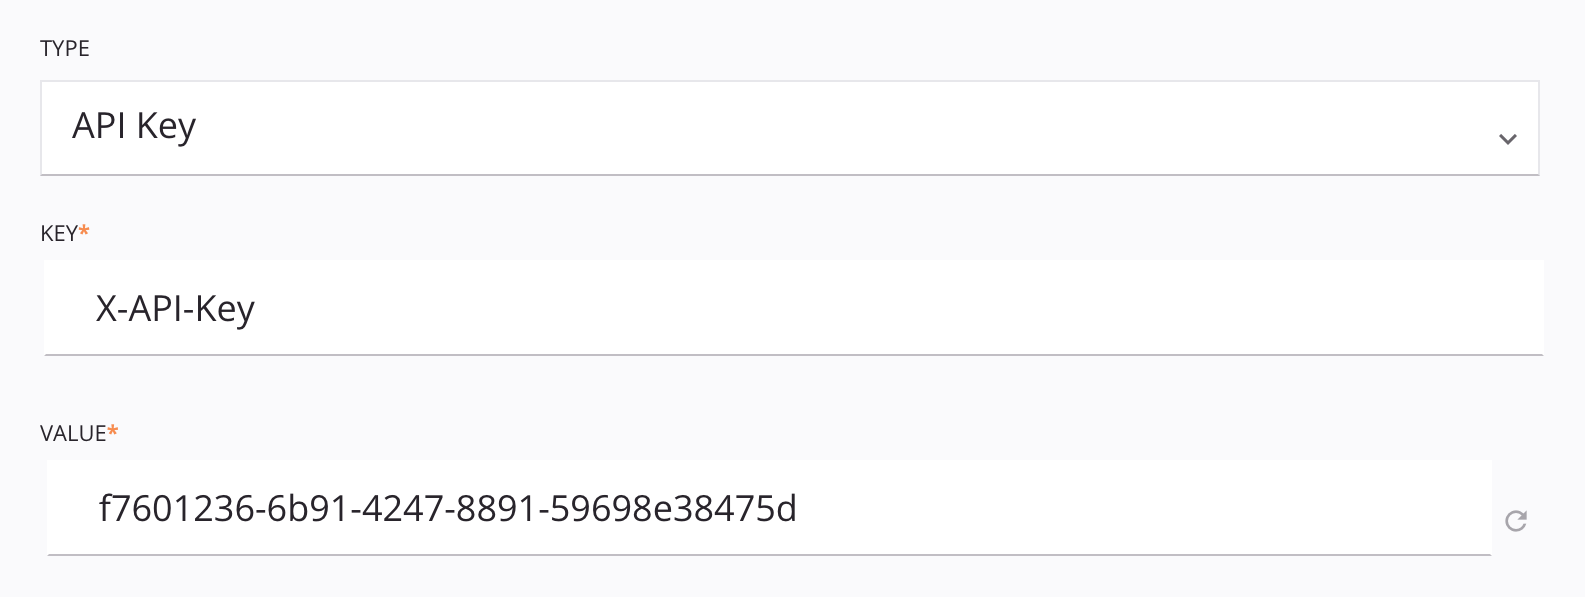
- Key: Enter the header name that you want to use, such as Authorization or X-API-KEY. A maximum of 256 characters is allowed.
- Value: A value is automatically generated for use with the Key header name. You can edit the value or use the refresh icon to generate a new value. A maximum of 256 characters is allowed.
Note
The key and value pair that is entered is accepted both as a header and as a query parameter. For example, a Key of X-API-KEY with a Value of abc123 is passed in a header as X-API-KEY:abc123 and in a query parameter as ?X-API-KEY=abc123.
Trusted IP addresses
You can select whether to restrict access to the APIs within the security profile to consumers from a single IP address or a range of IP addresses:

- No Restriction: Does not limit access to the APIs by IP address.
-
Trust Requests Only from the Following IP Ranges: Restricts access to the APIs within a security profile to consumers from certain IP addresses. Only IP addresses that are included within the specified ranges are able to access the APIs using this security profile.
-
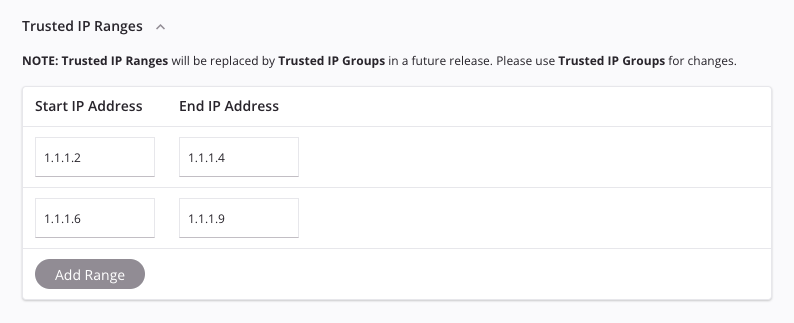
Trusted IP Ranges: If you have a trusted IP range that was configured prior to the 10.58 Harmony release, this user interface is presented:
Caution
It is recommend that all users switch to using Trusted IP Groups, as Trusted IP Ranges are deprecated and will be removed in a future release.
- Start IP Address: Enter the first IP address to include in the range. Only IP addresses entered in IPv4 format are supported.
- End IP Address: Enter the last IP address to include in the range. Only IP addresses entered in IPv4 format are supported.
- Add Range: Click to add an additional IP range.
- Delete: Hover over any IP address range and click the delete icon to delete that IP address range row.
-
Trusted IP Groups: Select an existing trusted IP group or add a new trusted IP group to the security profile:
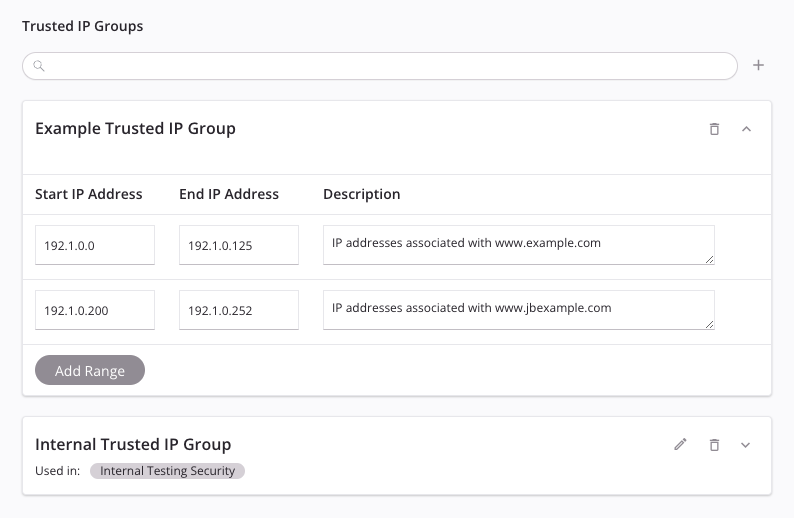
-
Search: Enter the name of an existing trusted IP group. When clicking the search box, a list of existing trusted IP groups is populated. The list is filtered in real time with each keystroke within the search box. Click the name of the trusted IP group to add it to the security profile.
-
Add: Click to add a new trusted IP group. Once the security profile has been saved, this trusted IP group will be added to the Trusted IP Groups page as an existing trusted IP group to be used in other security profiles as needed.
-
Name: Enter a name to identify the trusted IP group. For existing trusted IP groups, click the name of a trusted IP group to rename it.
-
Start IP Address: Enter the first IP address to include in the range. Only IP addresses entered in IPv4 format are supported.
-
End IP Address: Enter the last IP address to include in the range. Only IP addresses entered in IPv4 format are supported.
-
Description: Enter a description of the IP address range (optional).
-
Add Range: Click to add an additional range to the trusted IP group.
-
Edit: Click the edit icon to edit existing trusted IP groups that were selected for use with the security profile.
Note
Any changes made to an existing trusted IP group will affect all security profiles using the trusted IP group.
-
Delete: Click the delete icon next to the trusted IP group name to delete the entire trusted IP group from the security profile. Hover over any IP address range and click the delete icon to delete that IP address range row.
-
-
Next steps
After creating a security profile, it can be assigned to one or more APIs in the environment the security profile belongs to. For more information on assigning security profiles to an API, see these resources: