My APIs page in Jitterbit API Manager
Introduction
The My APIs page allows you to manage custom APIs, OData services, and proxy APIs created through API Manager. This page describes the user interface of the My APIs page within API Manager.
Access the My APIs page
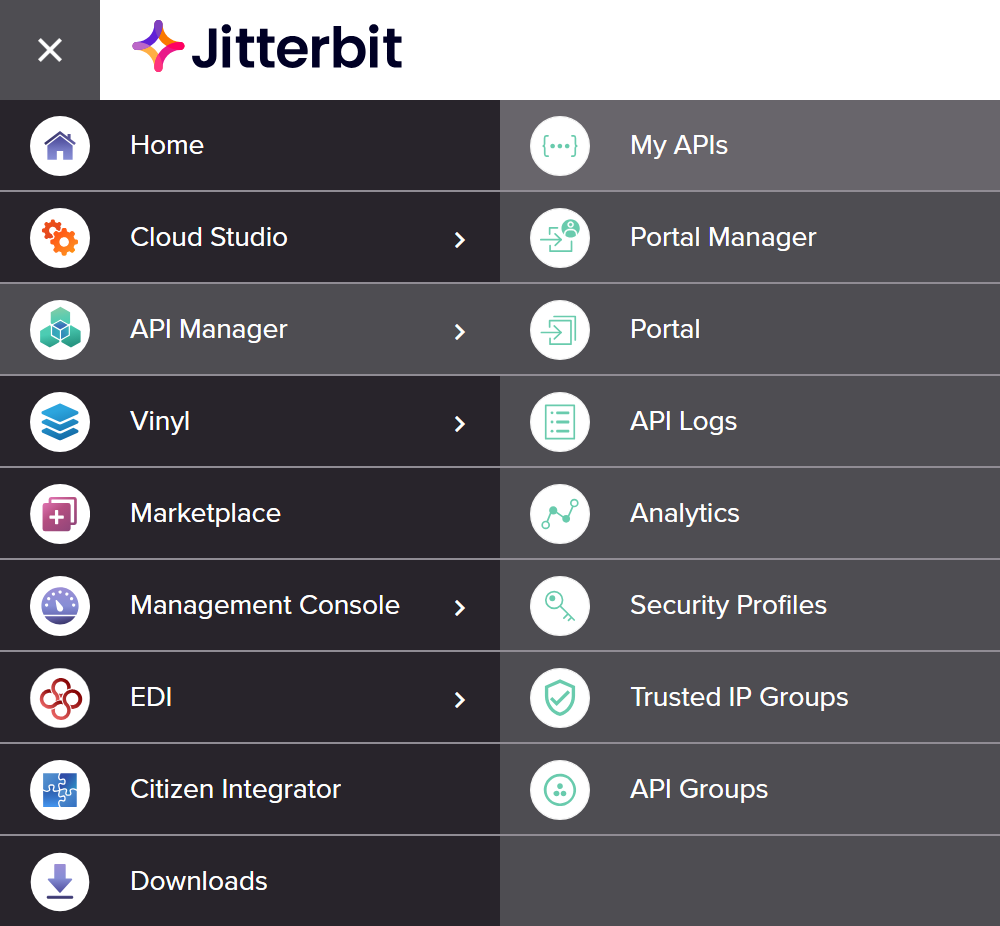
The My APIs page is the landing page for API Manager, which is accessed directly through the Harmony portal. It can also be accessed from the Harmony portal menu, or from other pages within API Manager:
-
Use the Harmony portal menu to select API Manager > My APIs:
-
When accessing an API Manager page, use its navigation menu to select My APIs:
My APIs page header
Information about your organization, in-app navigation, controls to filter the display, and several actions are available along the top of the My APIs page:

-
Base URL: The base API URL of the Harmony organization.
-
API URLs used: The number of currently used API URLs out of the total number of API URLs allowed by the organization's subscription. Currently used API URLs consist of those used by published custom and OData APIs and their published clones. Draft APIs do not count as in-use API URLs.
-
Proxy URLs used: The number of currently used proxy API URLs out of the total number of proxy API URLs allowed by the organization's subscription. Currently used proxy API URLs consist of those used by published proxy APIs and their published clones. Draft APIs do not count as in-use API URLs.
-
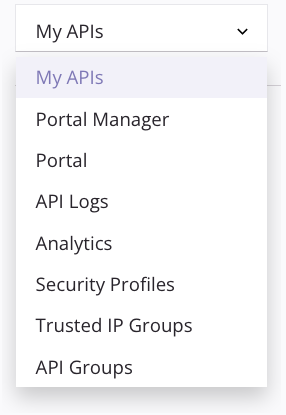
Navigation: Use the API Manager navigation menu to navigate between pages of API Manager, including Portal Manager, API Logs, Analytics, and Security Profiles.
-
View: Click the tile view or list view icon to toggle the format used to display APIs on this page. Tile view is the initial default view. The next time you load the My APIs page, the last selected view is preselected.
-
Filter by: These filters are available to limit the APIs displayed on this page. The next time you load the My APIs page, the last selected filters are preselected.
-
Environments: Use the dropdown to select one or more existing environments to limit APIs to those in the selected environments.
-
Profiles: Use the dropdown to select one or more existing security profiles to limit APIs to those that are assigned the selected security profiles.
-
Status: Use the dropdown to select one or more of these possible statuses:
-
Published: APIs that have been published and do not have an unpublished draft.
-
Published + Debugging: APIs that have been published and have an unpublished draft.
Note
This status is mislabeled; the word Debugging should read Draft.
-
Draft: APIs that have an unpublished draft and have not been published.
-
-
Types: Use the dropdown to select one or more API types.
-
-
Export API: Click to open the API export screen, where you can export selected APIs in APK format (see Exporting and importing APIs).
-
Import API: Click to open the API import screen, where you can import APIs in APK format (see Exporting and importing APIs).
-
New Proxy: Available only if there is a proxy API URL available, click to open the proxy API configuration screen to create a new proxy API.
-
New API: Available only if there is an API URL available, click to open the API configuration screen to create a new custom or OData API.
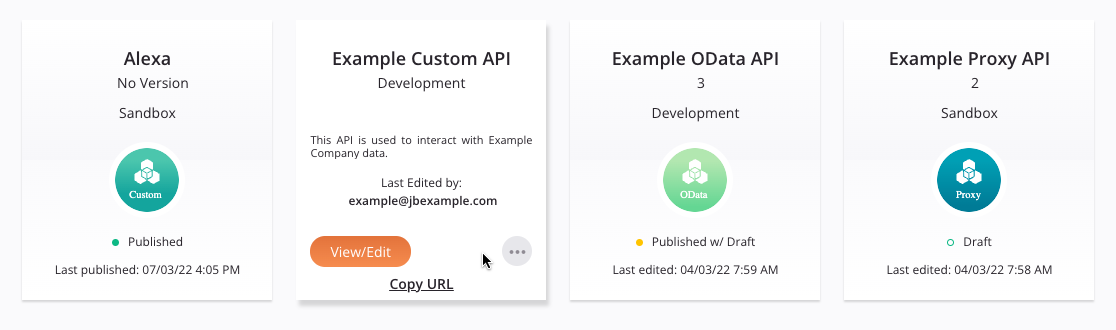
Tile view
To access tile view, select the tile view icon.
Tile view displays APIs as tiles. Each tile has a front and a back that can be "flipped" over to reveal additional API information and actions. The front is displayed by default. The back is displayed on hovering over the tile:
-
Front: The front of the tile shows the API name, version, environment, API type (Custom, OData, or Proxy), API status (Published, Published w/ Draft, or Draft), and last edited date (in
MM/DD/YYformat) in local browser time. The color of the icon to the left of the API status indicates the category of the API status:Icon Color Category 
Green The API is published. 
Yellow The API is published with a draft. 
Open Green The API is a draft. -
Back: The back of the tile (visible when hovering on a tile) shows the API name, environment, API description, and name of the user who last edited the API. In addition, these actions are available:
-
View/Edit: Opens the API configuration screen (see Custom API configuration, OData service configuration, or Proxy API configuration).
-
Actions: Click the actions menu icon to open a menu with these actions:
API menu item Description 
API Logs opens the API Logs page, which displays processing and debug logs (if debug logging is enabled) for all APIs. 
Analytics opens the Analytics page, which displays consumption and performance metrics for all APIs. 
Clone opens the API configuration screen (see Custom API configuration, OData service configuration, or Proxy API configuration), prepopulated with the configuration details of the cloned API and updated defaults for these fields: - API Name: The API name is prepended with Copy of.
- Service Root: The service root is prepended with Copyof.
- Version: The version is appended with -2. This number does not increment with additional clones.

Export initiates a download of the API to a file named apis-export.apk. This file can then be imported into a different environment or organization (see Exporting and importing APIs).
Delete permanently deletes the API. On clicking Delete, a confirmation dialog is displayed to confirm that you want to permanently delete the API. Caution
OpenAPI documentation displayed on the Portal page is not automatically updated when you delete an API. To update OpenAPI documentation, do so through the Portal Manager page.
-
Copy URL: Copies the API URL to your clipboard.
-
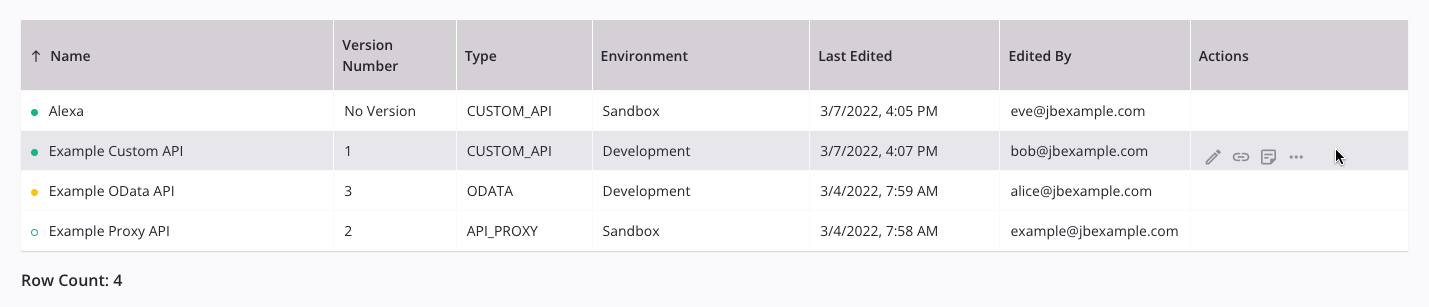
List view
To access list view, select the list view icon.
List view displays APIs in a table, with each column described below. Each column except for the Actions column can be sorted by clicking the column header. Additional actions are displayed by hovering over the API row:
-
Name: The name of the API. Click the name to open the API configuration screen (see Custom API configuration, OData service configuration, or Proxy API configuration). The color of the icon to the left of the API name indicates the category of the API status:
Icon Color Category Green The API is published. Yellow The API is published with a draft. Open Green The API is a draft. -
Version Number: The version of the API, as entered during API configuration.
-
Type: The type of API, either custom (CUSTOM_API), OData (ODATA), or proxy (API_PROXY).
-
Environment: The environment where the API is stored.
-
Last Edited: The last saved date (in
M/D/YYYYformat) in local browser time. -
Edited By: The name of the user who last saved the API.
-
Actions: Hover over the API row to reveal additional actions:
-
Edit: Click to open the API configuration screen (see Custom API configuration, OData service configuration, or Proxy API configuration).
-
Copy URL: Click to copy the API URL to your clipboard.
-
Description: Click to view the API description.
-
Additional Actions: Click the actions menu icon to open a menu with these actions:
API menu item Description API Logs opens the API Logs page, which displays processing and debug logs (if debug logging is enabled) for all APIs. Analytics opens the Analytics page, which displays consumption and performance metrics for all APIs. Clone opens the API configuration screen (see Custom API configuration, OData service configuration, or Proxy API configuration), prepopulated with the configuration details of the cloned API and updated defaults for these fields: - API Name: The API name is prepended with Copy of.
- Service Root: The service root is prepended with Copyof.
- Version: The version is appended with -2. This number does not increment with additional clones.
Export initiates a download of the API to a file named apis-export.apk. This file can then be imported into a different environment or organization (see Exporting and importing APIs).Delete permanently deletes the API. On clicking Delete, a confirmation dialog is displayed to confirm that you want to permanently delete the API. Caution
OpenAPI documentation displayed on the Portal page is not automatically updated when you delete an API. To update OpenAPI documentation, do so through the Portal Manager page.
-
-
Row Count: The number of APIs displayed in the table.