QuickBooks desktop connection guide for Jitterbit App Builder
Overview
This guide describes the system requirements and instructions for connecting App Builder to a QuickBooks Desktop. This guide uses an example QuickBooks file with a Customer table containing customer records to illustrate the core concepts.
In this example scenario QuickBooks and App Builder reside on the same server. If you are connecting App Builder to an external QuickBooks environment, be sure to follow proper security protocol for your infrastructure.
System requirements
Application and remote connector
-
QuickBooks Desktop
-
QuickBooks Remote Connector
Client web browser
-
Chrome: 84+
-
Firefox: 73+
-
Safari: 13.0.1+
-
Edge: 84+
Connection instructions
Install QuickBooks remote connector
The Remote Connector is used to be able to write and read QuickBooks data in situations where direct access to QuickBooks is not available.
-
Download the QuickBooks Remote Connector Setup.exe file from remoteconnector.com<
-
Install the Remote Connector file on the same server where QuickBooks Desktop is installed
-
Run the .exe file as an Administrator in Single-user Mode
-
Click Next through the install wizard prompts and I agree to accept the License Agreement
-
Click Install to install the Remote Connector for QuickBooks
-
Click Finish to complete the installation and launch the Remote Connector
-
-
Confirm that QuickBooks Desktop app is launched and running in Single-user Mode
-
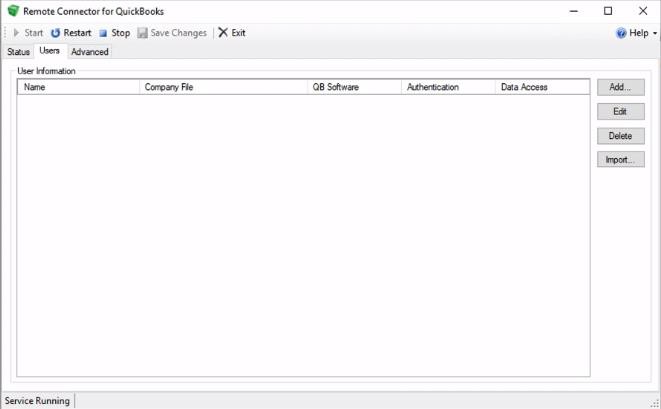
Click the Users tab from the Remote Connector
-
Click the Add… button

-
Create a record to register the user connecting in App Builder:
-
Enter the User. For example:
App BuilderDemo -
Enter the Password. For example:
vinyldemo123 -
Confirm the Authentication type. For example: Basic Authentication
-
Confirm the Software connecting to. For example: QB Desktop
-
Leave the default value <currently open company> as the Company File
-
Review and modify the Application Name if desired. For example:
App BuilderDemo -
Review the Data Access value, and modify it as needed. For example: Full
-
-
Click the OK button to save
-
An Application Authorization prompt will appear
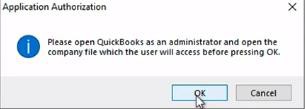
-
Click the OK button to open QuickBooks Desktop as an Administrator
-
Review the QuickBooks Application Certificate and select the appropriate option
- For this configuration, select Yes, always; allow access even if QuickBooks is not running
-
Review the Authorization prompt and click Yes
-
Review and determine if you wish to grant the application access to personal data
-
Click the Continue… button
-
Review the Access Confirmation screen
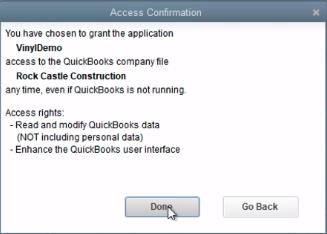
-
Click the Done button
-
An Authorization Successful prompt will now appear, asking if you want to save the Company File information.
-
Click the Yes button
-
Click the Status tab on the Remote Connector
-
Review and confirm that the Remote Connector has connected to QuickBooks
Create an App Builder app to connect to QuickBooks
In this section, we will create an App Builder app and establish a connection to QuickBooks. Once configured properly, QuickBooks records can be viewed and modified from the App Builder app.
-
Navigate to the App Builder Site Menu
-
Click the + App button
-
Assign an Application Name. For example: QuickBooks Demo
-
For the Data Source, select Existing Source
-
For the Home Page, select Left Menu
-
Click the Proceed button
-
From the Add a Source to your application screen, select New Connection
-
Click the Next button
-
For the Connection Category, select Other
-
In the Types of Connections search field, enter "quick"
-
Click the Selected radio button for Quick Books Desktop
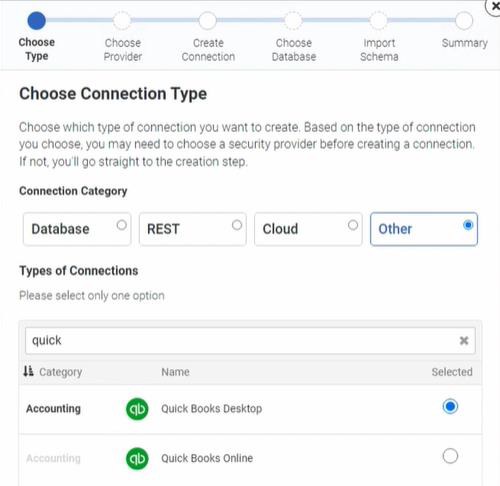
-
Click the Next button
-
Enter the appropriate values for the New Connection Server Settings and Security Settings:
-
Server Name: the name of the server. For example:
QuickBooksDemo -
Type: the type of connection. For example: Quick Books Desktop
-
URI: the server URI. For example:
10.0.0.44:8166 -
User Name: use the same User configured for the Remote Connector. For example:
App BuilderDemo -
Password: use the same Password configured for the Remote Connector. For example:
vinyldemo123
-
-
Click the Next button. App Builder now runs background processes and imports the Quick Books schema. This step may take a few minutes to complete.
-
Navigate to the Site Menu and launch the new app created. For example: QuickBooks Demo
-
Go to the App Workbench and confirm there is 1 Data Source registered and Tables exist from the source file connected to
-
Click the Data Sources tile
-
Confirm the Quick Books Desktop Data Source is registered
-
Click the corresponding Server Details button
-
Expand the Testing section
-
Click the Test Connection button
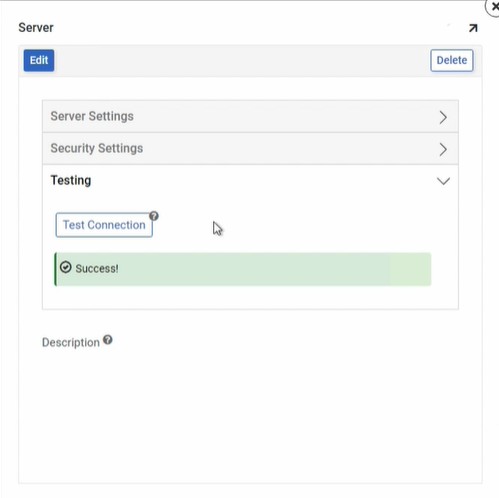
-
Confirm you see a green Success message, indicating the connection is configured correctly
-
The Remote Connector Status tab will also show successful connection traffic in Recent Activity
-
Navigate back to the App Workbench
-
Click the Tables tile
-
Locate the Customer table and click the corresponding Results icon
- While App Builder loads the Quick Books table data you can see the connection handshake processing through the Remote Connector Status tab
-
App Builder will retrieve and display all records from the selected table in QuickBooks. Based on the configuration provided, changes made to data from the App Builder app will be written and saved to QuickBooks.
Resources
The following sites offer more information, including the latest version of the QuickBooks Remote Connector Setup.exe file: