Menu supports data object in Jitterbit App Builder
Menus support the ability to be driven by a data object. This feature supports the following:
- Dynamic Labels, allowing things like "Welcome {{Username}}"
- Dynamic Links, including binding criteria in those links
- Dynamic images like user profiles
- Conditional Themes
- Visibility Rules that could control visibility of menu items

How to configure existing menu with a data object
- From the application layer, go to Action Drawer > Design a menu
- Locate the existing Menu from the Menu panel and click the corresponding pop-up icon
- Click the Edit button
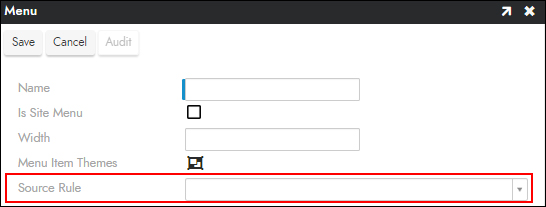
- Select the data object to use as the Source Rule value
- Click Save
How to configure new menu with a data object
- From the application layer, go to Action Drawer > Design a menu
- Click Create from the Menus panel
- Assign a Name for the menu. For example: North Sales Menu
- Click the Menu Item Themes icon to configure any theme information for the menu
- Select the appropriate data object from the Source Rule menu
- Click Save
After configuring the above information, if you are using a new menu and not the Site Menu you also need to configure this information in the Application Design:
- Navigate to the App Builder IDE > Build your application
- Click the cog Open Record icon for the application from the Applications panel
- Click the pencil edit icon for Menu from the Regions panel
- Select the new menu as the Default Control
- Click Proceed
How to insert an image in menu
There may be use cases where you want to display an image inside of a Menu. With this new feature you're able to display an image within the Menu region, and that image can be based on information stored in the data object you connect the Menu to. This example assumes you already have a data object with a Column that captures the image UUID information.
Note
Images can be stored in the data object as UUID, base64 string or binary column type with the image itself in there.

To locate a local stored image UUID
- Navigate to the App Builder IDE > Design your look & feel
- Locate the Collection where you uploaded the image to be stored locally
- Drill into Images for that identified Collection
- Doubleclick on the Image you want to get the UUID value for
- Select the part of the Relative URL value that appears following
/image/. For example:50e85d87-e283-4953-983f-0bc3e18b3a7e - Copy the value to your clipboard
- The UUID value is what you want to store in a Column in the data object or rule that gets referenced from the Menu
To add an image to a menu from a data object
- From the application layer go to Action Drawer > Design a menu
- Locate the Menu to add the image to
- Click Create under Menu Items
- Select Image as the Control Type
- Assign a Name
- Click to select the Alignment you're looking for. For example: Right
- Under Other control types, set the Source column to the column containing the image URL. For example: Avatar
- Navigate back to the application UI layer, refresh your web browser and check results
Additional information
If you're looking to add a custom logo image to an App, please see How to add a logo to an app