Configuring API key authentication in Jitterbit App Builder
App Builder REST APIs can be secured using API keys. Setting up API key authentication involves the following procedures:
- Creating an App Builder Security Provider.
- Generating an API key.
Requirements
To proceed, you will need:
- Administrator access to App Builder.
- REST API for testing.
Creating an App Builder security provider
- API key authentication is enabled within App Builder via a security provider. Start by signing into App Builder as an administrator.
- Navigate to the IDE
- Click the Security Providers button
- In the User Authentication panel, click the + User Authentication button
-
Provide the following:
- Name: API Key
- Type: API Key
- Active: Checked
- Priority: A integer between 10 and 100 (e.g. 50). Note that this value must be unique.
-
Click the Save button
Generating an API key
API keys are associated with App Builder users. To generate a new API key, start by signing into App Builder as an administrator.
- Navigate to the IDE
- Click the User Management button
- In the Users panel, locate the user for which you would like generate an API key
- Click the Open Record icon (Popup)
- Click the Keys icon (Key)
- Click the Create button
-
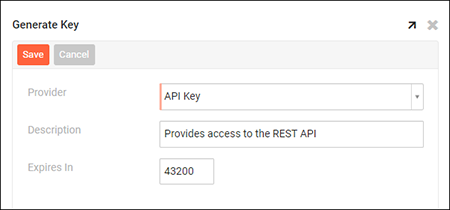
Provide the following:
- Provider: API Key
- Description: Description of key purpose. For example: Provides access to the REST API
-
Expires In: Lifetime of the API key in minutes. Once generated, the lifetime cannot be changed.

-
Click the Save button
Note the generated API key. It will take the form of a base64url-encoded, 128 bit integer. Example: DLOo9sPS5slJEMHpXBFt3g
Testing the API key
The following demonstrates how to authenticate a REST API request using an API key.
GET /rest/v1/sales/customers HTTP/1.1
Host: example.com:443
Accept: application/json
X-API-Key: DLOo9sPS5slJEMHpXBFt3g