Configure Recipe page in Jitterbit Citizen Integrator
Introduction
Citizen Integrator, accessible via the Harmony portal when enabled, is Jitterbit's click-and-run web application for non-technical users to quickly customize and deploy Design Studio integrations using pre-built Citizen Integrator recipes.
Within Citizen Integrator, the Configure Recipe page allows users to walk through a series of steps to configure a selected Citizen Integrator recipe.
Access the configure recipe page
You must select a Citizen Integrator recipe in order to reach the Configure Recipe page. This can be done from several places:
- Citizen Integrator - Dashboard:
- In the Search Recipes section, search for an endpoint or select a category, then click on the name of a specific recipe.
- In the Search My Deployed Recipes section, hover over the recipe and select the edit icon
 .
.
- Citizen Integrator - My recipes: In the My Recipes section, click on the row of a specific recipe, or hover over a recipe you have not already deployed and select the deploy icon
 .
.
Directions
Once you have selected a Citizen Integrator recipe to configure, you will see Directions on the left side of the screen. These are basic guidelines for completing the Configuration Steps on the right side of the screen. While completing the steps, you should:
- Navigate between steps using the
 and buttons.
 - Test that you can connect to any endpoints using the
 button.
 - Review any invalid steps, indicated as invalid by an orange heading. For example:
 .
. - Complete all steps and resolve any validation errors before you click the
 button.
Configuration steps
Once you have selected a Citizen Integrator recipe to configure, you will see the Configuration Steps on the right side of the screen. The Configuration Steps are specific to each recipe, although the workflow is similar among all recipes.
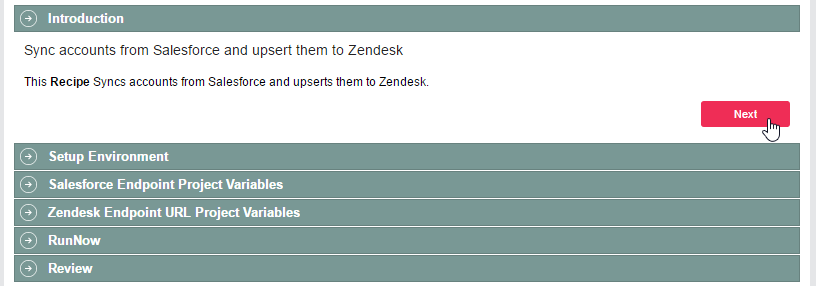
The screenshots below walk through an example of using a recipe to sync accounts from Salesforce to Zendesk.
Each configurable section will be specific to the selected Citizen Integrator recipe. Follow the instructions within each step and use the buttons within each step to advance to the next section.
Introduction
Citizen Integrator recipes typically begin with an introduction step that describes what the recipe is used for. You do not need to provide any information in this step and can click the Next button to continue.
Set up environment
This step will be present if you have more than one environment where the Citizen Integrator recipe can be deployed. If you have only one environment, that environment will be selected by default and this step will be hidden.
If this step is present, use the dropdown to select the environment where the recipe will be deployed. The agent group will also be listed, including the current state of the agent that is fetched when this step is opened. Click Next to continue.
Tip
If you do not have any environments set up in your organization, you will not be able to reach the Configure Recipes screen.
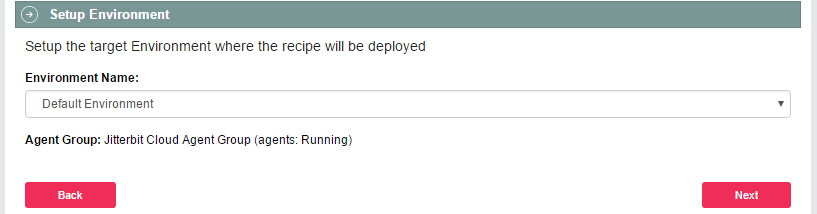
As each step is completed, the heading color will change to a bright green. You can go to any step at any time by clicking on its header to expand the step, or click Next to continue.
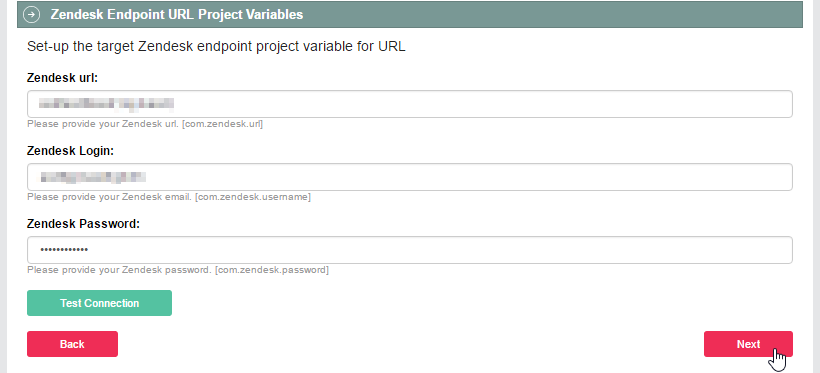
Project variables
The next two steps in this example ask you to enter information that will be used to connect to your endpoints. In Jitterbit, project variables are used so that the values you enter can easily be used within the Citizen Integrator recipe template. This recipe requires information for the Salesforce endpoint and the Zendesk endpoint.
In addition, many recipes have the option to Test Connection when credentials are provided. Testing the connection is usually a good idea in order to ensure your connection has been established. After clicking the button, a message will appear below the Test Connection button indicating if your connection is successful. Click Next to advance.

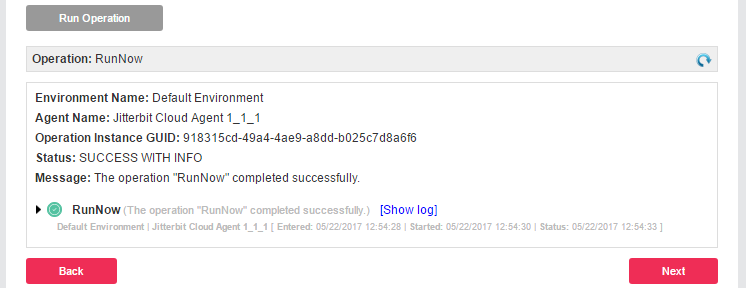
RunNow
Once the Citizen Integrator recipe is configured with information specific to your endpoints, many recipes have the option to run your operation immediately. Use the Run Operation button to execute the operation.
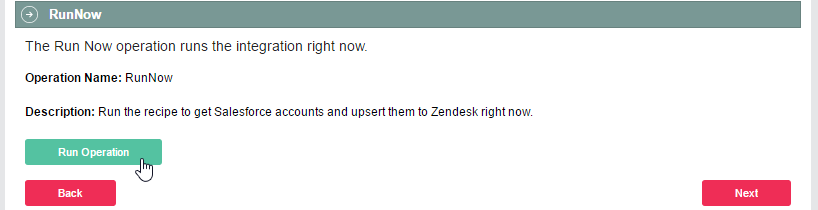
Any messages regarding your operation will automatically refresh in a box that appears below the Run Operation button. You can click [Show log] to expand a detailed log, or [Hide log] to collapse an expanded log. If there are no details to display, a message will be displayed to indicate this. Then click Next to continue.
Review
The last step typically provides any additional information that is built into the Citizen Integrator recipe (e.g. if a schedule is configured to execute the operation on a repeated basis). This step also includes a Save & Finish button. You must click this button in order to deploy the recipe.

Warning
After a Citizen Integrator recipe is deployed, if you modify your project outside of Citizen Integrator (using Design Studio), and then redeploy the recipe from Citizen Integrator, please note that the recipe will override any currently deployed version.
Tip
Since all Citizen Integrator recipes are configurable, each recipe may have different steps than those shown above. To learn more about authoring your own recipes, see Citizen Integrator - Generate or edit recipe and Creating New Recipes.
Additional steps
This section covers additional common steps that are not included in the Salesforce to Zendesk example used on this page.
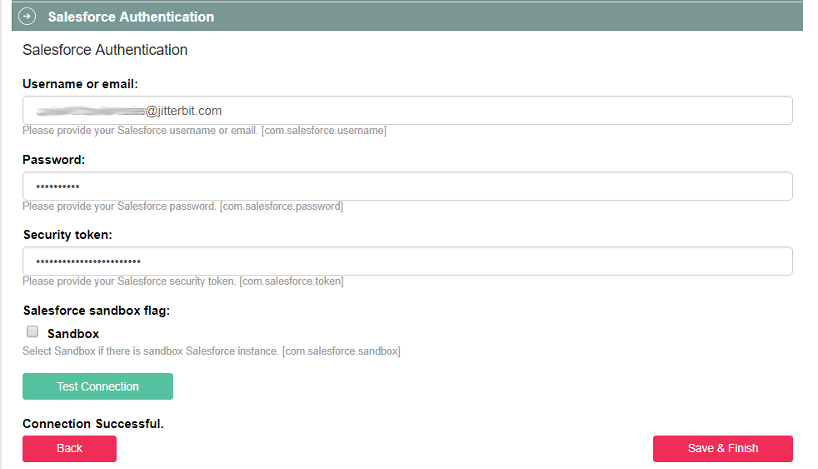
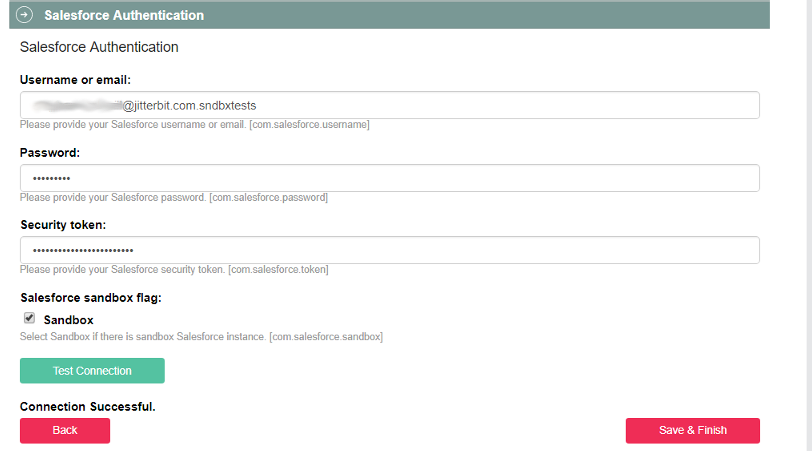
Test in a Salesforce sandbox
Citizen Integrator provides the ability to test a recipe within a Salesforce sandbox as well as in the production instance of Salesforce.
Enter the Username, Password, and Security Token required for the Salesforce sandbox. Click the Sandbox checkbox to enable the Salesforce Sandbox Flag and select Test Connection. An error message displays if the Salesforce sandbox flag has not been enabled and sandbox credentials have been entered. A message displays indicating the connection is successful if the Sandbox checkbox is checked.
To switch back to the production Salesforce instance, enter the Username, Password, and Security Token required for the production instance of Salesforce. Click the Sandbox checkbox to disable the Salesforce Sandbox Flag and select Test Connection. Connection Successful displays. If an error message displays, verify the production credentials are entered correctly and verify the Sandbox checkbox is blank. Select Test Connection again to validate the connection.