Cloud Studio overview for Design Studio users
Introduction
If you use Harmony Design Studio (also called Jitterbit Studio), you already know there are many moving pieces and parts to integrations. Design Studio offers the flexibility of designing projects in numerous ways, creating powerful solutions for a broad range of integration problems. Since its first release over 10 years ago, our design application has been enhanced countless times to add to its capabilities in delivering best-in-class functionality for evolving integration challenges.
Today, we've reimagined the user experience of designing integrations from the ground up. Built on the solid foundation of the Harmony cloud platform, which includes the Harmony agents that run the processes that support integrations, Harmony Cloud Studio accelerates integration design to the next level. Cloud Studio offers a modern, web-based experience, optimized for ease of use and ease of access by integration designers.
The purpose of this document is to help existing Design Studio users transition to Cloud Studio and includes a comparison of major features.
Access the design application
Design Studio is a client application that must be downloaded and installed on a supported operating system (Windows or macOS) with the specific hardware requirements listed in System requirements for Design Studio.
With Cloud Studio, you no longer need to install the design application on a machine. Instead, Cloud Studio offers platform- and location-independent access from anywhere with an Internet connection through the Harmony portal. Supported browsers include Chrome, Firefox, and Safari (macOS only). In addition, you can seamlessly navigate to and from the other Harmony portal applications while designing a project.
Q: Can I use both design applications at the same time?
A: You can use Cloud Studio and Design Studio at the same time for different projects. However, using them for the same project is not possible.
Create and import projects
When you open Design Studio, you are presented with a Getting Started screen where you can create a new project, open an existing project, or import a Design Studio project. After opening a project, the same actions can be taken from the File menu in the menu bar.
In Cloud Studio, these actions are taken from the Projects page, which shows a repository of all your Cloud Studio projects in project tile view or list view. The import functionality allows you to import projects that have been exported from Cloud Studio.
Q: Can I export a Design Studio project and import it into Cloud Studio?
A: Currently, this functionality is unavailable. However, we are developing an import tool that will allow you to import Design Studio projects into Cloud Studio in the future.
Q: Can I export a Cloud Studio project and import it into Design Studio?
A: Cloud Studio projects are not backwards-compatible with Design Studio. You can, however, export Cloud Studio projects and import them into Cloud Studio. Cloud Studio projects are in the format of a JSON file.
Q: Are there any templates so I don't have to build projects from scratch?
A: Jitterbit Marketplace provides hundreds of pre-built projects by offering Cloud Studio integration recipes and Cloud Studio process templates, with more continually being developed. To get started with an existing recipe or template, see Starting a recipe or template project. A limited number of Citizen Integrator recipes, which are exclusively for Design Studio, are also available.
Design interface
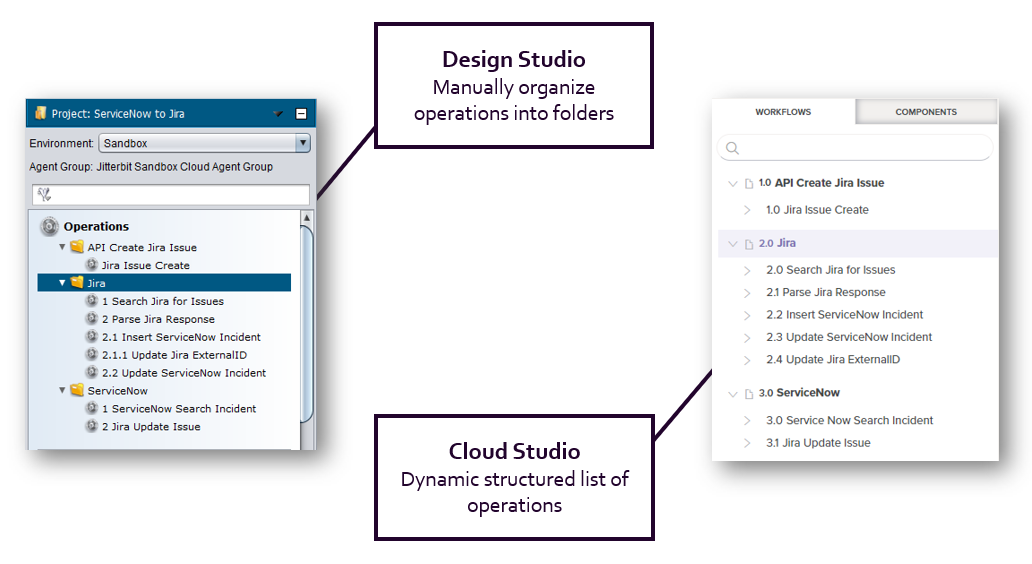
In Design Studio, the main area you work within and where you build operations is referred to as the design window or the design workspace. As you build your project, project items are listed in the left within the project items listing panel, where you can organize them into folders. You also have access to a toolbar and menus that offer additional options.
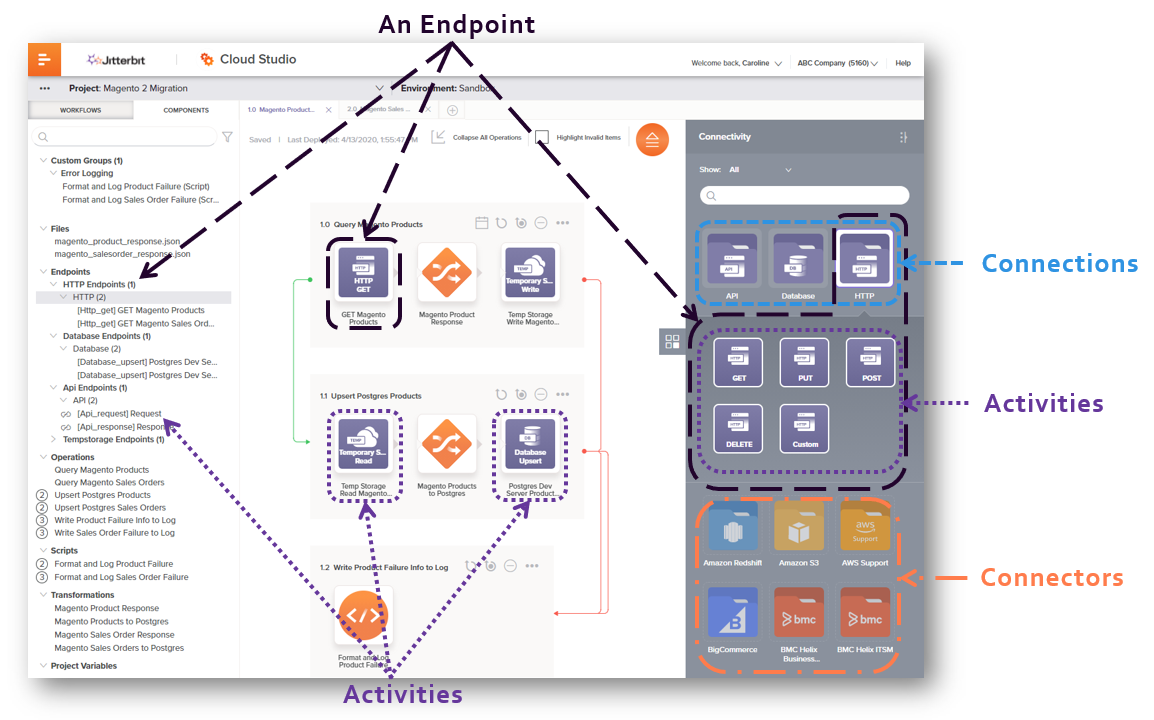
Cloud Studio offers an intuitive, modern workflow design using its project designer. On opening a project, these parts of the project designer are displayed:
- Project Toolbar: The project toolbar along the top allows you to access project actions and navigate to recent projects.
- Project Pane: The project pane on the left provides navigation throughout your project.
- Design Canvas: The design canvas is the primary workspace where you design workflows.
- Component Palette: On the right, the design component palette provides access to connectivity resources.

Instead of folders, operations are organized into workflows to help segregate different parts of the project. You can navigate your project using the project pane within two different views:
- Workflows: This tab shows the operations within each workflow, and the discrete steps that make up each operation, consisting of activities, transformations, or scripts.
- Components: This tab shows all components that exist within the project. Like using folders, you can also organize components into custom groups.
Within the Workflows tab, each workflow's structure is dynamically depicted with each operation auto-numbered based on its location in the workflow's hierarchy.
Establish connectivity
In Design Studio, connections to data consist of native connectors, sources, targets, web service methods, and other entities, many of which have unique configurations and behavior. For example, data structures are inherited from connectors, but defined in transformations for sources and targets.
Cloud Studio offers major advances in connectivity. Not only does Cloud Studio have new connectors, but the connector architecture has been redefined from the ground up. Connector development has been standardized to make it faster and easier for anyone to develop new connectors.
The Connector SDK that Jitterbit uses to develop new platform connectivity is now offered to developers to create new connectors for their organization. this has also allowed us to create Connector Builder, a point-and-click interface for non-developers to quickly stand up new, branded connectivity to REST-based interfaces.
Connectors that you create as well as the standard Jitterbit-provided connectors are now consistent, with all connections being configured using connectors that are accessed from the design component palette. See Connectors for all connectors that are available in Cloud Studio.
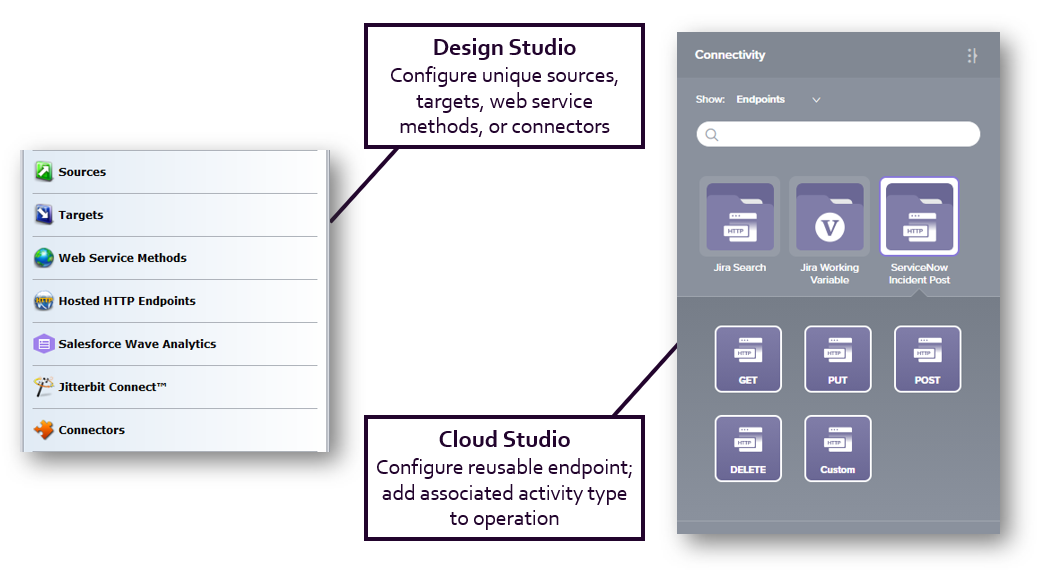
To establish connectivity, you start by using a connector to create a connection to the resource. Once a connection is configured, activity types associated with those connections can then be placed into operations on the design canvas and configured as sources or targets in a project. An endpoint refers to a specific connection and its activities.
Define schemas
In Design Studio, source and target data structures are defined directly in a transformation, and not within the source or target itself (except in the case of application connectors and SOAP web service methods).
With Cloud Studio, you now have the option to define a schema either in an activity, which will be automatically inherited by the transformation, or within the transformation itself.
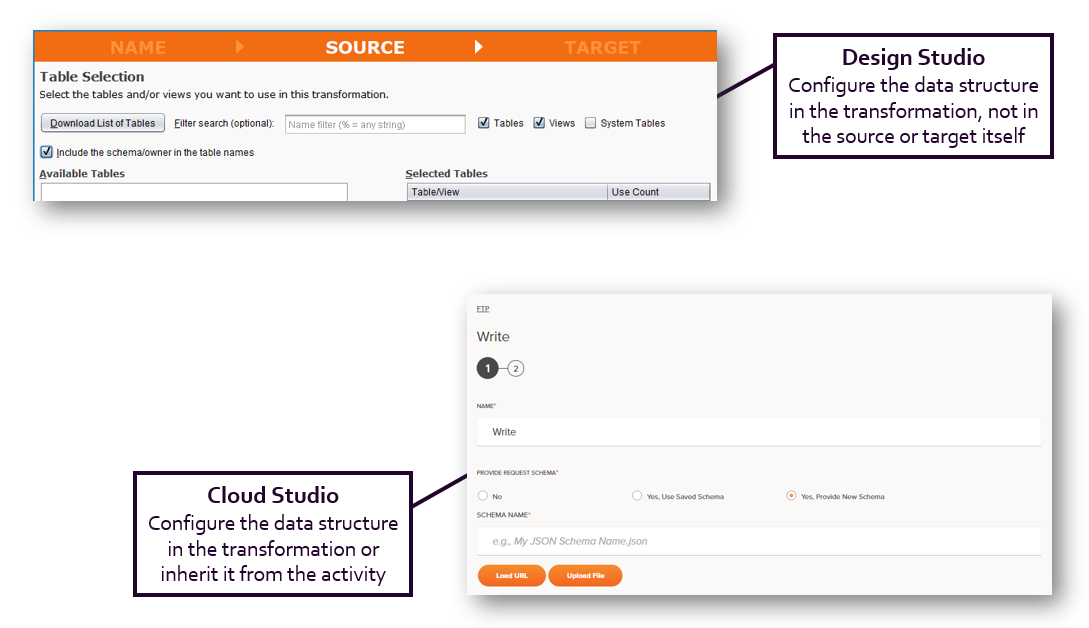
It's important to recognize that although sources and targets in Design Studio are referred to as activities in Cloud Studio, the concept of whether an activity is used as a source or a target still exists. That is, a source activity is any activity that provides data to an operation, while a target activity is any activity that receives data within an operation. Ultimately, whether a schema is required depends on if the activity is being used as a source or target of a transformation.
Create operations
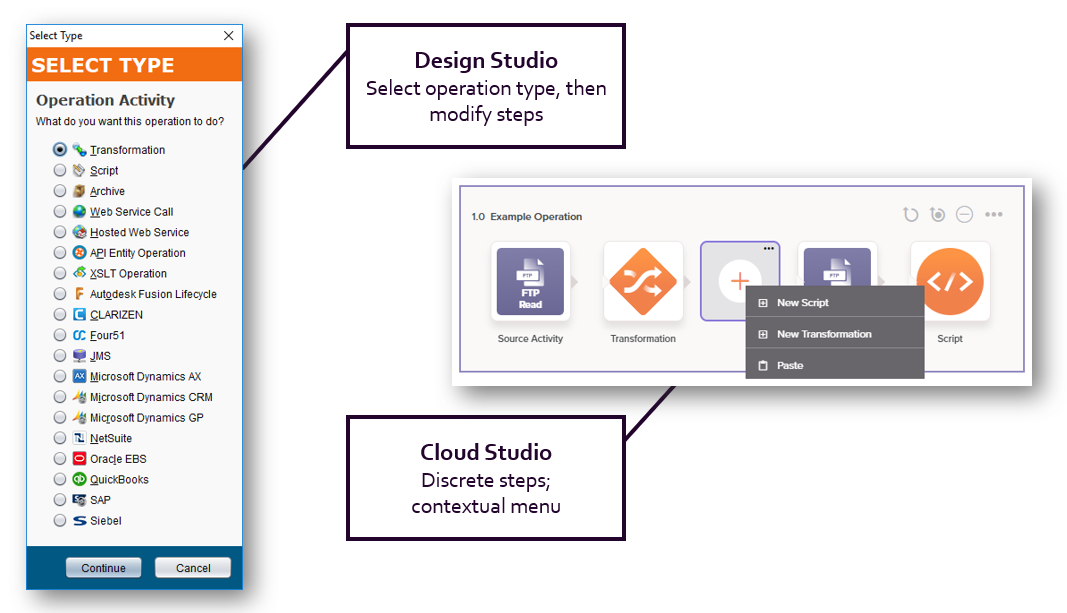
To build operations in Design Studio, you must select an operation type, which then creates an operation with certain components that are pre-placed for configuration. While easy to use, the operation types have limited flexibility.
With Cloud Studio, you can now populate each operation directly with appropriate activities, scripts, and transformations. This provides for more flexibility to create operations to meet the business use case. Contextual menus guide you to add components in the correct order.
In both Design Studio and Cloud Studio, you can chain operations together through success and failure conditions. In Cloud Studio, these are known as operation actions. Operations can be chained across workflows.
Transformation mapping
In Design Studio, transformations consist of visual mappings between source and target fields. Identifying the target logic, variables, and mapped source fields requires drilling down into each field, and identifying what source fields are mapped to a target requires additional effort.
Cloud Studio introduces easier browsing of mappings, allowing you to easily see the mapping details for all fields at a glance, including source fields, variables, and script logic, without additional clicks. Each source field indicates the number of mapped target fields, and provides direct access to those fields.
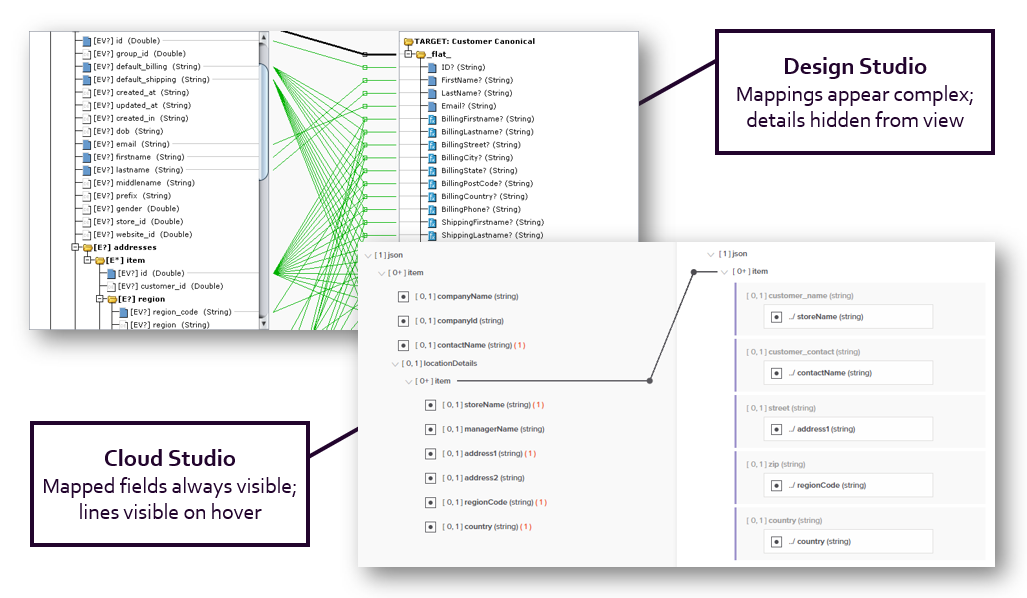
In addition, you still have access to the same types of robust features provided by Design Studio, including previewing a transformation and creating conditional mappings. Additional features that are available only in Cloud Studio include mirroring a schema from one side of the transformation to the other, and the exporting and importing of mappings with the ability to select which mappings to use if there are conflicts.
Use scripts
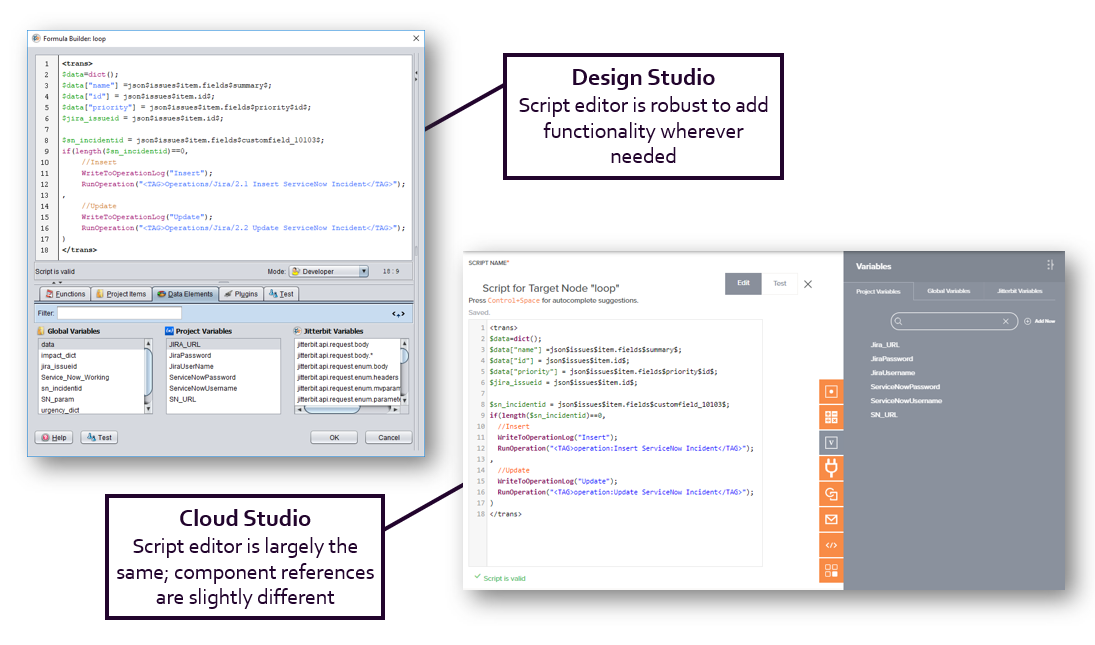
In Design Studio, you can use scripts throughout your project to add functionality wherever needed, whether the script is used as a step within an operation, as logic within a mapped target field, or as a condition on a target node to filter which records are processed.
Cloud Studio has the same use of script types and continues to use the Jitterbit Script language, with the same support for JavaScript as Design Studio. Overall, scripts are treated largely the same, with a few minor differences.
The biggest difference is the syntax for how project components are referenced in a script. For example, in Design Studio, an FTP source reference would have this syntax:
<TAG>Sources/My FTP Source Name<TAG>
In Cloud Studio, the corresponding component would be an FTP Read activity with this syntax:
<TAG>activity:ftp/My FTP Endpoint Name/ftp_read/My FTP Read Activity Name<TAG>
This difference is important if you're manually copying a script from a Design Studio project into Cloud Studio, as these references would need to be replaced (for details, see Endpoints under Jitterbit Script).
Deploy and migrate
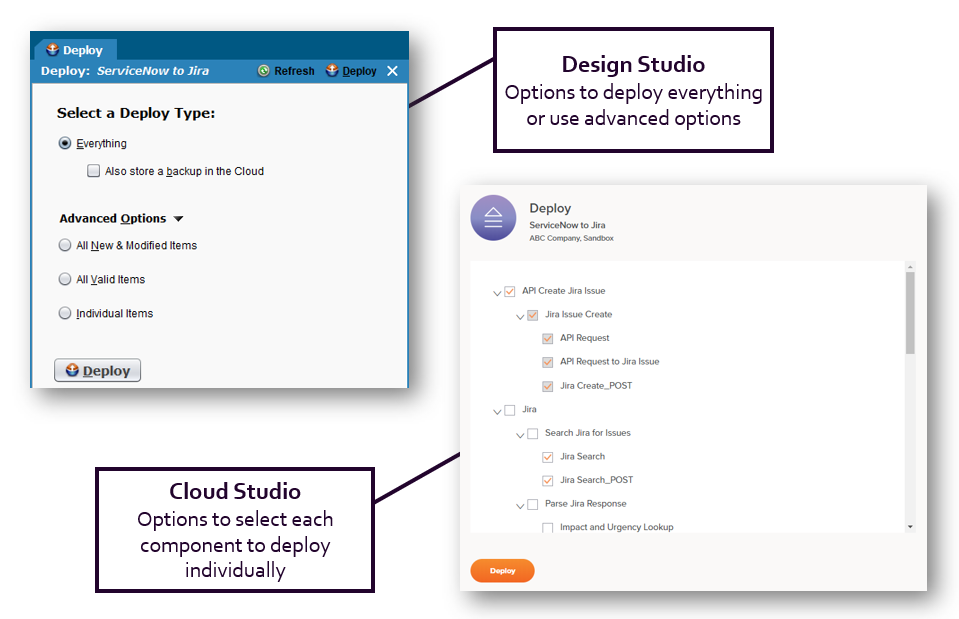
While you design a project in Design Studio, you can deploy selected project items or the entire project and migrate projects from one environment to another.
These concepts are the same in Cloud Studio: you can select certain project components to deploy or deploy the entire project (see Project deployment). Projects can also be migrated between environments (see Project migration).
(The term "migration" refers to moving a project from one environment to another. If instead you want to import an exported Cloud Studio project into Cloud Studio, see Create and import projects earlier on this page.)
Hands-on training
We've put together an introductory training course on Cloud Studio, offered through our online learning system at Jitterbit University. Over time, we'll develop advanced course material on Cloud Studio, just as we have for Design Studio. Learn more at Getting training.
Future enhancements
Our Cloud Studio developers work on a rapid cycle that delivers frequent updates to Cloud Studio, with additional functionality offered through new features, enhancements to existing features, and addressing defects.
We welcome any ideas you might have for future improvements! If you have suggestions, please submit a request through our Ideas Portal and a member of our product team will get back to you on the status of your request.