Connector Builder creation
Introduction
This page describes how to create and configure a new connector or edit an existing connector using Connector Builder.
Create a new connector
When you access the Connector Builder page, if no custom-built Connector Builder connectors are accessible, this screen is blank. Click New Connector to get started:

On clicking New Connector, the connector creation screen opens. There are four configuration steps, each covered in the next sections:
- Step 1: Basic settings
- Step 2: Authentication
- Step 3: Connector activities
- Step 4: Summary and confirmation
To demonstrate the creation of a connector, these steps show how to create a custom connector using Atlassian Jira as the endpoint.
Step 1: Basic settings

-
Upload Image: Use the link to Browse Local Files to select an SVG file to be used as the thumbnail image on the connector. The image should be no more than 120 KB in size. To replace an image that has already been selected, click Browse Local Files again to select a different file.
-
Remove Image: To clear an image that has been selected, click the Remove Image link. This reverts the image to the default Connector Builder image.
-
Connector Name: Enter a name for the connector to be used for registering the connector with Harmony. The connector name is also shown to end users as a tooltip when they hover over the connector in the design component palette.
Only letters, numbers, or spaces are allowed (no special characters). Some names may be reserved that are already in use in other areas of the product, in which case a message indicates that the name is already in use.
-
Display Name: Enter a name for the connector to be the primary connector name seen by end users.
-
Version #: Enter a version number to use for identifying this connector. Only letters and numbers are allowed (no special characters or spaces).
-
Description: Enter a description of the connector. This description appears in the Connector Builder page and may be useful to help organization members with Admin permission understand the connector. The description is not displayed to end users.
-
Next: Click to temporarily store the configuration for this step and continue to the next step.
-
Save Changes: Click to save the configuration for this step and navigate to Step 4: Summary and confirmation.
-
Delete: After opening an existing connector to edit, click to permanently delete the connector from the organization and close the configuration. For more information, see Delete or unpublish a connector later on this page.
-
Discard Changes: After making changes, click to close the configuration without saving changes made to any step. A message asks you to confirm that you want to discard changes.
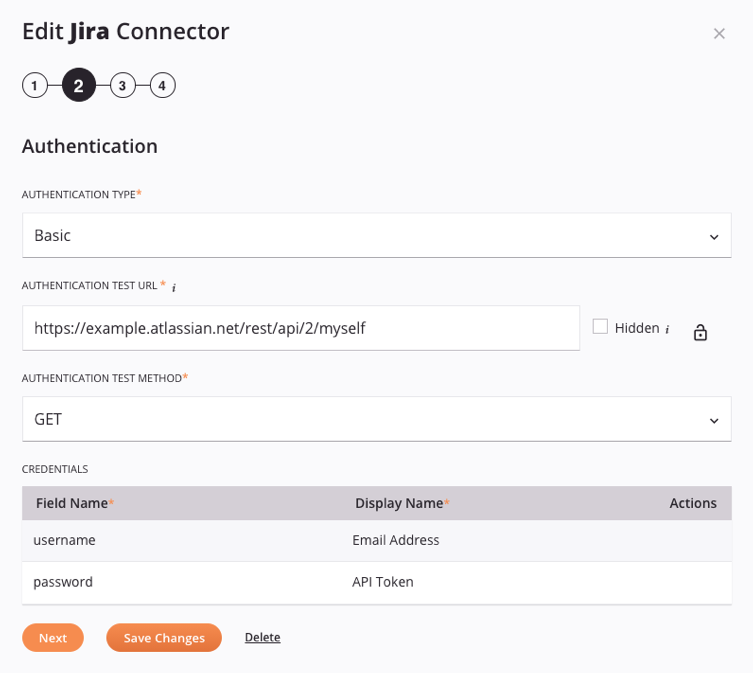
Step 2: Authentication
-
Authentication Type: Use the dropdown to select either Anonymous or Basic authentication. Other authentication types are not currently supported.
- Anonymous: Select this type if no HTTP authentication is required. This is also known as authenticating anonymously, with no username or password.
- Basic: Select this type to use basic HTTP authentication without SSL encryption. Note that if this option is used, the provided password is sent in clear text.
-
Authentication Test URL: When Basic is selected, enter a URL that you want to be tested against with an end user's credentials when they are configuring this connector. This is for purposes of validation to ensure that a connection can be made using the configured type of authentication with the end user's credentials. This field is not present when Anonymous is selected.
- Hidden: If you do not want end users to see the Authentication Test URL field when configuring this connector, select this checkbox.
- Padlock: Applicable only when a field is not hidden, the padlock icon is an indication of whether the field will be read-only or editable by end users. This is provided for informational purposes only; when creating a connector, you are not able to toggle this.
- Locked: A closed padlock icon
 indicates the field is read-only for end users.
 - Unlocked: An open padlock icon
 indicates the field is available for end users to edit. This is the default behavior for fields that are not hidden and cannot be changed.
- Locked: A closed padlock icon
-
Authentication Test Method: When Basic is selected, use the dropdown to select the method type to use with the Authentication Test URL entered above, selecting from
GET,PUT, orPOST. This field is not present when Anonymous is selected.Tip
To choose a URL and method for testing authentication, we recommend using a simple
GETrequest. Check the API documentation for your endpoint to construct a URL for your endpoint to test against. -
Credentials: When Basic is selected, this table shows information about the fields that the end user will use to provide their credentials:
- Field Name: The name of the field in Connector Builder. This will not be seen by end users and cannot be edited.
- Display Name: This name will be seen by the end user configuring the connection. By default, this is the same as the Field Name. You can rename this field using the actions available in the last column. For example, you may wish to rename "Username" to "Email Address" or rename "Password" to "API Token," depending on the specific requirements of the endpoint.
- Actions: Hover over the column cell and click the edit icon
 to make changes to the row. When finished, click the Save button that appears within this cell.
-
Next: Click to temporarily store the configuration for this step and continue to the next step.
-
Save Changes: Click to save the configuration for this step and navigate to Step 4: Summary and confirmation.
-
Delete: Available only after opening an existing connector to edit, click to permanently delete the connector from the organization and close the configuration. For more information, see Delete or unpublish a connector later on this page.
-
Discard Changes: After making changes, click to close the configuration without saving changes made to any step. A message asks you to confirm that you want to discard changes.
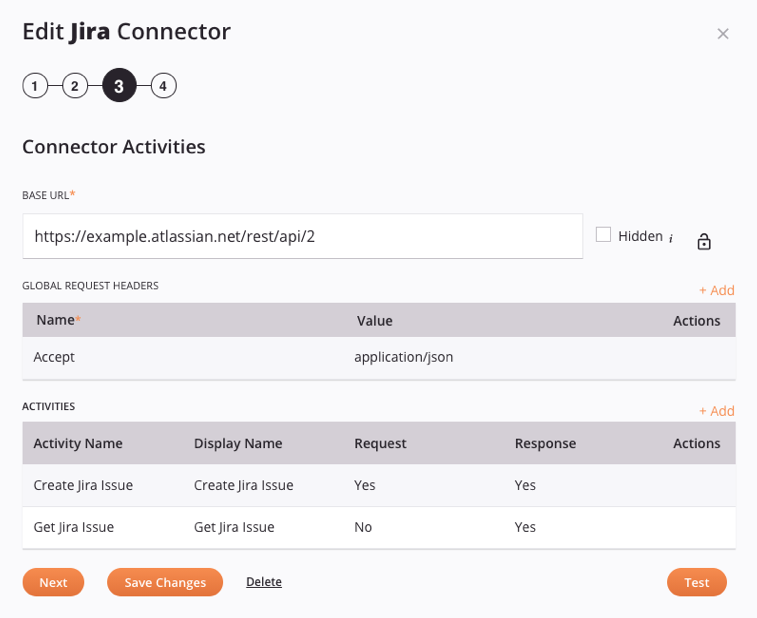
Step 3: Connector activities
-
Base URL: Enter a base URL that you want to be used for all activities configured by the end user. Do not include any query parameters or paths unless they will be used for all activities. (An end user will be able to specify unique paths and parameters during activity configuration.)
Tip
If a version is included in the endpoint's URL, you may want to include it as part of the base URL. If the version requires updating, you can change it here so that all activities inherit the new version path. (Note that you should validate paths will be valid with a new version.)
- Hidden: If you do not want end users to see the Base URL field when configuring this connector, select this checkbox.
- Padlock: Applicable only when a field is not hidden, the padlock icon is an indication of whether the field will be read-only or editable by end users. This is provided for informational purposes only; when creating a connector, you are not able to toggle this.
- Locked: A closed padlock icon indicates the field is read-only for end users.
- Unlocked: An open padlock icon indicates the field is available for end users to edit. This is the default behavior for fields that are not hidden and cannot be changed.
- Locked: A closed padlock icon
-
Global Request Headers: To add request headers that apply across all activities, use the Add link
 to insert a new blank row in the table below the link, then fill out the fields:
-
Name and Value: Enter a header name and corresponding value to use across all activities.
-
Actions: Click the Save button to save the row. To delete or edit a header row that has been saved, hover over the column cell and click the edit icon
or delete icon , respectively, to make changes or remove the header row.
-
-
Activities: To add activities that will become available for an end user to configure, use the Add link
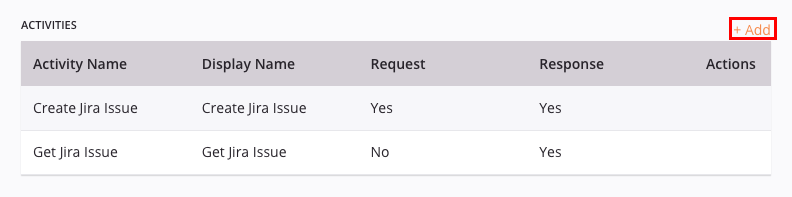
to create a new activity in the table below the link. For information on creating a new activity, see Create connector activities later on this page.These columns are displayed in the table of activities:
-
Activity Name and Display Name: These fields show the values entered during creation of the activity.
-
Request and Response: These fields indicate if a request or response schema was entered during creation of the activity.
-
Actions: To delete or edit an activity row that has been saved, hover over the column cell and click the edit icon
or delete icon , respectively, to make changes or remove the activity row.
-
-
Next: Click to temporarily store the configuration for this step and continue to the next step.
-
Save Changes: Click to save the configuration for this step and continue to the next step.
-
Delete: Available only after opening an existing connector to edit, click to permanently delete the connector from the organization and close the configuration. For more information, see Delete or unpublish a connector later on this page.
-
Discard Changes: After making changes, click to close the configuration without saving changes made to any step. A message asks you to confirm that you want to discard changes.
-
Test: Click to open a separate screen where you can test the connector. For more information, see Test a connector later on this page.
Step 4: Summary and confirmation

-
Basic Settings: Along the top is a summary of the information entered in Step 1: Basic settings, including the image, connector name, display name, version, and description.
To make changes, click the edit icon
to go back to Step 1: Basic settings. -
Authentication: The next section is a summary of the information entered in Step 2: Authentication, including authentication type. If basic authentication is used, the authentication test URL and method used for testing will also be displayed, with indication if this field is hidden.
To make changes, click the edit icon
to go back to Step 2: Authentication. -
Connector Activities: The last section is a summary of the information entered in Step 3: Connector activities, including the base URL, global request headers, and activities.
To make changes, click the edit icon
to go back to Step 3: Connector activities. -
Save: Click to save and close the connector. The connector will be saved in Cloud Studio but is not yet published or available for end users to use. When you save a connector, it is accessible from the Connector Builder page by the person who created it and by other members of the organization who have Admin permission.
-
Publish: Click to save and publish the connector. When you publish, the connector is automatically registered with Harmony and published to the agent. It is then available to be used by end users in the organization (see Connector Builder user configuration).
If you edit and then republish a connector that has already been published, a message asks you to confirm you want to overwrite the previously published version:
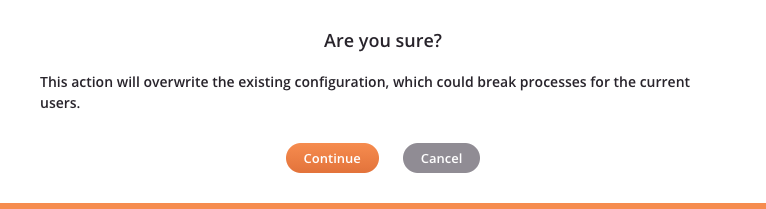
Caution
If the connector is already in use, depending on the changes, this may cause some operations to become invalid. We recommend checking each place where the connector is used to validate it is working properly after re-publishing.
To determine the projects where each connector is used, you can attempt to delete the connector. Projects where the connector is "in use" are listed in the error message indicating the connector cannot be deleted because it is in use (see Delete or unpublish a connector later on this page).
Once you know which projects use the connector, you can attempt to delete the connection within those projects. Components that are dependent on the connection are listed in the error message indicating the connection cannot be deleted because it has dependencies (see the Delete option under Configure a connection in Connector Builder user configuration).
-
Unpublish: Available only for connectors that have been published, click to hide the connector from end users. For more information, see Delete or unpublish a connector later on this page.
-
Delete: Available only after opening an existing connector to edit, click to permanently delete the connector from the organization and close the configuration. For more information, see Delete or unpublish a connector later on this page.
-
Export: Generates and downloads the connector as a JSON file with the connector metadata (see Connector Builder exports and imports).
Test a connector
Testing a connector allows you to test the connection prior to publishing.
The option to test a connector is available as button at the bottom of Step 3: Connector activities during connector creation:

On clicking the Test button, a separate screen opens where you can test the connector:
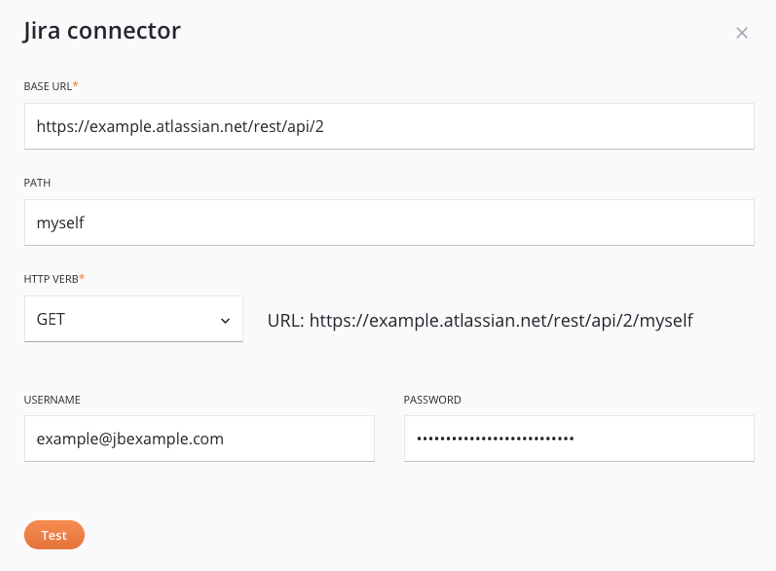
-
Base URL: Enter the base URL to be used for testing the connector.
-
Path: If applicable, enter a path to be appended to the base URL to be used for testing the connector.
-
HTTP Verb: Use the dropdown to select the appropriate method to test the connector with the URL listed to the right. The URL is constructed from the provided base URL and path. You can select from
GET,PUT,POST,DELETE, orPATCH. -
Username and Password: These are the Field Name credentials configured in Step 2: Authentication. The Display Name fields are not displayed.
-
Request Body: This area is present only if the selected HTTP Verb is
PUT,POST, orPATCH. Manually enter or paste the request body into this area. You can use the popout icon to edit the request body in a larger area (after opening that area, click the return icon to return to this screen). Loading a file from a schema from a URL or file is not supported.
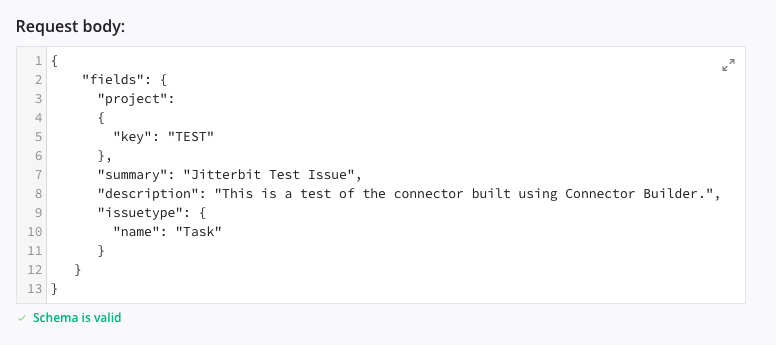
-
Test: On clicking Test, a message appears next to the button indicating whether the connection succeeded or failed. If the connection failed, a link to more details is present.
Create connector activities
Connector activities must be added so that end users can configure them to interact with an endpoint.
The area for adding connector activities is under Activities in Step 3: Connector activities of connector creation.
To add activities that will become available for an end user to configure, use the Add link ![]() to insert a new activity:
to insert a new activity:
On clicking this link, a new screen opens for you to enter information about the activity:

-
Activity Name: Enter a name for the activity. This will be seen only by those with access to connector creation and will not be seen by end users.
-
Display Name: Enter a name for the activity to be seen by end users who will be using the connector.
-
Description: Enter a description of this activity. This will be seen only by those with access to connector creation and will not be seen by end users.
Tip
It can be a good idea to use the same name and description that is used in the endpoint's API documentation to help others with access to connector creation in understanding exactly what the activity is for.
-
Method: Use the dropdown to select the appropriate method, selecting from
GET,PUT,POST,DELETE,PATCH, orMERGE. Custom methods are not supported for connector creation using Connector Builder, but can be configured using a generic HTTP endpoint instead. -
Path: Enter a path that should be appended to the Base URL supplied in Step 3: Connector activities. Path parameters that you want the end user to configure can be specified within curly brackets. For example,
/users/{firstname}/{lastname}defines two path parameters,firstNameandlastName. Path parameters entered in this fashion will automatically appear as rows in the Path Parameters field below. -
Path Parameters: This field displays a summary table of path parameters entered in the Path as described above, with these columns:
- Name: The name of the path parameter entered above is displayed. To edit the path name, edit the Path field above.
- Display Name: This name will be seen by the end user configuring the activity. By default, this field is the same as the Name field. You can rename this field using the actions available in the last column.
- Type: By default, the type is
string. You can make this field editable using the actions available in the last column. These data types are available in the dropdown:boolean,date,double,float,integer,long,string. - Actions: To delete or edit a parameter row, hover over the column cell and click the edit icon or delete icon , respectively, to make changes or remove the parameter row. If the row is currently editable, click the Save button to save the row.
-
Query String Parameters: To add query string parameters for the activity, use the Add link
to insert a new blank row in the table below, then fill out the fields:- Name: Enter the name of the query string parameter to use.
- Display Name: Enter the name you want to display in the connector for the query string parameter. This name will be seen by the end user configuring the activity.
- Type: Use the dropdown to select from these data types:
boolean,date,double,float,integer,long,string. - Required: Select the checkbox to make the query string parameter required to be entered by the end user configuring the activity.
- Default: If applicable, enter a default value for the query string parameter that will be provided for the end user configuring the activity.
- Actions: Click the Save button to save the row. To delete or edit a query string parameter row that has been saved, hover over the column cell and click the edit icon or delete icon , respectively, to make changes or remove the query string parameter row.
-
Request Headers: To add request headers for the activity, use the Add link
to insert a new blank row in the table below, then fill out the fields:- Name: Enter the name of the request header to use.
- Display Name: Enter the name you want to display in the connector for the request header. This name will be seen by the end user configuring the activity.
- Type: Use the dropdown to select from these data types:
boolean,date,double,float,integer,long,string. - Required: Select the checkbox to make the request header required to be entered by the end user configuring the activity.
- Default: If applicable, enter a default value for the request header that will be provided for the end user configuring the activity.
- Actions: Click the Save button to save the row. To delete or edit a request header row that has been saved, hover over the column cell and click the edit icon or delete icon , respectively, to make changes or remove the request header row.
-
Request Body Schema and Response Body Schema: These areas are used to provide request and response structures. When the selected Method is GET, providing a Request Body Schema is required and it is not possible to provide a response schema. When the selected Method is any other method, providing either schema is optional.
Whether you should provide these structures depends on the specific API call. Sample request and response structures can often be obtained from an endpoint's API documentation. To verify their accuracy, those structures should be validated using a third-party tool such as Postman or SoapUI.
If an API responds with more than one possible JSON response structure, it is recommended to combine the response structures into one structure to handle all possible responses, as all fields in a JSON structure are optional.
The uploaded schema(s) are used solely for the purpose of defining the Connector Builder activity request or response schemas. Unlike in a Cloud Studio project, the schemas are not saved and are not available for reuse elsewhere within Connector Builder or Cloud Studio.
After editing the schemas in an existing Connector Builder connector that is already in use in the Cloud Studio project, the connector user must use the Refresh button on the Data Schema step in order to bring in the current defined schema (see Connector Builder user configuration).
Caution
Inaccurate request or response structures will lead to errors in Harmony. Testing with a third-party tool is strongly recommended to verify accuracy.
-
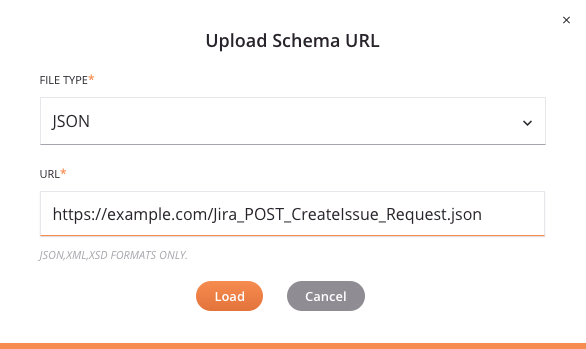
Load URL: Click to open a dialog where you can load a schema from a URL:
-
File Type: Use the dropdown to select from the supported file types, including JSON, XML, and XSD.
-
URL: Enter a URL that is accessible without authentication. Files up to 5 MB in size can be uploaded.
-
Load: Click to load the schema from the URL. Note that the file is retrieved only a single time for schema generation.
Note
When uploading an XSD file that contains multiple top-level elements, you are prompted to select the desired root node. Select the element and then click Finish to upload the file.
-
Cancel: Click Cancel to close the Upload Schema URL dialog without saving.
-
-
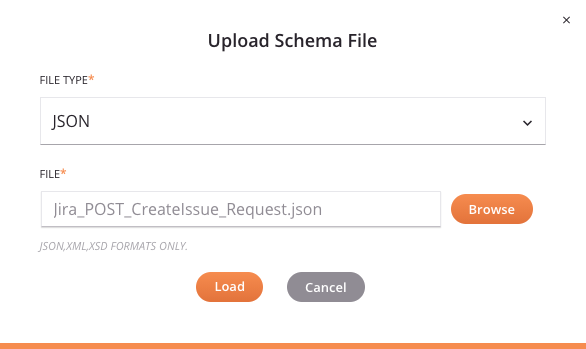
Upload File: Click to open a dialog where you can load a schema from a file that is accessible from the current machine:
-
File Type: Use the dropdown to select from the supported file types, including JSON, XML, and XSD.
-
File: Use the Browse button to the right to browse to a file that has not yet been used in the current project. Files up to 5 MB in size can be uploaded.
-
Load: Click to load the schema from the file.
Note
When uploading an XSD file that contains multiple top-level elements, you are prompted to select the desired root node. Select the element and then click Finish to upload the file.
-
Cancel: Click to close the Upload Schema File dialog without saving.
-
-
View/Edit Schema: If you are not uploading a schema, you can enter one manually into the text area below the Load URL and Upload File buttons. Otherwise, after uploading a schema, you can view or edit the schema directly within this text area.
To view or edit the schema in a larger area, click the popout icon
(after opening that area, click the return icon to come back to this screen).This text area can also be copied using
Control+C(Windows or Linux) orCommand+C(macOS).
-
-
Apply: Click to apply the activity to the connector configuration and return to the main screen of Step 3: Connector activities with the activity added as a row in the table. To save the activity, click the Save Changes button in Step 3: Connector activities.
-
Apply & New: Click to apply the activity to the connector configuration and open another screen where information for another new activity can be added. To save the activity, click the Save Changes button in Step 3: Connector activities.
-
Cancel: Click to close the activity screen without saving and return to the main screen of Step 3: Connector activities.
Delete or unpublish a connector
Before deleting or unpublishing a connector, any components created from that connector in projects must first be deleted as described in Delete connector dependencies below. After this is done, refer to Delete a connector or Unpublish a connector below.
Delete connector dependencies
Prior to deleting or unpublishing a connector, any components using the connector must first be deleted and formerly dependent components must be redeployed to the Harmony cloud:
- Delete any activities created from connections created using the connector. To delete an activity, first remove it from any operations where it is used. Then delete the activity from the project pane using its actions menu. For both of these options, see Activity actions menu in Connector basics.
- Delete any connections created from the connector. See the Delete option under Configure a connection in Connector Builder user configuration.
- Redeploy any operations that were previously dependent on the now-deleted activities. Alternatively, you can redeploy all operations used by a project's workflows. See Project deployment.
This will remove all references to the connector in both the projects and the Harmony cloud deployments.
Delete a connector
Deleting a connector permanently deletes the connector from the organization.
The option to delete a connector is available as a link at the bottom of each configuration step:

On clicking Delete, a message asks you to confirm you want to delete the connector:

On clicking Continue, the connector is permanently deleted and the configuration is closed.
If components that are dependent on the connector still exist in the Harmony cloud, an error message provides the names of any projects where the connector is still "in use":
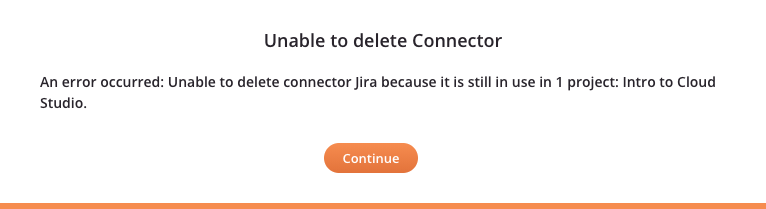
In this case, follow the steps outlined in Delete connector dependencies above to first delete any components that are dependent on the connector and then to redeploy any remaining previously dependent components to the Harmony cloud, such as operations that formerly referenced the activities.
Unpublish a connector
Unpublishing a connector hides the connector from end users. When a connector is unpublished, it is still accessible on the Connector Builder page for the person who created it and organization members with Admin permission, but is no longer visible to end users. Unpublished connectors are able to be re-published using the Publish button.
The option to unpublish a connector is available as a link at the bottom of Step 4: Summary and configuration only for connectors that have been published:

On clicking Unpublish, the connector is immediately unpublished.
If components that are dependent on the connector still exist in the Harmony cloud, an error message provides the names of any projects where the connector is still "in use":
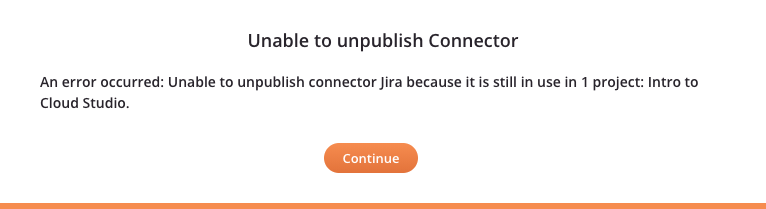
In this case, follow the steps outlined in Delete connector dependencies above to first delete any components that are dependent on the connector and then to redeploy any remaining previously dependent components to the Harmony cloud, such as operations that formerly referenced the activities.
Next steps
After you publish a connector, members of the Harmony organization where it is published will have access to configure and use the connector in Cloud Studio projects. Learn more in Connector Builder user configuration.