Connector Builder user configuration
Introduction
After a custom connector is published, members of the Harmony organization where it is published have access to configure and use the connector in Cloud Studio projects. This page describes where an end user can find custom connectors and how to use them.
Access a custom connector
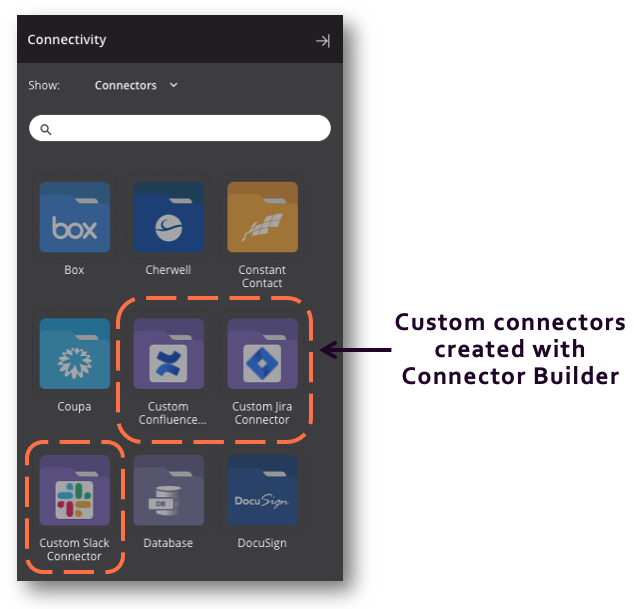
In a Cloud Studio project, custom connectors are accessed from the design component palette. They appear the same as any other connector, except that they have a purple folder background and the connector image provided during connector creation:
Note
End users must be using an agent that is version 10.0 or higher to use connectors created with Connector Builder.
Configure a connection
A connector provides the interface for entering user-provided input such as credentials to create an authenticated connection.
A new custom connection is created using the custom connector from one of these locations:
- The design component palette's Project endpoints and connectors tab (see Design component palette).
- The Global Connections page (see Create a global connection in Global connections).
An existing custom connection can be edited from these locations:
- The design component palette's Project endpoints and connectors tab (see Design component palette).
- The project pane's Components tab (see Component actions menu in Project pane Components tab).
- The Global Connections page (see Edit a global connection in Global connections).
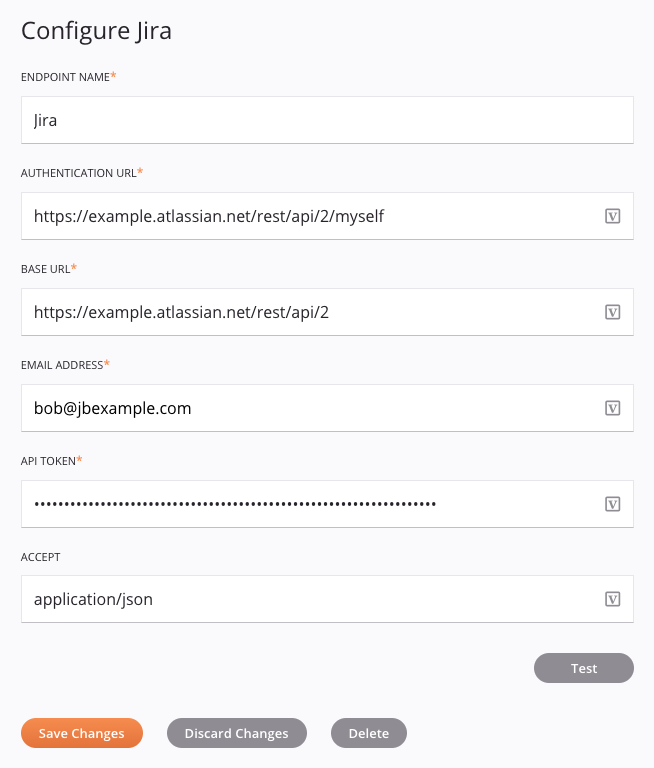
The fields provided for configuration are different for each custom connector and depend on how the creator of the connector configured the connector. Common elements of connection configuration are covered below.
Tip
Fields with a variable icon ![]() support using global variables, project variables, and Jitterbit variables. Begin either by typing an open square bracket
support using global variables, project variables, and Jitterbit variables. Begin either by typing an open square bracket [ into the field or by clicking the variable icon to display a list of the existing variables to choose from.
-
Endpoint Name: Enter a name to use to identify the custom connection. The name must be unique for each custom connection and must not contain forward slashes (
/) or colons (:). As a specific connection and its activities are referred to as an endpoint, this name is also used to identify the custom endpoint. -
Authentication URL: This field is present if the custom connector was configured to use basic authentication and this field was not hidden by the connector creator. If present, you can edit the URL to be tested against with the credentials entered below.
Caution
If editing the authentication URL, note that the authentication test method is not visible. Check with the connector creator to make sure the new test URL matches the method configured by the connector creator.
-
Base URL: This field is present if it was not hidden by the connector creator. If present, you can edit the base URL that is used for all activities configured by the end user. Do not include any query parameters or paths unless they are to be used for all activities (You can specify unique paths and parameters during activity configuration.).
-
Credentials: Fields to enter credentials are present if the custom connector was configured to use basic authentication. These include username and password fields, whose field labels correspond with those configured as Display Names during connector creation.
-
Request Headers: If the custom connector was created with global request headers, additional fields as defined during connector creation are present. Enter a value or edit the default value (if provided) for the header.
-
Test: This field is present if the custom connector was configured to use basic authentication. Click this button to test the connection against the configured authentication URL using the provided credentials.
-
Save Changes: Click to save and close the connection configuration.
-
Discard Changes: After making changes to a new or existing configuration, click to close the configuration without saving. A message asks you to confirm that you want to discard changes.
-
Delete: After opening an existing connection configuration, click to permanently delete the connection from the project and close the configuration (see Component dependencies, deletion, and removal).
Configure activities
After configuring a custom connection, you can configure one or more activities associated with that connection to use as a source or target within an operation. The activities that are available are defined during connector creation.
Whether the activity can be used as a source or a target depends on the specific web service and the request and response structures, if present. For more information about what determines if an activity can be used as a source or target, see Parts of an operation in Operation creation and configuration.
Use the Show dropdown to filter on Endpoints, and then click the custom connection block to display activities that are available to be used with a custom connection:
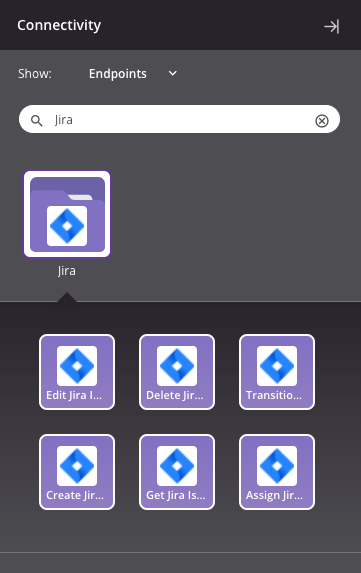
To create an activity that can be configured, drag the activity block from the palette to the operation.
For more information about the parts of an operation and adding activities to operations, see Operation creation and configuration.
The activity configuration screen provides a series of steps for a user to configure, which are different for each custom connector and depend on how the creator of the connector configured the connector.
The first step typically requires the user to enter basic information such as a name and configure fields as defined during connector creation:

Tip
Fields with a variable icon ![]() support using global variables, project variables, and Jitterbit variables. Begin either by typing an open square bracket
support using global variables, project variables, and Jitterbit variables. Begin either by typing an open square bracket [ into the field or by clicking the variable icon to display a list of the existing variables to choose from.
- Name: Enter a name to use to identify the custom connector activity. The name must be unique for each type of activity associated with the connection and must not contain forward slashes (
/) or colons (:). - Path Parameters, Query String Parameters, and Request Headers: If the custom connector was created with path parameters, query string parameters, or request headers for the activity, additional fields as defined during connector creation are present. Enter a value, edit the default value (if provided), or make appropriate selections as required for the specific connector.
- Save & Exit: If enabled, click to save the configuration for this step and close the activity configuration.
- Next: Click to temporarily store the configuration for this step and continue to the next step. The configuration is not saved until you click the Finished button on the last step.
- Discard Changes: After making changes, click to close the configuration without saving changes made to any step. A message asks you to confirm that you want to discard changes.
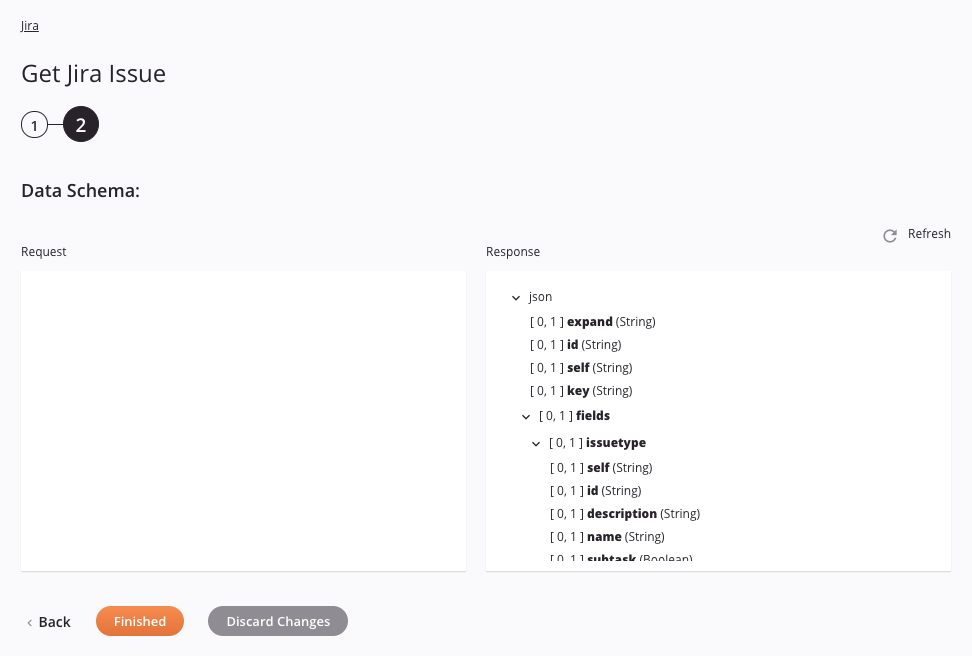
The second step displays any request or response data schemas that were provided during connector creation for the specific activity:
-
Data Schema: The request and/or response data schemas are displayed. If the operation uses a transformation, the data schemas are displayed again later during the transformation mapping process, where you can map to target fields using source objects, scripts, variables, custom values, and more.
-
Refresh: Click the refresh icon
 or the word Refresh to regenerate schemas from the Connector Builder connector design. This action also regenerates the schema in other locations throughout the project where the same schema is referenced, such as in an adjacent transformation.
 -
Back: Click to temporarily store the configuration for this step and return to the previous step.
-
Finished: Click to save the configuration for all steps and close the activity configuration.
-
Discard Changes: After making changes, click to close the configuration without saving changes made to any step. A message asks you to confirm that you want to discard changes.
Next steps
After configuring a custom Connector Builder activity, you can use it within an operation as described below. You may also want to configure chunking to split the data into smaller chunks for processing.
Complete the operation
After configuring a custom Connector Builder activity, complete the configuration of the operation by adding and configuring other activities, transformations, or scripts as operation steps. You can also configure an operation's operation settings, which include the ability to chain operations together that are in the same or different workflows.
Once a custom Connector Builder activity has been created, menu actions for that activity are accessible from the project pane in either the Workflows or the Components tabs, and from the design canvas. See Activity actions menu for details.
The operation patterns that Custom Connector Builder activities can be used with depend on whether the activity provides data (as a source) or receives data (as a target) in an operation, as described below in Used as a source and Used as a target.
When ready, deploy and run the operation and validate behavior by checking theoperation logs.
Used as a source
Custom Connector Builder activities that are used as a source can be used with these operation patterns:
- Transformation pattern
- Two-target archive pattern (as the first source only)
- Two-transformation pattern (as the first source only)
Other patterns are not valid using Connector Builder activities that are used as a source.
A typical use case is to use a Custom Connector Builder activity in the Transformation pattern. In this example, the custom Get Jira Issue activity (Get Jira Issue Request) provides data within the operation, which is then passed to the transformation (Jira to Variable). The Variable Write activity (Write Response) is used as a target, receiving data within the operation:

Used as a target
Custom Connector Builder activities that are used as a target can be used with these operation patterns:
- Transformation pattern
- Two-transformation pattern (as the second target only)
Other patterns are not valid using Connector Builder activities that are used as a target.
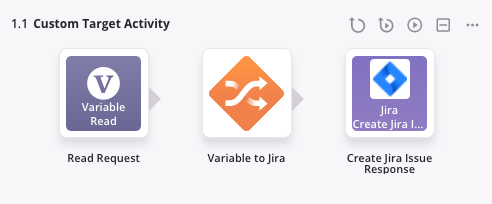
A typical use case is to use a Custom Connector Builder activity in the Transformation pattern. In this example, the Variable Read activity (Read Request) provides data within the operation, which is then passed to the transformation (Variable to Jira). The custom Create Jira Issue activity (Create Jira Issue Response) is used as a target, receiving data within the operation:
Use chunking
Many web service APIs have size limitations. If you are running into record limits imposed by the API, you may want to use chunking to split the source data into multiple chunks. The transformation is then performed on each chunk separately, with each source chunk producing one target chunk. The resulting target chunks combine to produce the final target.
For instructions and best practices on using chunking, see Operation options.