API SOAP Response activity
Introduction
An API SOAP Response activity, using its preconfigured API connection, returns data to an API Manager custom API and is intended to be used as a target to consume data in an operation.
The API SOAP Response activity can be configured using a WSDL schema only. To interact with an API connection using a JSON, XML, CSV, or XSD schema, use a non-SOAP API Response activity instead. To interact with a SOAP connection without using a Custom API, use the SOAP connector.
For information on the relationship between API connector activities and API Manager APIs, see these resources:
Create an API SOAP Response activity
An instance of an API SOAP Response activity is created from the preconfigured API connection using its SOAP Response activity type.
To create an instance of an activity, drag the activity type to the design canvas or copy the activity type and paste it on the design canvas. For details, see Creating an activity instance in Component reuse.
An existing API SOAP Response activity can be edited from these locations:
- The design canvas (see Component actions menu in Design canvas).
- The project pane's Components tab (see Component actions menu in Project pane Components tab).
Configure an API SOAP Response activity
Follow these steps to configure an API SOAP Response activity:
- Step 1: Enter a name and specify settings
Provide a name for the activity and select the method to be used for uploading the WSDL schema. - Step 2: Review the data schemas
Any request or response schemas generated from the endpoint are displayed.
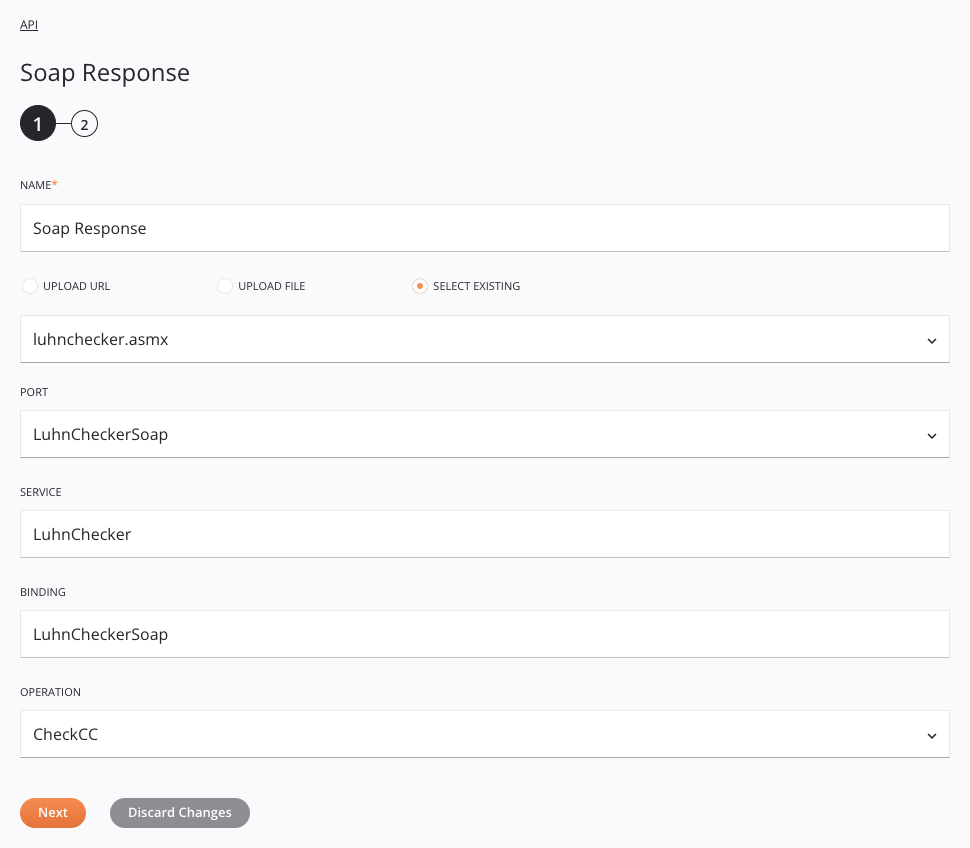
Step 1: Enter a name and specify settings
In this step, provide a name for the activity and select the method to be used for uploading the WSDL schema. Each user interface element of this step is described below.
-
Name: Enter a name to identify the activity. The name must be unique for each API SOAP Response activity and must not contain forward slashes
/or colons:. -
Upload URL, Upload File, or Select Existing: Use the radio button to select the source of the WSDL (Web Services Description Language) file to upload or reuse. Files up to 5 MB in size can be uploaded.
-
Upload URL: Enter the URL of the WSDL file into the text box, then click the Upload button. The URL must be accessible without authentication or you will receive an error. If uploading a WSDL with the same name as an existing WSDL, see Replacing an uploaded WSDL later on this page.
-
Upload File: Use the Browse button to the right to locally browse to a WSDL or ZIP file. If providing a ZIP file, it must contain a single WSDL file, though it can also contain any XSD files that the WSDL is dependent on. Then click the Upload button. If uploading a WSDL with the same name as an existing WSDL, see Replacing an uploaded WSDL later on this page.
Note
Any
schemaLocationmust be resolved to a local file using a relative reference. This usually means that instead of supplying a tuple such as:xsi:schemaLocation='http://schemas.xmlsoap.org/wsdl/mime/ http://ws-i.org/profiles/basic/1.1/wsdlmime-2004-08-24.xsd'you would supply:
xsi:schemaLocation='http://schemas.xmlsoap.org/wsdl/mime/ wsdlmime-2004-08-24.xsd'In the above example, the XSD file
wsdlmime-2004-08-24.xsdis located either in the same directory or on a path relative to the WSDL being loaded.
-
-
Select Existing: Use the dropdown to select from an existing WSDL file that has previously been used in the current project.
-
Port: Use the dropdown to select the appropriate port.
-
Service and Binding: By default, these fields autopopulate based on the WSDL and port provided and cannot be edited.
-
Operation: Use the dropdown to select the method from the provided WSDL that you want to execute with this activity.
-
Save & Exit: If enabled, click to save the configuration for this step and close the activity configuration.
-
Next: Click to temporarily store the configuration for this step and continue to the next step. The configuration will not be saved until you click the Finished button on the last step.
-
Discard Changes: After making changes, click to close the configuration without saving changes made to any step. A message asks you to confirm that you want to discard changes.
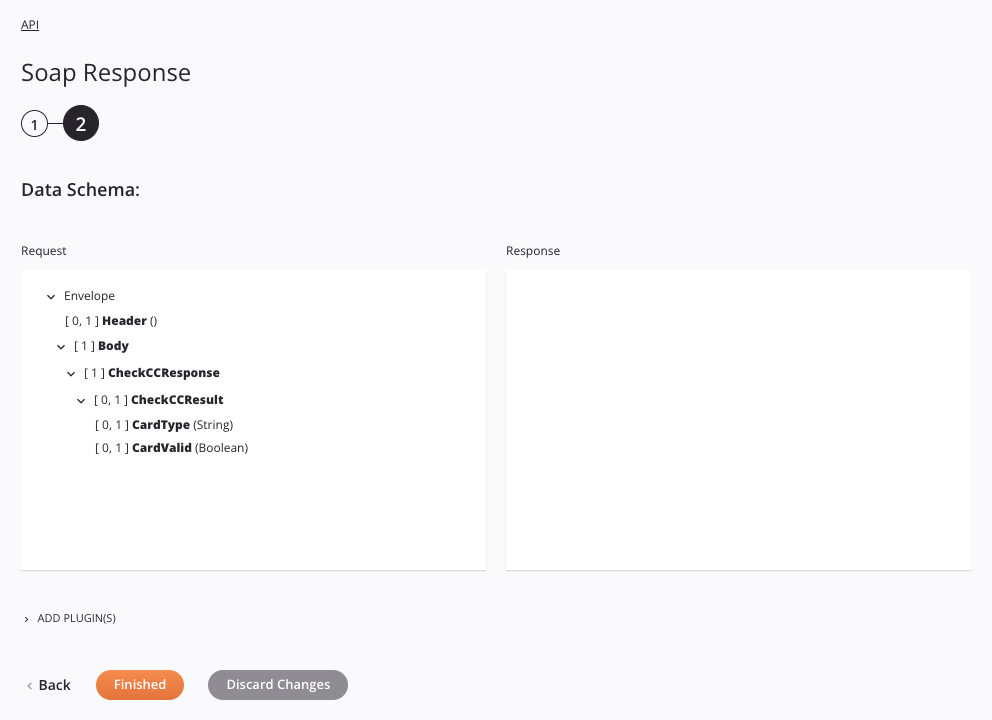
Step 2: Review the data schemas
Any request or response schemas generated from the endpoint are displayed:
-
Data Schemas: The request and response schemas for this activity are displayed. These data schemas are inherited by adjacent transformations are displayed again during transformation mapping.
Note
Data supplied in a transformation takes precedence over the activity configuration.
-
Back: Click to temporarily store the configuration for this step and return to the previous step.
-
Finished: Click to save the configuration for all steps and close the activity configuration.
-
Discard Changes: After making changes, click to close the configuration without saving changes made to any step. A message asks you to confirm that you want to discard changes.
Replacing an uploaded WSDL
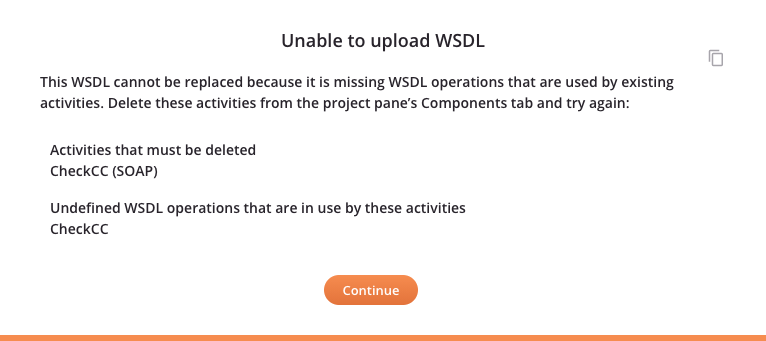
If replacing a WSDL by re-uploading one with the same name using Upload URL or Upload File, its WSDL operations must be named the same as any that are currently in use by existing activities. If they are not named the same or if in-use WSDL operations are missing from the replacement WSDL, an error message instructs you to delete those activities first:
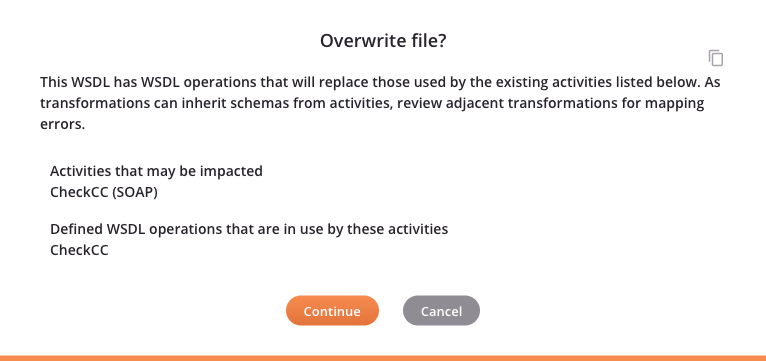
If the WSDL replacement criteria described above are met, a confirmation message lists activities that may be impacted by the replacement of the WSDL and suggests to review adjacent transformations for potential mapping errors. Clicking Continue replaces the WSDL in all locations where it is used throughout the project:
Next steps
After configuring an API SOAP Response activity, you can use it within an operation as described below. Once the operation is set up, select it in the configuration of an API Manager Custom API to expose the operation or operation chain as a consumable REST endpoint.
Complete the operation
Complete the configuration of the operation by adding and configuring other activities, transformations, or scripts as operation steps. You can also configure an operation's operation settings, which include the ability to chain operations together that are in the same or different workflows.
Menu actions for an activity are accessible from the project pane and the design canvas. For details, see Activity actions menu in Connector basics.
API SOAP Response activities can be used as a target with these operation patterns:
- Archive pattern
- Script pattern
- Transformation pattern
- Two-target archive pattern (as the second target only)
- Two-target HTTP archive pattern (as the second target only)
- Two-transformation pattern (as the second target only)
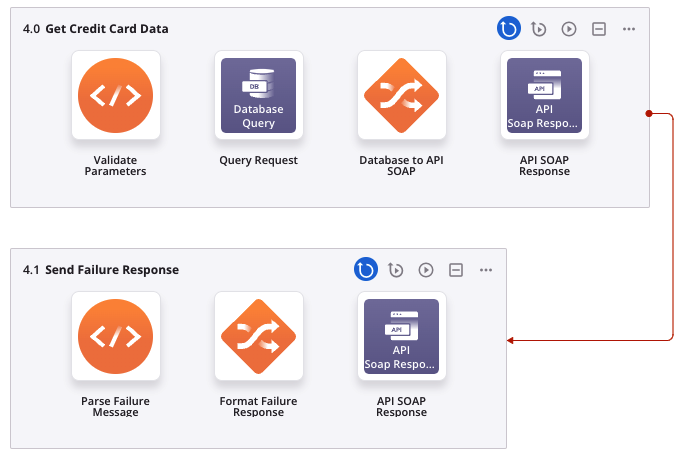
A typical use case is to use an API SOAP Response activity multiple times within an operation chain to handle different error responses. Both operations in this example use the Transformation Pattern.
In this example, in the operation Get Credit Card Data, the Validate Parameters script is used to provide input for a Database Query activity (Query Request), which generates a response structure that is received by the transformation (Database to API SOAP) and returned to the API by an API SOAP Response activity (API SOAP Response).
On failure of the operation Get Credit Card Data, the operation Send Failure Response runs. The script Parse Failure Message is used to override the HTTP error code response for an API Manager Custom API using the Jitterbit variable Jitterbit.API.response.status_code and provide the input for the transformation (Format Failure Response), which is then returned to the Custom API by an API SOAP Response activity (API SOAP Response):
To use the activity with scripting functions, write the data to a temporary location and then use that temporary location in the scripting function.
When ready, deploy and run the operation and validate behavior by checking the operation logs.
Important
By default, successful operations configured for a Custom API are not included in the operation logs unless one of these settings is enabled:
- Cloud agents: For API operations on a cloud agent, operation debug logging must be enabled on the operation.
- Private agents: For API operations on a private agent, either operation debug logging must be enabled on the operation or you must set
EnableLogging=truein the[APIoperation]section of the private agent configuration file.
Additional examples
Other examples using API activities as targets in an operation include Capturing data changes with a Harmony API or HTTP endpoint and Configure outbound messages with Harmony API. (These patterns use Design Studio as an example, but the same concepts can be applied in Cloud Studio.)
Configuring an API Manager custom API
After the operation setup is complete, configure a custom API using API Manager.
Note
After you have configured a Custom API to call a Cloud Studio operation, you cannot delete the operation without either deleting the API or changing the API's configuration to no longer call the operation.