Database query activity
Introduction
A Database Query queries data from a Database endpoint and is intended to be used as a source to provide data to an operation or to be called in a script. After configuring a Database connection, you can configure as many Database activities as you like for each Database connection.
Create a database activity
An instance of an activity is created from a connection using an activity type.
To create an instance of an activity, drag the activity type to the design canvas or copy the activity type and paste it on the design canvas. For details, see Creating an activity instance in Component reuse.
An existing activity can be edited from these locations:
- The design canvas (see Component actions menu in Design canvas).
- The project pane's Components tab (see Component actions menu in Project pane Components tab).
Configure a database query activity
The steps for configuring a Database Query activity differ depending on the use case and whether you already know the SQL statement:
- Single-object query using wizard: Follow these steps to query only a single object without joins when the SQL statement is unknown.
- Multiple-object query using wizard: Follow these steps to query multiple objects with joins when the SQL statement is unknown.
- Manual query: Follow these steps to query either single or multiple objects by manually providing a SQL statement. This option is available only with Database connections using a JDBC driver, and is not available for those configured using ODBC.
Single-object query using wizard
Follow these steps to use the wizard if you are querying a single object, and do not need to create any joins with other objects. If you need to join multiple objects, refer instead to Multiple-object query using wizard, or if you already know the SQL statement and are using a JDBC driver see Manual query.
Step 1: Enter a name and select an object
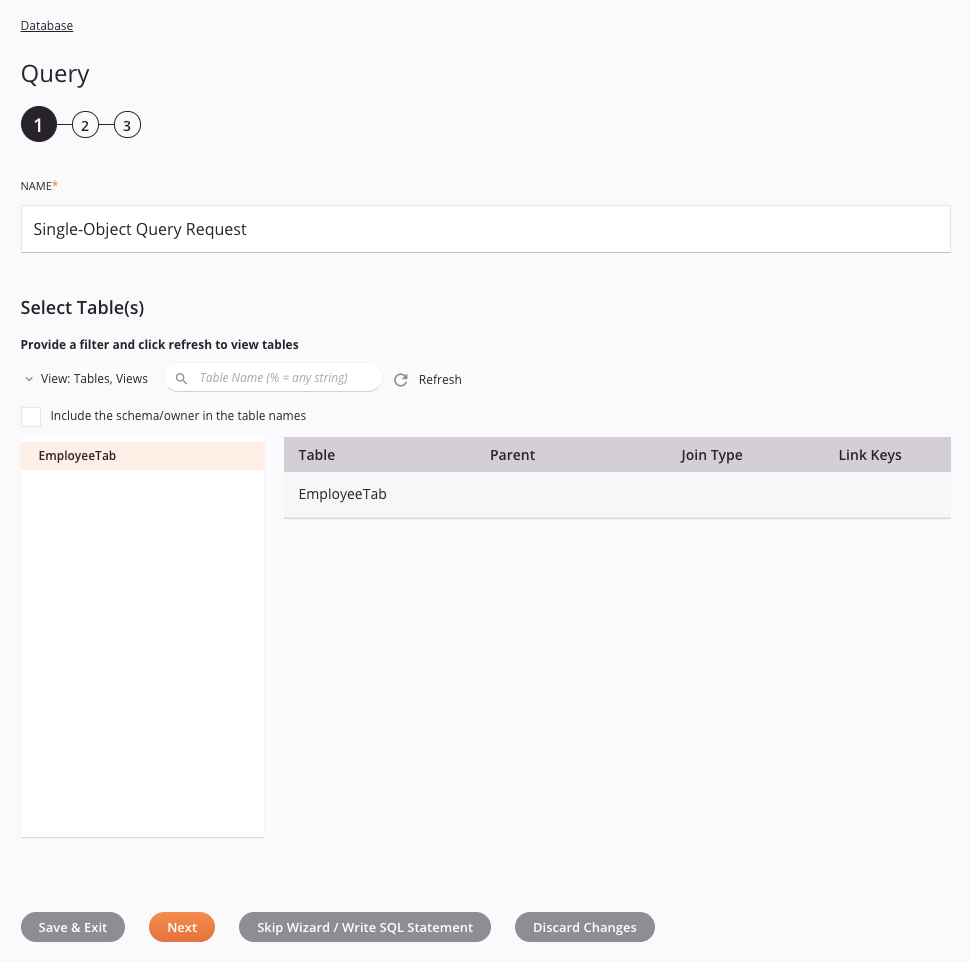
- Name: Enter a name to use to identify the Database activity. The name must be unique for each Database Query activity and must not contain forward slashes (
/) or colons (:). -
Select Table(s): This section displays the tables available in the Database endpoint using any applied filters, after using the refresh icon
 for the initial loading of objects. If there are a lot of objects in the database, you can filter the objects using View or Search prior to refreshing. If fetching the objects times out even after applying filters, use a manual SQL statement.
- View: Use the dropdown to filter the list of displayed objects to one of "Tables, Views", "Tables", "Views", or "System Tables". By default, the view "Tables, Views" is shown.
-
Search: Enter any column's value into the search box to filter the list of objects. The search is not case-sensitive. The list of objects may be filtered automatically, or you may need to refresh the list, depending on whether the objects have already been retrieved:
-
If searching on objects that have already been retrieved from the database and already appear within the list, any search terms typed within the search box automatically filter the list.
-
If searching on objects that have not yet been retrieved, for example when attempting to limit the number of objects retrieved for databases with a large number of objects, use the refresh icon next to the search box to fetch the objects from the database using the filter.
Note
For databases that do not support searching on objects, such as Microsoft Access, no results are returned.
-
-
Refresh: Click the refresh icon
to load or reload tables from the Database endpoint. This must be used for the initial loading of any objects. In addition, it may also be useful if you have recently added objects to the database, or if you have additional search criteria that you wish to apply prior to retrieving database objects. -
Include the Schema/Owner in the Table Names: Select this checkbox to include the schema in the table names. This may be useful if you use the same table name in multiple schemas (such as for development and production) to allow you to see and select the table in the correct schema.
-
Select Table(s): The list of objects is displayed in a column on the left. Click a single object to add it to the table on the right. If you are querying multiple objects that need to be joined, refer to Multiple-object query using wizard.
Tip
If the list does not populate with available objects even after applying a filter, the Database connection may not be successful. Ensure you are connected by reopening the connection and retesting the credentials.
-
Table of Selected Objects: The selected object is displayed in a table on the right. The columns in this table are not relevant for single-object queries and these fields cannot be edited, except to remove the object (hover over the rightmost column and click the remove icon
 ). If you are querying multiple objects that need to be joined, refer to Multiple-object query using wizard.
-
Save & Exit: If enabled, click to save the configuration for this step and close the activity configuration.
-
Next: Click to temporarily store the configuration for this step and continue to the next step. The configuration will not be saved until you click the Finished button on the last step.
-
Skip Wizard / Write SQL Statement: If present, do not click the words Skip Wizard / Write SQL Statement. This will cause any objects selected in this step to be ignored and instead use a SQL statement in the next step that overrides any selections made here.
-
Discard Changes: After making changes, click to close the configuration without saving changes made to any step. A message asks you to confirm that you want to discard changes.
Step 2: Add conditions
Tip
Fields with a variable icon ![]() support using global variables, project variables, and Jitterbit variables. Begin either by typing an open square bracket
support using global variables, project variables, and Jitterbit variables. Begin either by typing an open square bracket [ into the field or by clicking the variable icon to display a list of the existing variables to choose from.
-
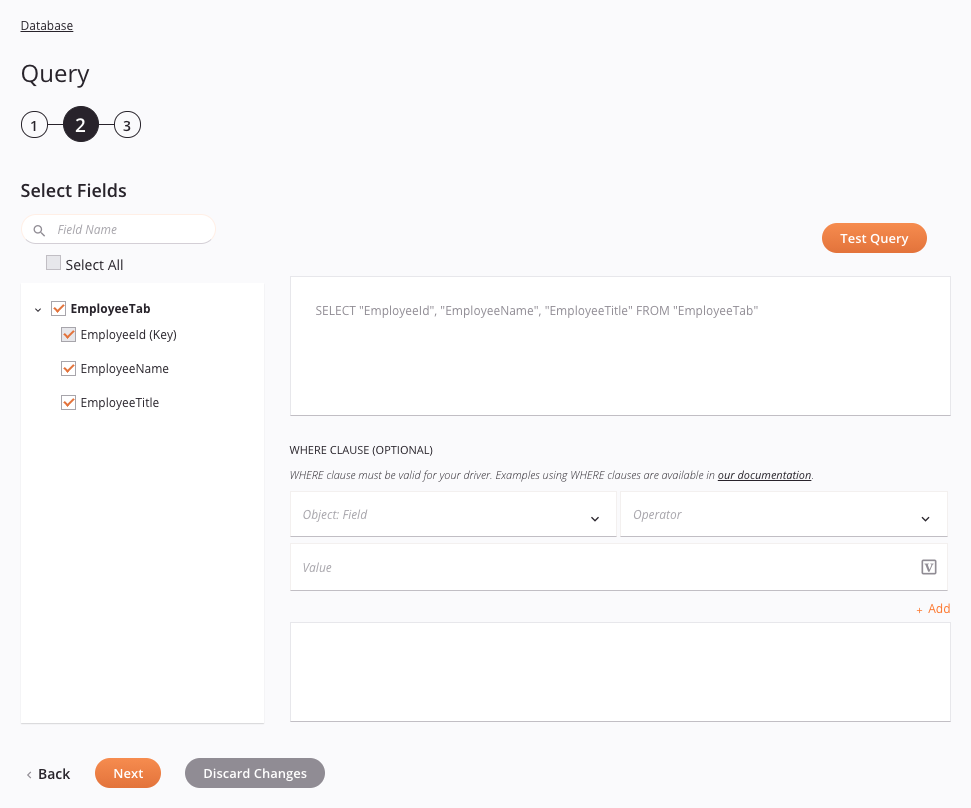
Select Fields: This section displays fields for the selected object(s) that are available in the Database endpoint. Objects that were selected in the previous step are shown in bold.
- Search: Enter any column's value into the search box to filter the list of fields. The search is not case-sensitive. The listed results are filtered in real time with each keystroke.
- Select All: When using the search box to filter, you can use this checkbox to select all visible fields at once (objects and collapsed fields are not selected).
- Select Fields: Select the checkboxes of the fields you want included in the query to have them automatically added to the SQL statement on the right. Unless using the search box, you can also select an entire object to select all of its fields at once.
-
SQL Statement: The query statement automatically populates with the object and any fields selected on the left.
-
WHERE Clause (Optional): To add a WHERE clause, you can use the fields below as input to help construct the clause, or you can manually enter the clause in the lower text box. For examples of WHERE clauses, see Database-specific information. After adding a WHERE clause, you must first test the query using the Test Query button in order to enable the Next button.
-
Object: Field: Use the dropdown to select a field from the selected object.
-
Operator: Use the dropdown to select the appropriate operator(s):
Arithmetic Operator Description + Add - Subtract * Multiply / Divide % Modulo Bitwise Operator Description & Bitwise AND | Bitwise OR ^ Bitwise XOR (Exclusive OR) Comparison Operator Description = Equal to > Greater than \< Less than >= Greater than or equal to \<= Less than or equal to != Not equal to Compound Operator Description += Add equals -= Subtract equals *= Multiply equals /= Divide equals %= Modulo equals &= Bitwise AND equals |*= Bitwise OR equals ^-= Bitwise exclusive OR equals Logical Operator Description ALL TRUE if all the subquery values meet the condition AND TRUE if all the conditions separated by AND are TRUE ANY TRUE if any of the subquery values meets the condition BETWEEN TRUE if the operand is within the range of comparisons EXISTS TRUE if the subquery returns one or more records IN TRUE if the operand is equal to one of a list of expressions LIKE TRUE if the operand matches a pattern NOT Displays a record if the condition(s) is NOT TRUE OR TRUE if any of the conditions separated by OR is TRUE SOME TRUE if any of the subquery values meets the condition -
Value: Enter the desired value to use with the dropdown selections.
Tip
When using global variables in a WHERE clause, it is recommended to specify a default value so that script testing is possible. Otherwise, since global variables obtain their value at runtime, the syntax may be invalidated during testing if no default value is specified.
-
Add: Click the
 link to automatically construct the clause based on the dropdown selections and entered value. The automatically constructed clause appears in the lower text box.
Caution
If providing a WHERE clause manually, you must enter it in the syntax that the database requires. You can also manually include an ORDER BY clause in this section. Using ORDER BY on child field(s) also affects the parent records.
Tip
To add multiple conditions to the WHERE clause, repeat the process by adding additional selections. Note that you may need to add a logical operator such as AND or OR to account for the additional conditions.
-
-
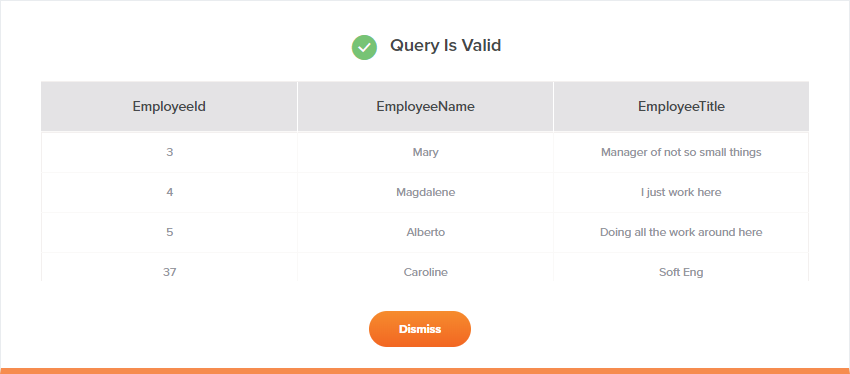
Test Query: Click this button to validate whether the query is valid. If the query is not valid, error messages provide additional detail. If the query is valid, a sample of up to 20 records is displayed in a table similar to that shown below:
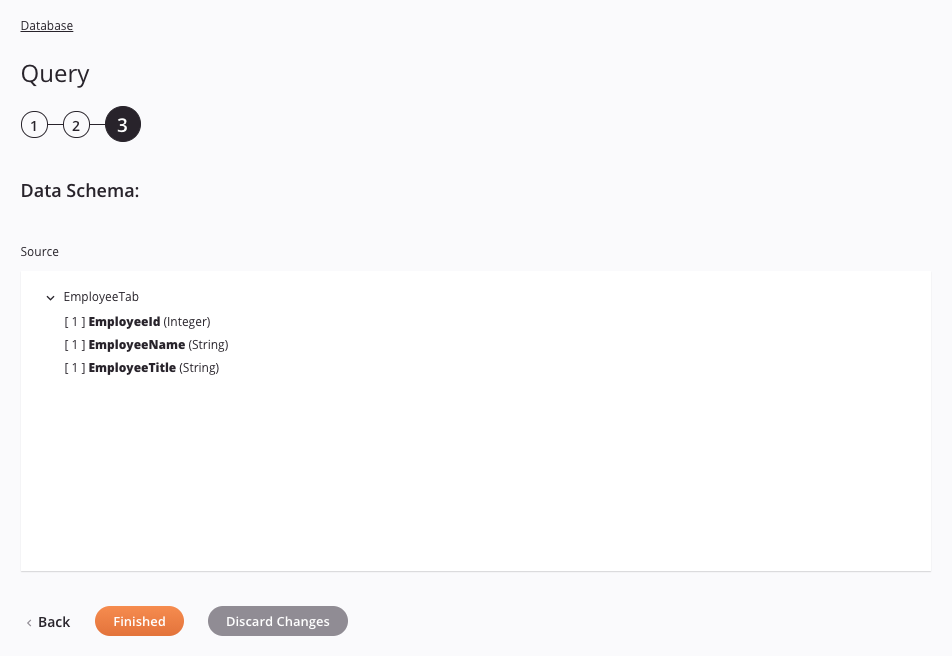
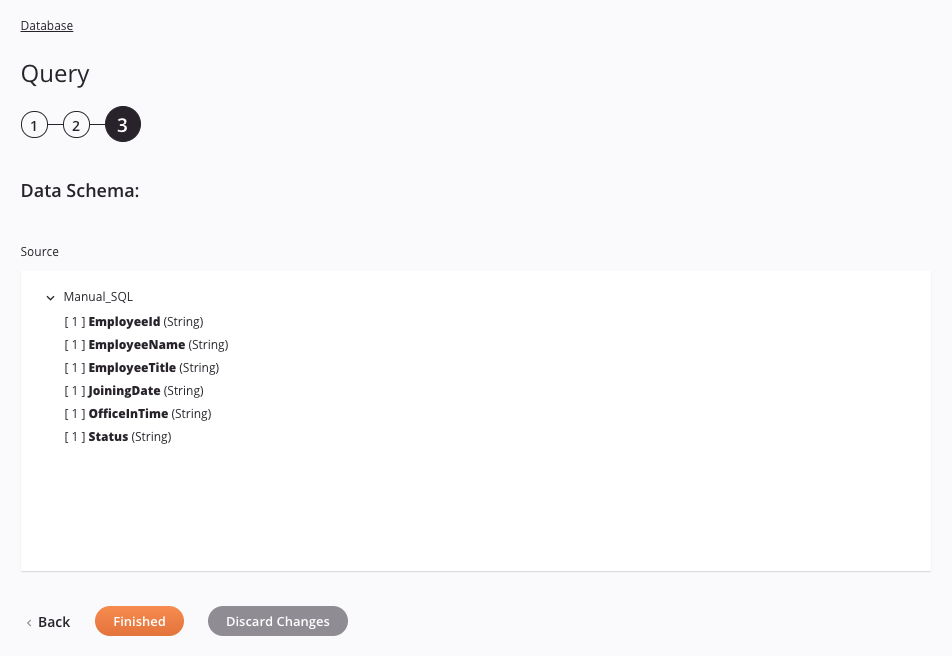
Step 3: Review the data schema
-
Data Schema: The source data schema is displayed. If the operation uses a transformation, the data schemas are displayed again later during the transformation mapping process, where you can map to target fields using source objects, scripts, variables, custom values, and more.
Note
To refresh a data schema in an existing activity, you must advance through each activity configuration step again, making at least one change (such as adding and removing a character from the end of the name of the activity) to force a refresh of the schema.
-
Back: Click to temporarily store the configuration for this step and return to the previous step.
-
Finished: Click to save the configuration for all steps and close the activity configuration.
-
Discard Changes: After making changes, click to close the configuration without saving changes made to any step. A message asks you to confirm that you want to discard changes.
Multiple-object query using wizard
Follow these steps if you are querying multiple objects and creating joins between them. If you need to query a single object, refer to Single-object query using wizard, or if you already know the SQL statement and are using a JDBC driver see Manual query.
Step 1: Enter a name and select objects
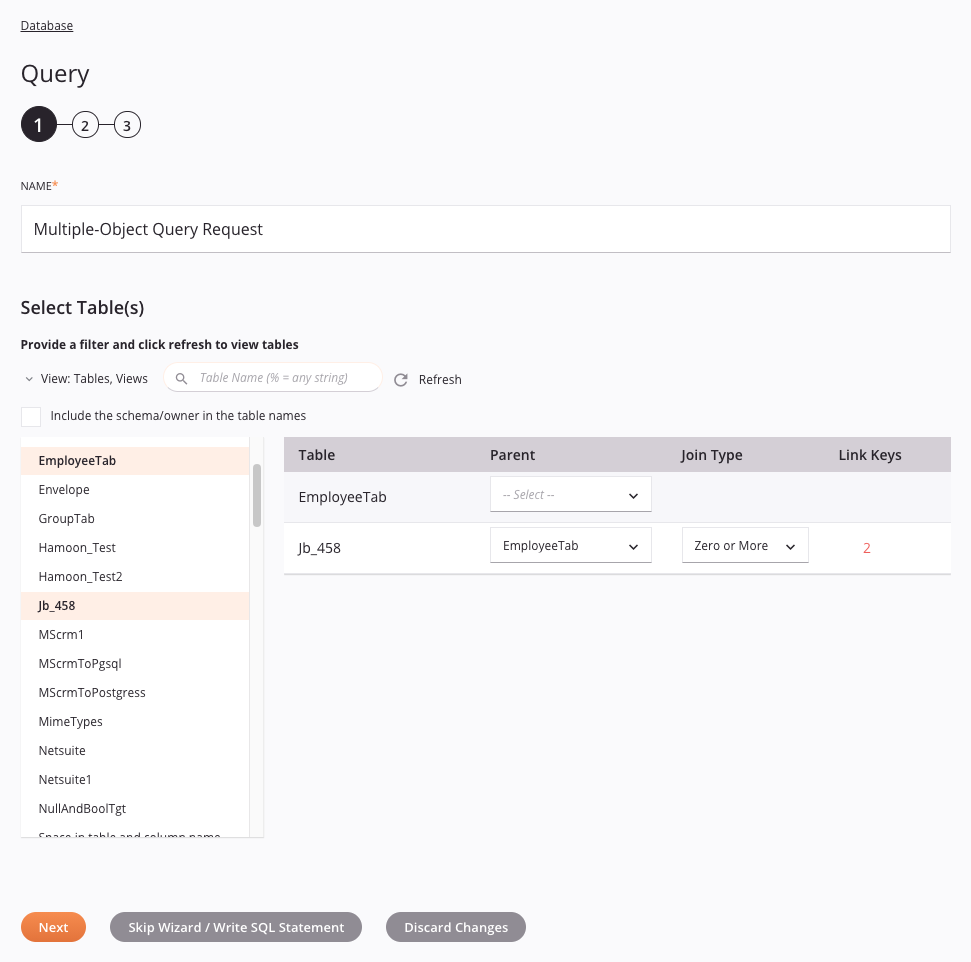
- Name: Enter a name to use to identify the Database activity. The name must be unique for each Database Query activity and must not contain forward slashes (
/) or colons (:). -
Select Table(s): This section displays the tables available in the Database endpoint using any applied filters, after using the icon
for the initial loading of objects. If there are a lot of objects in the database, you can filter the objects using View or Search prior to refreshing. If fetching the objects times out, even after applying filters, use a manual SQL statement.- View: Use the dropdown to filter the list of displayed objects to one of "Tables, Views", "Tables", "Views", or "System Tables". By default, the view "Tables, Views" is shown.
-
Search: Enter any column's value into the search box to filter the list of objects. The search is not case-sensitive. The list of objects may be filtered automatically, or you may need to refresh the list, depending on whether the objects have already been retrieved:
-
If searching on objects that have already been retrieved from the database and already appear within the list, any search terms typed within the search box automatically filter the list.
-
If searching on objects that have not yet been retrieved, for example when attempting to limit the number of objects retrieved for databases with a large number of objects, use the refresh icon next to the search box to fetch the objects from the database using the filter.
Note
For databases that do not support searching on objects, such as Microsoft Access, no results are returned.
-
-
Refresh: Click the refresh icon
to load or reload tables from the Database endpoint. This must be used for the initial loading of any objects. In addition, it may also be useful if you have recently added objects to the database, or if you have additional search criteria that you wish to apply prior to retrieving database objects. -
Include the Schema/Owner in the Table Names: Select this checkbox to include the schema in the table names. This may be useful if you use the same table name in multiple schemas (such as for development and production) to allow you to see and select the table in the correct schema.
-
Select Table(s): The list of objects is displayed in a column on the left. Click objects one at a time to add them to the table on the right. Any combination of tables, views, and/or system tables may be selected. If instead you need to query a single object without joins, refer instead to Single-object query using wizard.
Tip
If the list does not populate with available objects even after applying a filter, the Database connection may not be successful. Ensure you are connected by reopening the connection and retesting the credentials.
-
Table of Selected Objects: The selected objects are displayed in a table on the right. Each column is detailed below:

-
Table: The name of the selected object, a table, view, or system table.
-
Parent: On each child object being joined, use the dropdown to select the name of the object that should be the parent. This is needed to enforce transactional integrity of an object as well as to derive the link key(s) for a child object.
-
Join Type: On each child object being joined, a dropdown becomes available after you have assigned Link Keys (covered next). Use the dropdown to set the type of relationship between the selected objects:
-
One or More: This join type requires that every parent record has at least 1 child record, and possibly more child records.
-
One Only: This join type requires that every parent record has 1 and only 1 child record.
-
Zero or More: This join type allows every parent record to have either 0 or more child records.
-
Zero or One: This join type allows every parent record to have either 0 child records or only 1 child record.
-
-
Link Keys: On each child object being joined, once an object is selected as the Parent, a red Assign link appears within this field. Click Assign to open a separate window where you assign the link keys:
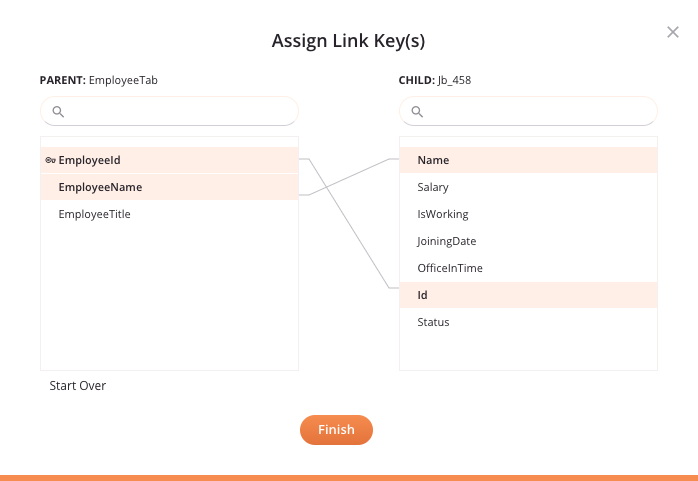
-
Parent Object: The parent object and list of fields is displayed in the left column. Any fields used as primary keys within the database are indicated by a key icon
 . If you have a large number of fields, you can use the search box to filter fields by name.
 -
Child Object: The child object and list of fields is displayed in the right column. If you have a large number of fields, you can use the search box to filter fields by name.
-
Assign Link Key(s): To assign a field as a link key, drag a field from the parent object on the left to a field within the child object on the right, or vice versa. To assign multiple link keys, repeat this process as needed.
-
Unassign Link Key(s): To unassign link keys, click any field that has already been linked. The linked fields become deselected.
-
Start Over: To clear all assigned link keys, click Start Over located below the parent list on the left.
-
Finish: Click Finish to save the assigned link keys and close the window. Under Link Keys, you should now see the number of assigned link keys, which you can click to reopen the link key assignment window. In addition, the Join Type dropdown becomes available for you to set the type of relationship (cardinality) between the selected objects:

-
-
Remove: To remove a selected object from the table, hover over the rightmost column and click the remove icon
. -
Save & Exit: If enabled, click to save the configuration for this step and close the activity configuration.
-
Next: Click to temporarily store the configuration for this step and continue to the next step. This button will not be enabled until after you have specified any Parent objects, set the Join Type, and assigned Link Keys. The configuration will not be saved until you click the Finished button on the last step.
-
Skip Wizard / Write SQL Statement: If present, do not click the words Skip Wizard / Write SQL Statement. This will cause any objects selected in this step to be ignored and instead use a SQL statement in the next step that overrides any selections made here.
-
Discard Changes: After making changes, click to close the configuration without saving changes made to any step. A message asks you to confirm that you want to discard changes.
-
Step 2: Add conditions

Tip
Fields with a variable icon ![]() support using global variables, project variables, and Jitterbit variables. Begin either by typing an open square bracket
support using global variables, project variables, and Jitterbit variables. Begin either by typing an open square bracket [ into the field or by clicking the variable icon to display a list of the existing variables to choose from.
-
Source: This section displays fields for the selected object that are available in the Database endpoint. If a field is identified by the database as a key, then this field must be included.
- Search: Enter any column's value into the search box to filter the list of fields for the selected object. The search is not case-sensitive. The listed results are filtered in real time with each keystroke.
- Select All: Select the checkbox to select all visible objects and fields at once (collapsed objects are not selected). This selection mode is not available if object-level selections are in use, but is available when using the search box.
- Select Fields: Select the checkboxes of the fields you want included in the query to have them automatically added to the SQL statement on the right. You can also select an entire object to select all of its fields at once.
-
Table of Object Fields: The selected objects and their fields are displayed in tables on the right, with optional fields to add conditions and sorting:
-
Filter Condition: If desired, enter a condition in the form of the argument of a WHERE clause; that is, operator(s) followed by value(s). For examples of WHERE clauses, see Database-specific information.
Caution
If providing a WHERE clause manually, you must enter it in the syntax that the database requires.
Tip
When using global variables in a WHERE clause, it is recommended to specify a default value so that script testing is possible. Otherwise, since global variables obtain their value at runtime, the syntax may be invalidated during testing if no default value is specified.
-
Sort: If desired, use the dropdown to select from None, Ascending, or Descending to apply a sort order. Selecting the None option is the same as leaving this field blank.
Caution
Using ORDER BY on child field(s) also affects the parent records.
-
-
Back: Click to temporarily store the configuration for this step and return to the previous step.
-
Next: Click to temporarily store the configuration for this step and continue to the next step. The configuration will not be saved until you click the Finished button on the last step.
-
Discard Changes: After making changes, click to close the configuration without saving changes made to any step. A message asks you to confirm that you want to discard changes.
Step 3: Review the data schema
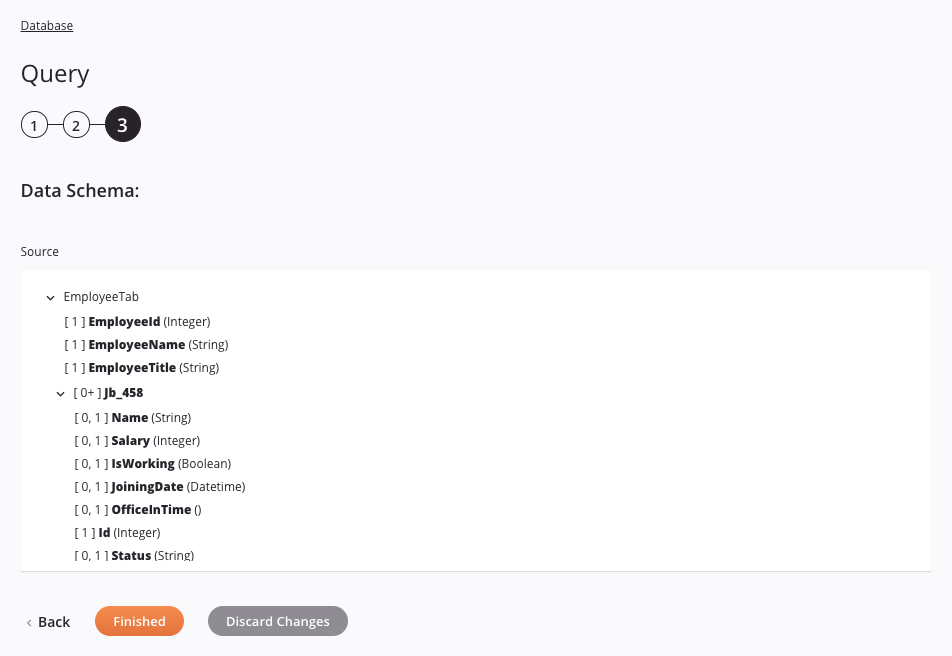
-
Data Schema: The source data schema is displayed. If the operation uses a transformation, the data schemas are displayed again later during the transformation mapping process, where you can map to target fields using source objects, scripts, variables, custom values, and more.
Note
To refresh a data schema in an existing activity, you must advance through each activity configuration step again, making at least one change (such as adding and removing a character from the end of the name of the activity) to force a refresh of the schema.
-
Back: Click to temporarily store the configuration for this step and return to the previous step.
-
Finished: Click to save the configuration for all steps and close the activity configuration.
-
Discard Changes: After making changes, click to close the configuration without saving changes made to any step. A message asks you to confirm that you want to discard changes.
Manual query
Follow these steps if you know the SQL statement for the query and want to provide it manually. This option is available only with Database connections using a JDBC driver, and is not available for those configured using ODBC. If you do not already know the statement or if the connection uses ODBC, follow either Single-object query using wizard or Multiple-object query using wizard above.
- Step 1: Enter a name and skip the wizard
- Step 2: Enter a SQL statement
- Step 3: Review the data schema
Step 1: Enter a name and skip the wizard
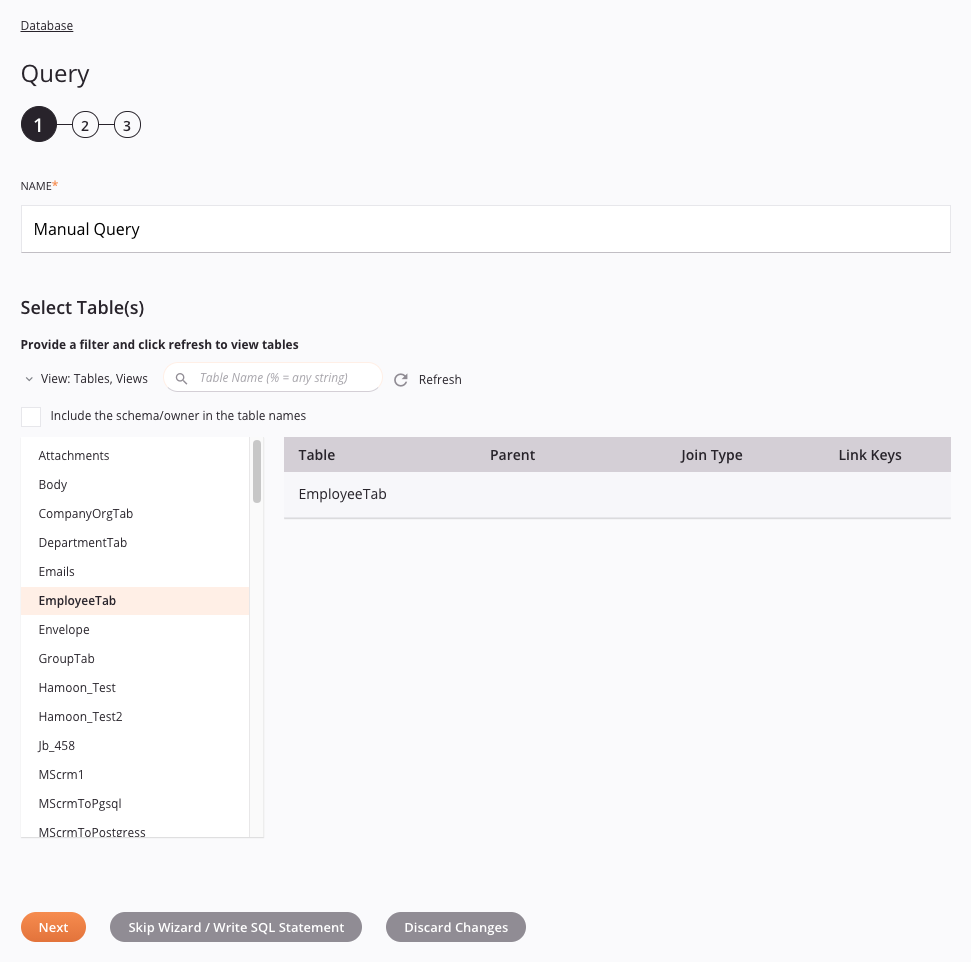
-
Name: Enter a name to use to identify the Database activity. The name must be unique for each Database Query activity and must not contain forward slashes (
/) or colons (:). -
Select Table(s): Do not use this section, as it is not relevant for manual queries. This section is applicable only when using the Database Query wizard (refer to Single-object query using wizard or Multiple-object query using wizard). Instead, you will specify the tables (if any are required) when you enter the SQL statement in the next step.
-
Save & Exit: If enabled, click to save the configuration for this step and close the activity configuration.
-
Next: This button should not be enabled, as it is applicable only when using the Database Query wizard (refer to Single-object query using wizard or Multiple-object query using wizard).
-
Skip Wizard / Write SQL Statement: Click Skip Wizard / Write SQL Statement to continue to the next step in providing the manual SQL statement.
Warning
If you have selected any tables, your selections will be lost.
-
Discard Changes: After making changes, click to close the configuration without saving changes made to any step. A message asks you to confirm that you want to discard changes.
Step 2: Enter a SQL Statement

-
Write or Paste SQL Statement: Enter the SQL query statement into the text box. Note:
-
All SQL statements should be ANSI-SQL compliant for the JDBC driver of the database you are accessing.
-
There is a 2,000-character limit to the SQL statement.
Note
A workaround for SQL statements that exceed the character limitation is to create database views.
-
To use variables, enter them using the square bracket syntax described in documentation for global variables, project variables, or Jitterbit variables.
-
When using global variables in a WHERE clause, we recommend specifying a default value so that script testing is possible. Otherwise, since global variables obtain their value at runtime, the syntax may be invalidated during testing if no default value is specified. For examples of WHERE clauses, see Database-specific information.
-
Using ORDER BY clauses on child fields also affects the parent records.
-
You can also use User-Defined Functions (UDF) within the SQL statement using the
<udf>function. This function lets you use any database function supported by the target database, such as theTO_DATEfunction in Oracle, or theCONVERT()function in SQL Server. See details under Database functions.
-
-
Test Query: Click this button to validate whether the query is valid. If the query is not valid, error messages provide additional detail. If the query is valid, a sample of up to 20 records is displayed in a table similar to that shown below:
Step 3: Review the data schema
-
Data Schema: The source data schema is displayed. If the operation uses a transformation, the data schemas are displayed again later during the transformation mapping process, where you can map to target fields using source objects, scripts, variables, custom values, and more.
Note
To refresh a data schema in an existing activity, you must advance through each activity configuration step again, making at least one change (such as adding and removing a character from the end of the name of the activity) to force a refresh of the schema.
-
Back: Click to temporarily store the configuration for this step and return to the previous step.
-
Finished: Click to save the configuration for all steps and close the activity configuration.
-
Discard Changes: After making changes, click to close the configuration without saving changes made to any step. A message asks you to confirm that you want to discard changes.
Next steps
After configuring a Database Query activity, you can use it within an operation or script as described below. In addition, if you are running into record limits imposed by the target, you may want to use chunking.
Complete the operation
After configuring a Database Query activity, complete the configuration of the operation by adding and configuring other activities, transformations, or scripts as operation steps. You can also configure an operation's operation settings, which include the ability to chain operations together that are in the same or different workflows.
Once a Database Query activity has been created, menu actions for that activity are accessible from the project pane in either the Workflows or the Components tabs, and from the design canvas. See Activity actions menu for details.
Database Query activities can be used as a source with these operation patterns:
- Transformation pattern
- Two-target archive pattern (as the first source only)
- Two-target HTTP archive pattern (as the first source only)
- Two-transformation pattern (as the first source only)
Other patterns are not valid using Database Query activities. See the validation patterns on the Operation validity page.
Within a transformation, if using the option to mirror a schema provided by a Database activity using a single table (without joins), the resulting mirrored schema is automatically created with an additional node named row. When fields within this additional node are mapped to, the node becomes a loop node to allow all records to be looped through (see Loop nodes under Nodes and fields).
In addition, if joining database tables, note that the values of a child table's joined fields default to the values of the parent table's joined fields. A child table's joined fields cannot be mapped to.
When ready, deploy and run the operation and validate behavior by checking the operation logs.
Using database activities in scripts
Database Query activities can also be referenced in a script for use with script functions that use a databaseId as a parameter, including these:
Jitterbit Script Functions
CacheLookupCallStoredProcedureDBCloseConnectionDBExecuteDBLookupDBLookupAllDBRollbackTransaction
JavaScript Jitterbit Functions
Jitterbit.DbExecuteJitterbit.DbLookup
For more details on referencing endpoints in scripts, see Endpoints in Jitterbit Script or Endpoints in JavaScript.
Use chunking
When using chunking on an operation where the source is a Database activity, the data is chunked in the transformation, not when the data is retrieved. The target data is first written to numerous temporary files (one for each chunk). These files are then combined into one target file.
For instructions and best practices on using chunking, see Operation options.