Database-specific information
Introduction
This page provides information on installation and configuration of certain database drivers. Note that this page is not comprehensive; Harmony supports most ODBC- and JDBC-compliant databases.
Database drivers are automatically detected from the Harmony Agent. For cloud agents, managed by Jitterbit, a set of commonly used JDBC drivers is already provided. For private agents, installed drivers are detected from the operating system where each private agent is installed. In addition, you can install other database drivers on private agents as needed. For general information and instructions on installing additional drivers on private agents, refer to Install additional ODBC or JDBC drivers.
IBM DB2 (as400)
You can connect to DB2 on iSeries using either a JDBC or ODBC driver. Note that if you want to use additional features, such as being able to provide a manual query, these are available using the JDBC driver only. These instructions are for installing the JTOpen (AS400) JDBC driver.
Note
A few customers have experienced issues connecting to DB2 on iSeries using the JDBC driver. In these cases, the issues were resolved by using the ODBC driver (private agents only).
Install the JDBC driver
-
Download JTOpen. The ZIP file includes the JDBC driver file
jt400.jar. -
Install the driver on a private agent by unzipping the download and then copying the
jt400.jarfile to<JITTERBIT_HOME>/tomcat/drivers/lib/, replacing<JITTERBIT_HOME>with the path to your private agent root directory. -
Edit the file
<JITTERBIT_HOME>/JdbcDrivers.confand add this driver entry:<Driver> <Name>IBM DB2</Name> <Class>com.ibm.as400.access.AS400JDBCDriver</Class> <Subprotocol>as400</Subprotocol> </Driver> -
All Jitterbit services must be restarted in order for the new configuration to take effect.
On the machine where each private agent is installed, first stop the services, then restart them. See Restart a Windows private agent or Restart a Linux private agent for more information.
Configure the database connection
After the JDBC driver is installed, specify these inputs during configuration of the Database connection:
-
Driver Type: Select JDBC.
-
Driver: Select the IBM DB2 (AS400) driver.
-
Use Connection String: Under Optional Settings, select this checkbox.
-
Connection String: Under Optional Settings, enter a manual connection string, replacing this example with your own host, libraries, and database name (if applicable):
Sample Connection Stringjdbc:as400://example.com;libraries=LIB1;Database=S12345;socket timeout=30000
WHERE clause examples
These WHERE clause examples are provided for reference purposes when configuring a Database query activity:
WHERE WORKDEPT = 'D21' AND HIREDATE > '1987-12-31'
WHERE WORKDEPT = 'C01' OR WORKDEPT = 'D11'
WHERE WORKDEPT = 'E11' AND NOT JOB = 'ANALYST'
  WHERE EDLEVEL > 12 AND
     (WORKDEPT = 'E11' OR WORKDEPT = 'E21')
WHERE WORKDEPT = 'E11' AND EDLEVEL = 12 AND JOB = 'CLERK'
WHERE (WORKDEPT, EDLEVEL, JOB) = ('E11', 12, 'CLERK')
For additional examples, refer to the IBM Knowledge Center articles for the specific version:
- Specifying a search condition using the WHERE clause
- Multiple search conditions within a WHERE clause
- Defining complex search conditions
IBM DB2 (jcc)
You can connect to DB2 on iSeries using either a JDBC or ODBC driver. Note that if you want to use additional features, such as being able to provide a manual query, these are available using the JDBC driver only. These instructions are for installing the JCC JDBC driver.
Note
A few customers have experienced issues connecting to DB2 on iSeries using the JDBC driver. In these cases, the issues were resolved by using the ODBC driver (private agents only).
Important
IBM's JCC driver requires a license file db2jcc_license_cisuz-XX.jar. If you do not have a license file, you will need to obtain one or use the Jtopen (as400) library instead.
Install the JDBC driver
-
Download JCC from IBM's DB2 JDBC Driver Versions and Downloads. The TAR.GZ file includes a ZIP file with the JDBC driver file
db2jcc4.jar.Note
The driver file
db2jcc.jaruses the JDBC 3 specification and is deprecated. Use the driver filedb2jcc4.jar, which uses the JDBC 4 specification instead. -
Install the driver on a private agent by extracting the download and then copying the file
db2jcc4.jarto<JITTERBIT_HOME>/tomcat/drivers/lib/, replacing<JITTERBIT_HOME>with the path to your private agent root directory. -
Edit the file
<JITTERBIT_HOME>/JdbcDrivers.confand add this driver entry:<Driver> <Name>IBM DB2 JCC Driver</Name> <Class>com.ibm.db2.jcc.DB2Driver</Class> <Subprotocol>db2</Subprotocol> </Driver> -
Locate and copy your IBM-provided license file
db2jcc_license_cisuz-XX.jarto<JITTERBIT_HOME>/tomcat/shared/lib/. -
Edit the file
<JITTERBIT_HOME>/tomcat/conf/catalina.propertiesand add this entry if not present:shared.loader=${catalina.home}/shared/lib/*.jar -
All Jitterbit services must be restarted in order for the new configuration to take effect.
On the machine where each private agent is installed, first stop the services, then restart them. See Restart a Windows private agent or Restart a Linux private agent for more information.
Configure the database connection
After the JDBC driver is installed, specify these inputs during configuration of the Database connection:
-
Driver Type: Select JDBC.
-
Driver: Select the IBM DB2 (JCC) driver.
-
Use Connection String: Under Optional Settings, select this checkbox.
-
Connection String: Under Optional Settings, enter a manual connection string, replacing this example with your own host and database name (if applicable):
Sample Connection Stringjdbc:db2://example.com/DBNAME
WHERE clause examples
These WHERE clause examples are provided for reference purposes when configuring a Database query activity:
WHERE WORKDEPT = 'D21' AND HIREDATE > '1987-12-31'
WHERE WORKDEPT = 'C01' OR WORKDEPT = 'D11'
WHERE WORKDEPT = 'E11' AND NOT JOB = 'ANALYST'
  WHERE EDLEVEL > 12 AND
     (WORKDEPT = 'E11' OR WORKDEPT = 'E21')
WHERE WORKDEPT = 'E11' AND EDLEVEL = 12 AND JOB = 'CLERK'
WHERE (WORKDEPT, EDLEVEL, JOB) = ('E11', 12, 'CLERK')
For additional examples, refer to the IBM Knowledge Center articles for the specific version:
- Specifying a search condition using the WHERE clause
- Multiple search conditions within a WHERE clause
- Defining complex search conditions
Microsoft Access
You must be running a private agent in order to connect to Microsoft Access. Microsoft Office must be installed on the same system that the private agent is running on, and that system must be a Windows operating system. Note that the Jitterbit team has not tested Linux ODBC drivers for Microsoft Access.
Install the ODBC driver
The Microsoft Access ODBC driver is typically installed as part of Windows. Older drivers support the .mdb file extension. However, if your database is Access 2007 or later with the .accdb extension, you may need to obtain a later version of the ODBC driver such as the Microsoft Access 2016 Redistributable.
Configure the database connection
After the driver is installed, specify these inputs during configuration of the Database connection:
-
Driver Type: Select ODBC.
-
Driver: Select the Microsoft Access driver.
-
Use Connection String: Under Optional Settings, select this checkbox.
-
Connection String: Under Optional Settings, enter the manual connection string using this format:
DRIVER=<driver>;DBQ=<database-path>;UID=<username>;PWD=<password>;Use one of these connection strings, depending on the version and whether you have a password. Replace the folder path and file name with those specific to the file located on your private agent.
Microsoft Access Driver (\*.mdb) without PasswordDRIVER={Microsoft Access Driver (*.mdb, *.accdb)};DBQ=C:\myfolder\mydatabase.accdb;Microsoft Access Driver (\*.mdb, \*.accdb) with PasswordDRIVER={Microsoft Access Driver(*.mdb, *accdb)};DBQ=C:\myfolder\mydatabase.accdb;UID=username;PWD=password;
Configure database activities
During Database activity configuration, note that the Microsoft Access ODBC driver does not support searching for objects. Do not enter search criteria into the table selection search box, as no results will be returned.
WHERE clause examples
These WHERE clause examples are provided for reference purposes when configuring a Database query activity:
WHERE [LastName]='Bagel'
WHERE field1 LIKE field2
WHERE City = "Chicago" OR BirthDate < DateAdd (" yyyy ", -40, Date())
For additional examples, refer to Microsoft's documentation:
Microsoft Excel
You must be using a private agent in order to connect to an Excel spreadsheet.
Install the ODBC driver
To connect to Excel spreadsheets, you may need to install a driver if the appropriate driver is not already included with the private agent's operating system.
For example, Windows 10 comes with x32 .xls ODBC drivers that support Excel versions 3.0, 4.0, 5.0/95, and 97-2000. However, to get the newer ODBC drivers that support all of these versions and Excel 12.0 (Excel 2007), you can install one of these drivers:
- Microsoft Access 2016 Runtime (Win 7/8/10/2008 R2/2012)
- Microsoft Access 2016 Redistributable
Configure the database connection
After the driver is installed, specify these inputs during configuration of the Database connection:
-
Driver Type: Select ODBC.
-
Driver: Select the Microsoft Excel driver.
-
Use Connection String: Under Optional Settings, select this checkbox.
-
Connection String: Under Optional Settings, use one of these connection strings, depending on your version of Excel. Replace the folder path and file name with those specific to the file located on the private agent.
Excel 97, Excel 2000, Excel 2002, Excel 2003Driver={Microsoft Excel Driver (*.xls, *.xlsx, *.xlsm, *.xlsb)}; DBQ=C:\Folder Path\My File Name.xls;Excel 2007, Excel 2010, Excel 2013Driver={Microsoft Excel Driver (*.xls, *.xlsx, *.xlsm, *.xlsb)}; DBQ=C:\Folder Path\My File Name.xlsx;To specify the connection to be updateable (for example, if you want to allow writing to a target file), you can add
ReadOnly=0;to the end of the connection string. For example:UpdateableDriver={Microsoft Excel Driver (*.xls, *.xlsx, *.xlsm, *.xlsb)}; DBQ=C:\Folder Path\My File Name.xlsx;ReadOnly=0;Tip
See additional options for Excel connection strings at Microsoft Excel 2007 ODBC Driver connection strings in the The Connection Strings Reference.
Configure database activities
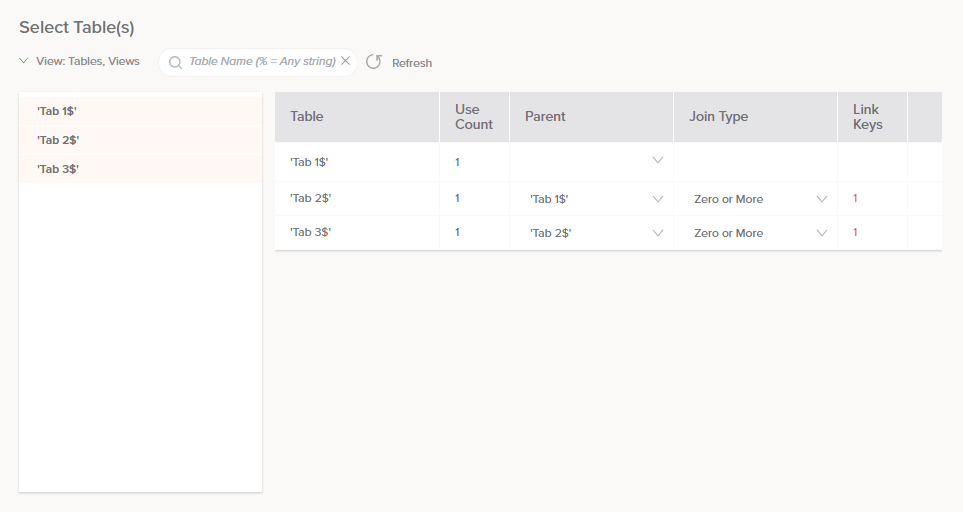
During Database activity configuration, you can select and join worksheets within the Excel spreadsheet:
Note
On running the operation, if you receive an error "[Microsoft][ODBC Excel Driver] Operation must use an updateable query," then the Excel file may be read only. You can allow your Excel file to be updateable by appending ReadOnly=0; to your connection string while configuring the endpoint as described above.
Microsoft SQL Server
Microsoft SQL Server databases are accessible from Harmony Agents running on Windows or Linux, with Windows ODBC on private agents recommended for optimized performance. However, note that if you want to use additional features, such as being able to provide a manual query, these are available using the JDBC driver only. Harmony supports these authentication options:
- MS SQL ODBC on Windows using Windows authentication or SQL Server authentication
- MS SQL JDBC on Windows using Windows authentication or SQL Server authentication
- MS SQL JDBC on Linux using SQL Server authentication
The procedures below show how to configure Microsoft SQL Server as a Database connection using either Windows or SQL Server authentication, followed by examples of WHERE clauses that can be used with database activities.
Windows authentication
Windows authentication is supported using ODBC and JDBC on private agents only, and can be used with only one domain account. To use Windows authentication, set up these properties in Windows:
- Open the Services Administrative tool (Start > Administrative Tools > Services).
- If using ODBC, right-click the Jitterbit Apache Server service and select Properties. If using JDBC, right-click the Jitterbit Tomcat Server service and select Properties.
- Go to the Log On tab. Select This account and enter the name and credentials of the account you want to use for authentication. Then click Apply.
- Repeat for the Jitterbit Process Engine service.
- Set
TempDirin the agent configuration file (Jitterbit.conf) toC:\Windows\Temp\jitterbit. - Restart Jitterbit services.
Caution
Make sure that you have granted the domain user a privilege of Log on as a service and Act as part of the operating system. Make sure the domain user has read and write privileges on the private agent install directory.
Note
An alternative to above steps 1 to 4 is to grant the account being used on the private agent machine permissions to the SQL Server. This can be done by the SQL Server administrator by setting the private agent machine account in Windows Active Directory (<domainName>\<machineName>$).
After these steps are completed, go to Cloud Studio and set up your database as usual, specifying these inputs during configuration of the Database connection:
-
Driver Type: Select ODBC or JDBC as appropriate.
Important
Windows authentication is supported with the following JDBC drivers:
- SQL Server jTDS [JDBC]
- SQL Server Microsoft [JDBC]
- Newer versions of the Microsoft JDBC Driver for SQL Server
To use Windows authentication with the Microsoft JDBC drivers, copy the
mssql-jdbc_auth-x.x.x.x64.dllfile bundled with the driver's download package to theC:\Program Files\Jitterbit Agent\jre\binfolder on the agent. Make a backup copy of the file as it may be deleted during major agent upgrades. -
Driver: Select the SQL Server driver.
- Server Name: Enter the name or IP address of the server running the SQL Server that Harmony needs to connect to. You may need to specify the SQL Server instance name (
HostName\InstanceName). - Database Name: Enter the name of the database on the server that Harmony needs to connect to.
- Login and Password: Leave these fields blank.
-
Additional Connection String Parameters: Under Optional Settings, enter the following depending on your driver:
- ODBC SQL Server: If you are using the ODBC SQL Server driver enter
integratedSecurity=true. If this does not work, enterTrusted_Connection=yes. - ODBC Driver 11 for SQL Server, SQL Server Native Client 10.0, SQL Server Native Client 11.0: If you are using another ODBC SQL server driver, enter
Trusted_Connection=yes. - SQL Server jTDS [JDBC], SQL Server Microsoft [JDBC]: If you are using a JDBC SQL Server driver enter
integratedSecurity=true.
- ODBC SQL Server: If you are using the ODBC SQL Server driver enter
The driver will now authenticate as the Windows domain user specified above.
SQL Server authentication
Go to Cloud Studio and set up your database as usual, specifying these inputs during configuration of the Database connection:
-
Driver Type: Select either ODBC or JDBC as appropriate.
-
Driver: Select the SQL Server driver. When selecting a JDBC driver, we recommend using SQL Server MS JDBC.
-
Server Name: Enter the name or IP address of the server running the SQL Server that Harmony needs to connect to. You may need to specify the SQL Server instance name (
HostName\InstanceName). -
Database Name: Enter the name of the database on the server that Harmony needs to connect to.
-
Login and Password: Enter the username and password for SQL Server authentication.
The driver will now authenticate using the SQL Server authentication credentials as specified.
WHERE clause examples
These WHERE clause examples are provided for reference purposes when configuring a Database query activity:
WHERE LastName = 'Smith' ;
WHERE LastName LIKE ('%Smi%');
WHERE EmployeeKey <= 500;
WHERE EmployeeKey = 1 OR EmployeeKey = 8 OR EmployeeKey = 12;
WHERE EmployeeKey <= 500 AND LastName LIKE '%Smi%' AND FirstName LIKE '%A%';
WHERE LastName IN ('Smith', 'Godfrey', 'Johnson');
WHERE EmployeeKey Between 100 AND 200;
For additional examples, refer to Microsoft's documentation:
MySQL
We recommend using the MySQL JDBC driver for MySQL that ships with the Harmony Agent. Using the JDBC driver is recommended for additional features, such as being able to provide a manual query, that are not available through an ODBC connection.
If you want to use an ODBC driver (private agents only), one can be downloaded at MySQL Community Downloads, Connector/ODBC.
ODBC and JDBC
After the driver is installed, specify these inputs during configuration of the Database connection:
-
Driver Type: Select either ODBC or JDBC as appropriate.
-
Driver: Select the MySQL driver. The driver is typically called "MySQL" for JDBC or "MySQL ODBC 3.51 Driver" for ODBC.
-
Server Name: Enter the name or IP address of the database server.
-
Database Name: Enter the name of the catalog that Harmony needs to access.
-
Login and Password: Enter the user credentials for Harmony to use to access the database.
Note
If the ODBC driver does not display in the Driver dropdown in Cloud Studio, use the ODBC manager on the private agent to see if the driver is visible. Check to see if the driver is listed in the Data Sources (ODBC) Windows applet (under Administrative Tools).
If you are still unable to see the driver after seeing it in the ODBC manager, double-check that you are connecting to the correct machine. To do so, stop the Jitterbit Apache service on that machine and make sure you can no longer connect using the client.
Permission errors
If you get permission errors such as "Access denied for user 'root'@'%' to database 'test'" and you are certain that the credentials are correct, it may be a MySQL configuration problem. You can configure MySQL to accept different credentials for different IP addresses or a group of addresses. See the MySQL documentation or contact your MySQL administrator.
Ports
The port required to allow the Harmony Agent to communicate with a remote MySQL database depends on the port that MySQL has been configured to listen to. Open that port (default 3306) on the machine where the MySQL database server is running.
Secure or encrypt the connection
Securing the connection between a database and a private agent depends on the ODBC driver being used. The standard MySQL ODBC driver does not use encryption. The best way to enable such encryption is by tunneling the connection through SSH. This can be done on private agents only.
WHERE clause examples
These WHERE clause examples are provided for reference purposes when configuring a Database query activity:
WHERE
    jobtitle = 'Sales Rep' AND
    officeCode = 1;
WHERE
    jobtitle <> 'Sales Rep';
WHERE
    officecode > 5;
WHERE
    officecode <= 4;
WHERE t1.primary_key=1 AND t2.primary_key=t1.id;
WHERE key_part1=constant;
WHERE key_part1=val1 AND key_part2=val2;
For additional examples, refer to Basic MySQL Tutorial and to the MySQL Reference Manual article WHERE Clause Optimization.
Oracle
You can connect to an Oracle database using either a JDBC or ODBC driver. The JDBC driver is recommended for additional features, such as being able to provide a manual query, that are not available through an ODBC connection. This section describes how to configure an Oracle database within Cloud Studio using an ODBC driver on private agents.
Install the Oracle client on the Harmony private agent
Before you can establish a connection to Oracle through ODBC, you must have the Oracle Client (including the Oracle ODBC driver) installed on the Harmony private agent. If you are using multiple private agents within an agent group, the Oracle Client must be installed on all agents in the group. See Agents > Agent groups for details.
Configure and test the Oracle client
After you have installed the Oracle Client, configure the tnsnames.ora file to reference the database you are planning to use. This is part of the standard Oracle Client setup procedure. For additional information see the Tnsnames.org - Oracle FAQ or refer to the Oracle documentation for the version you are using.
After the Oracle Client is set up on the private agent, you should test the server to ensure that Harmony has connectivity to the database. One way to do this is to connect to the server through SQL*Plus. If this is successful, the Oracle Client should operate correctly with Harmony.
In addition, some versions of the Oracle driver (not the Microsoft Oracle driver) may require one or more environment variables within the operating system to be set. For example:
ORACLE_HOME=/usr/local/oracle/10.2.0
TNS_ADMIN=/usr/local/oracle/10.2.0/network/admin
TWO_TASK=//dbdpmr:1555/pmrd1
On Linux, you may also need to add the Oracle library directory to your path (e.g. LD_LIBRARY_PATH ). Add these to the /etc/sysconfig/jitterbit file. Some examples are shown below, but the exact path depends on your Oracle Client installation:
LD_LIBRARY_PATH=/usr/local/oracle/lib
export ORACLE_HOME=/usr/local/oracle/10.2.0
export TNS_ADMIN=/usr/local/oracle/10.2.0/network/admin
export TWO_TASK=//dbdpmr:1555/pmrd1
Configure the database connection
After the Oracle Client is configured and tested, specify these inputs during configuration of the Database connection:
-
Driver Type: Select ODBC.
-
Driver: Select the Oracle driver. If you do not see your driver in the list, see Add your driver to the Jitterbit agent config file below.
-
Use Connection String: Under Optional Settings, select this checkbox. You must construct the connection string manually, as Oracle references the database based on the setting in
tnsnames.ora. -
Connection String: Under Optional Settings, enter the manual connection string for your specific Oracle database. For example:
Oracle in OraHome92Driver={Oracle in OraHome92};Dbq=myTNSServiceName;Uid=myUsername;Pwd=myPassword;Oracle in OraClient11g_home1DRIVER={Oracle in OraClient11g_home1};SERVER=[server SID];UID=[userid]; PWD=[password];DBQ=[server SID];Tip
Additional Oracle connection string examples are available at The Connection Strings Reference.
Add your driver to the private agent config file
Because of the many variations on the Oracle driver name, you may need to add your driver information to the private agent configuration file.
Once the driver information is added as described below, while selecting your driver within Cloud Studio you should see your driver appear in the list of ODBC drivers. If the steps below are not successful, see Install additional ODBC or JDBC drivers for details regarding driver installation.
Remote agent configuration
If you have remote agent configuration enabled through the Management Console, you can add your driver information under the Db Drivers tab as follows. For details on remote agent configuration, see the section on View or edit Jitterbit conf under Agents > Agent groups.
-
Within the Management Console, go to Agents > Agent Groups.
-
Within the table, find your agent group and use the Action dropdown to select Jitterbit Conf.
-
In the dialog, select the tab Db Drivers, then click Edit in the upper right. Find the following example entry for a specific Oracle version, and replace the provided sample information with that for your specific Oracle ODBC driver. When complete, click Submit to save the driver information to the private agent configuration file.
#Oracle in OraClient10g_home2 'Oracle in OraClient10g_home2 Quote Begin'='\"' 'Oracle in OraClient10g_home2 Quote End'='\"' -
All Jitterbit services must be restarted in order for the new configuration to take effect.
On the machine where each private agent is installed, first stop the services, then restart them. See Restart a Windows private agent or Restart a Linux private agent for more information.
Manual agent configuration
If you are using manual agent configuration, you can add your driver information under the [DbDrivers] section of the jitterbit.conf file located on each private agent. For details, see Edit the configuration file (Jitterbit.conf).
-
Open
jitterbit.confin a text editor and scroll to the[DbDrivers]section. -
Find the following example entry for a specific Oracle version, and replace the provided sample information with that for your specific Oracle ODBC driver. When complete, save the
jitterbit.conffile.#Oracle in OraClient10g_home2 'Oracle in OraClient10g_home2 Quote Begin'='\"' 'Oracle in OraClient10g_home2 Quote End'='\"' -
All Jitterbit services must be restarted in order for the new configuration to take effect.
On the machine where each private agent is installed, first stop the services, then restart them. See Restart a Windows private agent or Restart a Linux private agent for more information.
WHERE clause examples
These WHERE clause examples are provided for reference purposes when configuring a Database query activity:
WHERE
    product_name = 'Kingston';
WHERE
    list_price > 500;
WHERE
    list_price > 500
    AND category_id = 4;
WHERE
    list_price BETWEEN 650 AND 680
WHERE
    category_id IN(1, 4)
WHERE
    product_name LIKE 'Asus%'
WHERE business_seats_taken IS NULL
    OR business_seats_taken = 0
WHERE EMP_ACT.EMPNO = EMPLOYEE.EMPNO
WHERE THIS_EMP.JOB = 'SALESREP'
       AND THIS_EMP.WORKDEPT = DINFO.DEPTNO
For additional examples, refer to Oracle Basics and the Oracle article WHERE clause.
PostgreSQL
You can connect to an PostgreSQL database using either a JDBC or ODBC driver. The JDBC driver is recommended for additional features, such as being able to provide a manual query, that are not available through an ODBC connection. The PostgreSQL drivers should already be available on the Harmony Agent, as the agent currently uses PostgreSQL to store internal data.
Client encoding
If you receive a "client encoding mismatch" error when you test the connection to a PostgreSQL database, this means the encoding that the PostgreSQL server you are connecting to is different than the default encoding assumed by the PostgreSQL driver.
To resolve this issue, set the client encoding on Windows to WIN1251 and specify the encoding during configuration of a Database connection:
-
Additional Connection String Parameters: Under Optional Settings, enter this additional parameter:
ConnSettings=SET CLIENT_ENCODING to 'LATIN1'
Linux users
When running the Harmony Agent on Linux, always use the PostgreSQL driver installed with the agent. The PostgreSQL driver installed with many distributions as part of unixODBC does not work well with Harmony and produces errors.
WHERE clause examples
These WHERE clause examples are provided for reference purposes when configuring a Database query activity:
WHERE first_name = 'Jamie' AND
 last_name = 'Rice';
WHERE amount <= 1 OR amount >= 8;
WHERE distributors.name LIKE 'W%'
WHERE did = $1;
WHERE manager_name = 'Mary'
WHERE er.employee_name = e.manager_name
For additional examples, refer to PostgreSQL Tutorial and the PostgreSQL Manual for your version.
Progress
Follow the steps below to configure and use the Progress JDBC driver on each Harmony private agent within a private agent group:
-
Download the Progress database JDBC driver (
openedge.jar). -
Stop Jitterbit services by running
StopServices.batin your private agent home directory. The private agent root directory is usually in one of these default locations:-
Windows (Harmony):
C:\Program Files (x86)\Jitterbit Agent\ -
Windows (v5.x):
C:\Program Files (x86)\Jitterbit Integration Server\ -
Linux:
/opt/jitterbit
-
-
Copy the JAR file to this recommended folder path:
<JITTERBIT_HOME>/tomcat/drivers/lib/, replacing<JITTERBIT_HOME>with the private agent root directory.Caution
You may also have JAR files located in
<JITTERBIT_HOME>/tomcat/webapps/axis/WEB-INF/lib/; however, this directory may be overwritten if you upgrade your private agent. Instead, we recommend placing any drivers you install in<JITTERBIT_HOME>/tomcat/drivers/lib/. -
Add these lines to
JdbcDrivers.conffile in your private agent home directory:<Driver> <Name>Progress OpenEdge</Name> <Class>com.ddtek.jdbc.openedge.OpenEdgeDriver</Class> <Subprotocol>datadirect:openedge</Subprotocol> </Driver> -
Restart Jitterbit services by running
StartServices.batin the private agent home directory. -
During configuration of the Database connection, specify these inputs:
-
Driver Type: Select JDBC.
-
Driver: Select the Progress OpenEdge driver.
-
Use Connection String: Under Optional Settings, select this checkbox.
-
-
Connection String: Under Optional Settings, enter the manual connection string with the appropriate host, port, and database name:
jdbc:datadirect:openedge://localhost:7777;databaseName=jb -
On successful connection, you should be able to view the tables and views during Database activity configuration.