Epicor Prophet 21 Create activity
Introduction
An Epicor Prophet 21 Create activity, using its Epicor Prophet 21 connection, creates object data in Epicor Prophet 21 and is intended to be used as a target to consume data in an operation.
Create an Epicor Prophet 21 Create activity
An instance of an Epicor Prophet 21 Create activity is created from an Epicor Prophet 21 connection using its Create activity type.
To create an instance of an activity, drag the activity type to the design canvas or copy the activity type and paste it on the design canvas. For details, see Create an activity instance in Component reuse.
An existing Epicor Prophet 21 Create activity can be edited from these locations:
- The design canvas (see Component actions menu in Design canvas).
- The project pane's Components tab (see Component actions menu in Project pane Components tab).
Configure an Epicor Prophet 21 Create activity
Follow these steps to configure an Epicor Prophet 21 Create activity:
-
Step 1: Enter a name and select an object
Provide a name for the activity and select an object. -
Step 2: Review the data schemas
Any request or response schemas are displayed.
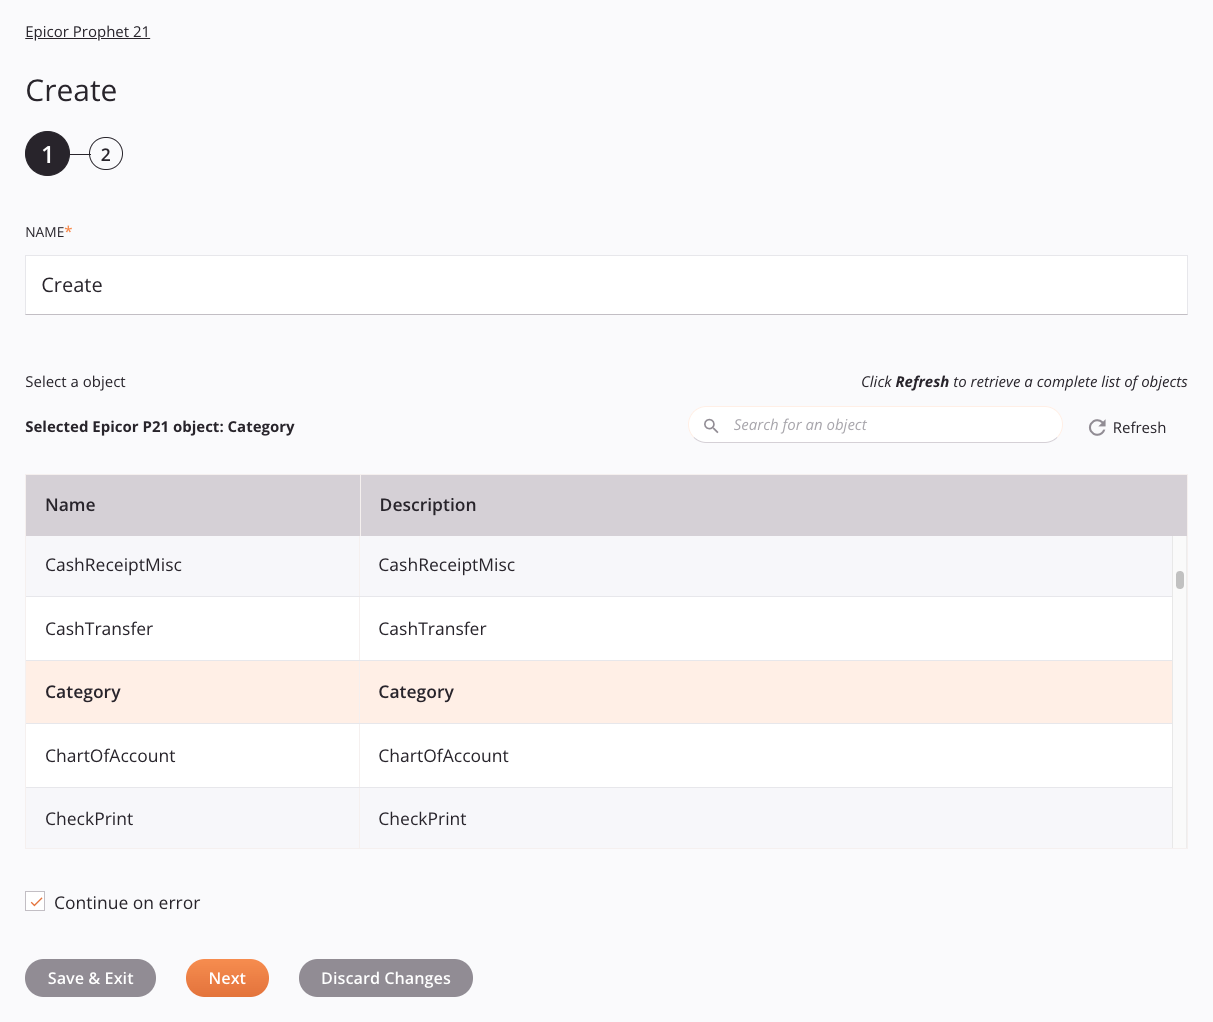
Step 1: Enter a name and select an object
In this step, provide a name for the activity and select an object. Each user interface element of this step is described below.
-
Name: Enter a name to identify the activity. The name must be unique for each Epicor Prophet 21 Create activity and must not contain forward slashes
/or colons:. -
Select an Object: This section displays objects available in the Epicor Prophet 21 endpoint.
-
Selected Epicor P21 Object: After an object is selected, it is listed here.
-
Search: Enter any column's value into the search box to filter the list of objects. The search is not case-sensitive. If objects are already displayed within the table, the table results are filtered in real time with each keystroke. To reload objects from the endpoint when searching, enter search criteria and then refresh, as described below.
-
Refresh: Click the refresh icon
 or the word Refresh to reload objects from the Epicor Prophet 21 endpoint. This may be useful if objects have been added to Epicor Prophet 21. This action refreshes all metadata used to build the table of objects displayed in the configuration.
 -
Selecting an Object: Within the table, click anywhere on a row to select an object. Only one object can be selected. The information available for each object is fetched from the Epicor Prophet 21 endpoint:
-
Name: The name of the object.
-
Description: The description of the object.
-
Tip
If the table does not populate with available objects, the Epicor Prophet 21 connection may not be successful. Ensure you are connected by reopening the connection and retesting the credentials.
-
-
Continue on Error: Select to continue the activity execution if an error is encountered for a dataset in a batch request. If any errors are encountered, they are written to the operation log.
Note
When a Create activity is configured without Continue on Error and the API returns a
200response with at least one failed record, the operation reports an error. -
Save & Exit: If enabled, click to save the configuration for this step and close the activity configuration.
-
Next: Click to temporarily store the configuration for this step and continue to the next step. The configuration will not be saved until you click the Finished button on the last step.
-
Discard Changes: After making changes, click to close the configuration without saving changes made to any step. A message asks you to confirm that you want to discard changes.
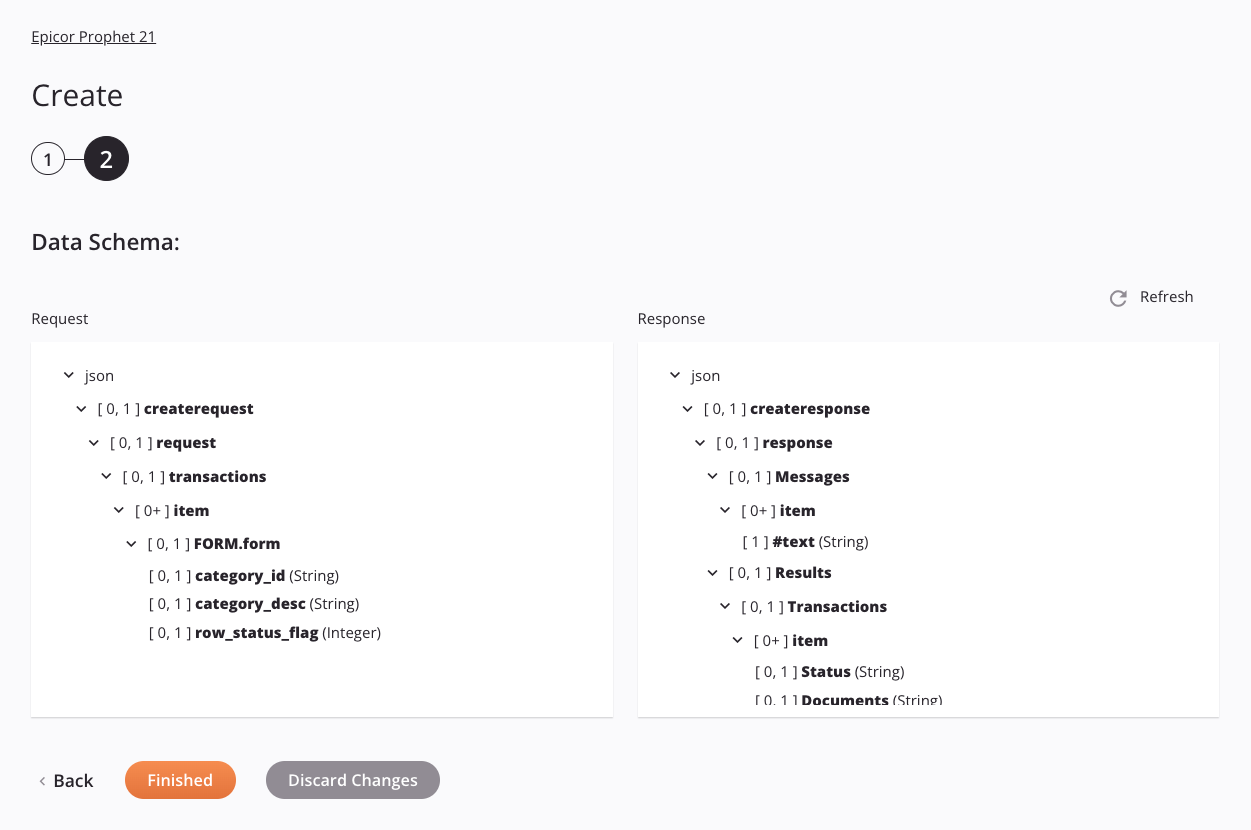
Step 2: Review the data schemas
Any request or response schemas are displayed. Each user interface element of this step is described below.
-
Data Schemas: These data schemas are inherited by adjacent transformations and are displayed again during transformation mapping.
The Epicor Prophet 21 Create activity uses this Epicor Prophet 21 Middleware API:
- Transaction API Services
Refer to the API documentation for information on the schema nodes and fields. API documentation can be accessed through your Epicor Prophet 21 Middleware account using this URL:
https://[YOUR_MIDDLEWARE_URL].com/docs/apiref.aspx(replace[YOUR_MIDDLEWARE_URL]with the URL to your Epicor Prophet 21 Middleware instance). -
Refresh: Click the refresh icon
or the word Refresh to regenerate schemas from the Epicor Prophet 21 endpoint. This action also regenerates a schema in other locations throughout the project where the same schema is referenced, such as in an adjacent transformation. -
Back: Click to temporarily store the configuration for this step and return to the previous step.
-
Finished: Click to save the configuration for all steps and close the activity configuration.
-
Discard Changes: After making changes, click to close the configuration without saving changes made to any step. A message asks you to confirm that you want to discard changes.
Next steps
After configuring an Epicor Prophet 21 Create activity, complete the configuration of the operation by adding and configuring other activities, transformations, or scripts as operation steps. You can also configure the operation settings, which include the ability to chain operations together that are in the same or different workflows.
Menu actions for an activity are accessible from the project pane and the design canvas. For details, see Activity actions menu in Connector basics.
Epicor Prophet 21 Create activities can be used as a target with these operation patterns:
- Transformation pattern
- Two-transformation pattern (as the first or second target)
To use the activity with scripting functions, write the data to a temporary location and then use that temporary location in the scripting function.
When ready, deploy and run the operation and validate behavior by checking the operation logs.