HTTP connection
Introduction
An HTTP connection, created using the HTTP connector, establishes access over the HTTP or HTTPS protocol to a service such as a REST API, GraphQL API, or web form. Once a connection is configured, you can create instances of HTTP activities associated with that connection to be used either as sources (to provide data in an operation) or as targets (to consume data in an operation).
Note
This connector supports the Enable Re-authentication on Change organization policy. If enabled, a change to the Base URL or Username in this connection requires users to re-enter the Password for the connection.
Important
With the release of the HTTP v2 connector, we recommend converting existing HTTP connections and activities to HTTP v2. Learn more about the benefits of the HTTP v2 connector in our HTTP v2 blog post or see a comparison of HTTP and HTTP v2 connector features.
Jitterbit's long-term intention is to deprecate the HTTP connector, which will be announced in accordance with Jitterbit's End-of-life policy. At present, there is no timeline for deprecation and the HTTP connector remains fully supported. We recommend that you convert existing HTTP connections and activities to HTTP v2 when possible.
Create or edit an HTTP connection
A new HTTP connection is created using the HTTP connector from one of these locations:
- The design component palette's Project endpoints and connectors tab (see Design component palette).
- The Global Connections page (see Create a global connection in Global connections).
An existing HTTP connection can be edited from these locations:
- The design component palette's Project endpoints and connectors tab (see Design component palette).
- The project pane's Components tab (see Component actions menu in Project pane Components tab).
- The Global Connections page (see Edit a global connection in Global connections).
Configure an HTTP connection
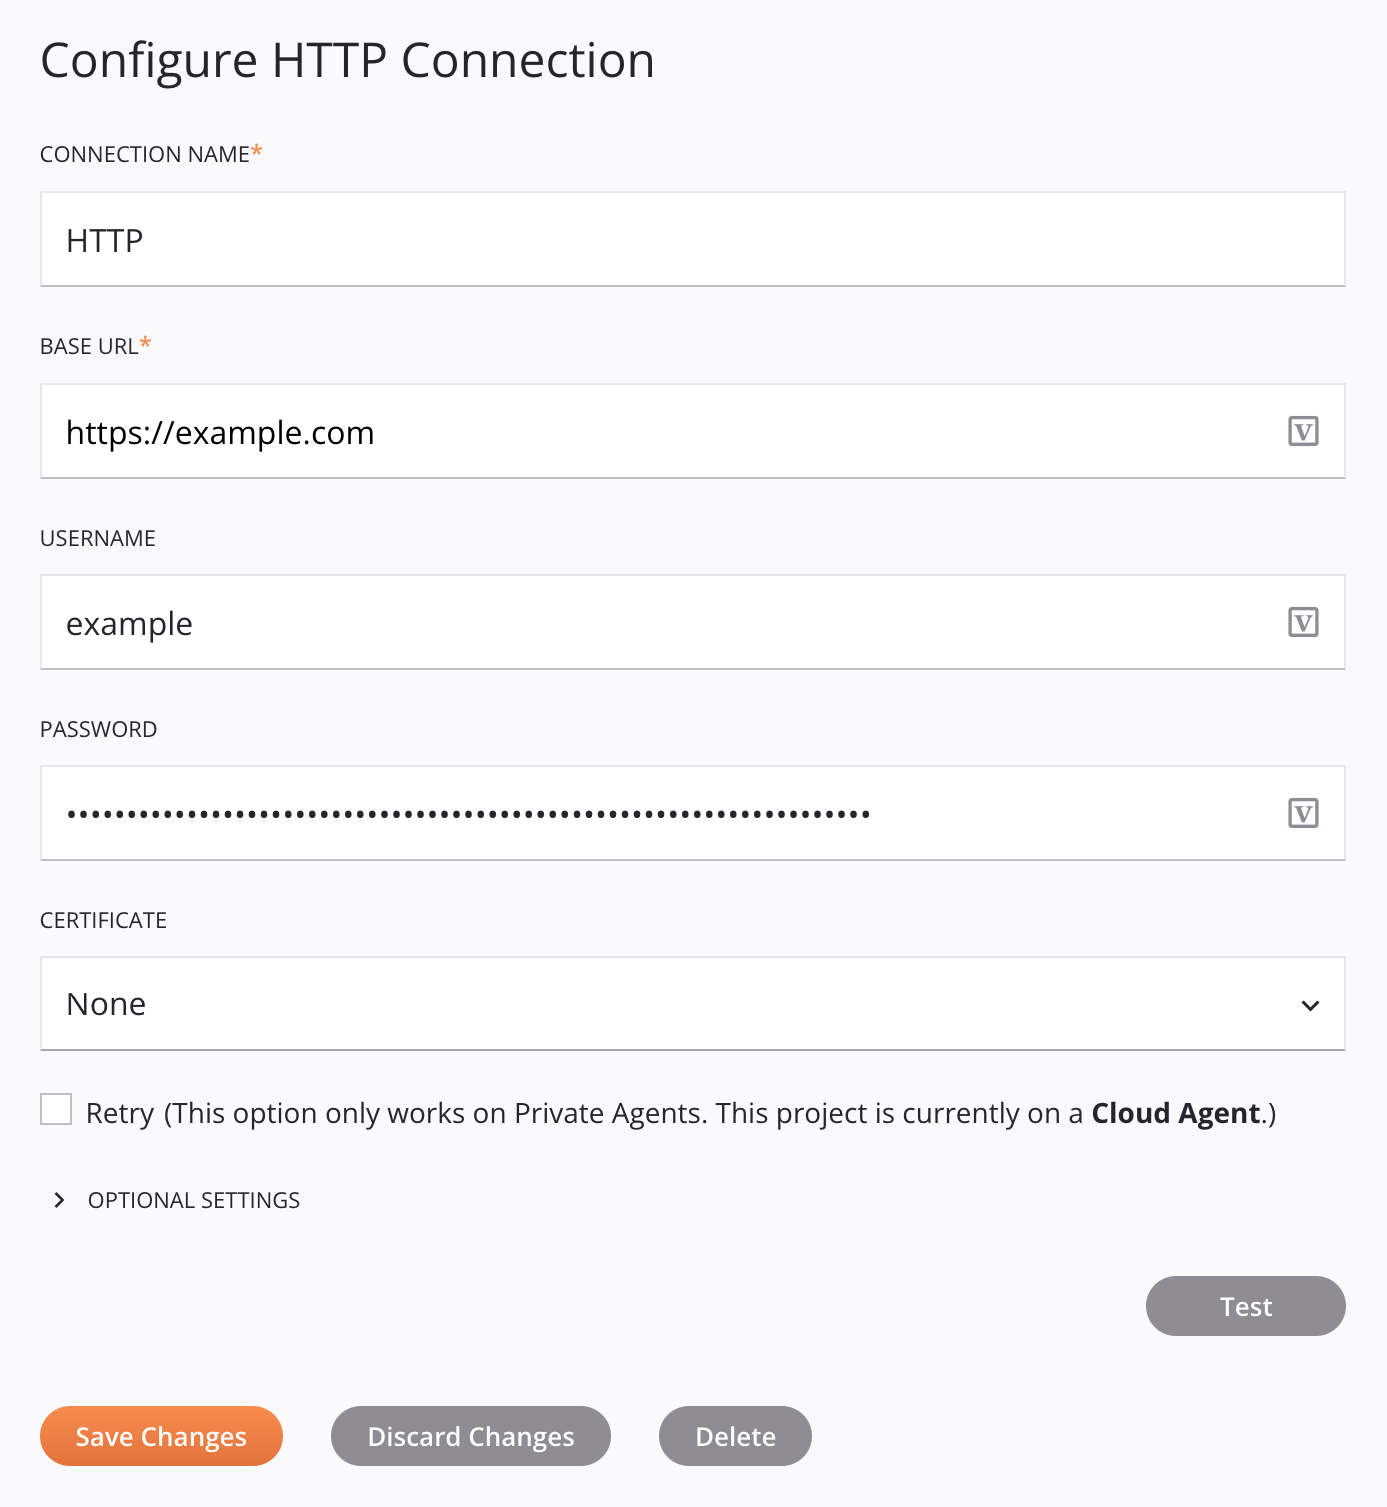
Each user interface element of the HTTP connection configuration screen is described below.
Tip
Fields with a variable icon ![]() support using global variables, project variables, and Jitterbit variables. Begin either by typing an open square bracket
support using global variables, project variables, and Jitterbit variables. Begin either by typing an open square bracket [ into the field or by clicking the variable icon to display a list of the existing variables to choose from.
-
Connection Name: Enter a name to use to identify the connection. The name must be unique for each HTTP connection and must not contain forward slashes (
/) or colons (:). This name is also used to identify the HTTP endpoint, which refers to both a specific connection and its activities. -
Base URL: Enter a valid base URL for the connection. To use SSL encryption, simply use
https://in the URL. Do not include any query parameters or paths unless they will be used for all associated activities (You will be able to specify unique paths and parameters during activity configuration.). The final URL will be concatenated from the Base URL provided here along with any paths specified during activity configuration. -
Username and Password: If applicable, enter a username and password that will allow access to the HTTP server. You can leave these fields blank for anonymous authentication if no username or password is required.
-
Certificate: Use the menu to select an available certificate to authenticate with the HTTP server. You can manage client-side SSL certificates from the Management Console under Customizations > Client certificates.
-
Retry: Functional only when using an environment associated with a private agent group, this setting is used to retry a request when an HTTP endpoint returns one of these status codes:
500,502,503, or504.This setting takes effect when used with private agents version 10.22 or later.
Note
For private agents version 10.30 through 10.33, the
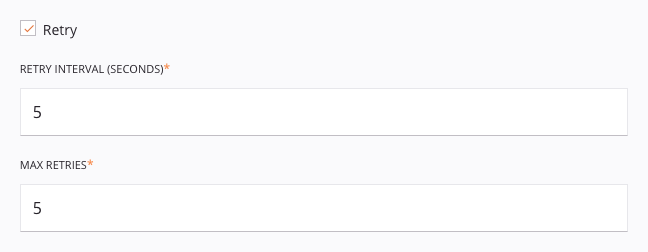
RecoverableStatusCodesetting and the error code list must be added manually to the Private agent configuration file.Select the Retry checkbox to expand additional configuration options:
-
Retry Interval (Seconds): Enter the number of seconds (maximum of 5 seconds) to wait before resending a request to the HTTP endpoint.
-
Max Retries: Enter the maximum number of times (recommended no more than 5 times) to retry sending a request to the HTTP endpoint. If the request still fails after the maximum number of retries, an exception with an error message will be returned in the operation log. In addition, the private agent will log each retry in the
jitterbit.loglog file.Each retry is treated as part of the same operation run, where only a single record appears in the operation log. Any operation actions configured to run downstream operations are triggered based on the end status of the operation after retrying up to the maximum number of retries.
-
-
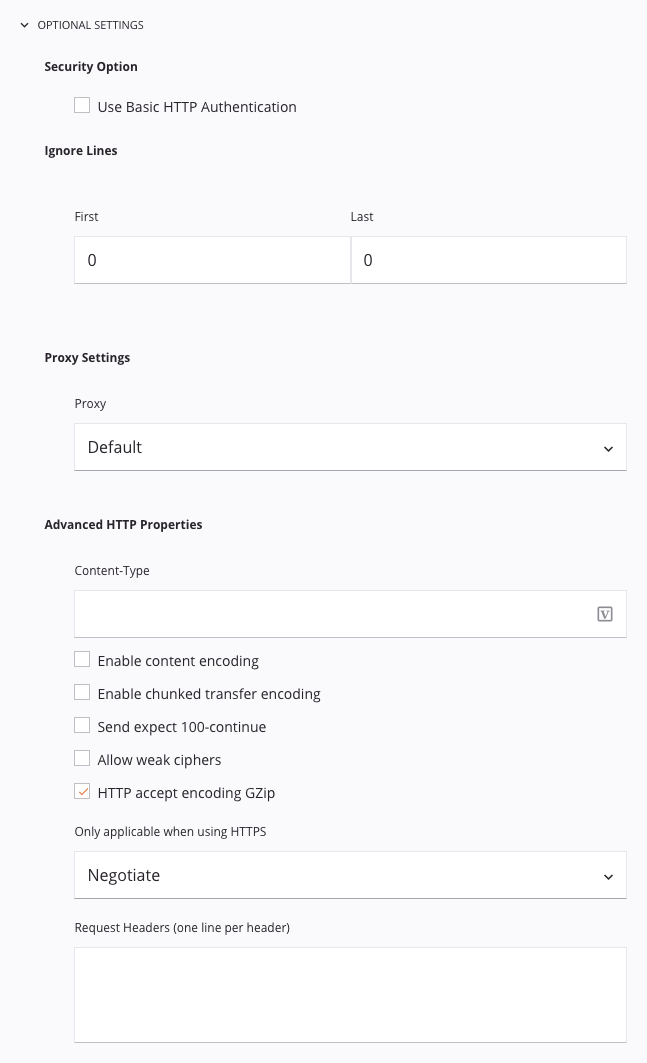
Optional Settings: Click to expand additional optional settings:
-
Security Option: If applicable, select Use Basic HTTP Authentication to authenticate with the host using basic HTTP authentication without SSL encryption. Note that if this option is used, the provided password is sent in clear text. (Unless required, this is not recommended.)
If this option is not used, by default Harmony negotiates with the endpoint to determine which authentication methods are supported, and uses the provided credentials against one of the protocols. In addition to HTTP Basic, Harmony supports these HTTP authentication options:
-
HTTP Digest
-
HTTP Digest with authentication with an IE flavor
-
-
Ignore Lines: If there are headers and/or footers in the source data that you want to be ignored, enter the number of lines to ignore in the First and Last fields.
-
Proxy Settings: If you want to specify a custom proxy, use the dropdown to select one of these options:
-
Default: Proxy settings are enabled, using the Private agent proxy configuration if one exists. If proxy settings are not specified in the agent configuration, then the Default setting has the same result as the Disable setting.
-
Disable: Proxy settings are disabled for this specific connection, bypassing the Private agent proxy configuration if one exists.
-
Custom: Proxy settings are enabled for this specific connection using custom information provided here. This option bypasses the Private agent proxy configuration if one exists, and instead uses custom proxy information. When Custom is selected, additional fields become available for you to configure. For details on these fields, see Enabling proxy for private agents.
Note
Additional fields with a variable icon
 support variables with 10.66 agents and later.
-
-
Advanced HTTP Properties: If applicable, set these advanced options:
-
Content-Type: Enter the content-type of the request structure that is expected by the particular API. If the method being used does not accept structured data, or if the API does not require the content-type to be specified, you can leave this field blank. Examples of content-types include
text/plain,application/json,application/x-www-form-urlencoded, etc. -
Enable Content Encoding: If selected, the Accept-Encoding header is sent with the encoding supported by Harmony. Currently Gzip is supported.
-
Enable Chunked Transfer Encoding: If selected, the Transfer-Encoding: chunked header is sent. Use this option if you are transferring large data sets.
-
Send Expect 100-continue: If selected, the Expect: 100-continue header is sent. With this option, no data is sent until the HTTP server has validated the headers. Use this option if you are sending large amounts of data but don't want to use chunked transfer encoding.
-
Allow Weak Ciphers: Select this checkbox to communicate with HTTP servers that use weak ciphers (DES/3DES and RC4).
-
HTTP Accept Encoding Gzip: Selected by default, this option tells the HTTP server that Harmony can accept a Gzip-compressed response. In return, Harmony follows the RFC 1952 standard and automatically decompresses Gzip HTTP responses. If the server does not use Gzip, Harmony sees that the response is not compressed and handles it as usual.
Note
This setting is unrelated to the Gzip connector.
-
Only Applicable When Using HTTPS: Use the dropdown to select a specific SSL version if the HTTP server requires it. The default is Negotiate.
-
Request Headers (One Line per Header): Any text entered in this box is sent as an HTTP header. Specify each header on one line unless the header is wrapped according to the HTTP standard. This field also supports using global variables, project variables, and Jitterbit variables by replacing variables in square brackets
[ ]with their values.
-
-
-
Test: Click to verify the connection by sending an HTTP GET request with no authorization.
-
Save Changes: Click to save and close the connection configuration.
-
Discard Changes: After making changes to a new or existing configuration, click to close the configuration without saving. A message asks you to confirm that you want to discard changes.
-
Delete: After opening an existing connection configuration, click to permanently delete the connection from the project and close the configuration (see Component dependencies, deletion, and removal). A message asks you to confirm that you want to delete the connection.
Next steps
After an HTTP connection has been created, you place an activity type on the design canvas to create activity instances to be used either as sources (to provide data in an operation) or as targets (to consume data in an operation).
Menu actions for a connection and its activity types are accessible from the project pane and design component palette. For details, see Actions menus in Connector basics.
-
GET: Retrieves information about a resource on a service accessible over the HTTP or HTTPS protocol and can be used as a source or target in an operation.
-
PUT: Replaces an existing resource on a service accessible over the HTTP or HTTPS protocol and can be used as a source or target in an operation.
-
POST: Creates a new resource on a service accessible over the HTTP or HTTPS protocol and can be used as a source or target in an operation.
-
DELETE: Deletes a resource on a service accessible over the HTTP or HTTPS protocol and can be used as a source or target in an operation.
-
Custom: Performs a specified HTTP method on a service accessible over the HTTP or HTTPS protocol and can be used as a source or target in an operation.