Jira connection
Introduction
A Jira connection, created using the Jira connector, establishes access to Jira. Once a connection is configured, you can create instances of Jira activities associated with that connection to be used either as sources (to provide data in an operation) or as targets (to consume data in an operation).
Create or edit a Jira connection
A new Jira connection is created using the Jira connector from one of these locations:
- The design component palette's Project endpoints and connectors tab (see Design component palette).
- The Global Connections page (see Create a global connection in Global connections).
An existing Jira connection can be edited from these locations:
- The design component palette's Project endpoints and connectors tab (see Design component palette).
- The project pane's Components tab (see Component actions menu in Project pane Components tab).
- The Global Connections page (see Edit a global connection in Global connections).
Configure a Jira connection
Each user interface element of the Jira connection configuration screen is described below.
The interface used in the Jira connection configuration depends on the Authentication Mechanism option selected:
-
Credential-based auth: For this option, the connection is authenticated using a username and an API token or password.
-
OAuth: For this option, the connection is authenticated using a 3-legged OAuth 2.0 app. This option requires the use of agent version 10.83 / 11.21 or later.
Note
Credential-based Auth must be used for configuring a global connection.
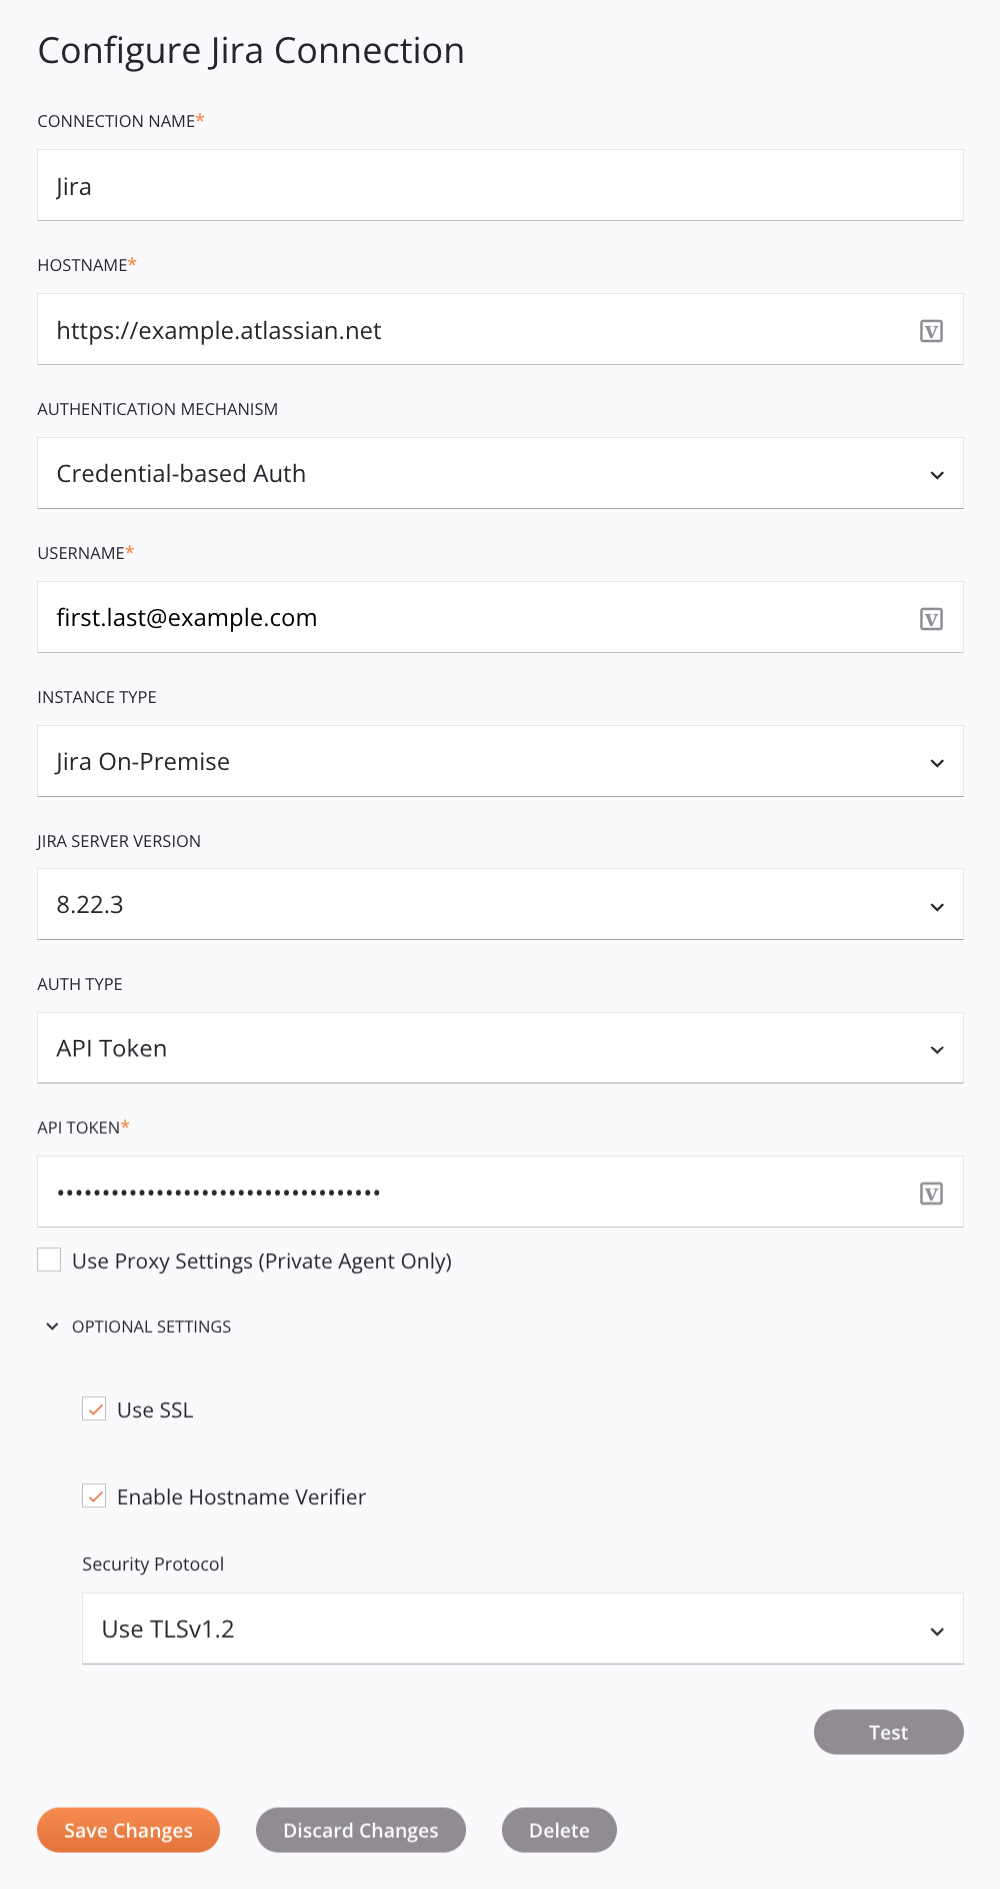
Credential-based auth
When Credential-based Auth is selected as the Authentication Mechanism, this interface is presented:
Tip
Fields with a variable icon ![]() support using global variables, project variables, and Jitterbit variables. Begin either by typing an open square bracket
support using global variables, project variables, and Jitterbit variables. Begin either by typing an open square bracket [ into the field or by clicking the variable icon to display a list of the existing variables to choose from.
-
Connection Name: Enter a name to use to identify the connection. The name must be unique for each Jira connection and must not contain forward slashes
/or colons:. This name is also used to identify the Jira endpoint, which refers to both a specific connection and its activities. -
Hostname: Enter the Jira hostname. The name can be preceded by either
https://orhttp://. If not provided,https://is assumed. -
Authentication Mechanism: Select Credential-based Auth to authenticate using a username and an API token or password (described below).
-
Username: Enter the Jira username.
-
Instance Type: Select an instance type from the list, either Jira Cloud or Jira On-premise:
-
Jira Cloud: Connect to Jira Software Cloud.
-
Jira On-premise: Connect to Jira Server or Jira Data Center.
-
-
Jira Server Version: When Jira On-premise is selected as the Instance Type, select the version of Jira Server or Jira Data Center to use, either 8.22.3 or 9.4.3.
-
Auth Type: Select the authentication type for the Jira instance, either API Token or Password. This option is visible only when Jira On-premise is selected as the Instance Type. If Jira Cloud is selected as the Instance Type, you must enter an API token for authentication.
-
API Token: Enter the API token for the Jira instance.
-
Password: Enter the password for the Jira instance.
-
Use Proxy Settings (Private Agent Only): When using a private agent, this setting can be selected to use Private agent proxy settings.
-
Optional Settings: Click to expand additional optional settings:
-
Use SSL: When using a private agent, select to authenticate the connection using client Secure Sockets Layer (SSL).
Important
When using this option, a certificate must be added to the Jitterbit Java KeyStore.
-
Enable Hostname Verifier: When using a self-signed certificate, select to prevent the HTTP request from being blocked by the connector.
-
Security Protocol: When Use SSL is selected, use the menu to select the security protocol to use, either TLSv1.2 or TLSv1.3. For more information on these protocols, see RFC 6347 (TLS v1.2) or 8446 (TLS v1.3).
-
-
Test: Click to verify the connection using the provided configuration. When the connection is tested, the latest version of the connector is downloaded by the agent(s) in the agent group associated with the current environment. This connector supports suspending the download of the latest connector version by using the Disable Auto Connector Update organization policy.
-
Save Changes: Click to save and close the connection configuration.
-
Discard Changes: After making changes to a new or existing configuration, click to close the configuration without saving. A message asks you to confirm that you want to discard changes.
-
Delete: After opening an existing connection configuration, click to permanently delete the connection from the project and close the configuration (see Component dependencies, deletion, and removal). A message asks you to confirm that you want to delete the connection.
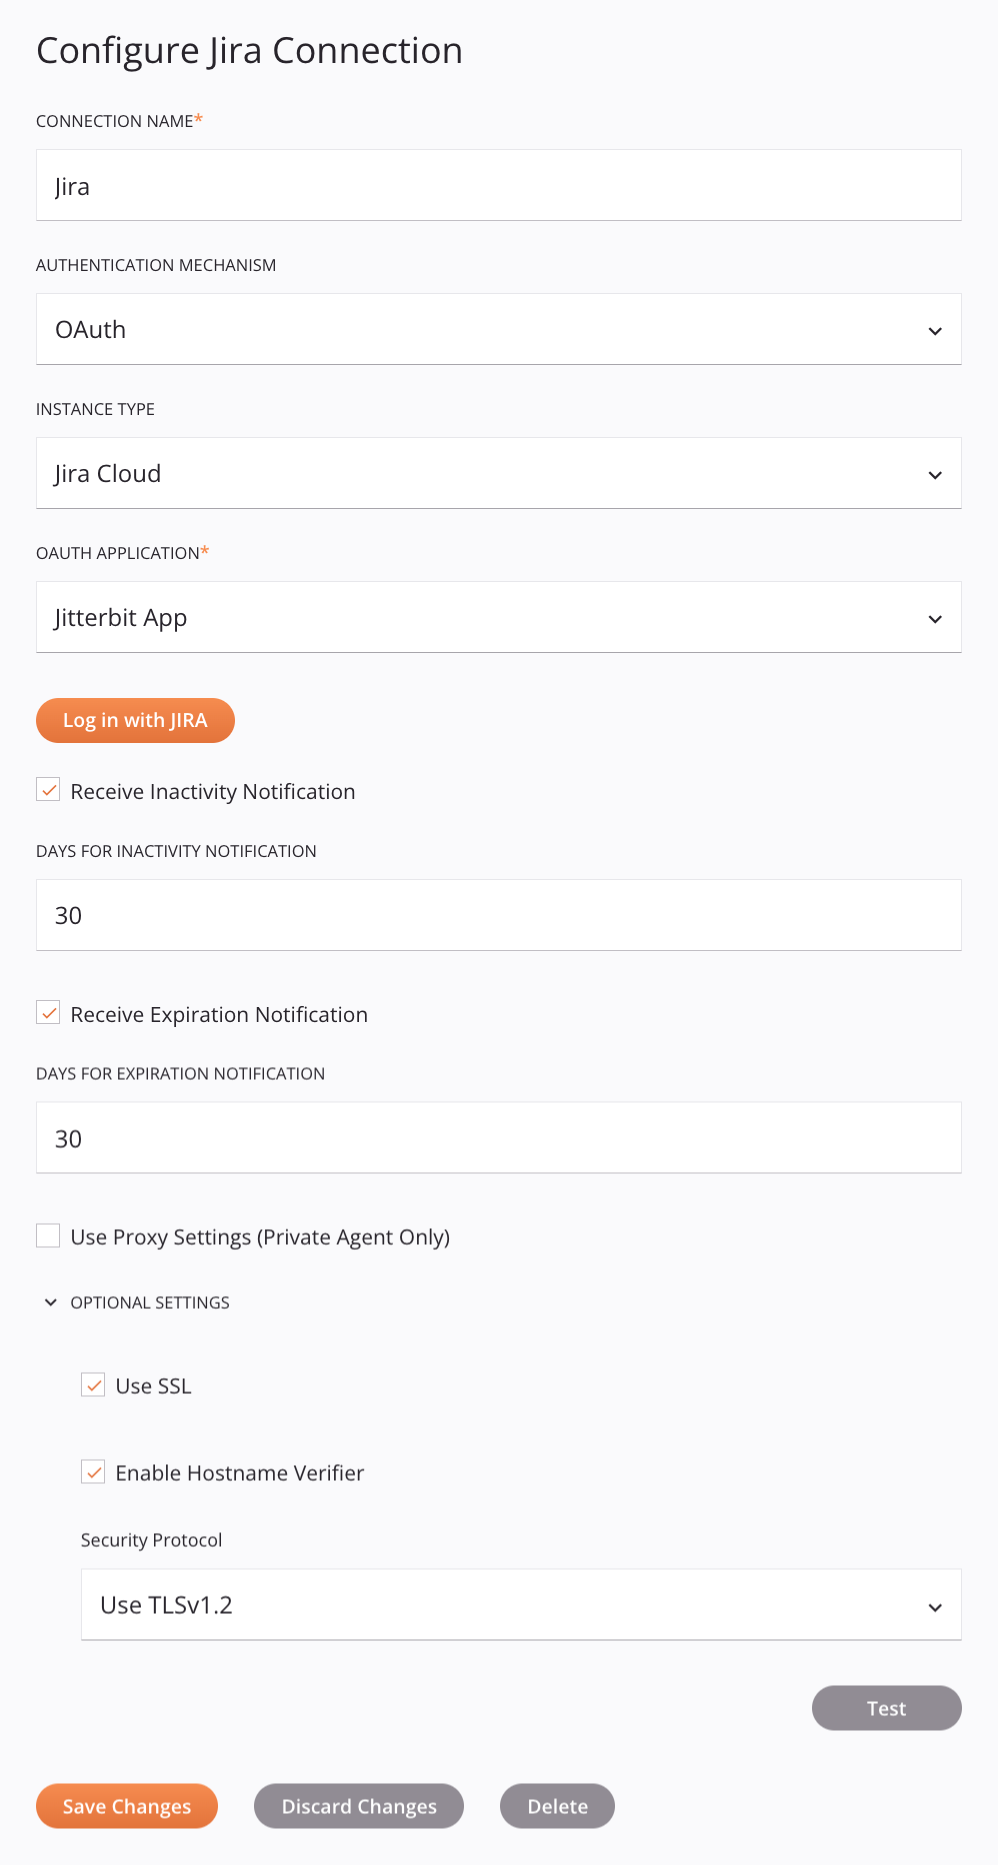
OAuth
When OAuth is selected as the Authentication Mechanism, this interface is presented:
Tip
Fields with a variable icon ![]() support using global variables, project variables, and Jitterbit variables. Begin either by typing an open square bracket
support using global variables, project variables, and Jitterbit variables. Begin either by typing an open square bracket [ into the field or by clicking the variable icon to display a list of the existing variables to choose from.
-
Connection Name: Enter a name to use to identify the connection. The name must be unique for each Jira connection and must not contain forward slashes
/or colons:. This name is also used to identify the Jira endpoint, which refers to both a specific connection and its activities. -
Authentication Mechanism: Select OAuth to authenticate using a 3-legged OAuth 2.0 application. When this authentication mechanism is selected, the OAuth Application field becomes available (described below). This option requires the use of agent version 10.83 / 11.21 or later.
-
Instance Type: Select an instance type from the list, either Jira Cloud or Jira On-premise:
-
Jira Cloud: Connect to Jira Software Cloud.
-
Jira On-premise: Connect to Jira Server or Jira Data Center.
-
-
Hostname: When Jira On-premise is selected as the Instance Type, enter the Jira hostname. The name can be preceded by either
https://orhttp://. If not provided,https://is assumed. -
Jira Server Version: When Jira On-premise is selected as the Instance Type, select the version of Jira Server or Jira Data Center to use, either 8.22.3 or 9.4.3.
-
OAuth Application: Use the menu to select an OAuth 2.0 application from one of these categories:
-
Cloud Applications: The application in this category (Jitterbit App) is a Jitterbit-provided OAuth 2.0 application. This application is visible only when using a cloud agent group and when Jira Cloud is selected as the Instance Type.
-
Private Applications: This category displays Jira connector applications configured in the Management Console App registrations page. To configure a Jira connector application in the App Registrations page, you must first configure a 3-legged OAuth 2.0 application for the Jira instance.
-
-
Log in with Jira: Click to authenticate with the selected OAuth Application. When using a Private Application, you will be directed to the URL specified in the connector application's configured Authentication URL (see App registrations). When using the Jitterbit App, you will be directed to allow the Jitterbit App to access the Jira instance. After successfully authenticating, these fields become available:
-
Receive Inactivity Notification: When Enable refresh token inactivity expiration is enabled in the app registration's Token policy tab (under Advanced options, select to receive an email notification (and a notification throughout the Harmony Portal) after the set amount of days of user inactivity has passed.
- Days for Inactivity Notification: Enter the number of inactive days to trigger the notification. The default is
30days.
- Days for Inactivity Notification: Enter the number of inactive days to trigger the notification. The default is
-
Receive Expiration Notification: When Enable refresh token expiration is enabled in the app registration's Token policy tab (under Advanced options, select to receive an email notification (and a notification throughout the Harmony Portal) once the set amount of days prior to the OAuth 2.0 application's expiration has been met.
- Days for Expiration Notification: Enter the number of days to trigger the notification. The default is
30days.
Note
When either the Receive Inactivity Notification or Receive Expiration Notification is set, the notification is sent to the Harmony organization administrators (members of a role with the Admin permission and the user who last deployed the project.
- Days for Expiration Notification: Enter the number of days to trigger the notification. The default is
-
-
Use Proxy Settings (Private Agent Only): When using a private agent, this setting can be selected to use Private agent proxy settings.
-
Optional Settings: Click to expand additional optional settings:
-
Use SSL: When using a private agent, select to authenticate the connection using client Secure Sockets Layer (SSL).
Important
When using this option, SSL must be configured for the JMS client and a certificate must be added to the Jitterbit Java KeyStore.
-
Enable Hostname Verifier: When using a self-signed certificate, select to prevent the HTTP request from being blocked by the connector.
-
Security Protocol: From the menu, select the security protocol to use, either TLSv1.2 or TLSv1.3. For more information on these protocols, see RFC's 6347 (TLS v1.2) or 8446 (TLS v1.3).
-
-
Test: Click to verify the connection using the provided configuration. When the connection is tested, the latest version of the connector is downloaded by the agent(s) in the agent group associated with the current environment. This connector supports suspending the download of the latest connector version by using the Disable Auto Connector Update organization policy.
-
Save Changes: Click to save and close the connection configuration.
-
Discard Changes: After making changes to a new or existing configuration, click to close the configuration without saving. A message asks you to confirm that you want to discard changes.
-
Delete: After opening an existing connection configuration, click to permanently delete the connection from the project and close the configuration (see Component dependencies, deletion, and removal). A message asks you to confirm that you want to delete the connection.
Next steps
After a Jira connection has been created, you place an activity type on the design canvas to create activity instances to be used either as sources (to provide data in an operation) or as targets (to consume data in an operation).
Menu actions for a connection and its activity types are accessible from the project pane and design component palette. For details, see Actions menus in Connector basics.
These activity types are available:
-
Search: Retrieves object data from a Jira project and is intended to be used as a source in an operation.
-
Issue: Creates, updates, or deletes an issue in a Jira project and is intended to be used as a target in an operation.
-
Create: Creates object data in a Jira project and is intended to be used as a target in an operation.
-
Update: Updates object data in a Jira project and is intended to be used as a target in an operation.
-
Search Dashboard: Retrieves dashboard data from Jira and is intended to be used as a source in an operation.
-
Delete: Deletes object data from Jira and is intended to be used as a target in an operation.
-
Transition: Retrieves or updates Jira issues and is intended to be used as a target in an operation.
-
Search Filter: Retrieves filter data from Jira and is intended to be used as a source in an operation.