NetSuite Search activity
Introduction
A NetSuite Search activity retrieves existing records from NetSuite and is intended to be used as a source to provide data to an operation. After configuring a NetSuite connection, you can configure as many NetSuite activities as you like for each NetSuite connection.
In a NetSuite Search activity, you can configure these types of searches:
- Basic Search: Filters on all available fields for a selected object.
- Expanded Search: Filters on all available fields for a selected object and related objects. The selected object must have related objects.
- Advanced Search: Filters on a specific column for a selected object and related objects, and is faster than a basic or expanded search. The selected object must have related objects.
- Saved Search: Uses a reusable search that you have already defined in NetSuite.
Important
To use this activity with the CustomRecord object in an Expanded or Advanced search, an agent version 11.26 or later is required.
Create a NetSuite activity
An instance of an activity is created from a connection using an activity type.
To create an instance of an activity, drag the activity type to the design canvas or copy the activity type and paste it on the design canvas. For details, see Creating an activity instance in Component reuse.
An existing activity can be edited from these locations:
- The design canvas (see Component actions menu in Design canvas).
- The project pane's Components tab (see Component actions menu in Project pane Components tab).
Configure a NetSuite Search activity
Follow these steps to configure a NetSuite Search activity:
- Step 1: Enter a name and select an object
- Step 2: Select a search type
- Step 3: Select fields and create conditions
- Step 4: Review the data schemas
Step 1: Enter a name and select an object
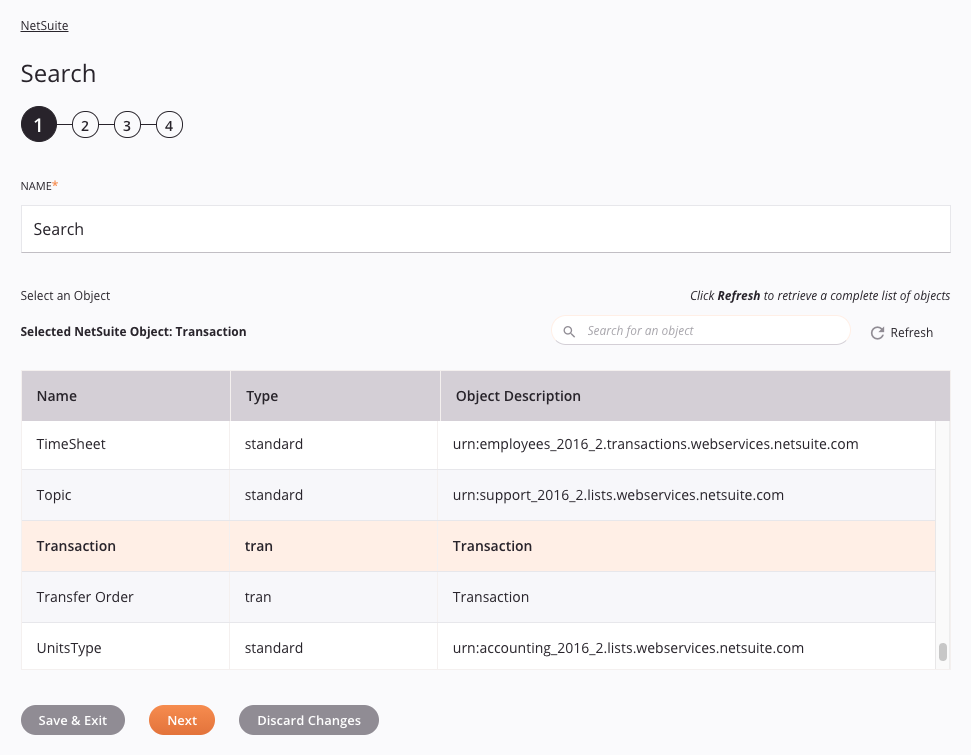
- Name: Enter a name to use to identify the NetSuite Search activity. The name must be unique for each NetSuite Search activity and must not contain forward slashes (
/) or colons (:). -
Select an Object: This section displays objects available in the NetSuite endpoint. When reopening an existing activity configuration, only the selected object is displayed instead of reloading the entire object list.
-
Selected NetSuite Object: After an object is selected, it is listed here.
-
Search: Enter any column's value into the search box to filter the list of objects. The search is not case-sensitive. If objects are already displayed within the table, the table results are filtered in real time with each keystroke. To reload objects from the endpoint when searching, enter search criteria and then refresh, as described below.
-
Refresh: Click the refresh icon
 or the word Refresh to reload objects from the NetSuite endpoint. This may be useful if you have recently added objects or fields to NetSuite. This action refreshes all metadata used to build the table of objects displayed in the configuration.
 -
Selecting an Object: Within the table, click anywhere on a row to select an object. Only one object can be selected. The information available for each object is fetched from the NetSuite endpoint:
-
Name: The object name from NetSuite.
Note
If selecting the
TransactionorItemobject directly, you can specify sub-types in step 2. This applies only to the objects with a Name ofTransactionorItemand does not apply generally across all objects with a Type of transaction (tran) or item. -
Type: The object type from NetSuite. This includes all standard, transaction (tran), item, and custom objects that are available to search within the NetSuite endpoint.
-
Object Description: The object description from NetSuite.
Tip
If the table does not populate with available objects, the NetSuite connection may not be successful. Ensure you are connected by reopening the connection and retesting the credentials.
-
-
-
Save & Exit: If enabled, click to save the configuration for this step and close the activity configuration.
- Next: Click to continue to the next step and temporarily store the configuration. The configuration is not saved until you click the Finished button on the last step.
- Discard Changes: After making changes, click to close the configuration without saving changes made to any step. A message asks you to confirm that you want to discard changes.
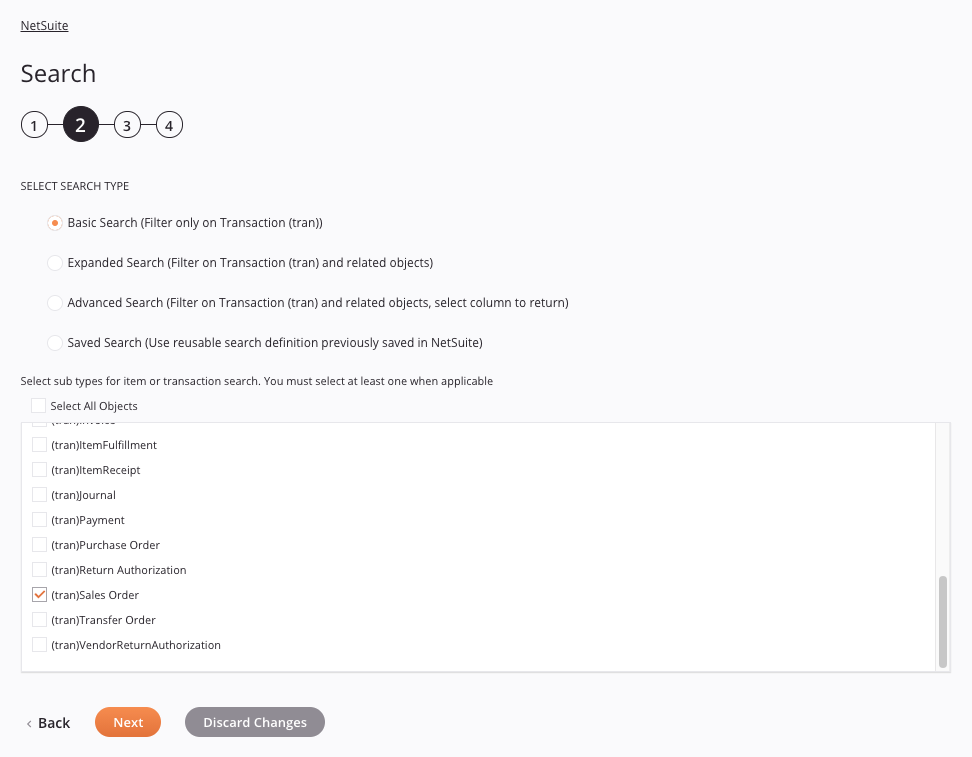
Step 2: Select a search type
-
Select Search Type: Select the type of search to perform:
-
Basic Search: Filters only on the selected object. This type of search always returns all available fields for the selected object. For example, a basic search for the
Transactionobject queries all fields in theTransactionobject. For details, see Basic search below. -
Expanded Search: Filters on the selected object and related objects. This type of search always returns all available fields for the selected object and related objects, and can be selected only for objects that have related objects in NetSuite. For example, an expanded search for the
Transactionobject also includes additional related objects in NetSuite such asaccountJoin,caseJoin,opportunityJoin,purchaseOrderJoin,userJoin, etc. For details, see Expanded search below. -
Advanced Search: Filters on the selected object and related objects. This type of search returns results only for a specific column, and can be selected only for objects that have related objects in NetSuite. An advanced search can be much faster than a basic search or expanded search, even if you do not want to query related objects, because it allows you to limit the query to specific fields in NetSuite. For details, see Advanced search below.
Warning
In an advanced search, custom segments of the type List/Record as defined in NetSuite are not supported. However, the Multiple Select type is supported in an advanced search. This limitation does not apply to other types of NetSuite searches (basic, expanded, and saved searches), which support both the List/Record and Multiple Select types. For more information, see NetSuite custom segments.
-
Saved Search: Filters using a reusable search that you have already defined in NetSuite. This type of search can be selected only for objects that support NetSuite saved searches. Instead of building the search within Jitterbit, the search is already set up within NetSuite and can then be pulled into Harmony. For additional information on NetSuite saved searches, see NetSuite documentation on Using saved searches. For details, see Saved search below.
-
-
Select Sub-types for Item or Transaction Search. You Must Select at Least One When Applicable: This section is displayed only when the object selected in the previous step is the
TransactionorItemobject. This applies only to the objects with a Name ofTransactionorItemand does not apply generally across all objects with a Type of transaction (tran) or item. If this section is displayed, use the Select All Objects checkbox to select all sub-types to include in the search, or select each sub-type individually. -
Back: Click to return to the previous step and temporarily store the configuration.
-
Next: Click to continue to the next step and temporarily store the configuration. The configuration is not be saved until you click the Finished button on the last step.
-
Discard Changes: After making changes, click to close the configuration without saving changes made to any step. A message asks you to confirm that you want to discard changes.
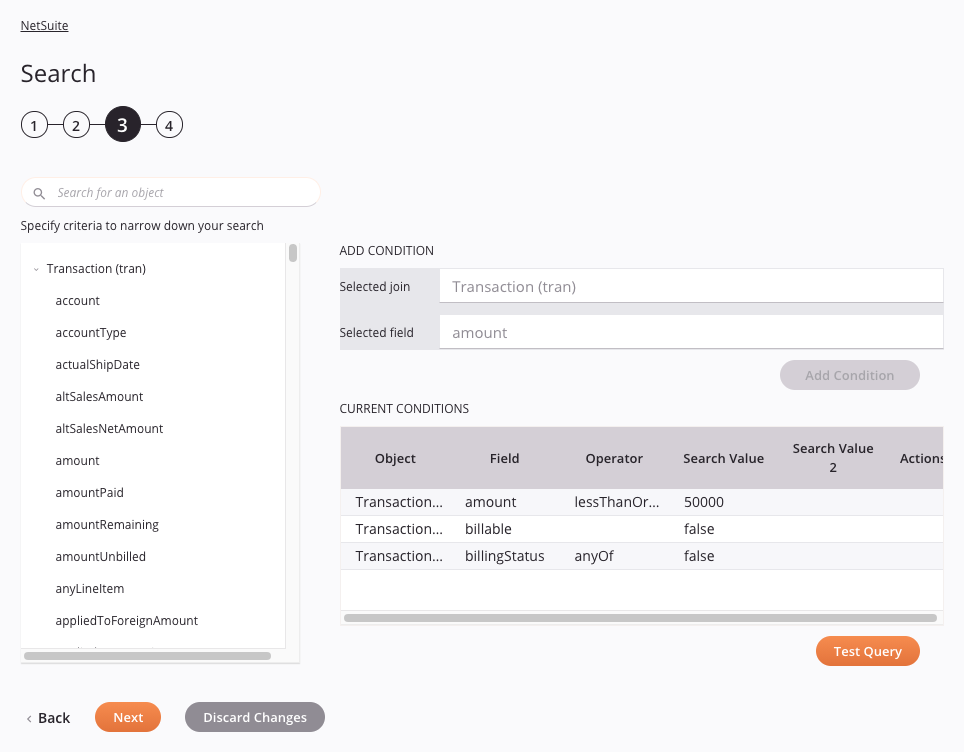
Step 3: Select fields and create conditions
The interface used in this step of the configuration of a NetSuite Search activity depends on the search type selected in the previous step:
Basic search
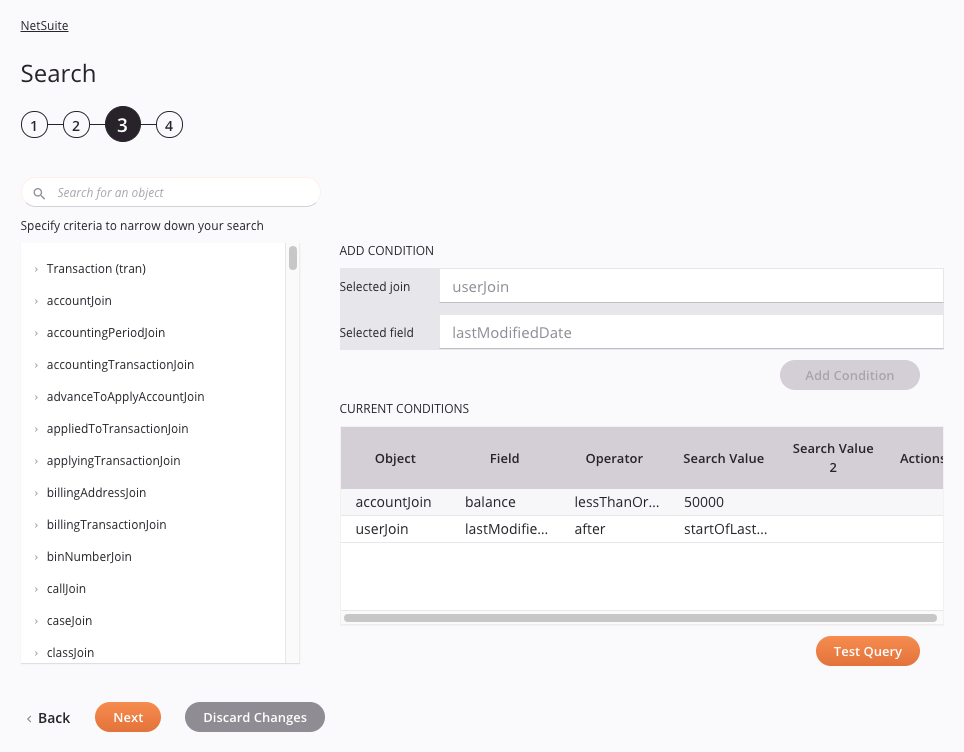
If a Basic Search was selected in step 2, this interface is presented:
-
Search: Enter any column's value into the search box to filter the list of fields for the selected object. The search is not case-sensitive. The listed results are filtered in real time with each keystroke.
-
Specify Criteria to Narrow Down Your Search: One at a time, click a field available within the selected object to select the field. When you select a field, the Add Condition area becomes populated with the object and field information for Selected Join and Selected Field, respectively.
-
Add Condition: Select a field on the left to populate the Selected Join and Selected Field fields under the Add Condition section on the right. Then click the Add Condition button to open a dialog for any appropriate selections or user input for the selected field. (The Add Condition button is disabled if you have already added the maximum number of conditions allowed by the NetSuite WSDL.) The presented options vary depending on the selected field. When complete, click the Add Condition button within the dialog to add the field to the Current Conditions table.
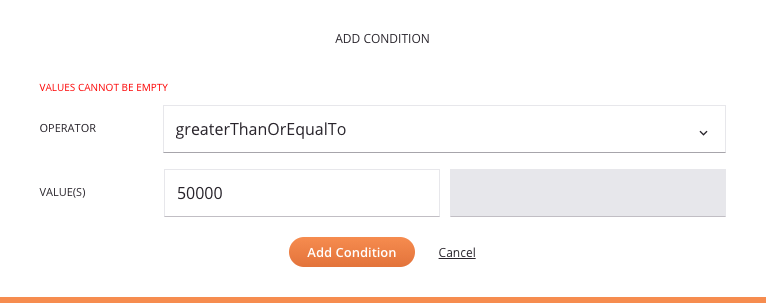
Tip
If searching within an object's
statusfield, the search values that correspond to internal statuses within NetSuite are provided for your convenience in a list under Searching by status in NetSuite. For search values to enter for other fields, refer to NetSuite's documentation. -
Current Conditions: As you select fields and add conditions using the methods described above, this table becomes populated with a summary of the selected objects and fields. These columns are displayed in the table:
- Object: The selected NetSuite object.
- Field: The selected NetSuite field.
- Operator: The operator used for the search, if any.
- Search Value: The first search value entered as input while adding the condition, if any.
- Search Value 2: The second search value entered as input while adding the condition, if any.
- Actions: In the Actions column, hover over a row to show icons for actions you can take on the row:
- Edit: Click the edit icon
 to reopen the Add Condition dialog where you can edit any selections for the condition.
 - Delete: Click the remove icon
 to remove a condition from the Current Conditions table.
- Edit: Click the edit icon
Tip
You can add any number of conditions to your search. In this way you can effectively create any combination of multiple record searches.
-
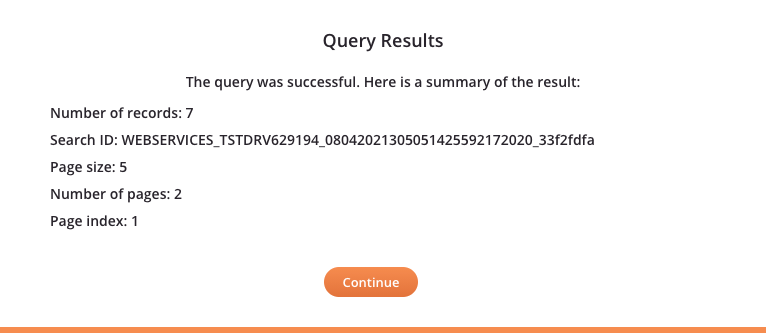
Test Query: Click to validate the query. If the query is valid, a summary of the search results is displayed in an informational message similar to that shown below. If the query is not valid, relevant error messages are displayed.
-
Back: Click to return to the previous step and temporary store the configuration.
-
Next: Click to continue to the next step and temporarily store the configuration. The configuration is not saved until you click the Finished button on the last step.
-
Discard Changes: After making changes, click to close the configuration without saving changes made to any step. A message asks you to confirm that you want to discard changes.
Expanded search
If an Expanded Search was selected in step 2, this interface is presented:
Important
To use this activity with the CustomRecord object in an Expanded Search, an agent version 11.26 or later is required.
-
Search: Enter any column's value into the search box to filter the list of fields for the selected object and any related objects. The search is not case-sensitive. The listed results are filtered in real time with each keystroke.
-
Specify Criteria to Narrow Down Your Search: One at a time, click a field available within the selected object to select the field. When you select a field, the Add Condition area becomes populated with the object and field information for Selected Join and Selected Field, respectively.
-
Add Condition: Select a field on the left to populate the Selected Join and Selected Field fields under the Add Condition section on the right. Then click the Add Condition button to open a dialog for any appropriate selections or user input for the selected field. (The Add Condition button is disabled if you have already added the maximum number of conditions allowed by the NetSuite WSDL.) The presented options vary depending on the selected field. When complete, click the Add Condition button within the dialog to add the field to the Current Conditions table. (See the documentation on basic search for a screenshot of this dialog.)
Tip
If searching within an object's
statusfield, the search values that correspond to internal statuses within NetSuite are provided for your convenience in a list under Searching by status in NetSuite. For search values to enter for other fields, refer to NetSuite's documentation. -
Current Conditions: As you select fields and add conditions using the methods described above, this table becomes populated with a summary of the selected objects and fields. These columns are displayed in the table:
- Object: The selected NetSuite object.
- Field: The selected NetSuite field.
- Operator: The operator used for the search, if any.
- Search Value: The first search value entered as input while adding the condition, if any.
- Search Value 2: The second search value entered as input while adding the condition, if any.
- Actions: In the column with an actions menu icon
 , hover over a row to show icons for actions you can take on the row:
- Edit: Click the edit icon to reopen the Add Condition dialog where you can edit any selections for the condition.
- Delete: Click the remove icon to remove a condition from the Current Conditions table.
- Edit: Click the edit icon
Tip
You can add any number of conditions to your search. In this way you can effectively create any combination of multiple record searches.
-
Test Query: Click to validate the query. If the query is valid, a summary of the search results is displayed. If the query is not valid, relevant error messages are displayed. (See the documentation on basic search for a screenshot of query results.)
Caution
Expanded searches must include a query on a related object, or the Test Query button is disabled. If the search is on the same object, please use a basic search.
-
Back: Click to return to the previous step and temporarily store the configuration.
-
Next: Click to continue to the next step and temporarily store the configuration. The configuration is not saved until you click the Finished button on the last step.
-
Discard Changes: After making changes, click to close the configuration without saving changes made to any step. A message asks you to confirm that you want to discard changes.
Advanced search
If an Advanced Search was selected in step 2, this interface is presented:
Important
To use this activity with the CustomRecord object in an Advanced Search, an agent version 11.26 or later is required.
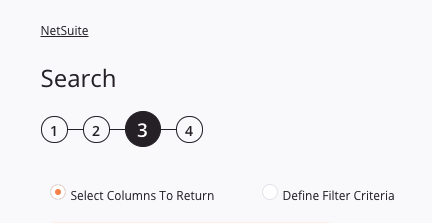
On this step, different configuration options are shown depending on whether Selected Columns to Return or Define Filter Criteria is selected.
Warning
Though these radio buttons might make it seem like you should select either one option or the other, they are actually two different specifications, both of which need to be reviewed and configured. Be sure to select each one to configure the options on each screen.
-
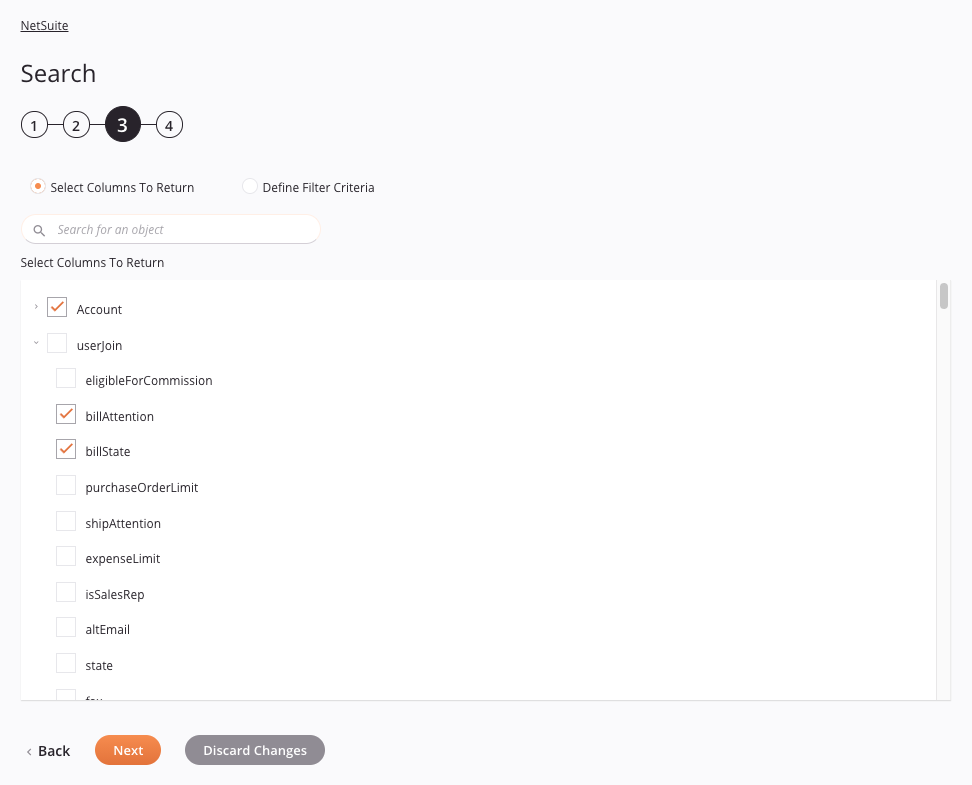
Select Columns to Return: When this option is selected, the columns to be returned can be specified:
-
Search: Enter any column's value into the search box to filter the list of fields for the selected object and any related objects. The search is not case-sensitive. The listed results are filtered in real time with each keystroke.
-
Select Columns to Return: Select the checkboxes of the specific fields to include in the search. You can also select an entire object to select all of its fields at once.
-
-
Define Filter Criteria: When this option is selected, the filter criteria to be used in the search can be specified:
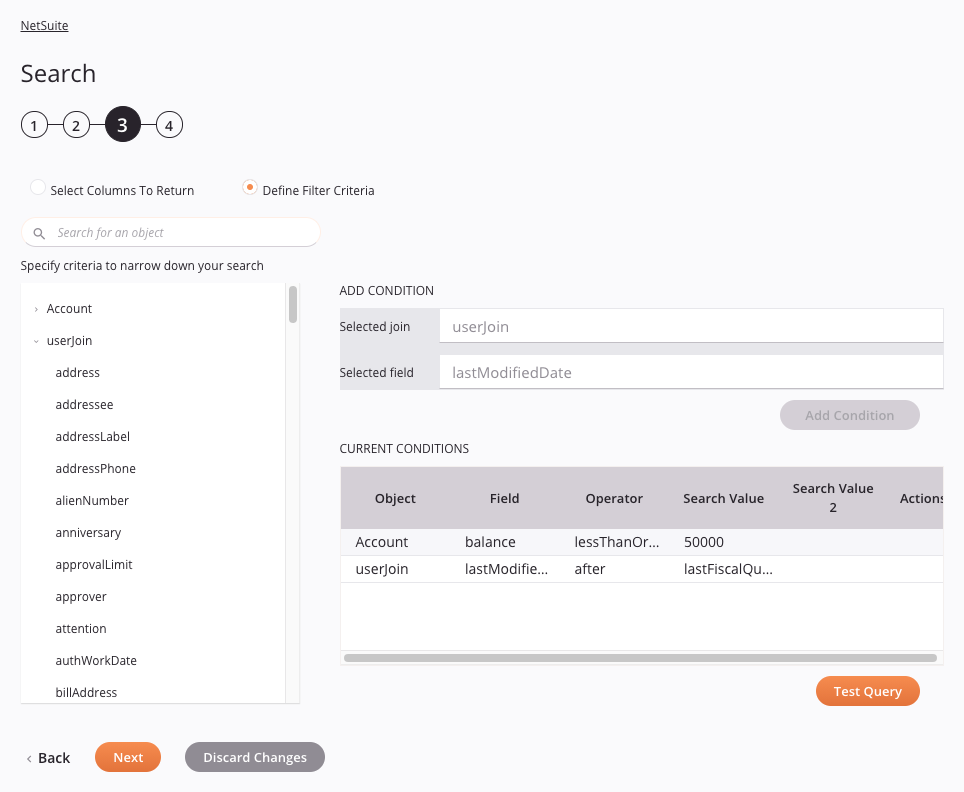
-
Search: Enter any column's value into the search box to filter the list of fields for the selected object and any related objects. The search is not case-sensitive. The listed results are filtered in real time with each keystroke.
-
Specify Criteria to Narrow Down Your Search: One at a time, click a field available within the selected object to select the field. When you select a field, the Add Condition area becomes populated with the object and field information for Selected Join and Selected Field, respectively.
-
-
Add Condition: Select a field on the left to populate the Selected Join and Selected Field fields under the Add Condition section on the right. Then click the Add Condition button to open a dialog for any appropriate selections or user input for the selected field. (The Add Condition button is disabled if you have already added the maximum number of conditions allowed by the NetSuite WSDL.) The presented options vary depending on the selected field. When complete, click the Add Condition button within the dialog to add the field to the Current Conditions table. (See the documentation on basic search for a screenshot of this dialog.)
Tip
If searching within an object's
statusfield, the search values that correspond to internal statuses within NetSuite are provided for your convenience in a list under Searching by status in NetSuite. For search values to enter for other fields, refer to NetSuite's documentation.-
Current Conditions: As you select fields and add conditions using the methods described above, this table becomes populated with a summary of the selected objects and fields. These columns are displayed in the table:
- Object: The selected NetSuite object.
- Field: The selected NetSuite field.
- Operator: The operator used for the search, if any.
- Search Value: The first search value entered as input while adding the condition, if any.
- Search Value 2: The second search value entered as input while adding the condition, if any.
- Actions: In the column with an actions menu icon , hover over a row to show icons for actions you can take on the row:
- Edit: Click the edit icon to reopen the Add Condition dialog where you can edit any selections for the condition.
- Delete: Click the remove icon to remove a condition from the Current Conditions table.
- Edit: Click the edit icon
Tip
You can add any number of conditions to your search. In this way you can effectively create any combination of multiple record searches.
-
-
Test Query: Click to validate the query. If the query is valid, a summary of the search results is displayed. If the query is not valid, relevant error messages are displayed. (See the documentation on basic search for a screenshot of query results.)
-
Back: Click to return to the previous step and temporarily store the configuration.
-
Next: Click to continue to the next step and temporarily store the configuration. The configuration is not saved until you click the Finished button on the last step.
-
Discard Changes: After making changes, click to close the configuration without saving changes made to any step. A message asks you to confirm that you want to discard changes.
Saved search
If a Saved Search was selected in step 2, this interface is presented:

-
Select a saved search for account: Use the dropdown to select an existing NetSuite saved search for the selected object.
Warning
When searching on an object with more than 1,000 saved searches, it may appear as if there are no saved searches available on the object (due to a NetSuite-imposed 1,000-record limit on API requests). As a workaround, use the Provide Saved Search Script ID option (described below).
-
Provide Saved Search Script ID: Select to specify a saved search with its script ID. This option can be used to overcome a limitation of the NetSuite API where the Select a Saved Search dropdown selection is limited to 1,000 saved searches. When selected this field is enabled:
- Saved search script ID: Enter the script ID for the saved search.
-
Test Query: Click to validate the query. If the query is valid, a summary of the search results is displayed. If the query is not valid, relevant error messages are displayed.
-
Back: Click to return to the previous step and temporarily store the configuration.
-
Next: Click to continue to the next step and temporarily store the configuration. The configuration is not saved until you click the Finished button on the last step.
-
Discard Changes: After making changes, click to close the configuration without saving changes made to any step. A message asks you to confirm that you want to discard changes.
Step 4: Review the data schemas
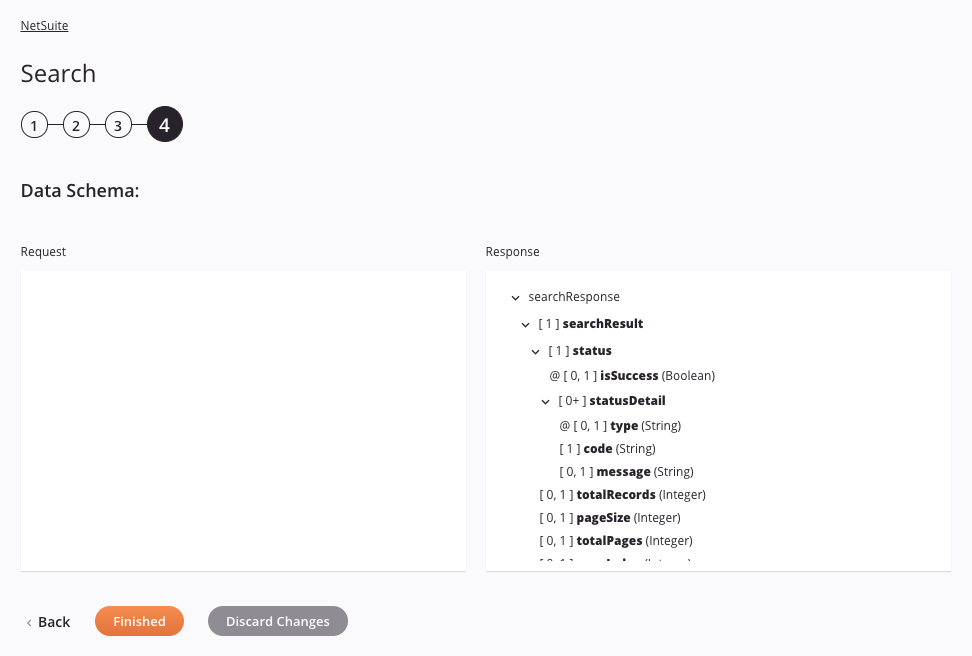
-
Data Schema: The response data schema for NetSuite is displayed. If the operation uses a transformation, the data schemas are displayed again during the transformation mapping process, where you can map to target fields using source objects, scripts, variables, custom values, and more.
The NetSuite connector uses the SOAP web services API of the version of the NetSuite WSDL you have configured. This is specified during configuration of the NetSuite connection. Refer to documentation provided in the NetSuite Help Center for information on the schema fields.
Note
To refresh a data schema in an existing activity, you must advance through each activity configuration step again, making at least one change (such as adding and removing a character from the end of the name of the activity) to force a refresh of the schema.
-
Back: Click to return to the previous step and temporarily store the configuration.
-
Finished: Click to save the configuration for all steps and close the activity configuration.
-
Discard Changes: After making changes, click to close the configuration without saving changes made to any step. A message asks you to confirm that you want to discard changes.
Next steps
After configuring a NetSuite Search activity, complete the configuration of the operation by adding and configuring other activities, transformations, or scripts as operation steps. You can also configure an operation's operation settings, which include the ability to chain operations together that are in the same or different workflows.
Once a NetSuite Search activity has been created, menu actions for that activity are accessible from the project pane in either the Workflows or the Components tabs, and from the design canvas. See Activity actions menu for details.
NetSuite Search activities can be used as a source with these operation patterns:
- Archive pattern
- Transformation pattern
- Two-target archive pattern (as either the first or second source)
- Two-transformation pattern (as either the first or second source)
Operations that contain a NetSuite activity can have only one NetSuite activity and cannot also contain any Salesforce, Salesforce Service Cloud, SAP, ServiceMax, or SOAP activities.
Other patterns are not valid using NetSuite Search activities. See the validation patterns on the Operation validity page.
To use the activity with scripting functions, write the data to a temporary location and then use that temporary location in the scripting function.
When ready, deploy and run the operation and validate behavior by checking the operation logs.