Salesforce Einstein Analytics Load activity
Introduction
A Salesforce Einstein Analytics Load activity, using its Salesforce Einstein Analytics connection, places an object into Salesforce CRM Analytics and is intended to be used as a target to consume data in an operation.
Note
Salesforce Einstein Analytics is the former name for Salesforce CRM Analytics.
Create a Salesforce Einstein Analytics Load activity
An instance of a Salesforce Einstein Analytics Load activity is created from a Salesforce Einstein Analytics connection using its Load activity type.
To create an instance of an activity, drag the activity type to the design canvas or copy the activity type and paste it on the design canvas. For details, see Creating an activity instance in Component reuse.
An existing Salesforce Einstein Analytics Load activity can be edited from these locations:
- The design canvas (see Component actions menu in Design canvas).
- The project pane's Components tab (see Component actions menu in Project pane Components tab).
Configure a Salesforce Einstein Analytics Load activity
Follow these steps to configure a Salesforce Einstein Analytics Load activity:
-
Step 1: Enter a name and specify app settings
Provide a name for the activity and specify the existing or new app (folder) to upload data. -
Step 2: Specify dataset settings
Specify the existing or new dataset to upload data. -
Step 3: Select the upload approach
Select the upload approach between a raw file or direct mapping from a tranformation. -
Step 4: Review the data schemas
Any request or response schemas generated from the endpoint are displayed.
Step 1: Enter a name and specify app settings
In this step, provide a name for the activity and specify the existing or new app (folder) to upload data. Each user interface element of this step is described below.
The interface used in this step of the configuration of a Salesforce Einstein Analytics Load activity depends on the Existing or New App option selected:
- Use existing app: For this option, you will select from a list of apps populated from the Salesforce instance.
- Create app if it does not exist: For this option, you will enter the name of a new app to be created in the Salesforce instance.
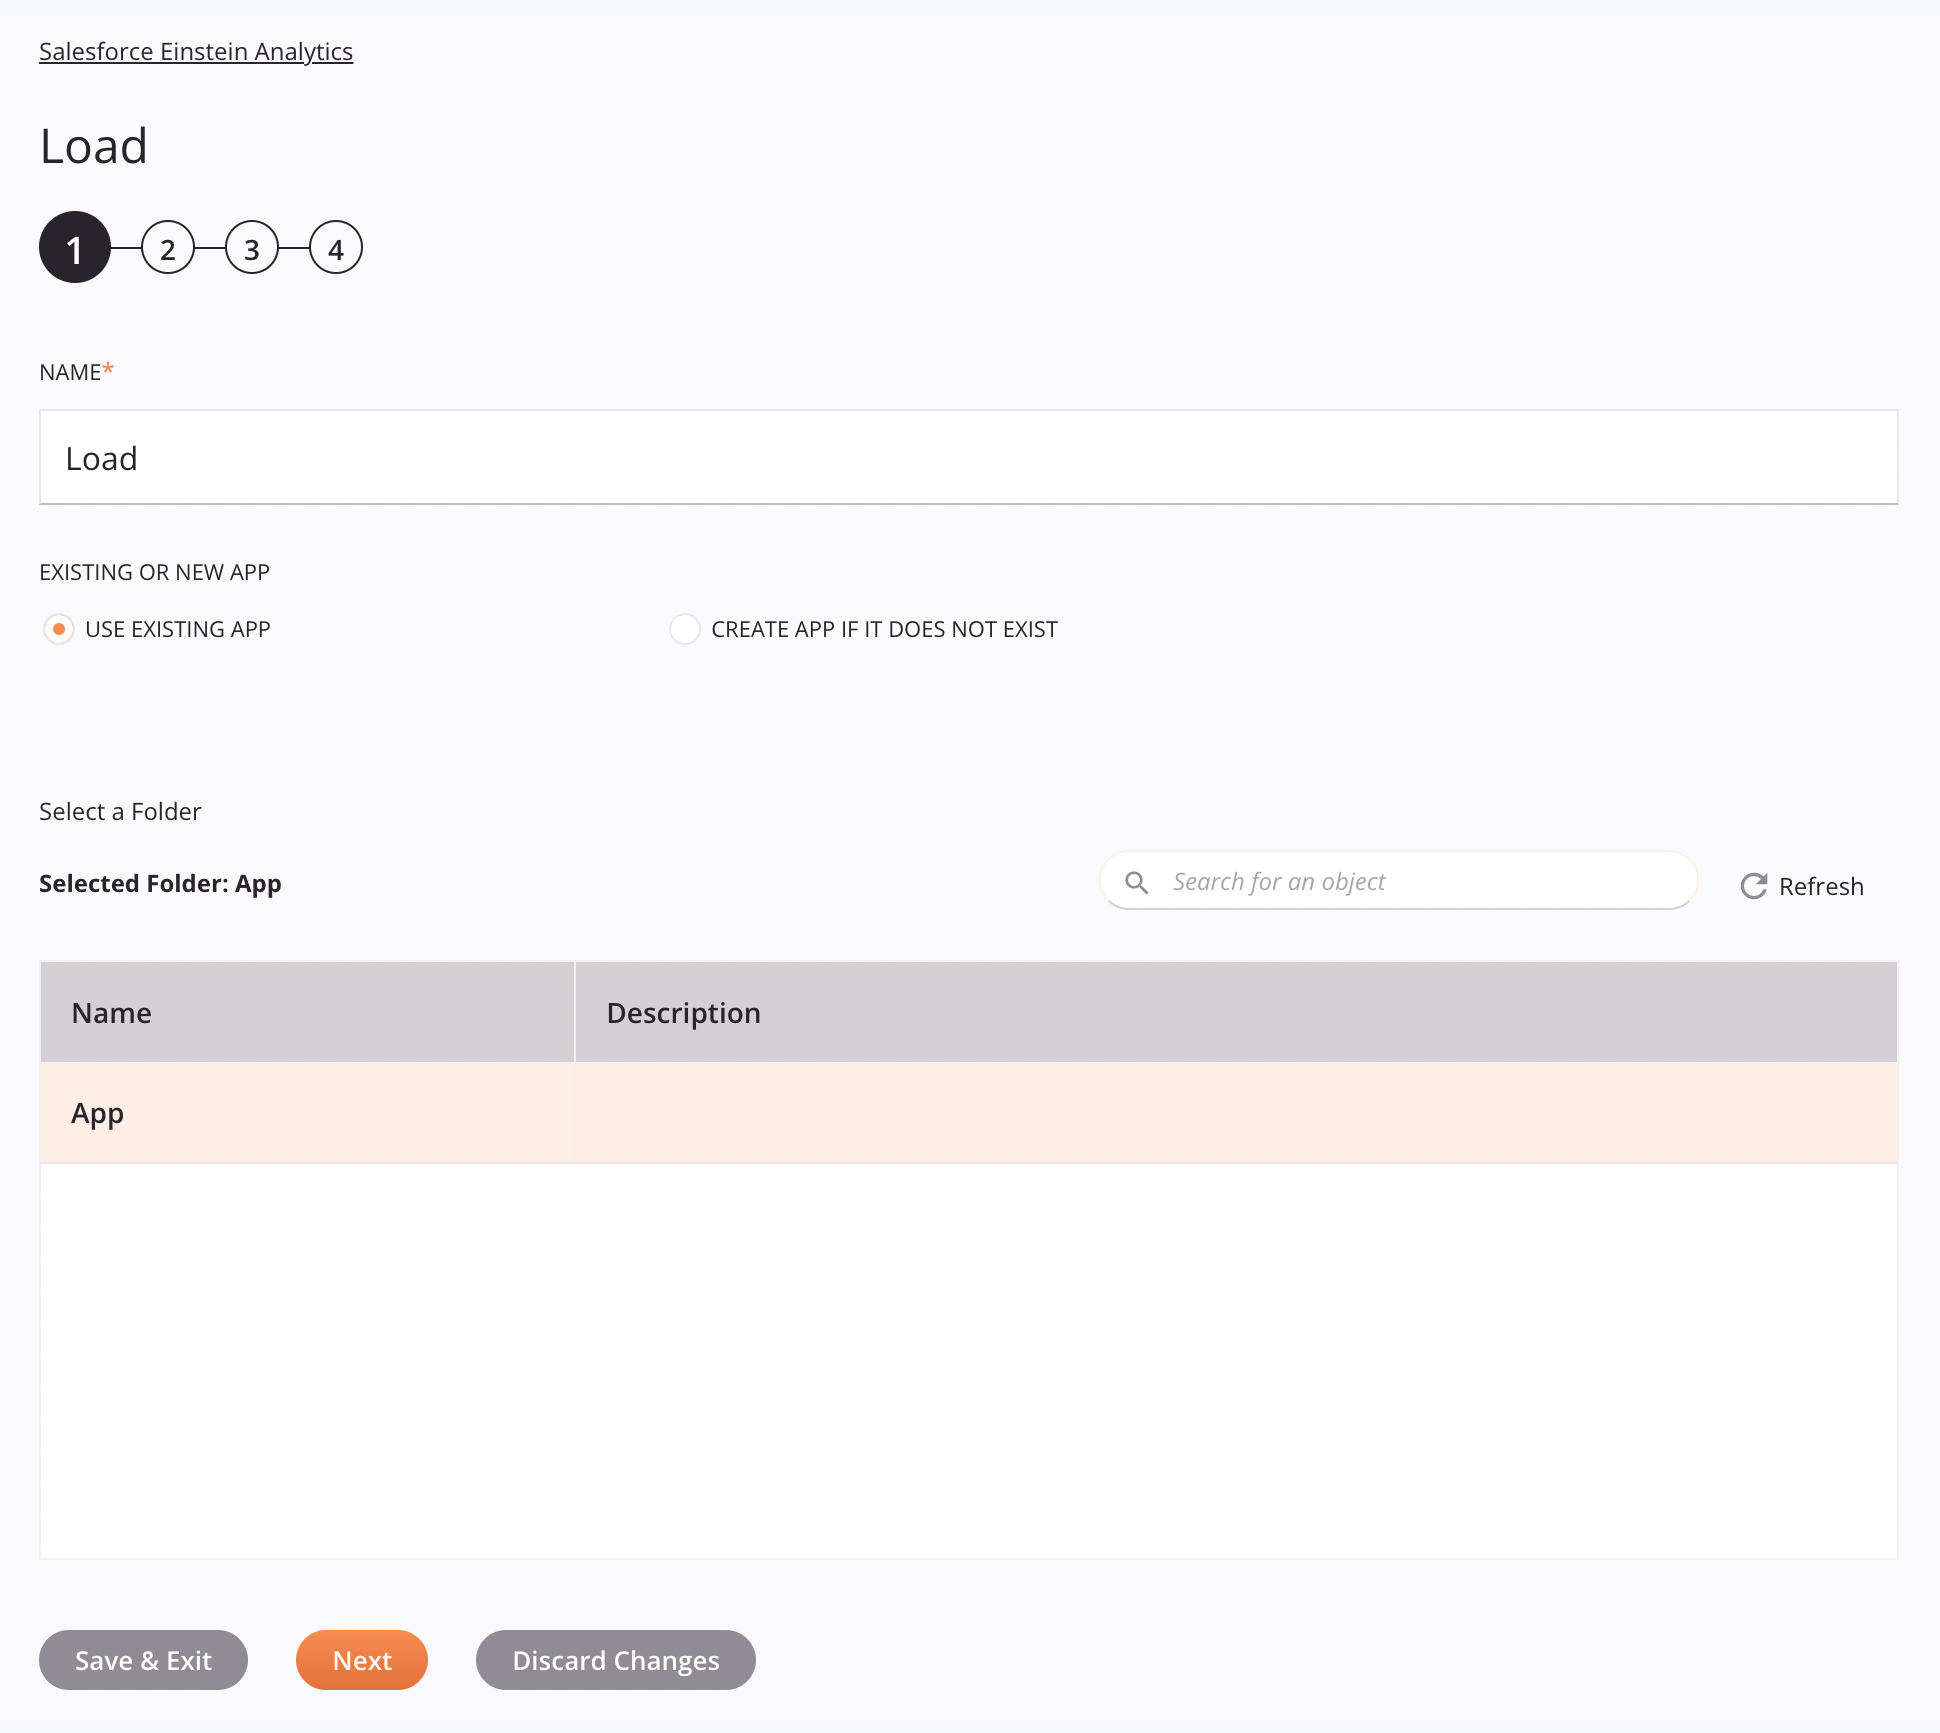
Use existing app
If Use Existing App is selected for Existing or New App, this interface is presented:
-
Name: Enter a name to identify the activity. The name must be unique for each Salesforce Einstein Analytics Load activity and must not contain forward slashes
/or colons:. -
Existing or New App: Specify the existing or new app to be used, one of Use Existing App or Create App if it Does Not Exist.
- Use Existing App: For this option, you will select from a list of apps populated from the Salesforce instance.
- Create App if it Does Not Exist: For this option, you will enter the name of a new app to be created in the Salesforce instance.
-
Select a Folder: Select an existing app. If none exist, you will need to either switch to Create App if it Does Not Exist: or create a new app manually on Salesforce CRM Analytics.
-
Save & Exit: If enabled, click to save the configuration for this step and close the activity configuration.
-
Next: Click to temporarily store the configuration for this step and continue to the next step. The configuration will not be saved until you click the Finished button on the last step.
-
Discard Changes: After making changes, click to close the configuration without saving changes made to any step. A message asks you to confirm that you want to discard changes.
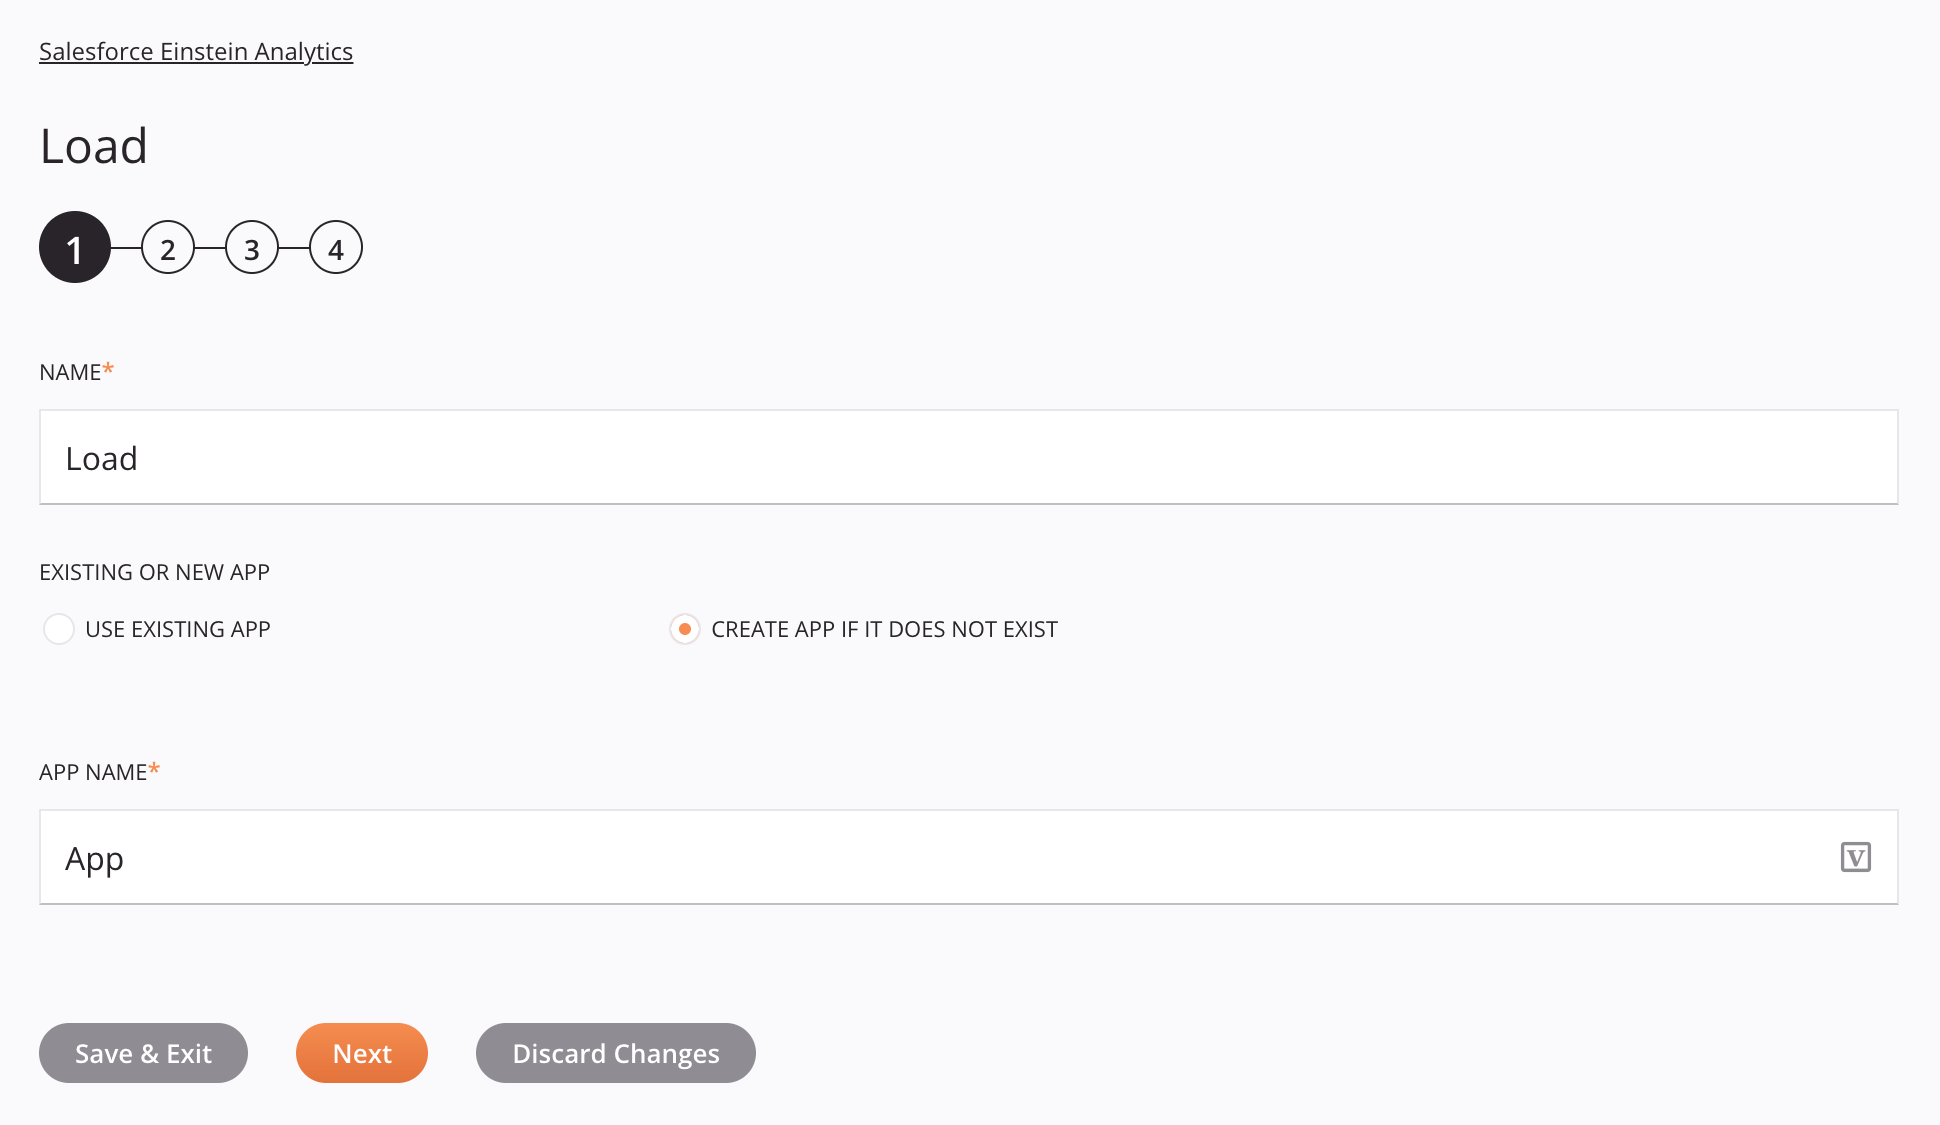
Create app if it does not exist
If Create App if it Does Not Exist is selected for Existing or New App, this interface is presented:
-
Name: Enter a name to identify the activity. The name must be unique for each Salesforce Einstein Analytics Load activity and must not contain forward slashes
/or colons:. -
Existing or New App: Specify the existing or new app to be used, one of Use Existing App or Create App if it Does Not Exist.
- Use Existing App: For this option, you will select from a list of apps populated from the Salesforce instance.
- Create App if it Does Not Exist: For this option, you will enter the name of a new app to be created in the Salesforce instance.
-
App Name: The name of the new app.
-
Save & Exit: If enabled, click to save the configuration for this step and close the activity configuration.
-
Next: Click to temporarily store the configuration for this step and continue to the next step. The configuration will not be saved until you click the Finished button on the last step.
-
Discard Changes: After making changes, click to close the configuration without saving changes made to any step. A message asks you to confirm that you want to discard changes.
Step 2: Specify dataset settings
In this step, specify the existing or new dataset to upload data. Each user interface element of this step is described below.
The interface used in this step of the configuration of a Salesforce Einstein Analytics Load activity depends on the Use Existing or New Dataset option selected:
- Use an existing dataset: For this option, you will select from a list of datasets populated from the Salesforce instance. The datasets shown are associated with the app selected in the previous step.
- Create dataset if it does not exist: For this option, you will enter the name of a new dataset to be created in the Salesforce instance.
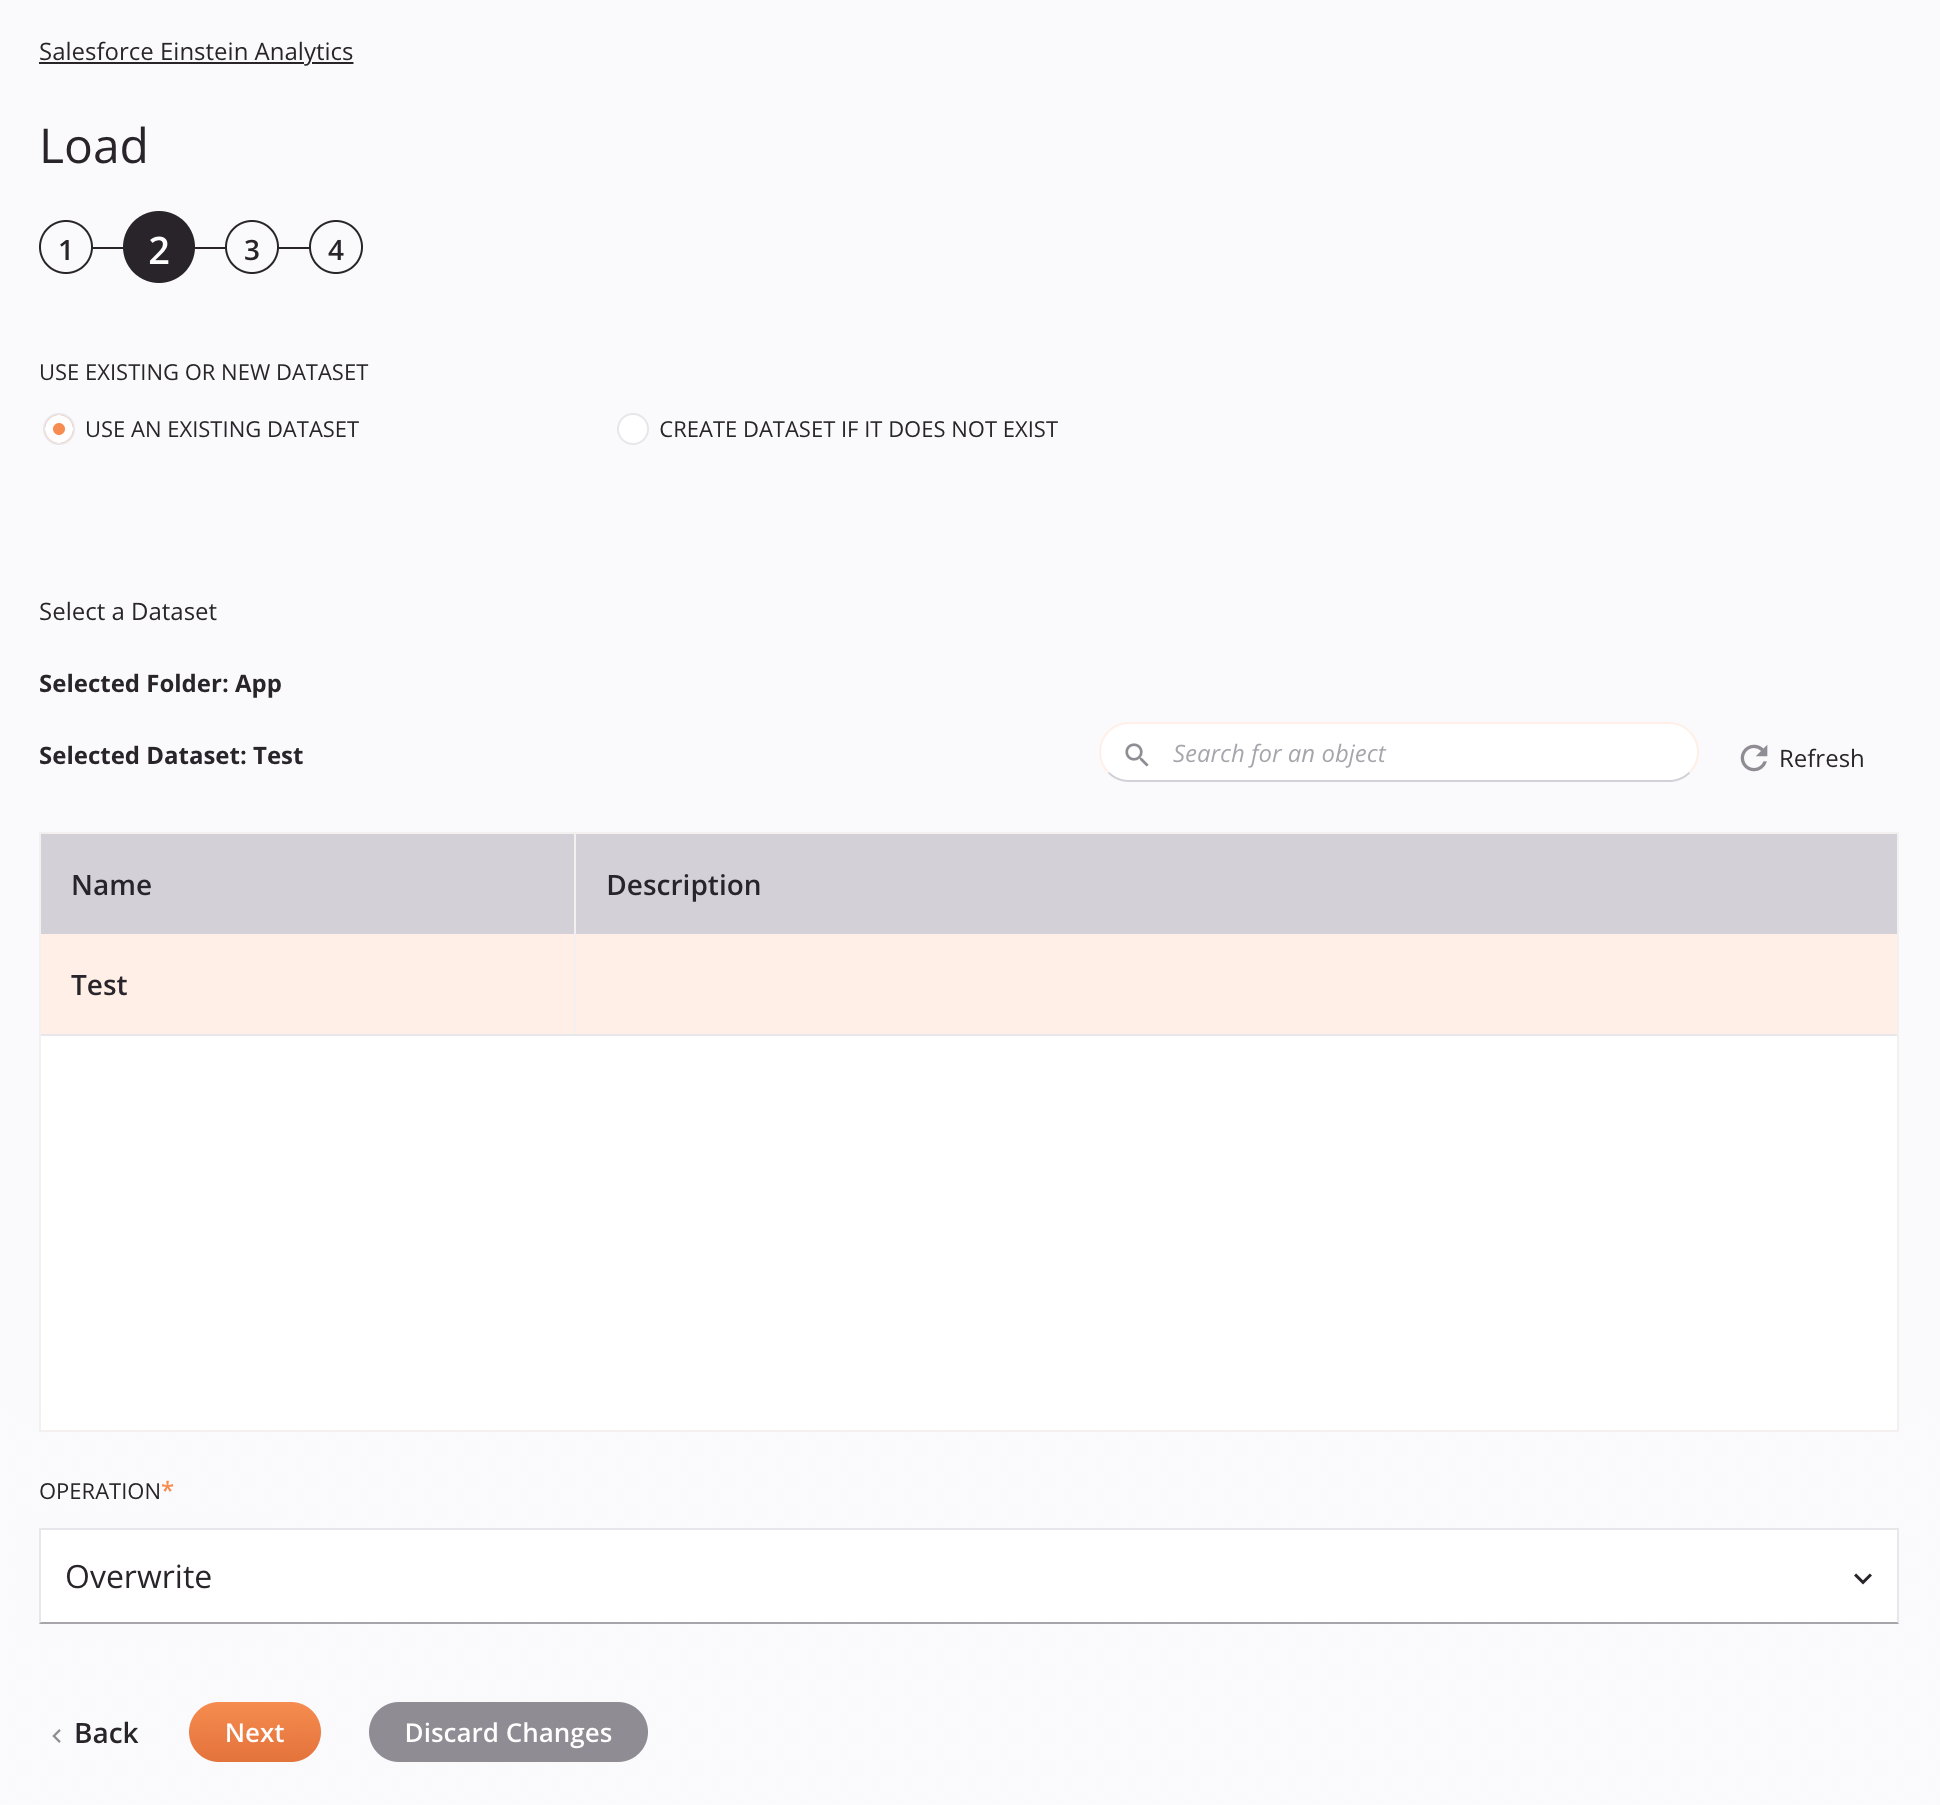
Use an existing dataset
If Use Existing or New Dataset is selected for Use Existing or New Dataset, this interface is presented:
-
Use Existing or New Dataset: Specify the use existing or new dataset to be used, one of Use an Existing Dataset or Create Dataset if it Does Not Exist.
- Use an Existing Dataset: For this option, you will select from a list of datasets populated from the Salesforce instance. The datasets shown are associated with the app selected in the previous step.
- Create Dataset if it Does Not Exist: For this option, you will enter the name of a new dataset to be created in the Salesforce instance.
-
Select a Dataset: Select an existing dataset based on the app chosen in the previous step. If none exist, you will need to either switch to Create Dataset if it Does Not Exist: or create a new dataset manually on Salesforce CRM Analytics.
-
Operation: Specify the data operation to be used on the existing dataset, one of Overwrite, or Append, or Upsert, or Delete. Overwrite is selected by default.
-
Back: Click to temporarily store the configuration for this step and return to the previous step.
-
Next: Click to temporarily store the configuration for this step and continue to the next step. The configuration will not be saved until you click the Finished button on the last step.
-
Discard Changes: After making changes, click to close the configuration without saving changes made to any step. A message asks you to confirm that you want to discard changes.
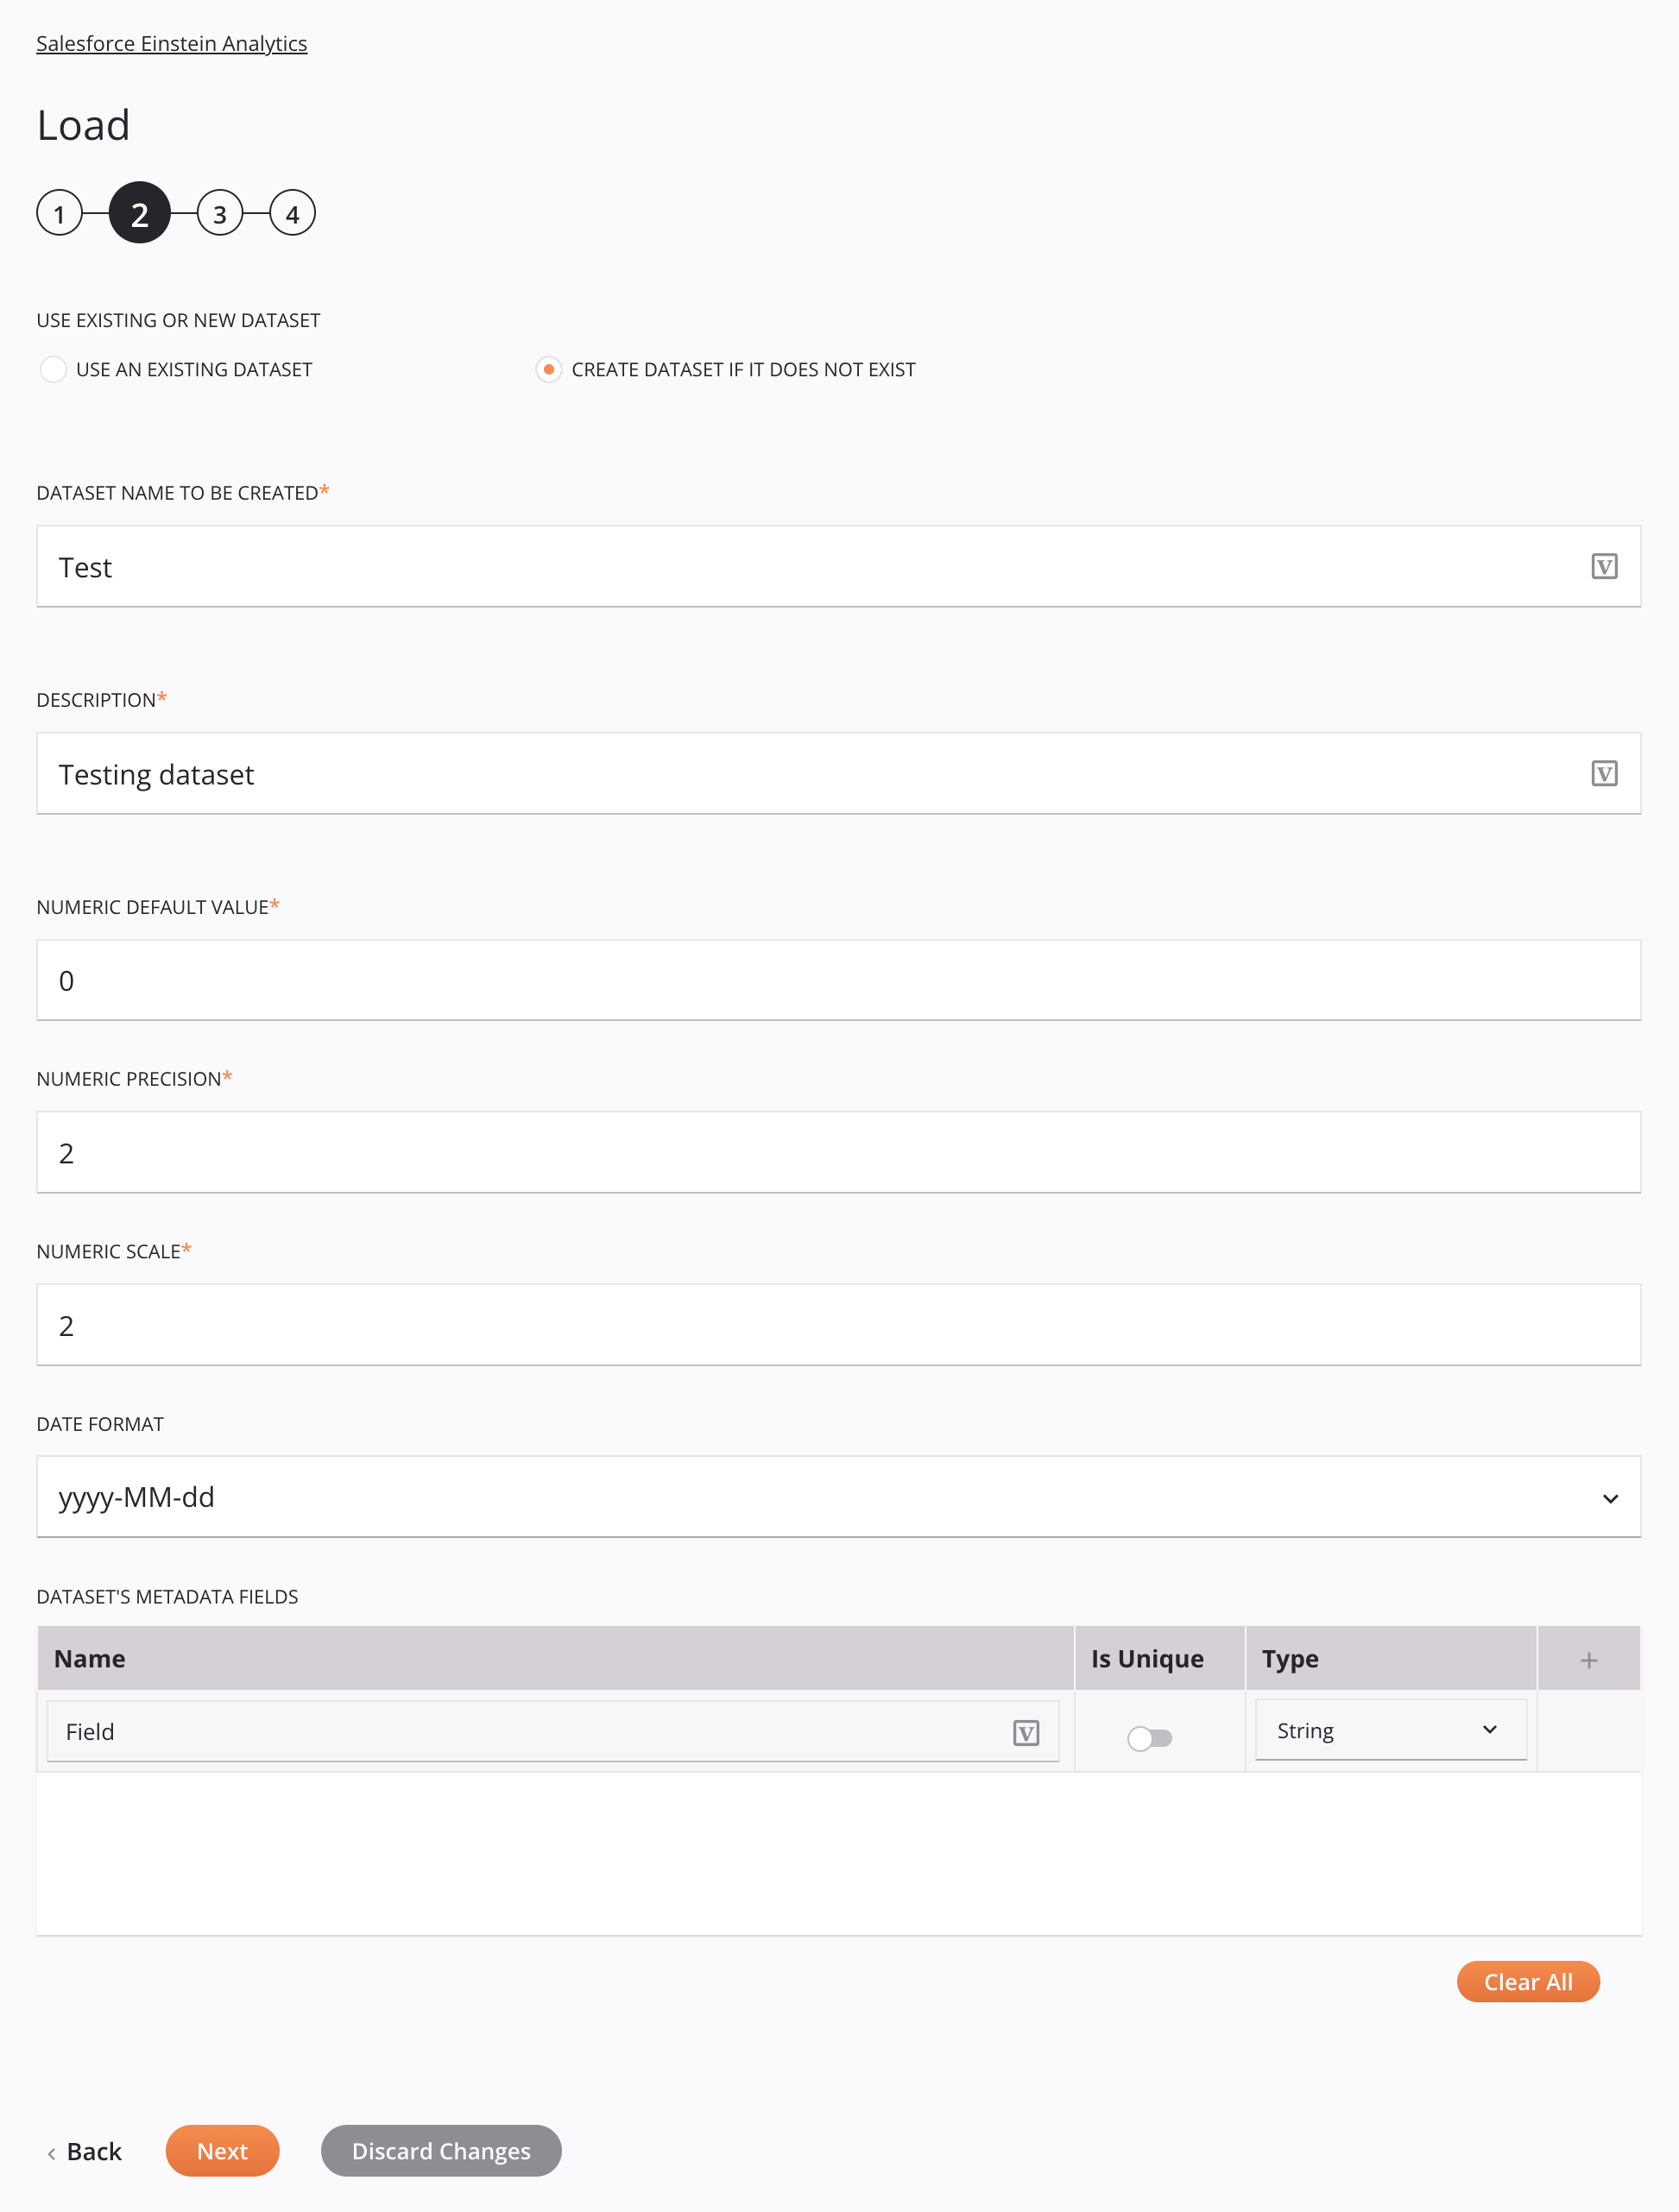
Create dataset if it does not exist
If Create Dataset if it Does Not Exist is selected for Use Existing or New Dataset, this interface is presented:
Tip
Fields with a variable icon ![]() support using global variables, project variables, and Jitterbit variables. Begin either by typing an open square bracket
support using global variables, project variables, and Jitterbit variables. Begin either by typing an open square bracket [ into the field or by clicking the variable icon to display a list of the existing variables to choose from.
-
Use Existing or New Dataset: Specify the use existing or new dataset to be used, one of Use an Existing Dataset or Create Dataset if it Does Not Exist.
- Use an Existing Dataset: For this option, you will select from a list of datasets populated from the Salesforce instance. The datasets shown are associated with the app selected in the previous step.
- Create Dataset if it Does Not Exist: For this option, you will enter the information for a new dataset to be created in the Salesforce instance.
-
Dataset Name to Be Created: The name of the new dataset.
-
Description: The description of the new dataset.
-
Numeric Default Value: The default value for numeric fields in the new dataset. This value is set to
0by default. For more information, see External Data Metadata Format Reference in the Salesforce documentation. -
Numeric Precision: The maximum number of digits allowed for numeric fields in the new dataset. This value must be bewteen
1and18inclusively and is set to2by default. For more information, see External Data Metadata Format Reference in the Salesforce documentation. -
Numeric Scale: The number of digits to the right of the decimal in numeric fields in the new dataset. This value should be less than the value set in Numeric Precision and is set to
2by default. For more information, see External Data Metadata Format Reference in the Salesforce documentation. -
Date Format: Specify the date format to be used in the new dataset. The format is set to
yyyy-MM-ddby default, but new options can be added based on Guidelines for Formatting Dates in the Salesforce documentation. -
Dataset's Metadata Fields: Specify metadata fields to be included in the upload associated with the new dataset.
Important
Fields in the Dataset's Metadata Fields table display the variable icon
 only in edit mode. For these fields' variable values to be populated at runtime, the agent version must be at least 10.75 / 11.13.
 -
Back: Click to temporarily store the configuration for this step and return to the previous step.
-
Next: Click to temporarily store the configuration for this step and continue to the next step. The configuration will not be saved until you click the Finished button on the last step.
-
Discard Changes: After making changes, click to close the configuration without saving changes made to any step. A message asks you to confirm that you want to discard changes.
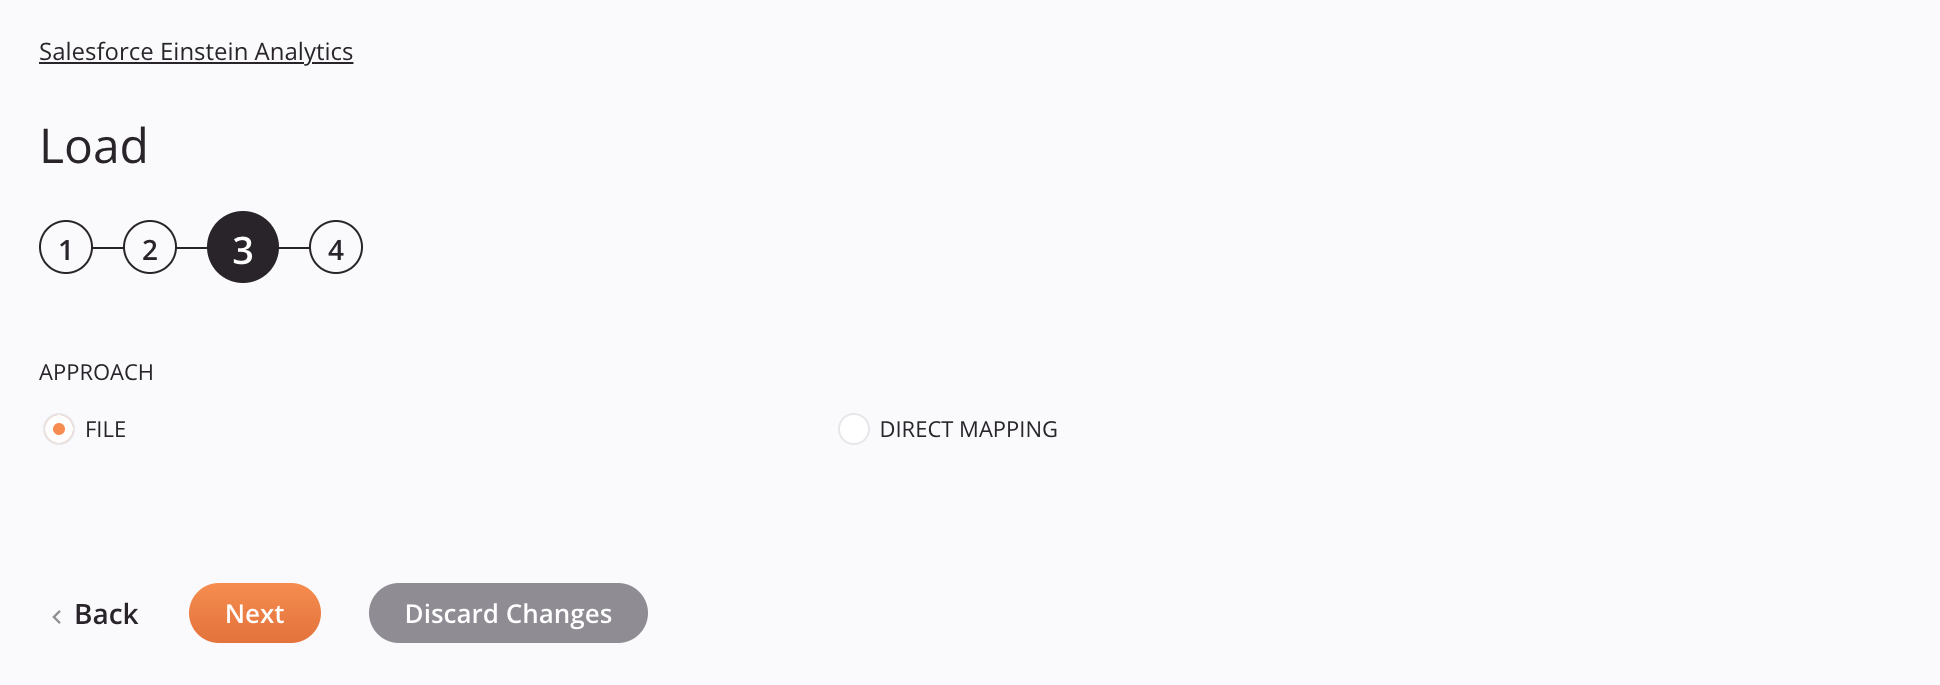
Step 3: Select the upload approach
In this step, select the upload approach between a raw file or direct mapping from a tranformation. Each user interface element of this step is described below.
-
Approach: Select the upload approach to be used, one of File or Direct Mapping. This setting affects the resulting data schema.
-
Back: Click to temporarily store the configuration for this step and return to the previous step.
-
Next: Click to temporarily store the configuration for this step and continue to the next step. The configuration will not be saved until you click the Finished button on the last step.
-
Discard Changes: After making changes, click to close the configuration without saving changes made to any step. A message asks you to confirm that you want to discard changes.
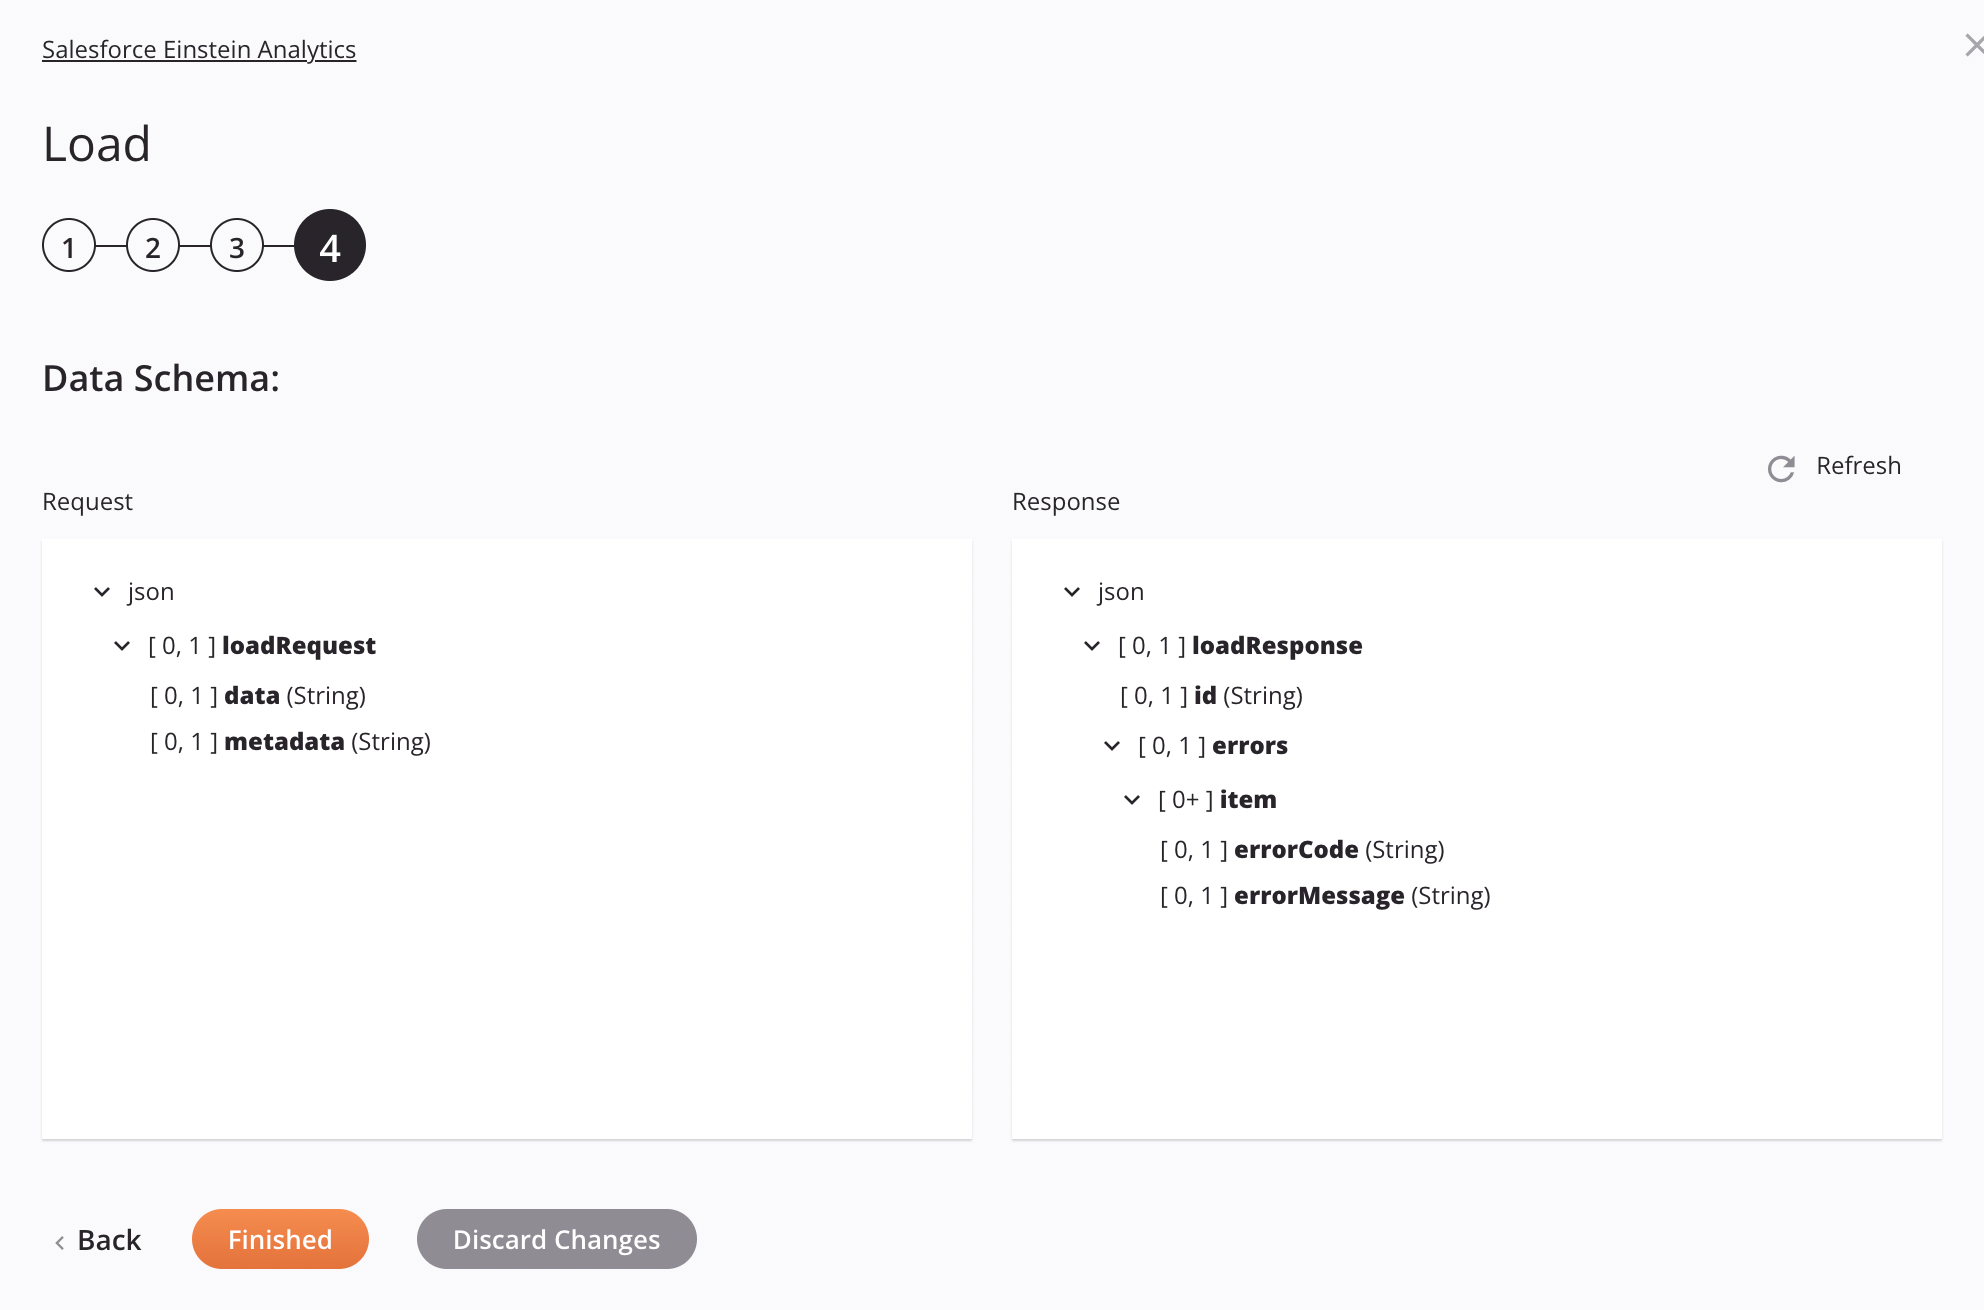
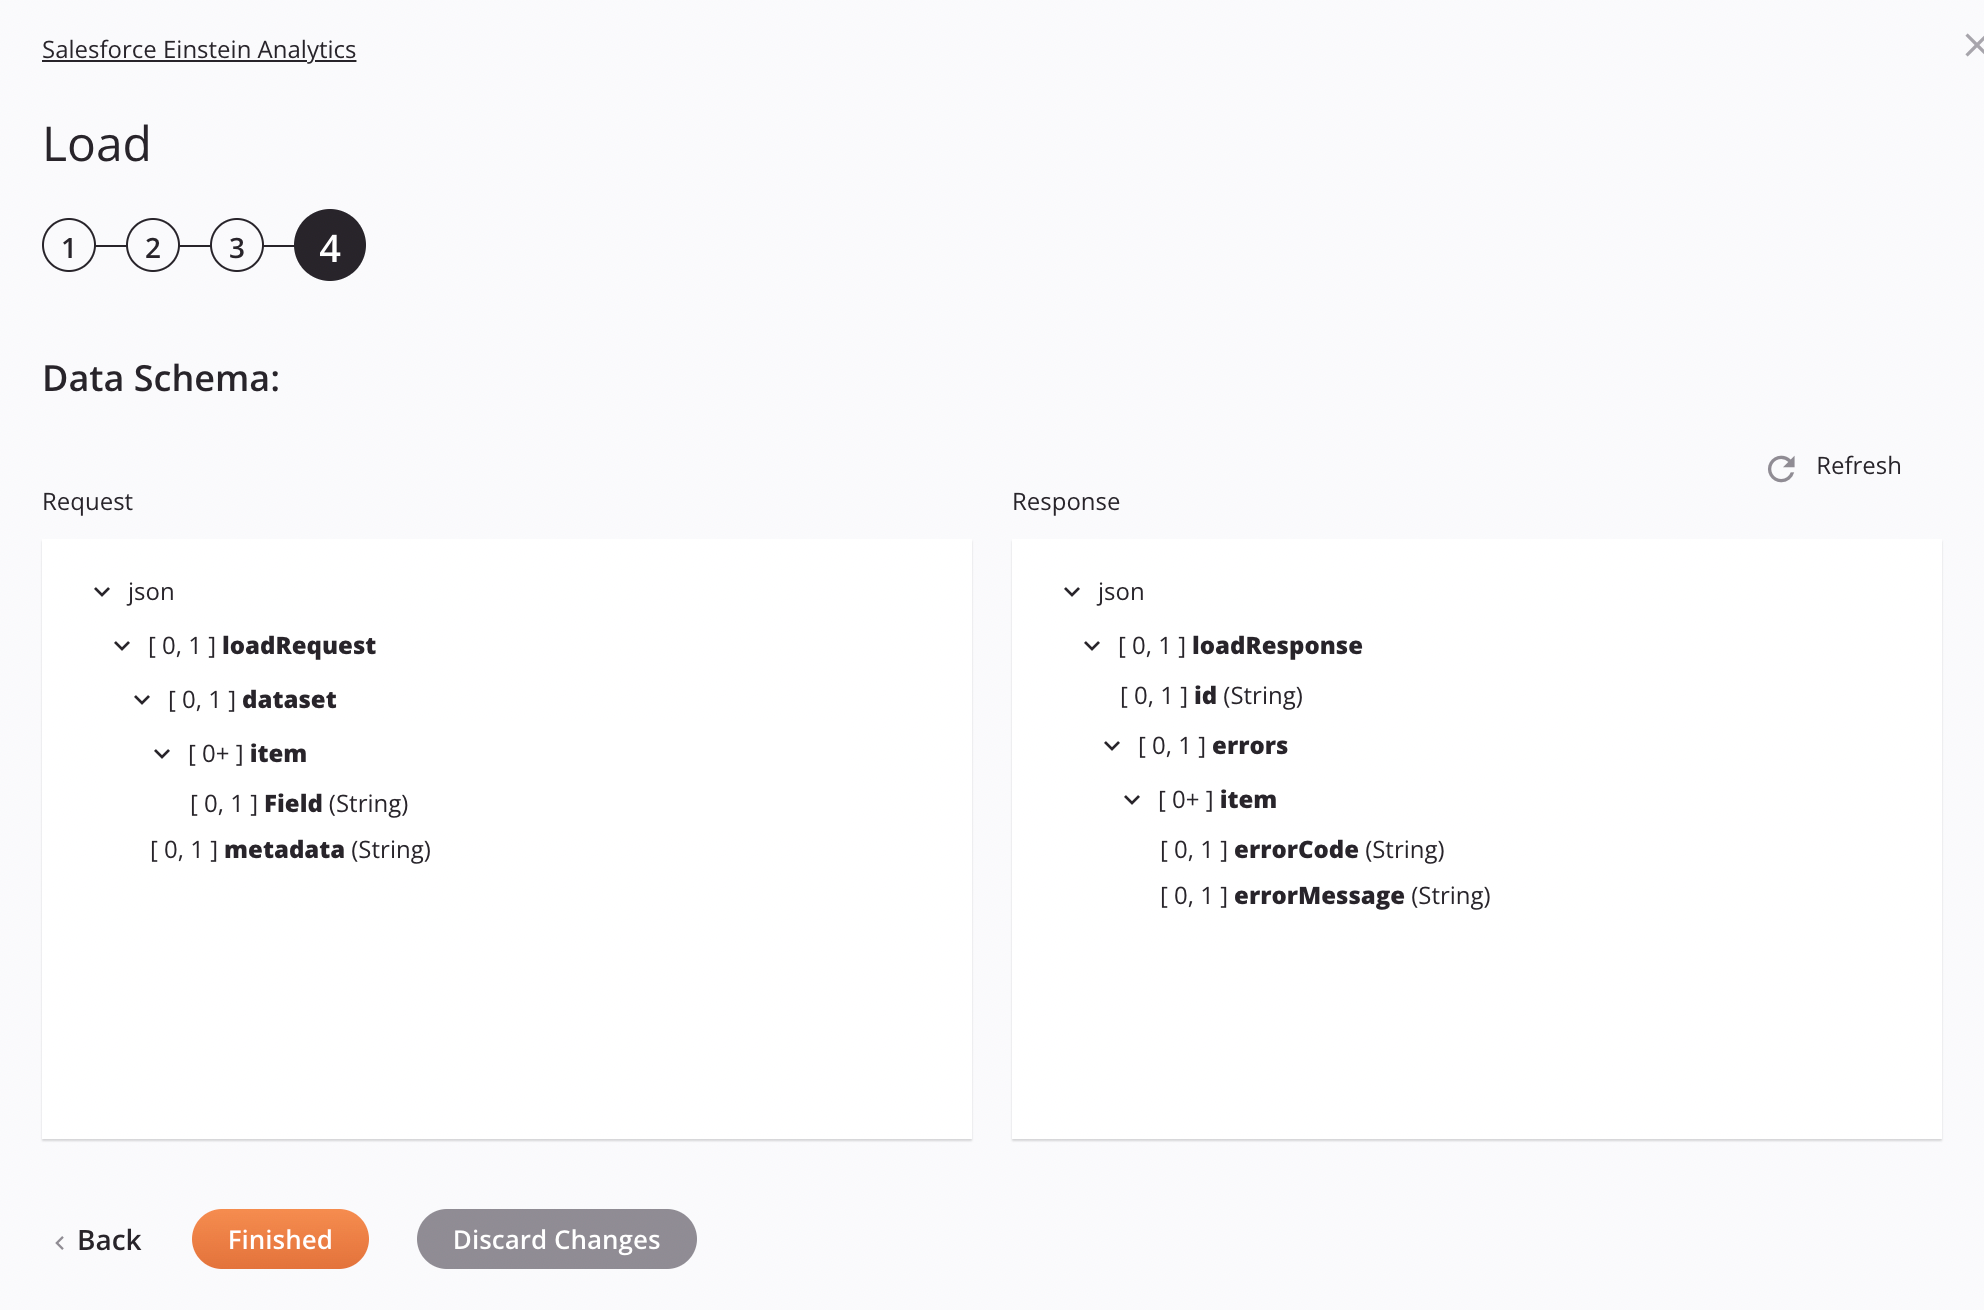
Step 4: Review the data schemas
Any request or response schemas generated from the endpoint are displayed. Each user interface element of this step is described below.
These subsections describe the request and response structures for each approach and stage type combination:
These actions are available with each approach:
-
Data Schemas: These data schemas are inherited by adjacent transformations and are displayed again during transformation mapping.
Note
Data supplied in a transformation takes precedence over the activity configuration.
The Salesforce Einstein Analytics connector uses the Salesforce SOAP API. Refer to the API documentation for information on the schema nodes and fields.
-
Refresh: Click the refresh icon
 or the word Refresh to regenerate schemas from the Salesforce Einstein Analytics endpoint. This action also regenerates a schema in other locations throughout the project where the same schema is referenced, such as in an adjacent transformation.
 -
Back: Click to temporarily store the configuration for this step and return to the previous step.
-
Finished: Click to save the configuration for all steps and close the activity configuration.
-
Discard Changes: After making changes, click to close the configuration without saving changes made to any step. A message asks you to confirm that you want to discard changes.
File approach
If the approach is File, the request and response data schemas consist of these nodes and fields:
-
Request
Request Schema Field/Node Notes loadRequestNode representing the load request. dataData associated with the load request. metadataRequired metadata associated with the load request. For more information, see Salesforce metadata format. -
Response
Response Schema Field/Node Notes loadResponseNode representing the load response. idID associated with the load response. errorsNode representing errors in the load response. itemNode representing a single error. errorCodeCode associated with an error. errorMessageMessage associated with an error.
Direct Mapping approach
If the approach is Direct Mapping, the request and response data schemas consist of these nodes and fields:
-
Request
Request Schema Field/Node Notes loadRequestNode representing the load request. datasetNode represeting the dataset in the load request. itemNode represeting a dataset item. fieldA named field associated with the dataset. metadataRequired metadata associated with the load request. For more information, see Salesforce metadata format. -
Response
Response Schema Field/Node Notes loadResponseNode representing the load response. idID associated with the load response. errorsNode representing errors in the load response. itemNode representing a single error. errorCodeCode associated with an error. errorMessageMessage associated with an error.
Salesforce metadata format
The Load activity requires metadata (in the request schema's metadata field) to load data into Salesforce CRM Analytics.
An example of correctly formatted metadata:
{
    "fileFormat": {
        "charsetName": "UTF-8",
        "numberOfLinesToIgnore": 0
    },
    "objects": [
        {
            "connector": "Jitterbit",
            "description": "",
            "fullyQualifiedName": "Record",
            "label": "Record",
            "name": "Record",
            "fields": [
                {
                    "description": "",
                    "fullyQualifiedName": "Record.Name",
                    "label": "Name",
                    "name": "Name",
                    "isSystemField": false,
                    "defaultValue": "",
                    "isUniqueId": false,
                    "isMultiValue": false,
                    "type": "Text",
                    "precision": null,
                    "scale": null,
                    "format": ""
                },
                {
                    "description": "",
                    "fullyQualifiedName": "Record.Id",
                    "label": "Id",
                    "name": "Id",
                    "isSystemField": false,
                    "defaultValue": "",
                    "isUniqueId": false,
                    "isMultiValue": false,
                    "type": "Text",
                    "precision": null,
                    "scale": null,
                    "format": ""
                }
            ]
        }
    ]
}
Important
Metadata can contain only one object definition.
For detailed information on every possible metadata field, see External Data Metadata Format Reference in the Salesforce documentation.
Next steps
After configuring a Salesforce Einstein Analytics Load activity, complete the configuration of the operation by adding and configuring other activities, transformations, or scripts as operation steps. You can also configure the operation settings, which include the ability to chain operations together that are in the same or different workflows.
Menu actions for an activity are accessible from the project pane and the design canvas. For details, see Activity actions menu in Connector basics.
Salesforce Einstein Analytics Load activities can be used as a target with these operation patterns:
- Transformation pattern
- Two-transformation pattern (as the first or second target)
To use the activity with scripting functions, write the data to a temporary location and then use that temporary location in the scripting function.
When ready, deploy and run the operation and validate behavior by checking the operation logs.