ServiceMax Bulk Query activity
Introduction
A ServiceMax Bulk Query activity queries a large number of records from a ServiceMax endpoint and is intended to be used as a source to provide data to an operation. After configuring a ServiceMax connection, you can configure as many ServiceMax activities as you like for each ServiceMax connection.
The Bulk Query activity is faster and scales better than a non-bulk ServiceMax Query activity, but should be used only if you do not need to use a transformation to change data prior to reaching its target. (ServiceMax bulk activities cannot be used with transformations.)
The ServiceMax connector supports Salesforce Bulk API. For more information, see Prerequisites and supported API versions.
Create a ServiceMax activity
An instance of an activity is created from a connection using an activity type.
To create an instance of an activity, drag the activity type to the design canvas or copy the activity type and paste it on the design canvas. For details, see Creating an activity instance in Component reuse.
An existing activity can be edited from these locations:
- The design canvas (see Component actions menu in Design canvas).
- The project pane's Components tab (see Component actions menu in Project pane Components tab).
Configure a ServiceMax Bulk Query activity
Follow these steps to configure a ServiceMax Bulk Query activity:
- Step 1: Enter a name and select objects Provide a name for the activity and select object(s) to be bulk queried.
- Step 2: Select fields and create conditions Create the query statement, either automatically by selecting fields and specifying conditions, or manually by directly entering a query statement. You must test the query to ensure it is valid before you proceed.
Step 1: Enter a name and select objects
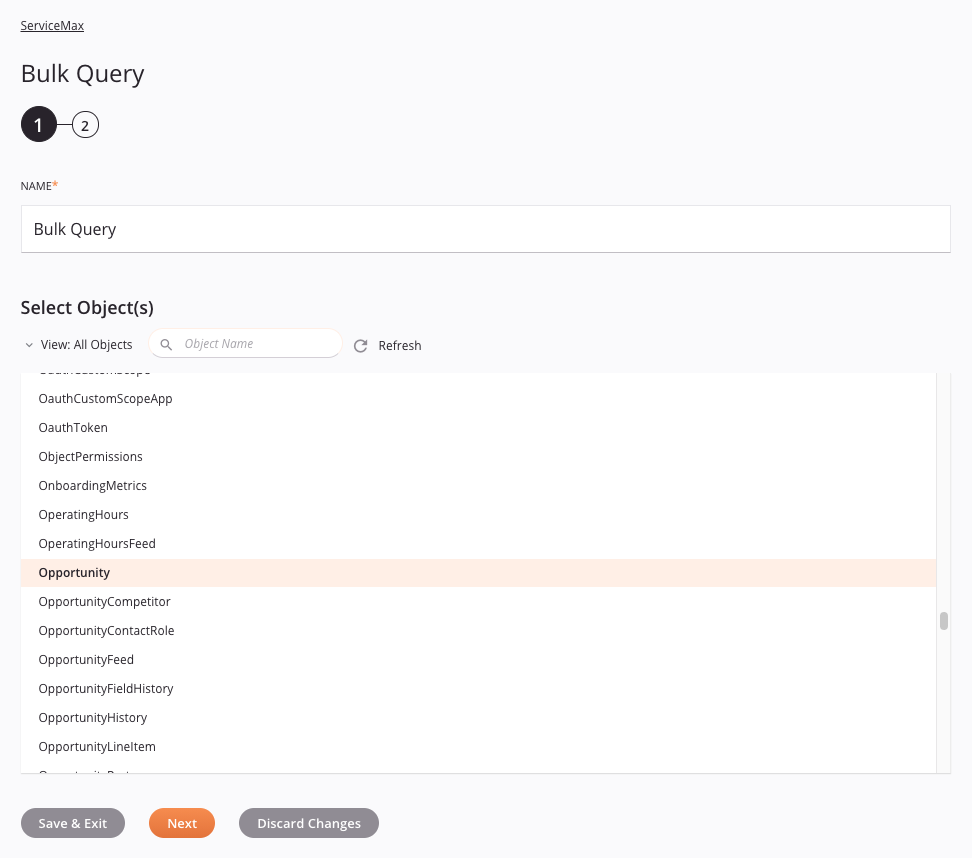
In this step, you provide a name for the activity and select object(s) to be bulk queried.

-
Name: Enter a name to use to identify the ServiceMax Bulk Query activity. The name must be unique for each ServiceMax Bulk Query activity and must not contain forward slashes (
/) or colons (:). -
Select Object(s): This section displays objects available in the ServiceMax endpoint:
-
View: Use the dropdown to filter the list of objects that support Bulk Query to Standard, Custom, or All Objects. By default, all objects are shown.
-
Search: Enter any column's value into the search box to filter the list of objects. The search is not case-sensitive.
-
Refresh: Click the refresh icon
 to reload objects and fields from the ServiceMax endpoint. This may be useful if you have recently added objects or fields to ServiceMax.
 -
Select Object(s): Click an object from the list of objects to select it. Only one object can be selected.
Note
If the list does not populate with available objects, the ServiceMax connection may not be successful. Ensure you are connected by reopening the connection and retesting the credentials.
-
-
Save & Exit: If enabled, click to save the configuration for this step and close the activity configuration.
-
Next: Click to temporarily store the configuration for this step and continue to the next step. The configuration will not be saved until you click the Finished button on the last step.
-
Discard Changes: After making changes, click to close the configuration without saving changes made to any step. A message asks you to confirm that you want to discard changes.
Step 2: Select fields and create conditions
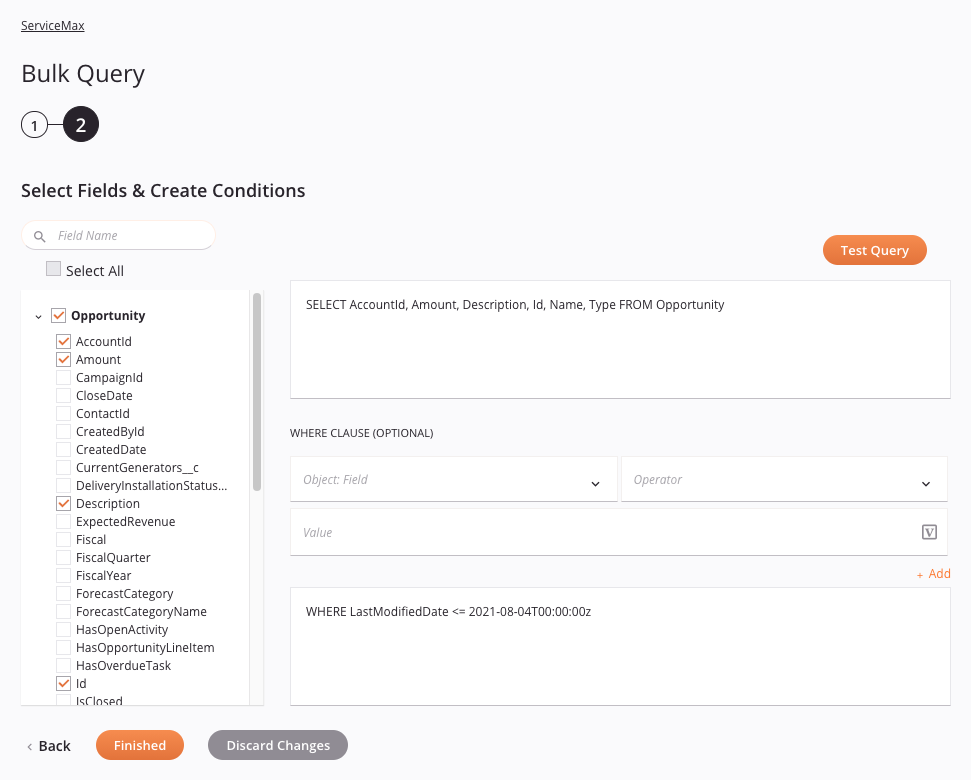
In this step, you create the query statement, either automatically by selecting fields and specifying conditions, or manually by directly entering a query statement. You must test the query to ensure it is valid before you proceed.

Note
Fields with a variable icon ![]() support the use of global variables, project variables, and Jitterbit variables. Begin either by typing an open square bracket
support the use of global variables, project variables, and Jitterbit variables. Begin either by typing an open square bracket [ into the field or by clicking the variable icon to display a list of the existing variables to choose from.
-
Select Fields & Create Conditions: This section displays fields for the selected object(s) that are available in the Salesforce endpoint. Objects that were selected in the previous step are shown in bold.
- Search: Enter any column's value into the search box to filter the list of fields. The search is not case-sensitive. The listed results are filtered in real time with each keystroke.
- Select All: When using the search box to filter, you can use this checkbox to select all visible fields at once (objects and collapsed fields are not selected).
- Select Fields: Select the checkboxes of the fields you want included in the query to have them automatically added to the SOQL statement on the right. Unless using the search box, you can also select an entire object to select all of its fields at once.
-
SOQL Statement: As you select fields, the query statement in the upper right text box automatically populates with the object and the selected fields. To use a custom SOQL statement, make edits within this text box as necessary. For reference on how to structure a custom SOQL statement, see Salesforce's documentation on SOQL SELECT Syntax.
-
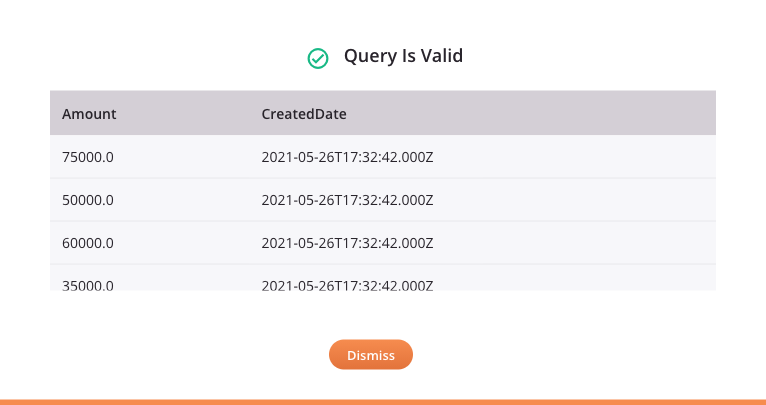
Test Query: Click this button to validate whether the query is valid. If the query is valid, a sample of 10 records retrieved from the query is displayed in a table similar to that shown below. If the query is not valid, relevant error messages are displayed. The query must be valid in order to enable the Next button.

-
WHERE Clause (Optional): To add a WHERE clause, you can use the fields below as input to help construct the clause, or you can manually enter the clause in the lower text box. After adding a WHERE clause, you must first test the query using the Test Query button in order to enable the Next button.
-
Object: Field: Use the dropdown to select a field from the selected objects.
-
Operator: Use the dropdown to select the appropriate operator(s). The list of available operators depends on the data type of the selected field.
------------ -------------------------------------------------- Comparison = Equals != Not equals \< Less than \<= Less than or equals > Greater than >= Greater than or equals LIKE Like IN IN NOT IN NOT IN INCLUDES Applies only to multi-select picklists EXCLUDES Applies only to multi-select picklists Logical AND TRUE if both left and right expressions are TRUE OR TRUE if either left or right expression is TRUE NOT TRUE if right expression is FALSE -
Value: Enter the desired value to use with the dropdown selections.
Note
When using global variables in a WHERE clause, you must specify a default value in order for the query to be valid for testing (with the Test Query button), as global variables obtain their value at runtime (see Define a default value in Global variables).
-
Add: Click the
 link to automatically construct the clause based on the dropdown selections and entered value. The automatically constructed clause appears in the lower text box.
Note
To add multiple conditions to the clause, repeat the process by adding additional selections. Note that you may need to add a logical operator such as AND or OR to account for the additional conditions.
-
-
Back: Click to temporarily store the configuration for this step and return to the previous step.
-
Finished: Click to save the configuration for all steps and close the activity configuration.
-
Discard Changes: After making changes, click to close the configuration without saving changes made to any step. A message asks you to confirm that you want to discard changes.
Next steps
After configuring a ServiceMax Bulk Query activity, you can use it within an operation as described below. After running an operation containing a ServiceMax activity on a private agent, you can download the operation's success and failure files.
Complete the operation
After configuring a ServiceMax Bulk Query activity, complete the configuration of the operation by adding and configuring other activities or scripts as operation steps. You can also configure an operation's operation settings, which include the ability to chain operations together that are in the same or different workflows.
Once a ServiceMax Bulk Query activity has been created, menu actions for that activity are accessible from the project pane in either the Workflows or the Components tabs, and from the design canvas. See Activity actions menu for details.
ServiceMax Bulk Query activities can be used as a source with the Salesforce bulk source pattern.
A ServiceMax activity can be used as an operation step in only a single operation. That is, you cannot reference the same activity multiple times within other operations. Instead, you can make a copy of a ServiceMax activity to use elsewhere (see Component reuse).
Other patterns are not valid using ServiceMax Bulk Query activities. See the validation patterns on the Operation validity page.
In addition, the file-based target used in the operation must be using a flat file format with a header and only the following data types:
- Base64
- Boolean
- Date formats
- Double
- Integer
- ServiceMax ID
- String
Operations that use ServiceMax activities can also have operation actions configured to trigger on a SOAP fault — an error resulting from an incorrect message format, header processing, or incompatibility. Operation actions can be configured to run an operation or send an email after a SOAP fault occurs. For instructions on triggering an action on SOAP fault, refer to Operation actions.
To use the activity with scripting functions, write the data to a temporary location and then use that temporary location in the scripting function.
When ready, deploy and run the operation and validate behavior by checking the operation logs.
View success and failure files
If you are running an operation containing a ServiceMax activity on a private agent, success and failure files are available for download in the Runtime Operations page of the Management Console. Select the relevant operation in the Runtime Operations table and click the Activity Logs tab in the bottom section of the screen to display download links for the files if available:
-
Download Success File: If you are running the operation on a private agent, click the Download link to save the success records as a CSV file.
-
Download Failure File: If you are running the operation on a private agent, click the Download link to save the failure records as a CSV file.
Note
By default, success and failure files are automatically deleted from the private agent after 14 days by the Jitterbit File Cleanup Service. The number of days the files are saved can be changed by editing the [Resultfiles] section in the Jitterbit.conf file. You can also change the success and failure file retention rules by editing the Jitterbit file cleanup service rules for private agents.
Activity log downloads are disabled for cloud agents. If the links are visible, you will receive an error message if you attempt a download.