ServiceNow prerequisites
Introduction
To configure a ServiceNow connection and use its activities, you must have a ServiceNow instance with an OAuth API endpoint, its client ID and client secret, and an authenticating user with specific permissions.
Create an OAuth API endpoint and retrieve its client ID and client secret
Follow these steps to create an OAuth API endpoint and retrieve its client ID and client secret for use in the ServiceNow connection:
-
Sign in at the ServiceNow Developer Portal and click Start Building for your ServiceNow instance.
-
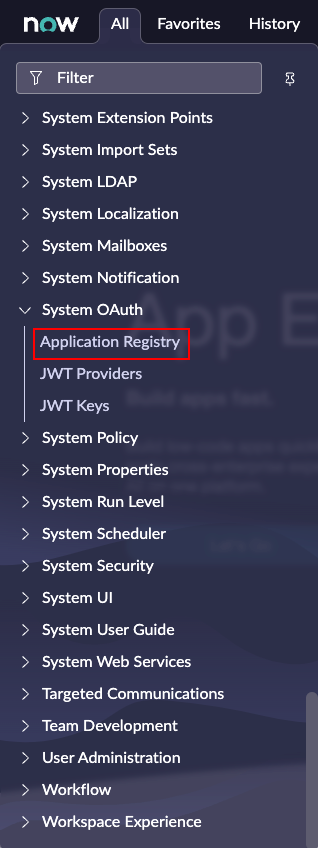
From anywhere within the ServiceNow instance, open the All menu and navigate to System OAuth > Application Registry:
-
On the Application Registries page, click the New button.
-
Click Create an OAuth API endpoint for external clients.
-
Enter these details for your app:
-
Name: Enter a unique name for the application, such as Harmony agent.
-
Client ID: Copy this value. This will be the Client ID in the ServiceNow connection.
-
Client Secret: Enter a value or leave blank for ServiceNow to generate a value. This will be the Client Secret in the ServiceNow connection.
-
Active: Ensure that Active is selected.
-
-
Click Submit to create the new OAuth API endpoint.
-
If you left the Client Secret blank so that ServiceNow would generate a value, reopen the entry to view and copy the client secret.
Note
Retain the Client ID and Client Secret in a secure location from where you can reterive them when configuring your ServiceNow connection.
Create an authenticating user and set permissions
These next sections describe how to create an authenticating user and set the required permissions for use with the ServiceNow connector. The connector requires these permissions to retrieve metadata from ServiceNow when an activity is configured.
Follow these steps:
-
Elevate your role: You will need to temporarily have the security_admin elevated role in order to complete the other steps in these sections.
-
Create a custom role for the authenticating user: The authenticating user will require a custom role with specific permissions.
-
Create an authenticating user: The authenticating user will be the user that is entered into the ServiceNow connection.
-
Create access control lists for the activities: Two separate Access Control List records using the custom role are required for each Jitterbit ServiceNow activity.
-
Assign roles to the authenticating user: Assign the custom role and two additional system roles to the authenticating user.
Elevate your role
You will need to temporarily have the security_admin elevated role in order to complete the other steps in these sections.
-
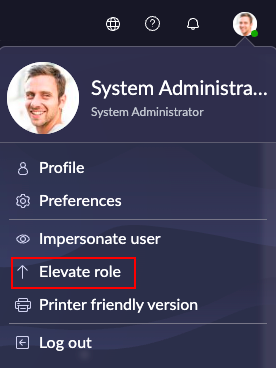
From anywhere within the ServiceNow instance, click the user icon located in the top-right corner of the page and then click Elevate role:
-
Select security_admin and click Update.
Note
The security_admin elevated role ends when the session times out or when you log out of the ServiceNow instance.
Create a custom role for the authenticating user
The authenticating user requires a custom role with specific permissions.
-
Click the All menu and navigate to User Administration > Roles.
-
Create a new custom role that will be used by the authenticating user on behalf of the Harmony agent by clicking New.
-
Complete the form:
-
Name: Enter an appropriate name for the role such as jitterbit_harmony_agent.
Note
The name of a role cannot be changed once the role is created.
-
Application: Leave as the default Global.
-
Requires Subscription: Leave as the default Unspecified.
-
Elevated privilege: Leave as the default unselected.
-
Description: Enter an appropriate description, such as Used by the authenticating user on behalf of the Harmony agent.
-
-
Click Submit to create the new role.
Create an authenticating user
The authenticating user will be the user that is entered into the Jitterbit ServiceNow connection. We recommend creating a separate user with an appropriate name rather than using an existing user.
-
Click the All menu and navigate to System Security > Users and Groups > Users.
-
Create a new user that will be the authenticating user on behalf of the Harmony agent by clicking New.
-
Complete the form, entering an appropriate User ID (such as jitterbit_harmony_agent).
-
Set a password for the new user by clicking Set Password and following the instructions in the resulting screen. Copy and save the password as it will be required by the ServiceNow connection.
Note
You will need this username and password for the ServiceNow connection.
Create access control lists for the activities
Two separate Access Control List records using the custom role are required for each Jitterbit ServiceNow activity. Follow these steps for each activity:
-
Click the All menu and navigate to System Security > Access Control.
-
Create a new Access Control List (ACL) record by clicking New.
-
Configure these settings for the new ACL record:
-
Type: Select record from the menu.
-
Operation: Select the appropriate ServiceNow operation from the menu. The read operation is the minimum operation type required to make a ServiceNow connection. These are the ServiceNow operations that are required for each Jitterbit ServiceNow connector activity:
Jitterbit ServiceNow Connector Activity ServiceNow Operation ServiceNow Create activity create ServiceNow Query activity read ServiceNow Update activity write ServiceNow Delete activity delete Note
If the appropriate ServiceNow operation for an activity is not configured in the ServiceNow instance, an error will be returned at runtime by the connector.
-
Name: To grant access to the sys_db_object, enter sys_db_object and select Table [sys_db_object] from the menu. Leave the second menu set to --None--.
-
Requires role: Under Role, double-click Insert a new row and then enter the previously created custom role (such as jitterbit_harmony_agent). Click the green checkmark to add the role to the ACL.
-
-
Click Submit to create the new ACL. You will be prompted to verify the settings to complete the creation of the new list.
-
Repeat the previous three steps and grant access to the sys_glide_object for the four ServiceNow operations by specifying Field class [sys_glide_object] in the Name field. Assign the same previously created custom role as above.
If you create an ACL for each connector activity and each of the two tables, you will have created eight new records when complete. You can sort the table of Access Controls by the Updated date and these new records will appear at the top.
Assign roles to the authenticating user
Assign the custom role and two additional system roles to the authenticating user.
-
Assign roles to the authenticating user by navigating to User Administration > Users and opening the authenticating user (such as jitterbit_harmony_agent) that you previously created.
-
In its Roles tab, click Edit and double-click the custom role created above to add it to the authenticating user's Related Links roles. In the same screen, you must also add the two roles personalize_dictionary and itil to the Roles list to enable access to the sys_dictionary and itil tables.
-
Click Update to save the configuration for the authenticating user.
Summary
With all these steps completed, you can then use the authenticating user as the username and its password with the created OAuth application's client ID and secret in the ServiceNow connection.