Snowflake Query activity
Introduction
A Snowflake Query activity, using its Snowflake connection, retrieves a CSV file of table or view data from Snowflake and is intended to be used as a source to provide data in an operation.
Note
Depending on your Snowflake permissions, the Query activity will return only data that you have access to. For example, if you have permissions only for view data, then the Get activity will return only view data and will not return table data.
Create a Snowflake Query activity
An instance of a Snowflake Query activity is created from a Snowflake connection using its Query activity type.
To create an instance of an activity, drag the activity type to the design canvas or copy the activity type and paste it on the design canvas. For details, see Creating an activity instance in Component reuse.
An existing Snowflake Query activity can be edited from these locations:
- The design canvas (see Component actions menu in Design canvas).
- The project pane's Components tab (see Component actions menu in Project pane Components tab).
Configure a Snowflake Query activity
Follow these steps to configure a Snowflake Query activity:
-
Step 1: Enter a name and select an object
Provide a name for the activity and select an object. -
Step 2: Build your query
Set conditions on a query using the object fields and apply paging to a query. -
Step 3: Review the data schemas
Any request or response schemas generated from the endpoint are displayed.
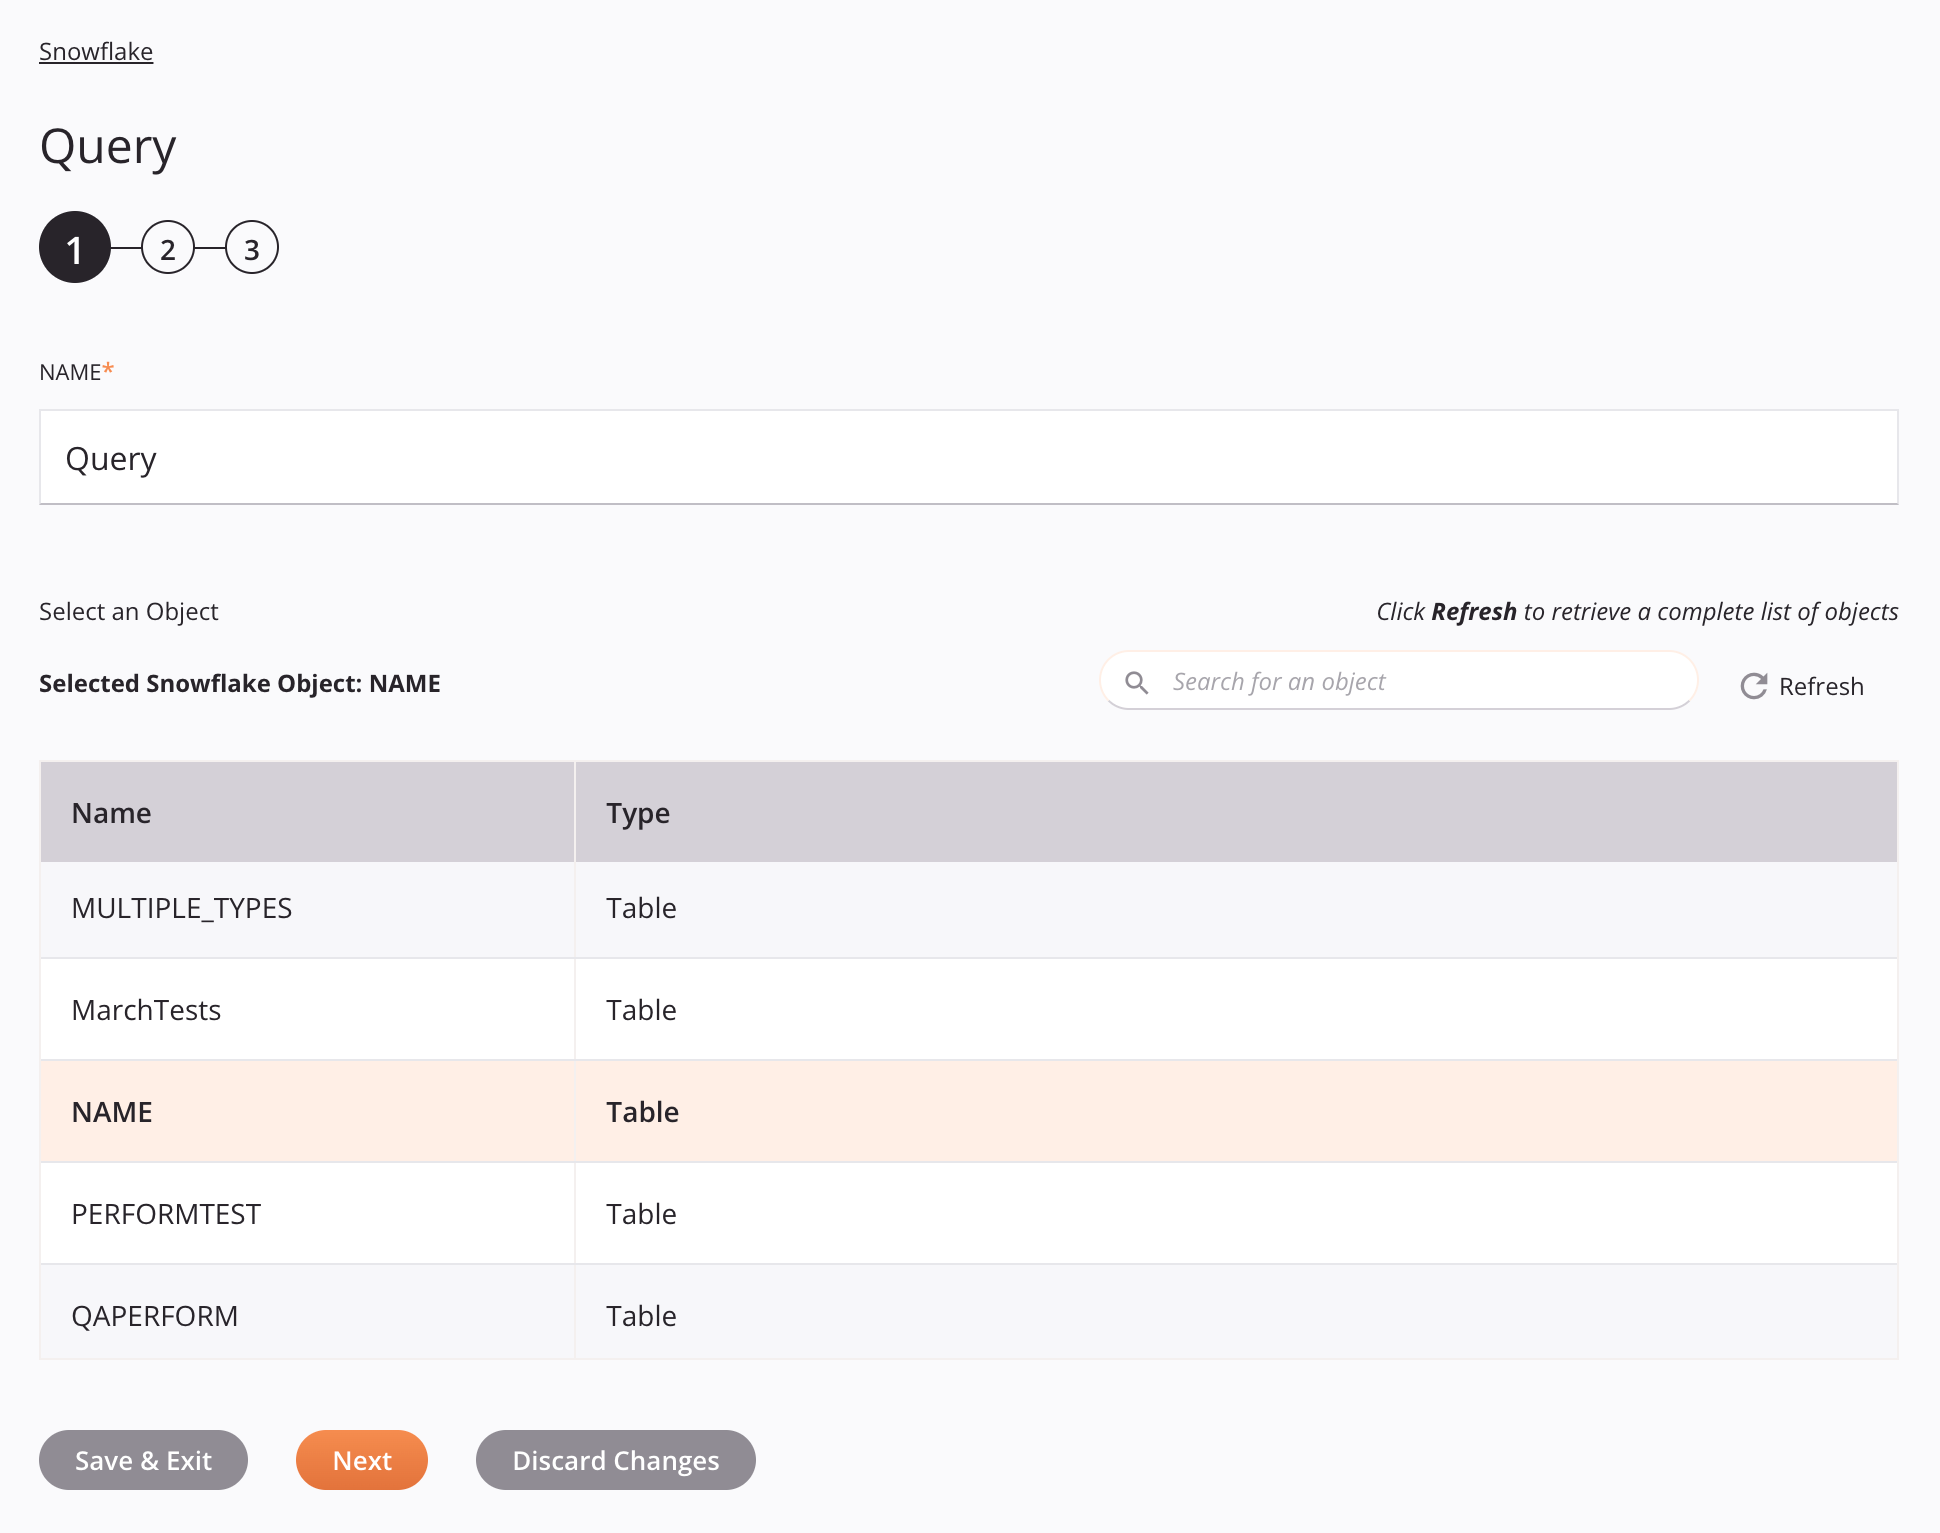
Step 1: Enter a name and select an object
In this step, provide a name for the activity and select a table or view (see Snowflake's Overview of Views). Each user interface element of this step is described below.
-
Name: Enter a name to identify the activity. The name must be unique for each Snowflake Query activity and must not contain forward slashes
/or colons:. -
Select an Object: This section displays objects available in the Snowflake endpoint. When reopening an existing activity configuration, only the selected object is displayed instead of reloading the entire object list.
-
Selected Snowflake Object: After an object is selected, it is listed here.
-
Search: Enter any column's value into the search box to filter the list of objects. The search is not case-sensitive. If objects are already displayed within the table, the table results are filtered in real time with each keystroke. To reload objects from the endpoint when searching, enter search criteria and then refresh, as described below.
-
Refresh: Click the refresh icon
 or the word Refresh to reload objects from the Snowflake endpoint. This may be useful if objects have been added to Snowflake. This action refreshes all metadata used to build the table of objects displayed in the configuration.
 -
Selecting an Object: Within the table, click anywhere on a row to select an object. Only one object can be selected. The information available for each object is fetched from the Snowflake endpoint:
-
Name: The name of an object, either a table or a view.
-
Type: The type of the object, either a table or a view.
-
Tip
If the table does not populate with available objects, the Snowflake connection may not be successful. Ensure you are connected by reopening the connection and retesting the credentials.
-
-
Save & Exit: If enabled, click to save the configuration for this step and close the activity configuration.
-
Next: Click to temporarily store the configuration for this step and continue to the next step. The configuration will not be saved until you click the Finished button on the last step.
-
Discard Changes: After making changes, click to close the configuration without saving changes made to any step. A message asks you to confirm that you want to discard changes.
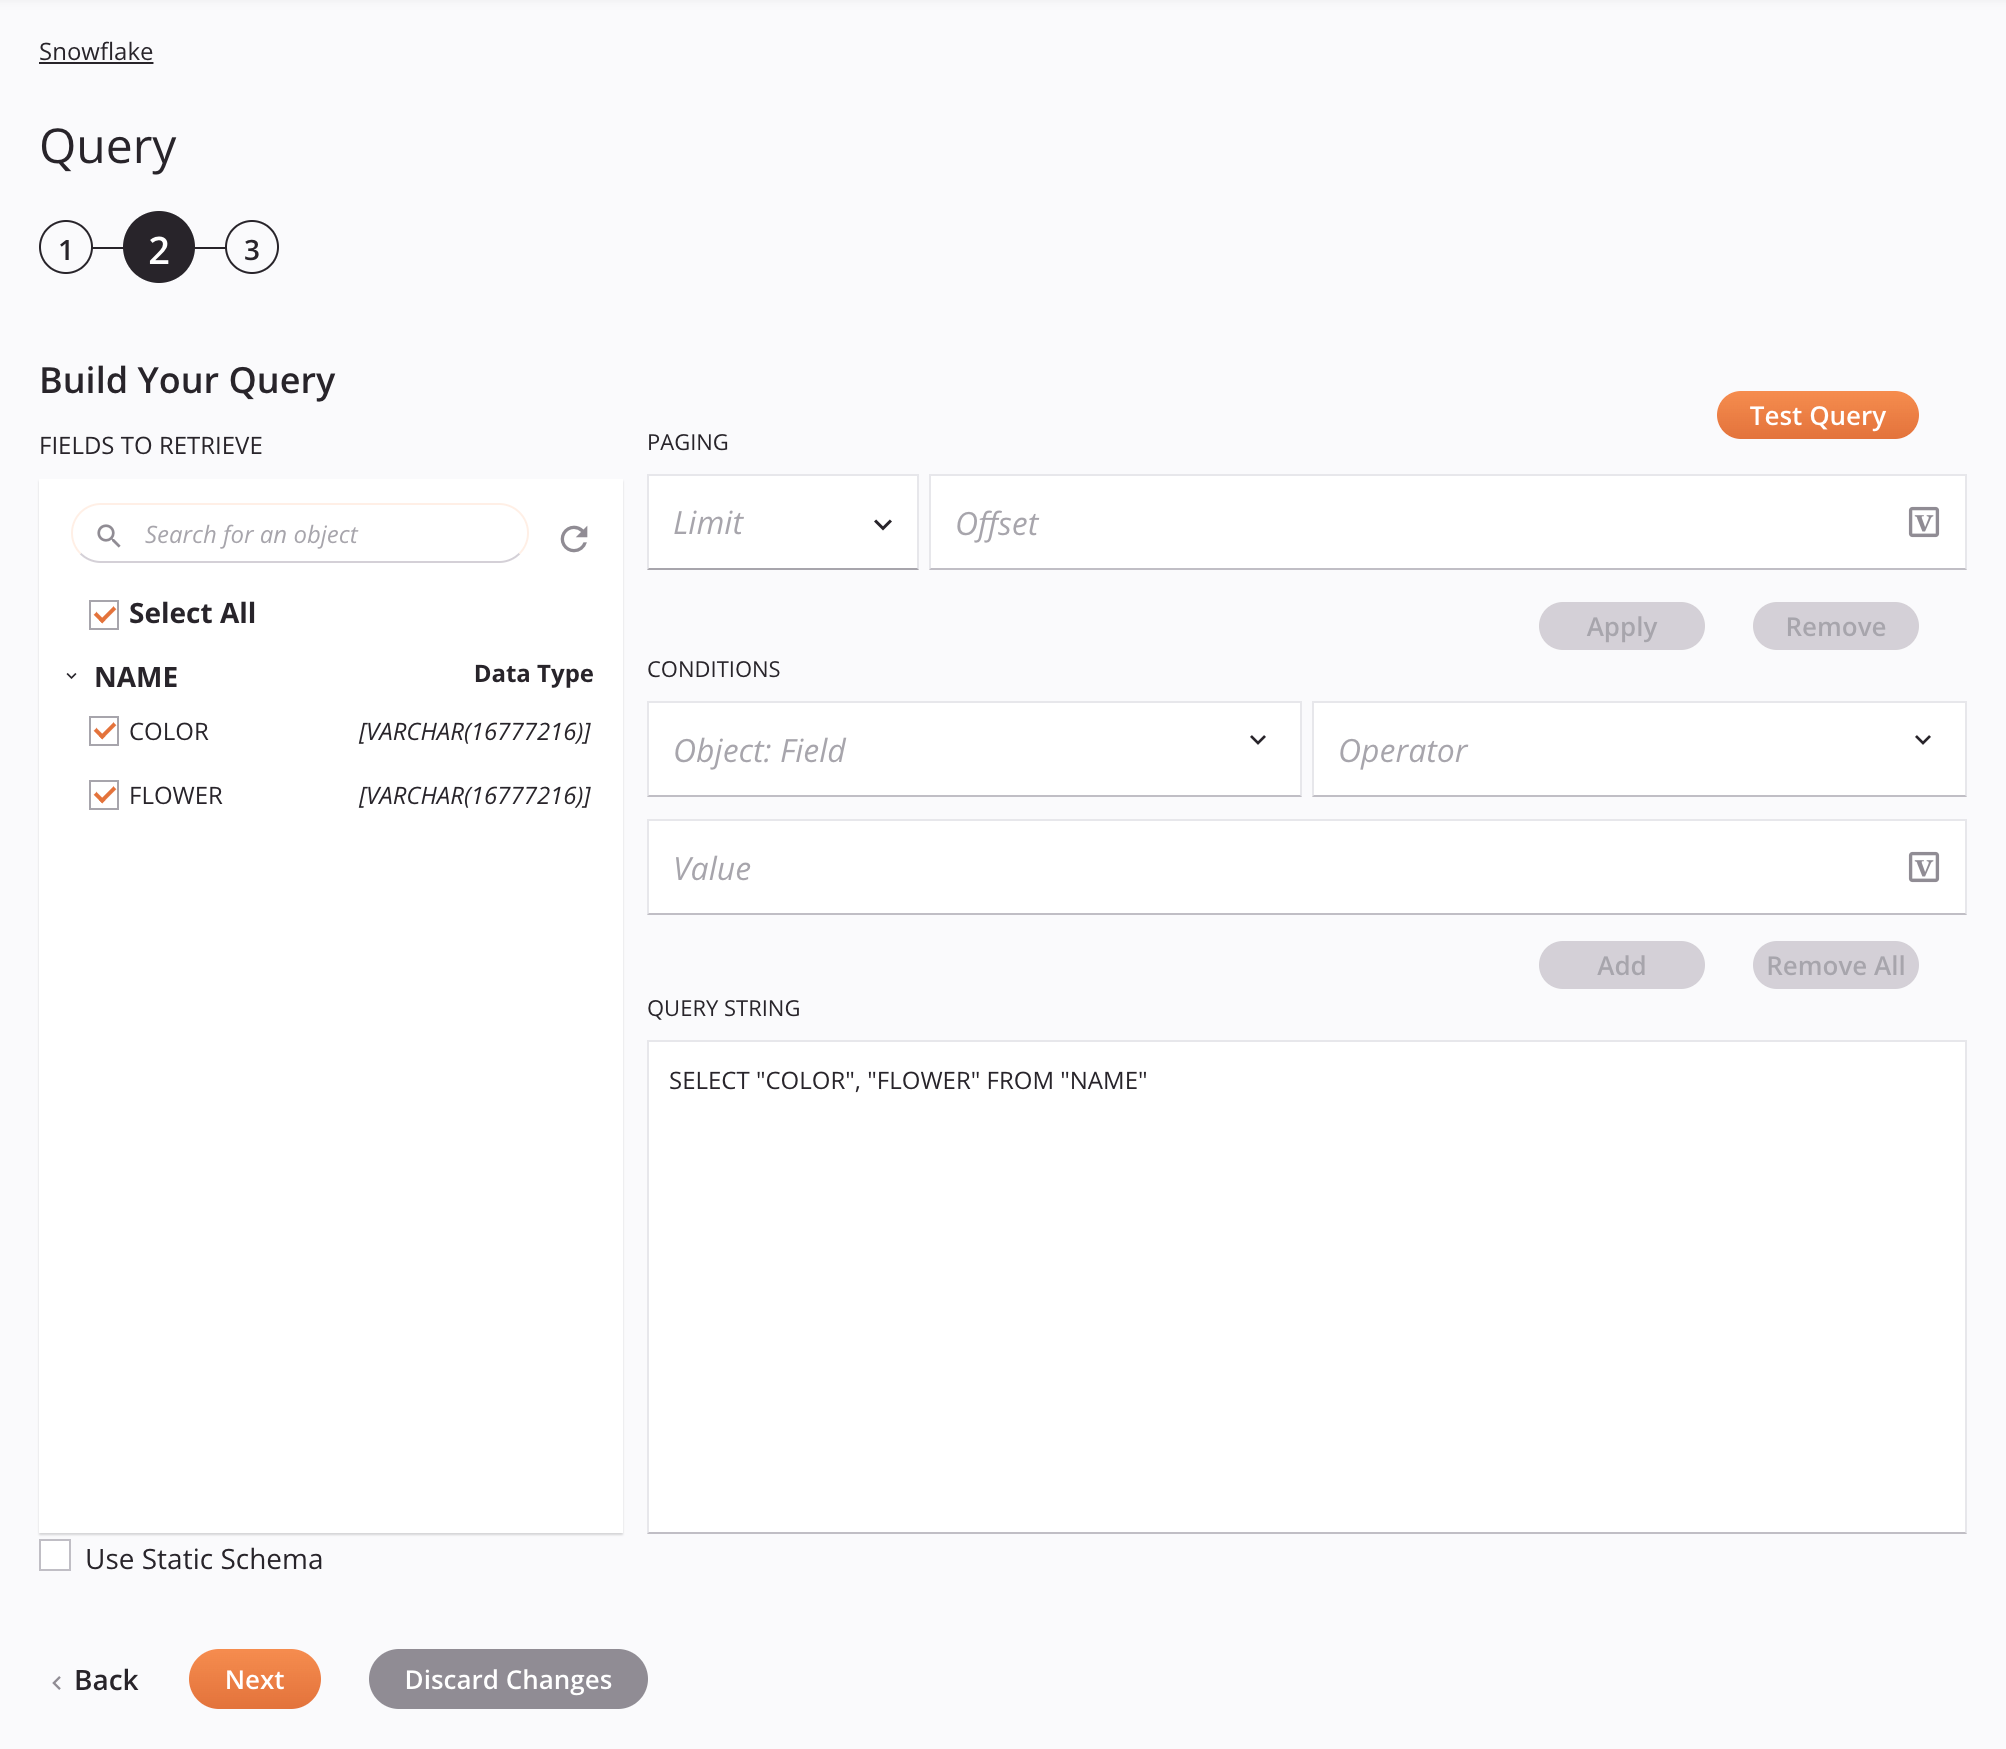
Step 2: Build your query
In this step, build a query statement by setting conditions for object fields and applying paging either through the query builder or by manually entering a query statement. Each user interface element of this step is described below.
Note
You can bypass the query builder and enter a query statement in the Query string field.
Tip
Fields with a variable icon ![]() support using global variables, project variables, and Jitterbit variables. Begin either by typing an open square bracket
support using global variables, project variables, and Jitterbit variables. Begin either by typing an open square bracket [ into the field or by clicking the variable icon to display a list of the existing variables to choose from.
-
Search: Enter any part of a field name into the search box to filter the list of fields for the selected object. The search is not case-sensitive. The listed results are filtered in real time with each keystroke.
-
Refresh: Click the refresh icon
or the word Refresh to reload fields of the object from the Snowflake endpoint. -
Select All: When using the search box to filter, you can use this checkbox to select all visible fields at once.
-
Select fields: Select the checkboxes of the fields you want included in the query to have them automatically added to the query statement in the Query string. You can also Select All of the fields at once using the checkbox.
-
Paging: To add a paging clause (a limit on the number of records with an optional record offset), you can use the dropdown to set the paging limit and the field to enter an offset. If an offset is not specified, it defaults to 0. A single paging clause is supported. If paging clause is not included, all records are returned.
-
Apply: Click to automatically construct the clause based on the dropdown selections and entered value. The automatically constructed paging clause appears in the Query string text box.
-
Remove: Click to remove a paging clause that has been applied.
-
-
Conditions: To add conditional clauses, use the fields below as input to help construct the clauses, which then appear in the Query string text box.
-
Field: Use the dropdown to select a field from the selected object.
-
Operator: Use the dropdown to select an operator that is appropriate for the field data type:
Operator Label Description = Equals != Not equals IN (value1, value2) In In list of values. LIKE 'string' Like Like string. LIKE 'string%' Starts with Starts with string. LIKE '%string' Ends with Ends with string. LIKE '%string%' Contains Contains string. < Less than <= Less or equal > Greater than >= Greater or equal -
Value: Enter the desired value to use with the dropdown selections.
-
Add: Click to automatically construct the clause based on the dropdown selections and entered value. The conditional clause is added to the Query string text box.
-
Remove All: Click to remove all entered conditional clauses.
-
-
Query string: As you select fields, specify conditions, and set paging, the query statement in this text box is autopopulated with the selected fields, conditions, and paging limits. This field is editable, meaning you can manually enter a query statement or edit the autopopulated statement.
Note
The values of any global variables used in the Query string are not populated when using the Test Query button, even if a default value is specified. Global variable values will be obtained at runtime when the query is executed. To test the query with a default variable value, use a project variable instead.
Important
To use a query statement that contains elements other than those selected via this interface, you must also select the Use Static Schema checkbox.
-
Use Static Schema: Select to set the response schema to a static schema that is independent of the query statement. This allows custom query statements entered in the Query string text box to be used.
-
Test Query: Click to validate the query. If the query is valid, a sample of up to 10 records retrieved from the query is displayed in a table. If the query is not valid, relevant error messages are displayed. If you edit the Query string manually, the query must be valid and validated through this button in order to enable the Next button.
-
Back: Click to temporarily store the configuration for this step and return to the previous step.
-
Next: Click to temporarily store the configuration for this step and continue to the next step. The configuration will not be saved until you click the Finished button on the last step.
-
Discard Changes: After making changes, click to close the configuration without saving changes made to any step. A message asks you to confirm that you want to discard changes.
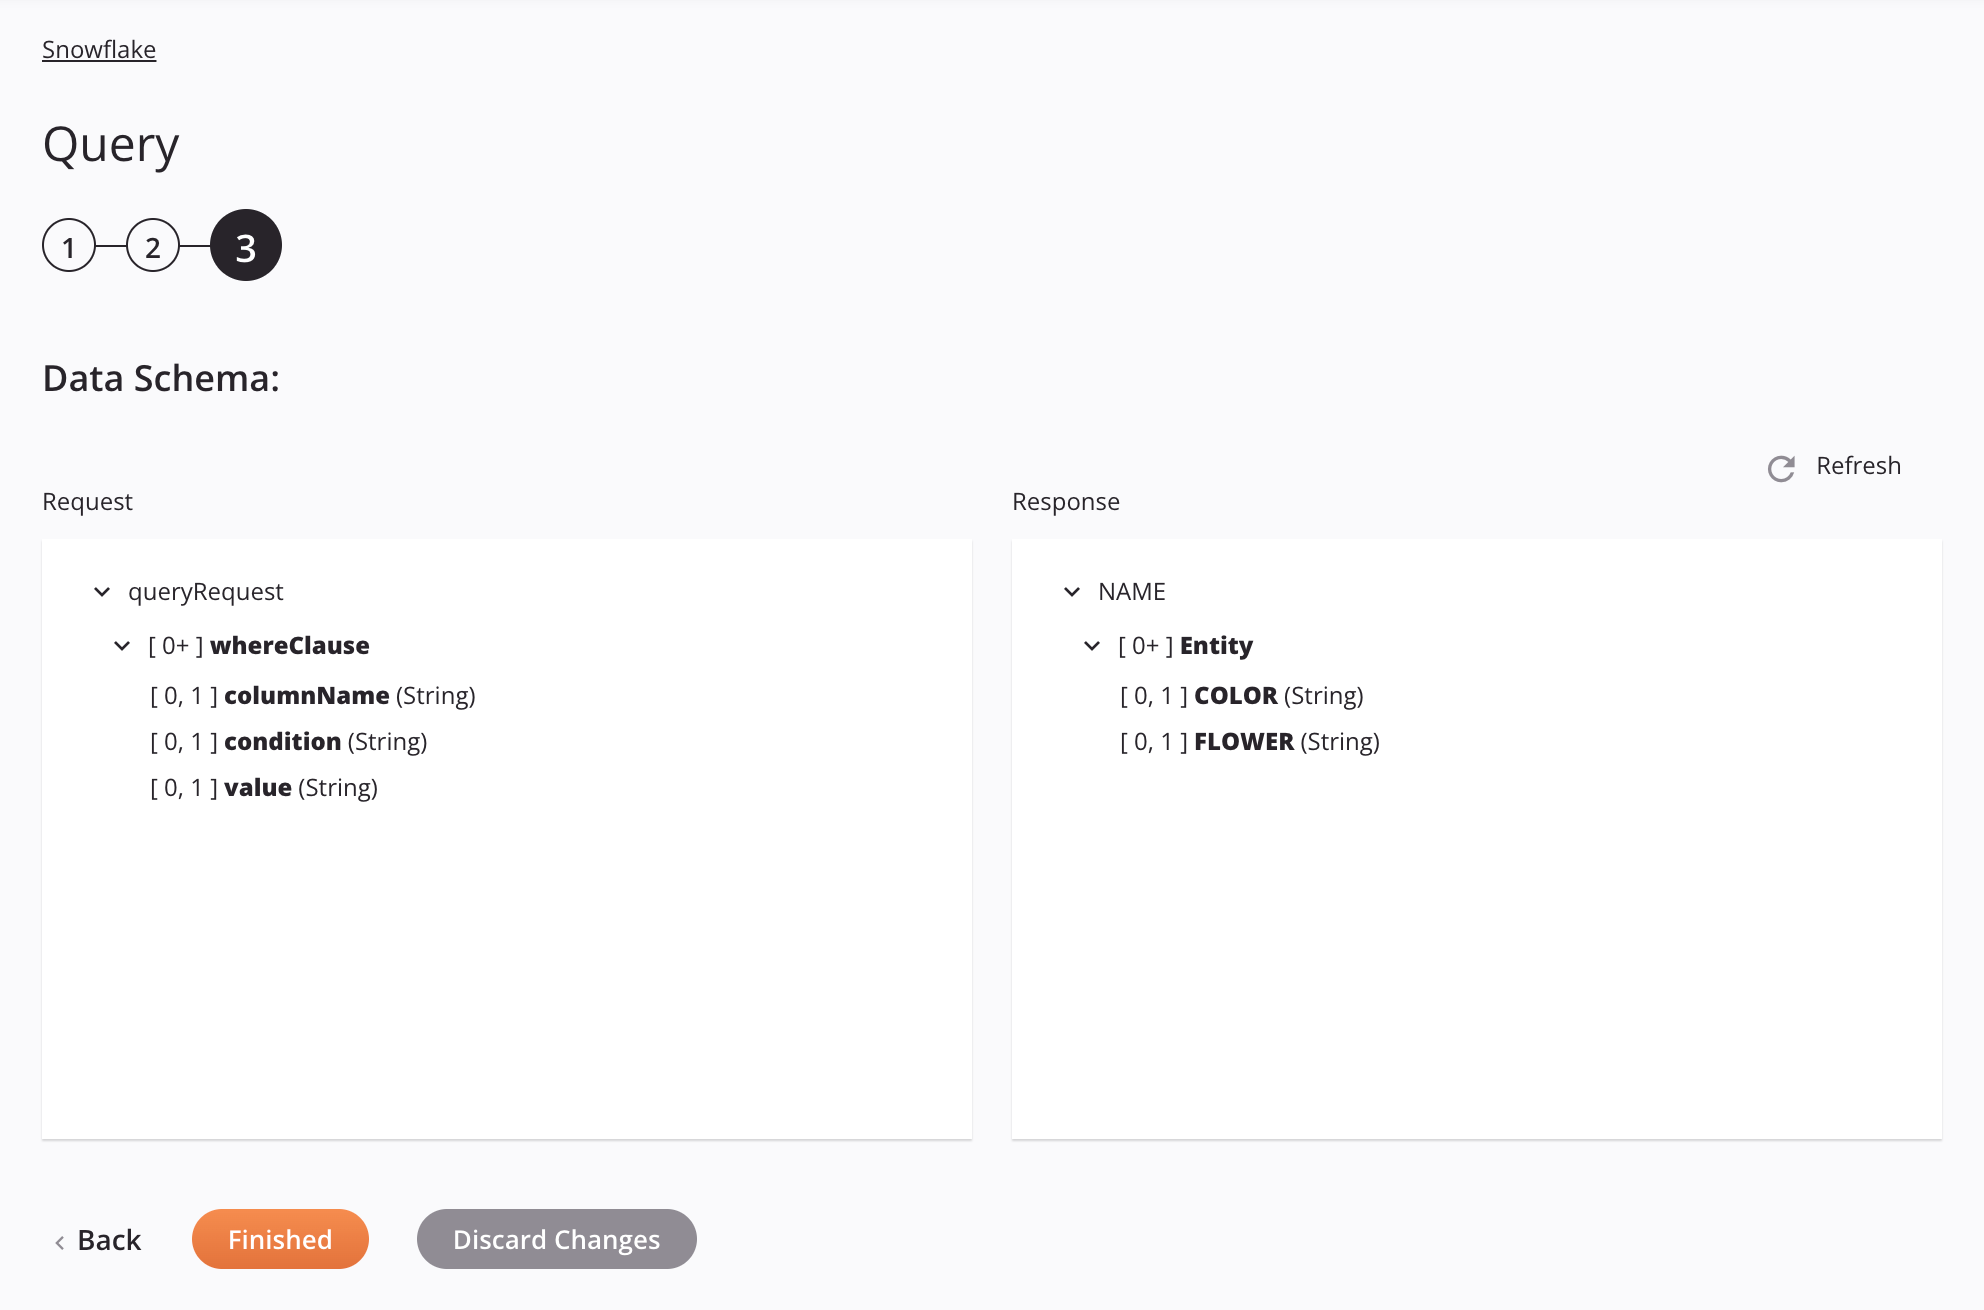
Step 3: Review the data schemas
Any request or response schemas generated from the endpoint are displayed. Each user interface element of this step is described below.
-
Data Schemas: These data schemas are inherited by adjacent transformations and are displayed again during transformation mapping.
Note
Data supplied in a transformation takes precedence over the activity configuration.
The Snowflake connector uses the Snowflake JDBC Driver and the Snowflake SQL commands. Refer to the API documentation for information on the schema nodes and fields.
The default request and response data schemas consist of these nodes and fields:
-
Request
Request Schema Field/Node Notes queryRequestNode of the query request. whereClauseNode of the WHERE clause request. columnNameColumn name of the WHERE clause. conditionCondition of the WHERE clause. valueValue of the WHERE clause. -
Response
Response Schema Field/Node Notes tableNode showing the table name NAME. EntityNode of the entity. column_AValue for the first column, COLOR. column_BValue for the second column, FLOWER. . . .Values for the succeeding table columns.
When Use Static Schemas is selected, the response data schema consists of these nodes and fields:
-
Response
Response Schema Field/Node Notes queryResponseNode of the query response. rowNode of the response row. itemNode of the response item. columnNameColumn name of the response item. columnValueColumn value of the response item.
-
-
Refresh: Click the refresh icon
or the word Refresh to regenerate schemas from the Snowflake endpoint. This action also regenerates a schema in other locations throughout the project where the same schema is referenced, such as in an adjacent transformation. -
Back: Click to temporarily store the configuration for this step and return to the previous step.
-
Finished: Click to save the configuration for all steps and close the activity configuration.
-
Discard Changes: After making changes, click to close the configuration without saving changes made to any step. A message asks you to confirm that you want to discard changes.
Next steps
After configuring a Snowflake Query activity, complete the configuration of the operation by adding and configuring other activities, transformations, or scripts as operation steps. You can also configure the operation settings, which include the ability to chain operations together that are in the same or different workflows.
Menu actions for an activity are accessible from the project pane and the design canvas. For details, see Activity actions menu in Connector basics.
Snowflake Query activities can be used as a source with these operation patterns:
- Transformation pattern
- Two-target archive pattern (as the first source only)
- Two-target HTTP archive pattern (as the first source only)
- Two-transformation pattern (as the first or second source)
To use the activity with scripting functions, write the data to a temporary location and then use that temporary location in the scripting function.
When ready, deploy and run the operation and validate behavior by checking the operation logs.