Operation schedules
Introduction
Each operation can be configured to run automatically by applying a schedule. Schedules contain information about when an operation will automatically be activated. You can define virtually any type of schedule you need, such as every Friday at 5 pm, the last Friday of each quarter, or every hour of a single day.
If an operation running on a schedule has configured operations actions, any downstream operations are also executed accordingly.
Schedules can be created and applied directly in Cloud Studio, as covered on this page, or they can be created and applied from the Projects page in the Management Console, where you can also see a list of all schedules assigned to operations within a project, or enable or disable schedules.
When deploying a schedule that has already been deployed in the Harmony cloud, you are presented with options for selecting which schedules to use. This is covered under Select schedules and project variables in Project deployment.
Other ways to execute operations include executing operations manually or using an API trigger, as covered under Operation deployment and execution.
Create a new schedule or open an existing schedule
Operation schedules can be accessed from the project pane, the operation settings, or the design canvas depending on if you are creating a new schedule or editing an existing schedule. After creating a schedule or opening an existing schedule to edit, see Configure operation schedules later on this page for configuration.
A new schedule can be created from the project pane's Components tab using the Create New option on the Schedules category (see Components tab actions menu in Project pane Components tab). New schedules are created with the default name New Schedule. Subsequent new schedules with default names are appended with an incremented number in parentheses.
An existing schedule can be edited from the project pane's Components tab using the View/Edit option on a schedule component (see Component actions menu in Project pane Components tab).
To edit an existing schedule that is already assigned to an operation, click the schedule icon in the operation action bar to display the Schedules tab of the operation settings.
The Schedules tab of the operation Settings can also be accessed from these locations:
- The project pane's Workflows tab (see Component actions menu in Project pane Workflows tab).
- The project pane's Components tab (see Components tab actions menu and Component actions menu in Project pane Components tab).
- The design canvas (see Component actions menu in Design canvas).
Note
Schedule edits take effect on all operations they are assigned to.
Configure operation schedules
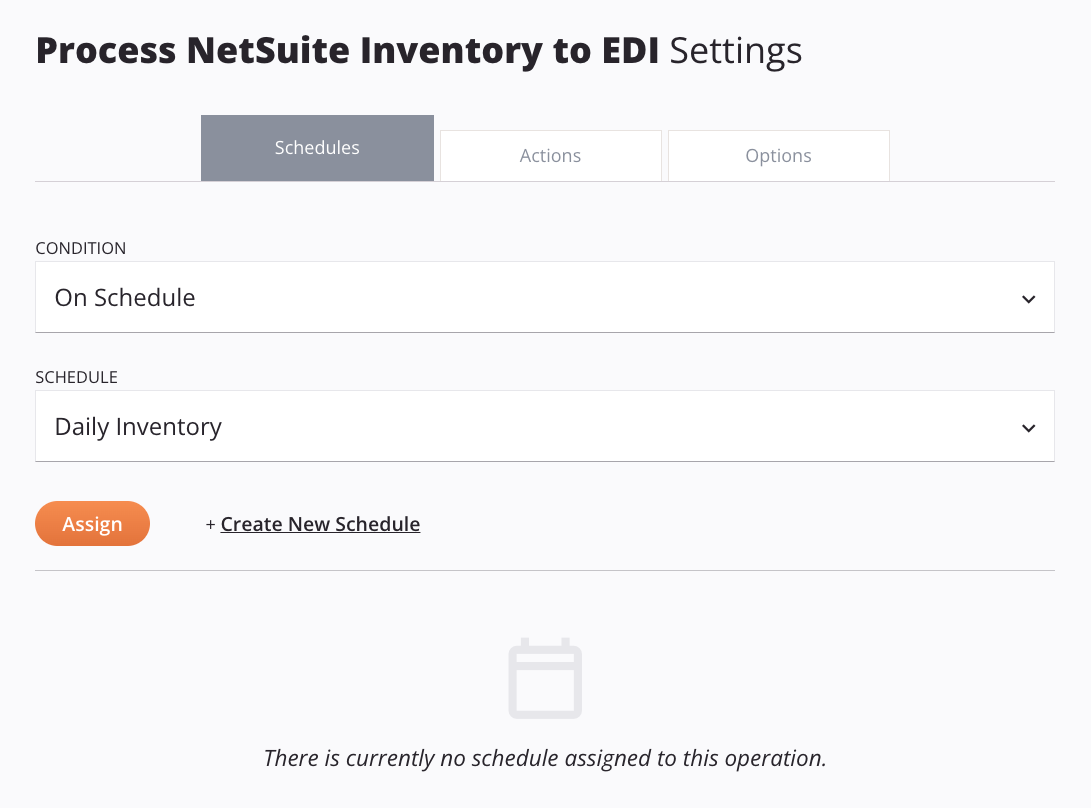
In the Schedules tab of the operation settings, existing schedules that have been created either in Cloud Studio or in the Management Console can be applied to operations. From here you can also create new schedules, edit existing schedules, and dissociate schedules from operations. Each option is described below.
-
Condition: The first menu should already show the selection as On Schedule, indicating that the condition on which the operation will trigger is a schedule. There are no other conditions able to be set at this time.
-
Schedule: Use this menu to select the existing schedule that you want to apply to the operation. If the schedule you want to use does not yet exist, click the link Create New Schedule to create a new schedule. This option is covered below.
-
Assign: Click Assign to apply the selected schedule to the operation. Note that only one schedule can be applied to each operation, and that the assigned schedule will not take effect until the project has been deployed.
When an operation has a scheduled assigned, the Schedule, Assign, and Create New Schedule fields are replaced with options to set the schedule policy and a summary of the assigned schedule. In addition, a schedule icon appears on the operation on the design canvas, which when clicked re-opens the operation schedules screen.
Tip
When you apply a schedule to an operation, it is a recommended best practice to set an On Fail operation action to trigger an email notification on the scheduled operation.
-
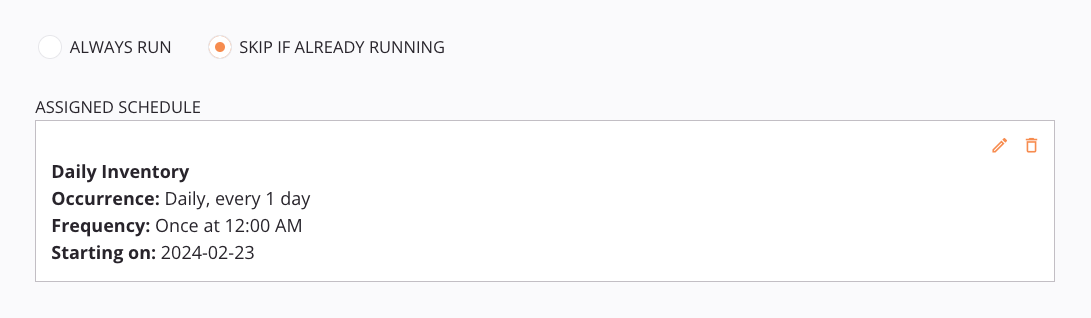
Schedule policy: Set the schedule policy, one of Always run or Skip if already running:
-
Always run: Select to run the operation on schedule in the event that a previous run of the operation is still running. This option should be selected only if you have a special requirement to do so. When using this option, ensure that having concurrent operations will not be detrimental by potentially processing the same source data records multiple times.
-
Skip if already running: Select to skip a scheduled run of the operation in the event that a previous run of the same operation is still running (default).
-
-
Assigned schedule: When an operation has a scheduled assigned, a summary of the assigned schedule is displayed with these options:
-
Edit: To edit the assigned schedule, click the edit icon to open the schedule configuration screen and make any needed changes. Existing schedules can also be accessed from the project pane. In the Components tab, to edit an schedule, hover over the schedule name, then click the actions menu icon and from the menu select View/Edit.
Note
If the same schedule is assigned to other operations, the edits affect the schedule for all operations it is assigned to.
-
Remove: To dissociate the schedule from the operation, click the remove icon . Note that the schedule itself is not deleted, but is simply unassigned from the operation.
-
-
Create New Schedule: To create a new schedule, click the link to Create New Schedule. This opens the schedule configuration screen.
Note
The schedule is not created until after you have configured and saved the new schedule. After the schedule is created, you then need to select it from the Available Schedule menu and click Assign to apply it to the operation.
-
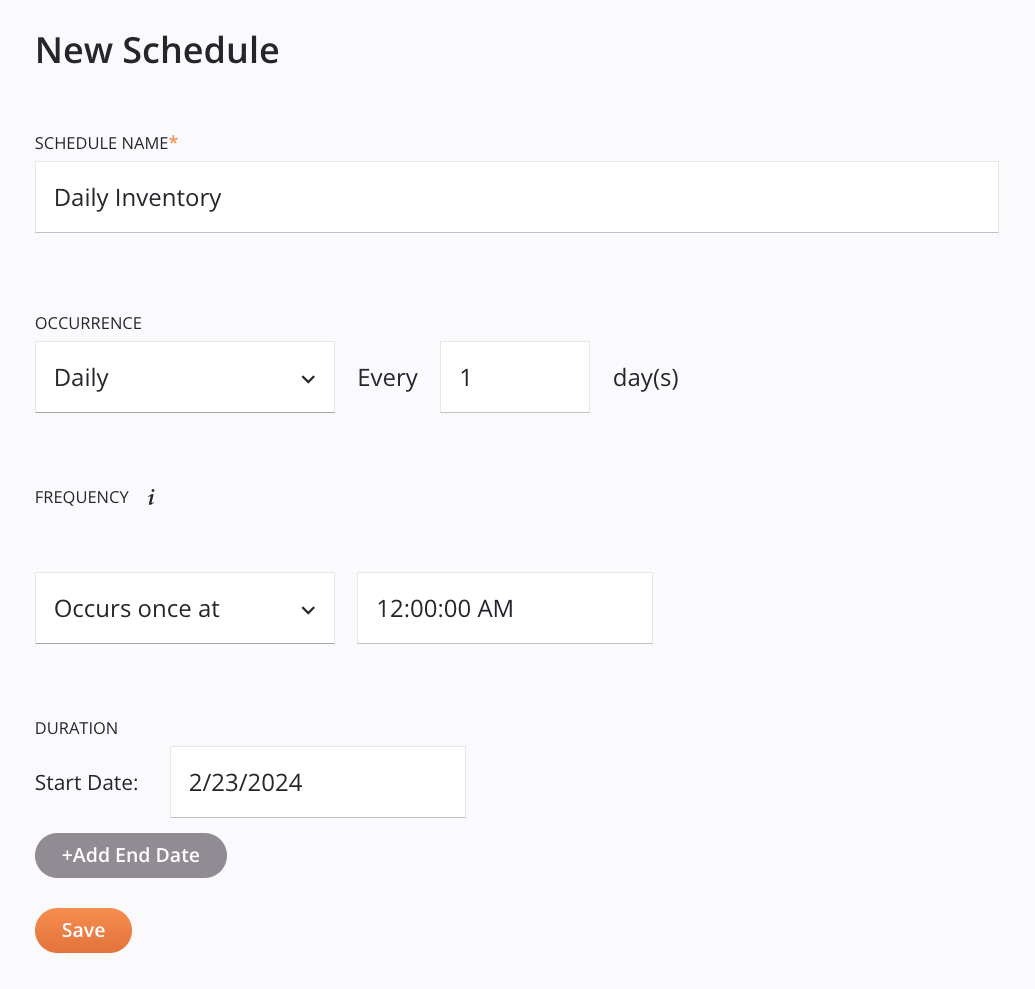
Schedule name: Enter a name for the schedule. You may want to give the schedule a name that is reflective of the schedule frequency or, if used for a specific operation, reflective of the purpose of the schedule (e.g. "Every 5 Minutes" or "Contact Sync"). The name must not begin or end with a space.
-
Occurrence: Use the menu to select one of three options for the days on which the schedule should kick off the operation(s) on which it is assigned:
-
Daily: The schedule will activate the operation every day, or every few days. When this option is selected, these fields become available to configure:
- Every [#] Day(s): Enter a number of day(s) in between operation runs.
-
Weekly: The schedule will activate the operation during a specified set of days of the week. When this option is selected, these fields become available to configure:
- Every [#] Week(s): Enter a number of week(s) in between operation runs.
- [Sun, Mon, Tue, Wed, Thu, Fri, Sat]: Click to select the day(s) of the week on which you want the operation to run. At least one day must be selected.
-
Monthly: The schedule will activate the operation on a monthly basis. When this option is selected, choose one of two options that become available to configure:
- Day [#] of Every [#] Month(s): Enter the day of the month and number of month(s) in between operation runs.
- The [1st, 2nd, 3rd, 4th, or Last] [Day of Week] of Every [#] Month: Use the menus to select which day of the month and enter the number of month(s) in between operation runs.
-
-
Frequency: Select one of two options for the times at which the schedule should kick off the operation on the days that it runs:
-
Occurs Once at [hh:mm:ss] [AM/PM]: The schedule will activate the operation only once at the time specified. Specify the time by using the top slider to adjust the hour or the bottom slider to adjust minutes.
-
Occurs Every [#] [Minute(s)/Hour(s)] Starting at [hh:mm:ss] [AM/PM] and Ending at [hh:mm:ss] [AM/PM]: The schedule will repeatedly reactivate the operation for the specified period of time throughout the day. Specify the times throughout the day that you want to limit the operation to run within either by using the top slider to adjust the hour or the bottom slider to adjust minutes.
Note
Time zones are discussed below in Operation time zones.
-
-
Duration: Configure the dates of duration for the schedule.
Note
Start and end dates in a schedule are inclusive.
- Start Date: By default, the schedule will be active starting on the current date. If you want the schedule to start on another day, use the date/time picker to select the desired start date.
- Add End Date: By default, the operation(s) on which the schedule is assigned will run indefinitely according to the schedule. If you want specify an end date, first click the link to Add End Date to add the End Date field. Then use the date/time picker to set a date that you want the schedule to end.
- Remove End Date: This link appears once the End Date field is added. To remove the End Date field, click the link to Remove End Date.
-
Save: Click to save and close the schedule configuration.
-
Operation time zones
When configuring a schedule, the Frequency field does not display the time zone in which the operation will run. The time zone in which the operation will run depends on the agent running the operation, unless the Override Schedule Agent Time Zone setting is enabled in your organization's policies:
-
Agent Time Zone
- Cloud agents: All cloud agents are in UTC.
- Private agents: Private agent time zones are determined by the time zone of the operating system of the private agent. It is highly recommended for all agents in a private agent group to be running on the same time zone, or the times at which a configured schedule initiates the operation may be unpredictable depending on the specific agent being used.
When using agent version 10.85 / 11.23 or later, and the agent is using a time zone that observes daylight savings, these actions occur during a daylight saving time switch:
-
When a once-daily schedule is set between 2 - 3 AM, the scheduled operation will run at 3 AM on the second Sunday of March.
-
When a once-daily schedule is set between 1 - 2 AM, the scheduled operation will run on the second instance of 1 AM on the first Sunday of November.
A known issue exists for the above scenarios when using agent version 10.84 / 11.22 and earlier.
Tip
For schedule consistency, it is recommended to use a time zone that does not observe daylight saving time, such as UTC (cloud agents use UTC by default). If using a private agent, you can use the Override Schedule Agent Time Zone setting and select Etc/UTC.
-
Override Schedule Agent Time Zone
- If the Override Schedule Agent Time Zone setting is enabled in your organization's policies, the selected time zone will determine the time zone in which all current and future schedules across an organization will run.
Schedule actions menu
After a schedule is created, menu actions for that schedule are accessible from the project pane's Components tab (see Component actions menu in Project pane Components tab).
Each of these menu actions is available:
| Menu Item | Description |
|---|---|
| View/Edit opens the schedule configuration screen (see Configure operation schedules earlier on this page). Note Schedule edits take effect on all operations they are assigned to. | |
| Cut places a copy of the schedule on your clipboard and deletes the original schedule from the project (see Component reuse). | |
| Copy places a copy of the schedule on your clipboard (see Component reuse). | |
| Duplicate creates a new, unreferenced schedule using the same configuration as the original component (see Component reuse). | |
| Rename positions the cursor on the schedule name for you to make any edits as necessary. | |
| View Dependencies changes the view in the project pane to display any other parts of the project that the schedule is dependent on (see Component dependencies, deletion, and removal). | |
| Add to Group opens a dialog to create a new custom group or to add the schedule to an existing group (see Component groups). | |
| Delete permanently deletes the schedule (see Component dependencies, deletion, and removal). | |
| Remove is not currently functional. |
Use scripts to schedule operations
If the options available in the user interface as described in Configure operation schedules do not meet your needs, you can create more complex schedules using scripting.
Note
If you have the Override Schedule Agent Time Zone setting enabled in your organization's policies, any scripts that use date and time functions as described here will not be overridden with your selected time zone.
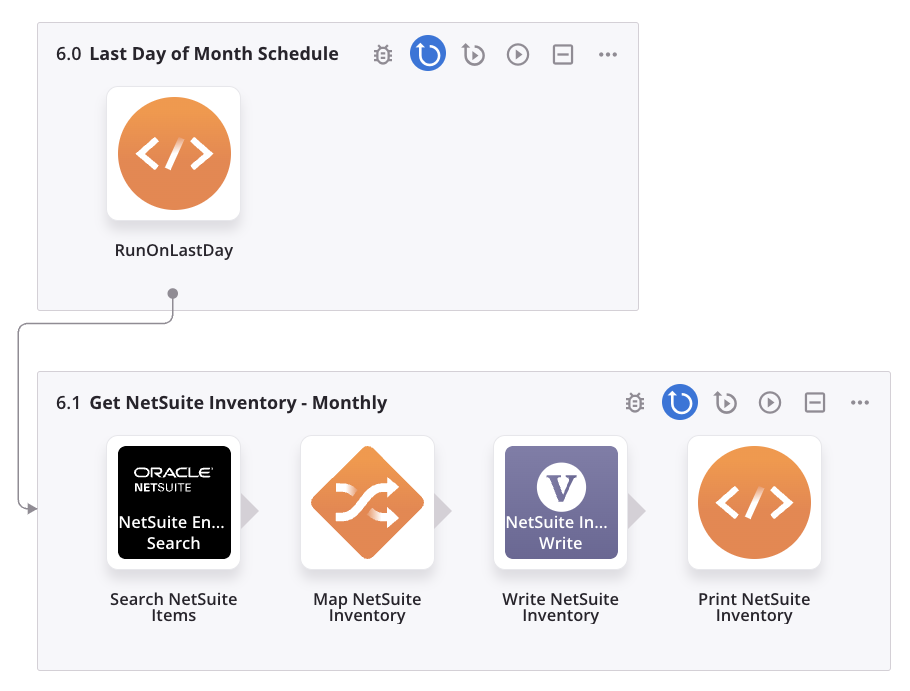
As an example, a common use case might be to create a schedule to run the operation on the last day of the month. These steps walk through this use case:
-
Create an operation containing a single script as a project component.
-
Configure the script as a Jitterbit Script containing script logic that checks for the last day of the month and runs an operation if true. Make sure to replace the operation reference with that of the operation you want to run on the schedule.
<trans> if(DayOfMonth(LastDayOfMonth(Now()))==DayOfMonth(Now()), RunOperation("<TAG>operation:Scheduled Operation</TAG>"); ); </trans> -
Create a schedule that runs every day at the desired time and apply it to the operation containing the script you just created.
-
The operation chain should look similar to this once these steps are complete:
Enable or disable schedules
When you create and apply a schedule to an operation, it is enabled by default. Using the Management Console, you can choose to disable or re-enable a schedule (if disabled) remotely from the Projects page.
On the Projects page, this can be done from either the Operations or Schedules tab using the toggle in the Operation Status column to enable or disable a schedule on a single operation, or using the toggle in the Schedule Status column to enable or disable a schedule across all operations that have the schedule applied. Note that disabling a schedule at the project level causes the Effective Status to be disabled even if the schedule is enabled for an individual operation. For detailed instructions, see Projects (Management Console).
Note
In the Cloud Studio interface, there is no indication as to which schedules are enabled or disabled, and it is not possible from Cloud Studio to disable a schedule or re-enable a schedule that has been disabled. Therefore it is important to remember if you disable a schedule, as the only way to tell that it is disabled or to re-enable it is through the Management Console.
Troubleshoot schedules
If a schedule is not working as expected, check these items when troubleshooting the issue:
-
Have you deployed the operation the schedule is assigned to?
In Cloud Studio, schedules must be assigned to an operation and then deployed for them to trigger. Once you have assigned a schedule to an operation in Cloud Studio, it will not take effect until it has been deployed. (In contrast, schedules assigned to an operation through the Management Console take effect immediately without needing to redeploy the project to Harmony.) -
Is the schedule enabled?
Schedules can be disabled and re-enabled only from within the Management Console. Check the Projects page within both the Operations and Schedules tabs to make sure the schedule is enabled. -
Do you know what time zone your schedule is in?
Time zones are discussed in Operation time zones. -
If you are using a private agent, is the scheduling service running?
On the machine where the private agent is installed, check that Jitterbit Scheduler and Jitterbit Scheduler Service are running. On Windows this can be checked through the Task Manager under Processes. On Linux and Docker, use thejitterbit statuscommand. -
If you are using a private agent, are aggressive schedules overloading the agent group?
If using private agents, additional evaluation should be made to ensure that too many schedules within a short time period will not overload the agent group, causing an operation backlog.Private agents default to being able to execute up to two times the CPU count for each agent machine. For example, if the private agent machine has 4 CPU cores, you will be able to process up to 8 concurrent operations.
When evaluating the requirements, some of the operations may be more time-dependent than others. If several non-critical operations were to backlog the agent queue, then more critical operations could be affected. To avoid this, determine the number of operations the agent group can process concurrently (using the CPU count calculations described above), and then balance that against the business priority and runtime duration of the scheduled operations.