Custom hierarchical schema
Introduction
A hierarchical schema (or hierarchical schema) is a complex file structure with multiple file row types such as header or summary rows. This page covers creating and editing a custom hierarchical schema within a transformation.
Create a hierarchical schema
Custom schemas, including hierarchical schemas, are defined in transformations. To be able to create a hierarchical schema, first create a transformation.
The Define Schema option is visible only when a transformation is not already inheriting a schema from an adjacent activity. If an adjacent activity that allows configuration of user-defined schemas is present, do not provide a request or response schema in the activity's configuration, as this would then cause those schemas to be inherited by the transformation.
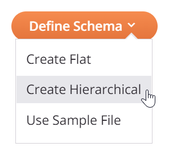
Provided this condition is met, the Define Schema button is displayed in mapping mode on each side of the transformation that does not already have a schema defined in an activity. Click Define Schema on the source or target side of the transformation and select Create Hierarchical:
Edit a hierarchical schema
To edit a hierarchical schema that has been defined in a transformation, use the schema actions menu in a transformation to select Edit Schema:

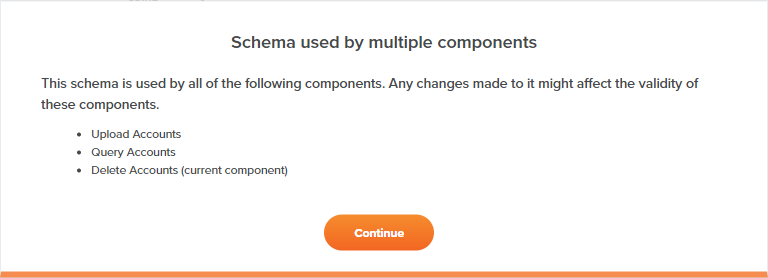
On opening a schema that is referenced by multiple components, a dialog displays a list of any components that reference the schema and will be affected by any changes:
Note
Duplicate nodes are not visible when editing a hierarchical schema.
Configure a hierarchical schema
Configuration of a schema using the hierarchical schema editor is covered as follows:
-
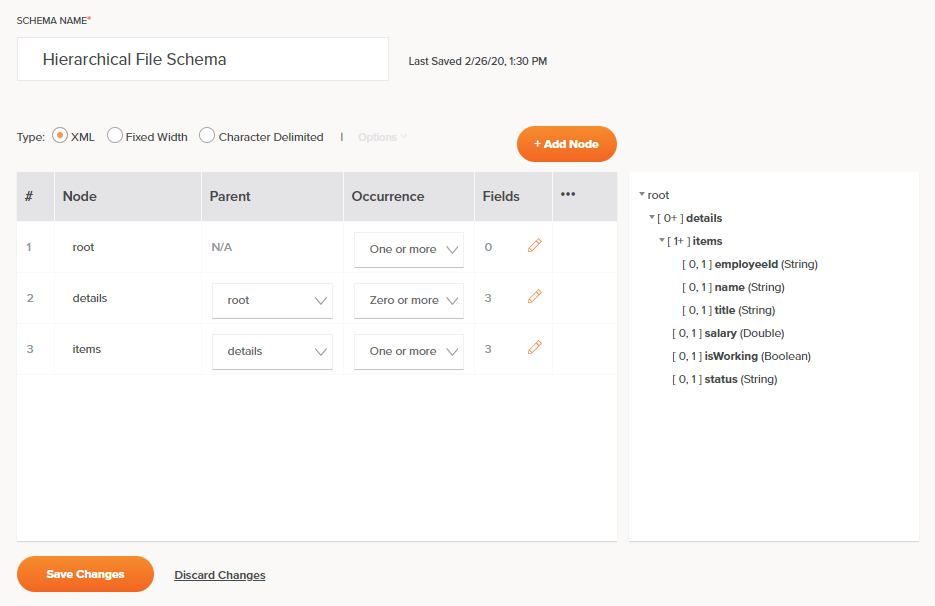
Schema Name: Enter a name to use to identify the hierarchical schema.
-
Save Status: To the right of the schema name are the date and time that the schema's associated transformation was last saved. This information is not associated with the schema itself, which is saved using the Save Changes button located at the bottom of the configuration.
-
Type: Select among the available types for a custom hierarchical schema:
- XML: The schema will be created in XML format.
- Fixed Width: The schema will be created in CSV format using length to delineate fields.
- Character Delimited: The schema will be created in CSV format using characters to delineate fields.
Note
Creating a hierarchical schema in JSON format is not supported.
-
Options: When Character Delimited is selected, these options become available:
-
Delimiter: Enter the characters to use as field delimiters that specify the boundary between data fields. The default is a comma. You can also use multiple-character delimiters, such as a double pipe
||. To use a tab as a delimiter, enter\t. -
Line Breaks for End of Records: Select this checkbox to use line breaks to separate records. This option is selected by default. When this option is selected, end of records are denoted by line breaks so that each record exists on one line (unless using a qualifier). When disabled, line breaks are ignored and new records begin after the total number of fields are reached.
Note
This option is relevant only for schemas used on the source side of a transformation. For schemas used on the target side of a transformation, line breaks are always used to denote end of records.
-
String Qualifier: Enter the character to be used as a wrapper, indicating a string of text that is to be treated as a single unit of data. The default is a double quote character. If left empty, no string qualifier is used.
When using a String Qualifier, select either Always or When Needed to indicate when the qualifier should be used. The default, When Needed, is recommended, so that if the characters specified as the Delimiter occur within the string, then the string is wrapped by the specified string qualifier characters. If the delimiter does not occur, then the string is not wrapped.
During the processing of sources, the string qualifier is stripped away. During the processing of targets, the string qualifier is added.
-
Convert Escape Sequences: Select this checkbox to convert or ignore escape sequences as indicated by a backslash
\. By default, escape sequences are converted following Java standards. When disabled, text conversion occurs with no interpretation of escape sequences.Note
This option is relevant only for schemas used on the source side of a transformation.
-
EDIFACT: Select this checkbox if the data follows the EDIFACT standard of syntax rules.
-
-
Add Node: Click the Add Node button to add new nodes one at a time to the table. These columns are available for each node row:
-
#: Each node row is automatically assigned a number in the order the row appears. Once you have at least two rows with the same parent in the tree, hover over the number and click the up
 or down arrow. The node serving as the root node (without a parent) cannot be reordered, nor can nodes be reordered to a different level in the tree structure (instead, this can be done by changing the parent of the node).
 -
Node: Enter a name for the node. The node name cannot contain whitespace characters or symbols such as these:
@ $ % & / + ( ) : ; ,. In addition, the field name cannot begin with a number, period (.), or hyphen (-).Tip
For reference on all unallowed characters, see NCName as defined by W3C.
-
Parent: Use the dropdown to select the parent of the node. Note that selecting a parent node that would cause a circular reference is not possible.
-
Occurrence: Use the dropdown to select how the node is to occur in the complex document:
- Zero or More: Select this option if this node may or may not occur, but if it does, it can occur any number of times.
- Zero or One: Select this option if this node may or may not occur, but if it does, it can occur only once.
- One or More: Select this option if this node must occur at least once, but can also be repeated.
- Exactly Once: Select this option if this node must occur once and only once in the document.
-
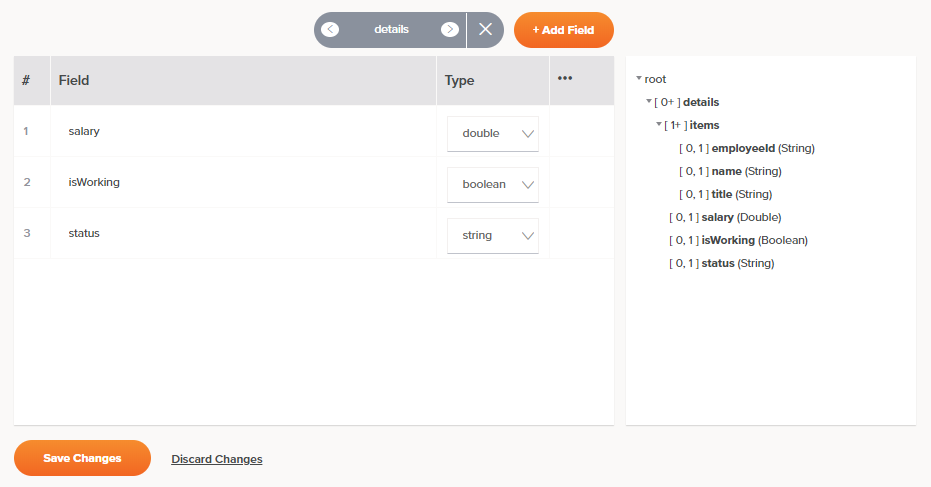
Fields: The number of fields defined for the node is listed. To define the node's fields, click the edit icon
 to the right of the number of fields. This opens a field editor for the specific node, as follows.
Note
Nodes should contain at least one field in order to be able to map to them when completing a transformation mapping.
-
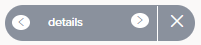
Node Cycle: Click the left or right arrows to cycle through nodes in the hierarchical schema to show the field table for the selected node.
-
Back: Click the close icon
 to return to the node table.
Node Navigator: Along the top of the table is an expanded gray button that allows you to change the table display by navigating to another node:
-
-
Add Field: Click to add new field rows one at a time to the table. Depending on the selected schema Type, these columns are available for each field row:
-
#: Each field row is automatically assigned a number in the order the row appears. To reorder rows, either drag and drop to another position within the table, or hover over the number and click the up
or down arrow. -
Field: Enter a name for the field. The field name cannot contain whitespace characters or symbols such as these:
@ $ % & / + ( ) : ; ,. In addition, the field name cannot begin with a number, period (.), or hyphen (-).Tip
For reference, see NCNameChar for the allowed characters as defined by the W3C.
-
Type: Use the dropdown to select a data type. Options for new custom schemas are
boolean,date,decimal,double,float,integer,long, andstring. The default isstring. If a custom schema was created by mirroring a schema from a server-based activity, additional data types may be listed. -
Begin: For Fixed Width schemas only, enter the starting character position. Note that 1 is considered to be the position for the beginning of the file.
The default value for subsequent rows is the next character after the previous field's ending position. For example, if the previous field's ending position is 50, then the next field's beginning position will be 51.
-
Length: For Fixed Width schemas only, enter the number of characters to be reserved for this field. When the starting character position and ending character position are already entered, this field is calculated automatically.
Fixed-length text files always specify a certain number of characters that are reserved for each field. For example, you may identify a field called
LastNamethat always has 30 characters reserved for it. If the actual value is "Smith", only 5 characters are used; the remaining characters have nothing in them. -
End: For Fixed Width schemas only, enter the ending character position. When the starting character position and length are already entered, this field is calculated automatically.
Note
By default, fixed-length segments are terminated with a newline character.
-
Default Value: For Fixed Width or Character Delimited schemas, if you want this field to have a default value, enter the value here.
-
Format: For Fixed Width or Character Delimited schemas, if you want this field to have a specific format, such as for date or currency, enter the format here.
-
Actions: For actions you can take on an existing field row, hover over the field on the far right under the actions menu icon
 . Then click the copy icon to duplicate the field row, or click the delete icon to delete the field row.
-
-
Review Schema: As you manually define each field within the schema, a preview of the schema is displayed on the right side. The schema is displayed using the standard interface elements described under Nodes and fields.
-
Save Changes: Click to save and close the schema.
-
Discard Changes: Click to close the schema without saving changes.
-
-
Actions: For actions you can take on an existing node row, hover over the field on the far right under the actions menu icon
. Then click the copy icon to duplicate the node row, or click the delete icon to delete the node row.
-
-
Review Schema: As you manually define each node within the schema, a preview of the schema is displayed on the right side. The schema is displayed using the standard interface elements described under Nodes and fields.
Caution
If you have created nodes that do not have any fields, then you cannot map to any fields within these nodes when completing a transformation mapping.
-
Save Changes: Click to save and close the schema.
-
Discard Changes: Click to close the schema without saving changes.
Schema actions menu
After a custom hierarchical schema is created, you can access additional menu options that are available for all schemas.
These include Delete, Rename, View Dependencies, Deploy, Configurable Deploy, and Add to Group, as well as Edit Schema and Clear Schema. For details on these actions, see Schema actions menu.