Common mode elements
Introduction
There are three display modes for accessing a transformation: mapping, script, and preview. Mapping and script modes provide tools for configuring the transformation, while preview mode provides tools for testing the transformation with sample data. Some elements of the user interface are common to all display modes.
This page covers elements that are shared by the header of the transformation screen:
-
Mapping Mode

-
Script Mode

-
Preview Mode

Rename a transformation
When you create a new transformation, its default name is New Transformation. Subsequent new transformations with default names are appended with an incremented number in parentheses. Transformation names must be unique and must not contain forward slashes (/) or colons (:) to be valid.
To rename a transformation from within the transformation configuration screen, edit the field in the top left:

Transformations can also be renamed from these locations:
- The project pane's Workflows tab (see Component actions menu in Project pane Workflows tab).
- The project pane's Components tab (see Component actions menu in Project pane Components tab).
- The design canvas (see Renaming workflows, operations, and operation steps in Design canvas).
Add notes
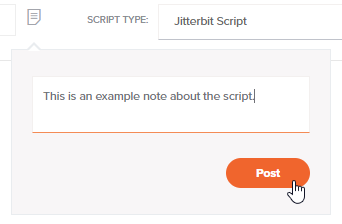
You can add custom notes to a script that serve as documentation or reminders for yourself or project collaborators. To add a note, click the note icon next to the Script Type field.
An editable area opens, where you can enter the text of your note. Click Post to add the note to the script:
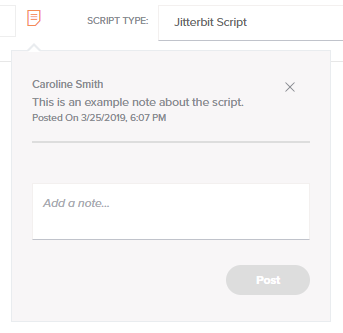
Your posted note is displayed, along with your name and a timestamp. Anyone with edit access to the script can remove notes by clicking the remove icon. To close the note, click another part of the interface. When one or more notes are present, an orange dot is displayed on the note icon:
View save status
After making changes to a mapping, the transformation configuration saves automatically. The save status is displayed:

The presence of an asterisk following the time indicates that the transformation has unsaved changes:

To manually save the transformation, use Control+S (Windows or Linux) or Command+S (macOS).
For more information about auto-save, see Cloud Studio permissions, collaboration, and saving.
Transformation toolbar
The transformation toolbar contains a contextual set of tools for interacting with the transformation.
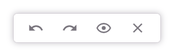
In mapping mode and script mode, the transformation toolbar contains this set of icons:
| Icon | Description |
|---|---|
| Undo reverses your last action (see Undo and redo in Cloud Studio permissions, collaboration, and saving). | |
| Redo reverses your last Undo action (see Undo and redo in Cloud Studio permissions, collaboration, and saving). | |
Preview changes the transformation view to preview mode (see Preview mode). This option is available only when the transformation has both a source schema and target schema specified. | |
| Close closes the transformation. |
In preview mode, additional tools are available that allow you to interact with the preview data:

Those tools are covered in Preview a transformation in Preview mode.
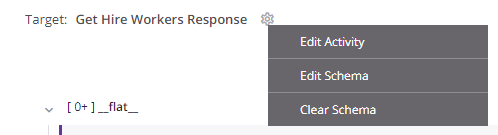
Schema actions menu
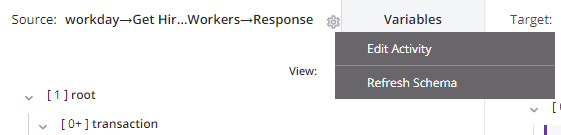
After specifying a source or target schema in a transformation, menu actions for that schema are available along the top of the transformation configuration screen. Along the top of either the source or target side, click the gear icon to open the actions menu:
| Menu Item | Description |
|---|---|
Edit Activity opens the activity configuration for you to make changes as necessary (see Schemas defined in an activity). This action is available only when the transformation is inheriting a schema from an adjacent or initially adjacent activity. For activities with user-defined schemas, you can edit the configuration to clear or swap out the file you selected to use for the schema. For other activities, you can edit the query, change the object selection, or other such configuration. | |
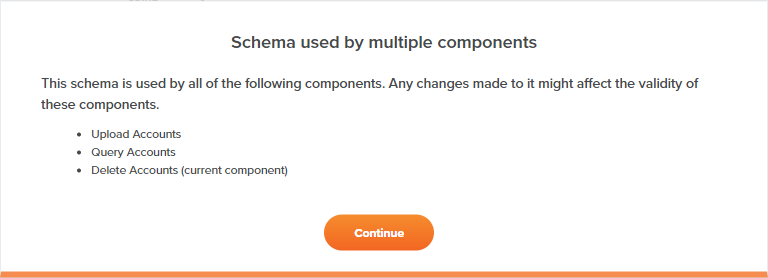
Edit Schema opens the schema editor for you to edit the schema (see Schemas defined in a transformation). This action is available only for schemas that are editable. When you edit a schema that was created from a sample file in a transformation, the configuration screen for a custom flat schema or custom hierarchical schema opens for you to add or edit fields and/or nodes as required. Schemas provided by an adjacent activity are not editable. On opening a schema that is referenced by multiple components, a dialog displays a list of any components that reference the schema and will be affected by any changes:
| |
Refresh Schema regenerates the schema from the endpoint. This action is available only for schemas inherited from an adjacent activity with a connector-generated schema (except for Database, NetSuite, Salesforce, Salesforce Service Cloud, or ServiceMax endpoints). This action also regenerates the schema in other locations throughout the project where the same schema is referenced, such as in an adjacent activity. For more information, see Schema regeneration. | |
Clear Schema clears a transformation-provided schema from the transformation. This action is available only for schemas defined in a transformation. When removing a schema, a message asks you to confirm removal of the schema, with these results:
Note If a transformation-provided schema was present prior to configuration of an adjacent activity, the Clear Schema option is not present. Though a transformation-provided schema remains referenced by the transformation, it is not used in processing. To clear a transformation-provided schema under these circumstances, temporarily remove the adjacent activity and the Clear Schema option will appear. Once you have cleared the transformation-provided schema, replace the activity in the operation. |
Filter or search
Using filter or search can help you locate a specific field within the source or target structures. You can also use search on the source structure to locate a specific variable to use in the target structure, or you can use search on the target structure to search within transformation mapping scripts themselves.
Filter
In mapping and preview modes, the View dropdown is located at the top of both the Source and Target structures. In script mode, the View dropdown is present at the top of the Target structure. This dropdown allows you to filter by these selections:
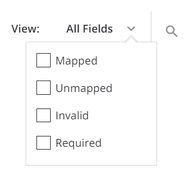
- All Fields: All fields are displayed.
- Mapped: Only fields that have been mapped are displayed. In mapping and preview modes, within the Source structure, mapped objects are limited to those that have been mapped to a target field. In all modes, for the Target structure, mapped fields are those that have been defined in some way (with a source object, a variable, a custom value, or any other script logic). Mapped fields show a script icon in the upper right of the target field.
- Unmapped: Only fields that have not been mapped are displayed.
- Invalid: This option is available only on the Target structure. Only fields that have been mapped where the mapping is not valid are displayed. Mapping validity is detailed under Transformation mapping validity.
- Required: This option is available only on the Target structure. Only fields that have a cardinality key of
[1]or[1+]are displayed. for more information, see cardinality key under Nodes and fields.
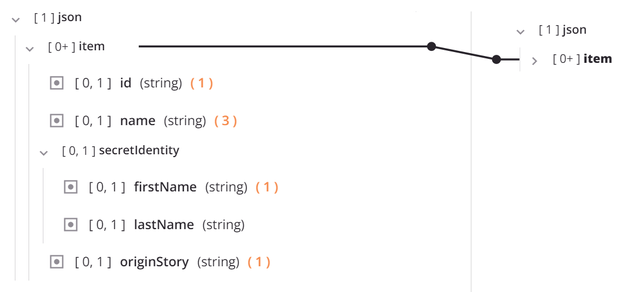
In mapping and preview modes, when viewing mapped objects within the Source or Variables tabs, a number in parentheses and the color orange indicates the number of times that each object is referenced on the target side of the transformation.
In addition, on hovering over a source object, line(s) appear that connect the source field to any target fields it is mapped to or nodes it is referenced within. Click directly on the number to display the referenced target field(s) or node(s) and click to automatically scroll to the object or node in the target structure.
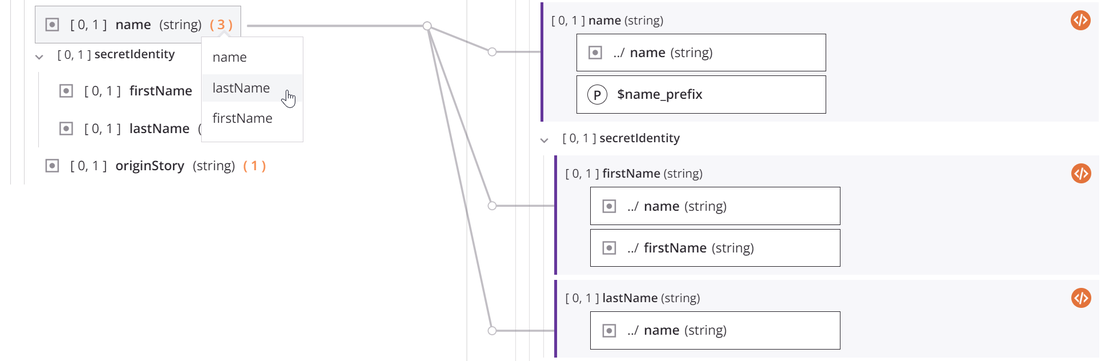
When viewing mapped objects within the Target structure, on hovering over the field a line appears that connects the mapped target field to its origins in the Source or Variables tabs, if applicable. Click the mapped source object to automatically go to the object in the tab.

Clicking the name of a mapped target object collapses it so that its mapped objects are not visible.

If a collapsed node contains target field mappings, that node is shown in bold to indicate it contains mappings:
Search
You can also search for specific fields in all modes by clicking the Search icon located at the top of the Source and Variables tabs in mapping and preview modes, and the Target structure for all modes:
-
Source: When searching on the source structure, fields or variables that have any of part of the keywords in their name are highlighted.
-
Target: When searching on the target structure, fields that have any part of the keywords in the field name or within a field's transformation mapping script are returned and highlighted. The search returns up to 100 transformation mapping scripts matching the search criteria. When this limit is met, a message is displayed:
Script search results were limited to 100 scripts. All paths were searched.
Source and target schemas containing more than 999 nodes require two or more characters to be entered in the search box to initiate a search.
When a search is initiated, the total number of results is returned:

Use the previous and next icons to move through the results.
Note
Within the Source tab and the Target structure, the search is limited to the selected filter. To search both mapped and unmapped fields, make sure to select All Fields in the filter dropdown.