Mapping mode
Introduction
Mapping mode provides an overview of a transformation mapping and the basic tools to perform the mapping. See Script mode for advanced mapping tools and Common mode elements for elements of the user interface that are shared by multiple display modes.
Access mapping mode
Mapping mode is the default display mode when opening a transformation for configuration.
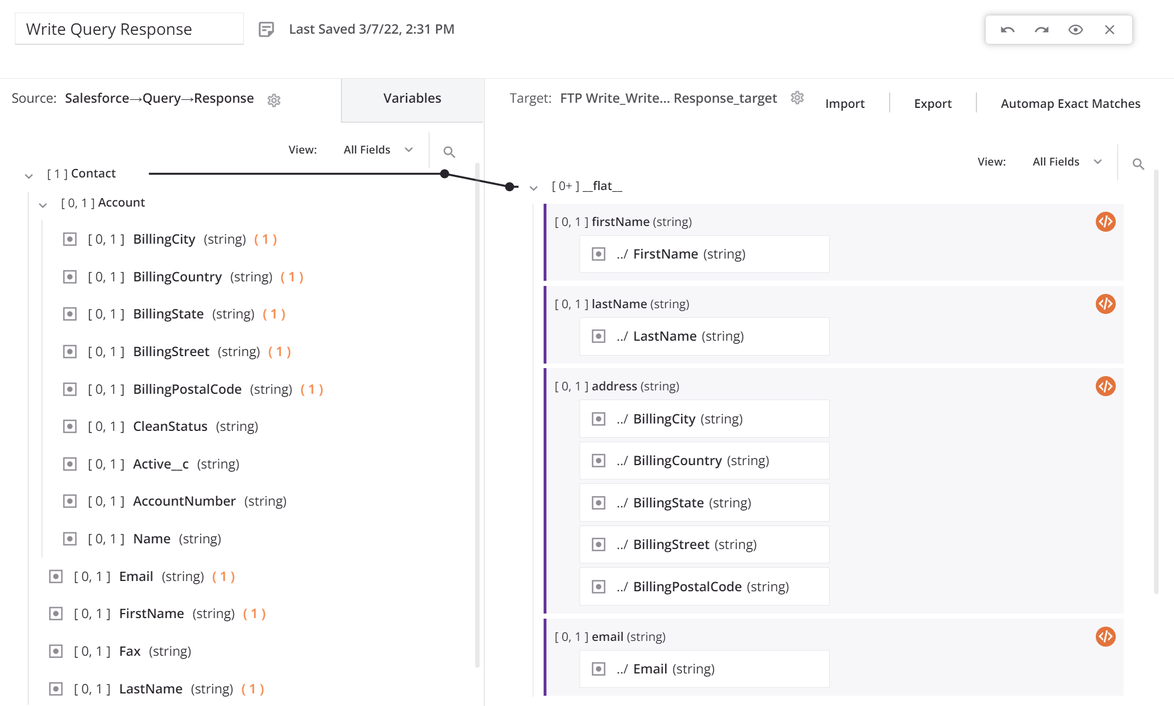
In mapping mode, the left side contains the source structure and variables available to be used within the mapping of the target structure on the right side:
When accessing a transformation that you previously opened, Cloud Studio automatically scrolls to the location in the schema that you last accessed.
Note
To return to mapping mode while in script mode, click the arrow on the left side of the screen:
![]()
Source and target schemas
In mapping mode, the left side of the transformation displays the source schema, while the right side displays the target schema. These schemas can be defined either in an activity that is located adjacent to the transformation, or directly in a transformation. If a schema has not yet been specified, you are presented with the options below for the source or target side, respectively.
Note
A target schema must be specified prior to being able to configure a transformation mapping.
No source specified
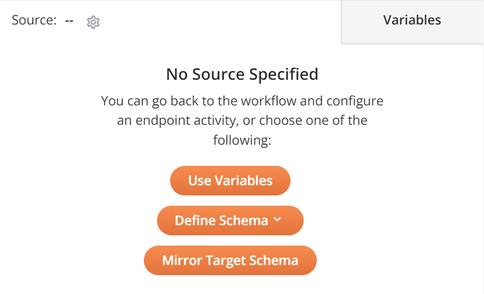
It is not required to specify a source schema (see Schema usage). If you don't want a source schema to be used, you don't need to do anything with the source side of the transformation.
If you have not specified a source schema and want to specify one, you can return to the workflow to provide a schema in an activity located adjacent to the transformation, or select one of these options:
- Use Variables: This toggles to the Variables tab, where you can add variables as described in Mapping variables.
- Define Schema: This provides an additional menu of options including Create Flat, Create Hierarchical, and Use Sample File. When an option is selected, this opens the flat or hierarchical custom schema editor or an interface for providing a sample file as described under Schemas.
- Mirror Target Schema: Copies the target schema as described under Schemas. This option is present only if (1) there is a specified target schema and (2) the source of the transformation is not an adjacent activity with a connector-generated schema.
No target specified
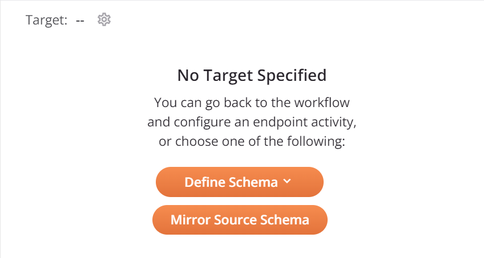
A target schema must be specified prior to being able to configure a transformation mapping (see Schema usage).
If you have not specified a target schema, you can return to the workflow to provide a schema in an activity located adjacent to the transformation, or select one of these options:
- Define Schema: This provides an additional menu of options including Create Flat, Create Hierarchical, and Use Sample File. When an option is selected, this opens the flat or hierarchical custom schema editor or an interface for providing a sample file as described under Schemas.
- Mirror Source Schema: Copies the source schema as described under Schemas. This option is present only if (1) there is a specified source schema and (2) the target of the transformation is not an adjacent activity with a connector-generated schema.
Target nodes
A specified target schema is made up of nodes that contain either fields or child nodes (which can contain additional fields and child nodes). Source data cannot be mapped to the target nodes themselves, but can be mapped only to the fields they contain. Once you have specified a target schema, hover over the target node to access options available on each node, then click the actions menu icon ![]() to show the actions menu. Each possible action is described below.
to show the actions menu. Each possible action is described below.
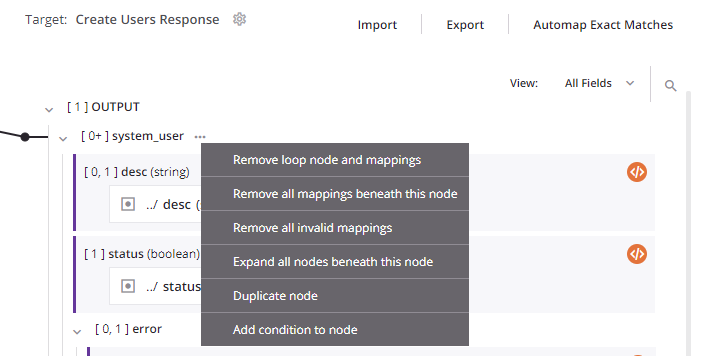
| Menu Item | Description |
|---|---|
Remove loop node removes the loop node definition. This action is available only on nodes that have a manually defined loop node. To remove a loop node definition on an automatically generated loop node, remove all of its direct leaf mappings as described under Remove a mapping in Mapping source objects. Note If you remove all of the direct leaf mappings of a manually defined loop node, the loop node definition still exists. | |
Remove loop node and mappings removes the loop node definition due to mappings that are direct leaf children associated with the loop node, and removes those mappings. Any other mappings within child loop nodes beneath the parent loop node are preserved, and the node retains its loop node definition if at least one grandchild is mapped. This action is available only on nodes that have a loop node defined (either manually or by automatic generation). | |
Remove all mappings beneath this node removes all mappings on fields contained within the node, as well as all mappings on fields contained within child nodes of that node. Using this action on a root node removes all mappings in a transformation. On selecting this action, a message asks you to confirm that you want to remove mappings. | |
Remove all invalid mappings removes all invalid mappings on fields contained within the node, as well as all invalid mappings on fields contained within child nodes of that node. For more information about invalid mappings, see Transformation mapping validity. | |
Expand all nodes beneath this node expands all child nodes beneath the parent node. (By default, nodes are expanded up to 8 levels deep for schemas with 750 or fewer nodes and up to 5 levels deep for schemas with more than 750 nodes.) | |
Duplicate node duplicates the node and its fields, as well as any child nodes and their fields. Mappings are not duplicated. This action is available on root nodes in flat schemas and on nodes whose cardinality indicates that elements can occur more than once. The node must not already be a duplicate of another node. For display purposes at design time only, the name of the duplicate node is appended with a hash ( Whether a duplicate node is reflected in other locations throughout the project depends on how the schema was defined:
| |
Remove duplicated node removes the duplicate node and its fields, as well as any duplicate child nodes and their fields. This action is available only on nodes that were created using Duplicate node. | |
Add condition to node is used to conditionally apply a mapping to the fields contained within a node. This action is available only on nodes that do not already have a condition applied. On selecting this action, script mode opens for you to create the condition. For details about creating the condition, see Conditional mapping. | |
Edit condition opens script mode for editing the existing condition in script mode. This action is available only on nodes that already have a condition applied. For more details, see Conditional mapping. | |
Remove condition removes the condition. This action is available only on nodes that already have a condition applied. |
Target fields
For a transformation mapping to result in output data from the transformation, you must map to at least one field in the target schema. Once you have specified a target schema, you can map to the target fields in any of the ways covered below, including by mapping source objects, variables, scripts, or custom values to the target fields or adding other script logic:
- Automapping
Automapping is used to automatically map source and target fields whose names are an exact match within identical data structures. You can perform automapping using the entire data structure or within selected source and target nodes. - Mapping Source Objects
In addition to automapping, source fields can be manually mapped to a target field. When you map a source field to a target field, the reference path of the source object is inserted into a script on the target field. - Mapping Variables
When you map a variable, the variable reference is inserted into a script on the target field. Variable references are constructed with a dollar sign ($) preceding the variable name. - Mapping Custom Values
Custom values are values (including hard-coded values) and expressions that can be mapped to a target field. - Mapping with Scripts
All transformation mappings are made up of scripts on individual nodes and fields within a target schema. This page covers how to open transformation scripts and reference project components and functions within them, although any valid script logic can be used.