Loop nodes
Introduction
Loop node iterator lines, which indicate the source and target nodes whose mapped fields a transformation will iterate on, are generated automatically during the mapping process, either when using automapping or when manually mapping source objects to target fields.
Normally, the automatic generation of loop nodes during mapping is appropriate for the data set. However, when the data is such that there are multiple sets of repeating data values — or multiple loop nodes — you may need to manually define a loop node to force the data to loop on a different node.
In certain situations, a mapped source field may have an iterator line above it that is configured to generate new records at a level on the target from a lower level on the source. This mapping configuration is valid, but may not result in the desired data in the target. In this case, you may need to adjust the mapping manually.
You can also, if needed, remove loop nodes, both those that have been automatically generated and those that have been manually defined.
Define loop nodes
When using automapping, loop nodes are generated automatically.
Loop nodes can also be defined manually on target nodes that meet both of these conditions:
- The cardinality of the target node must be
0+or1+. - There must not be any mappings on direct leaf fields within the target node.
In addition, the cardinality of the source node being used to create the target loop node must be 0+ or 1+.
To define a loop node manually, in mapping mode, drag a qualifying source node to a qualifying target node:
On dropping the source node onto the target node, a menu appears. Select the option Define loop node.
The loop node is now defined, and the iterator line is displayed, indicating how the transformation will loop through the source data set. (The line is displayed even if there are not yet any direct leaf mappings on fields under the node.) Complete the mapping of fields beneath the loop node as usual:
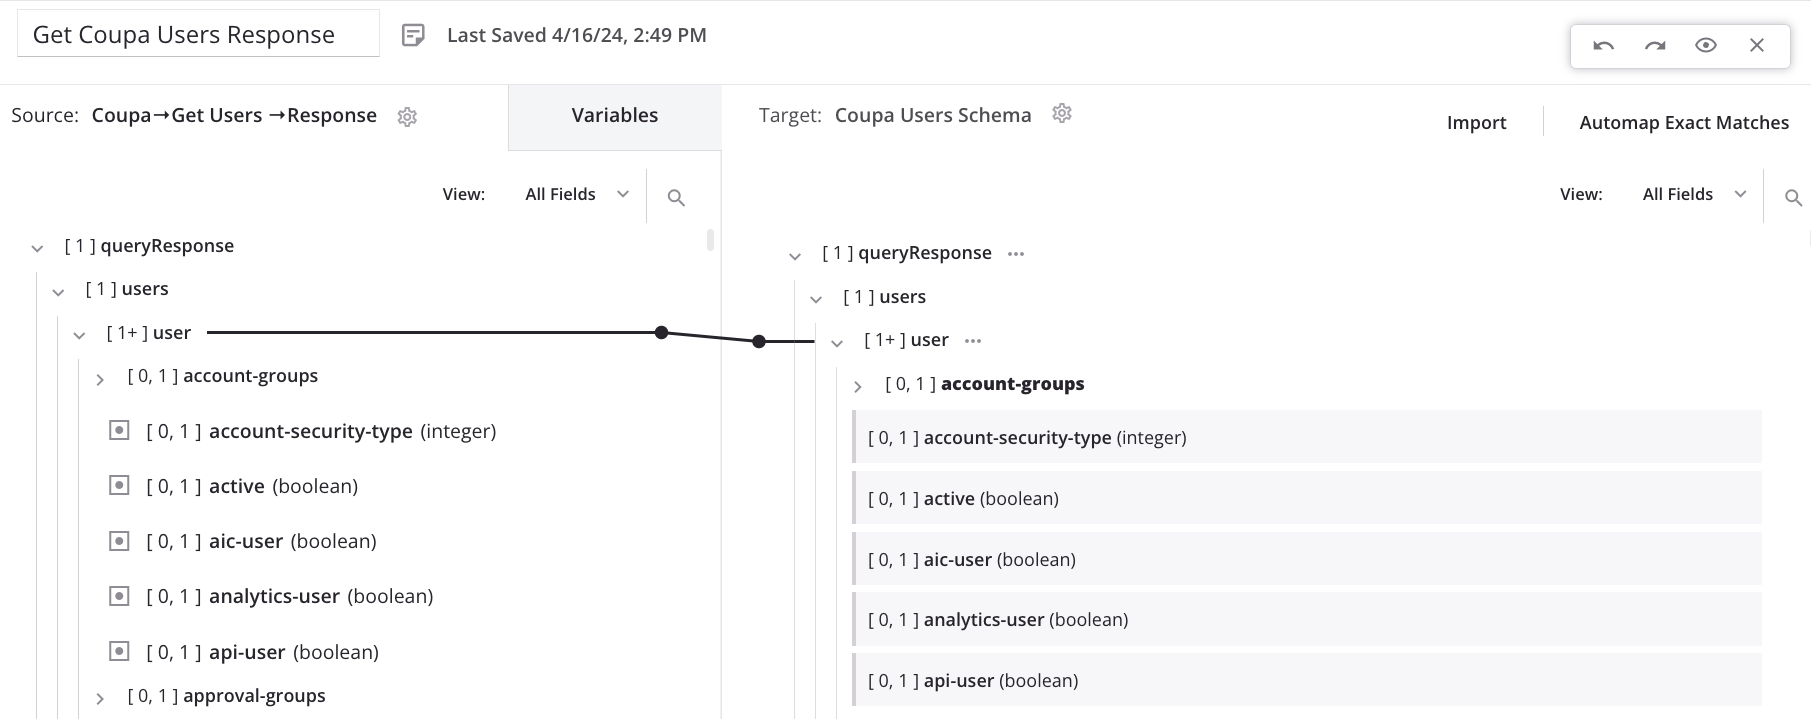
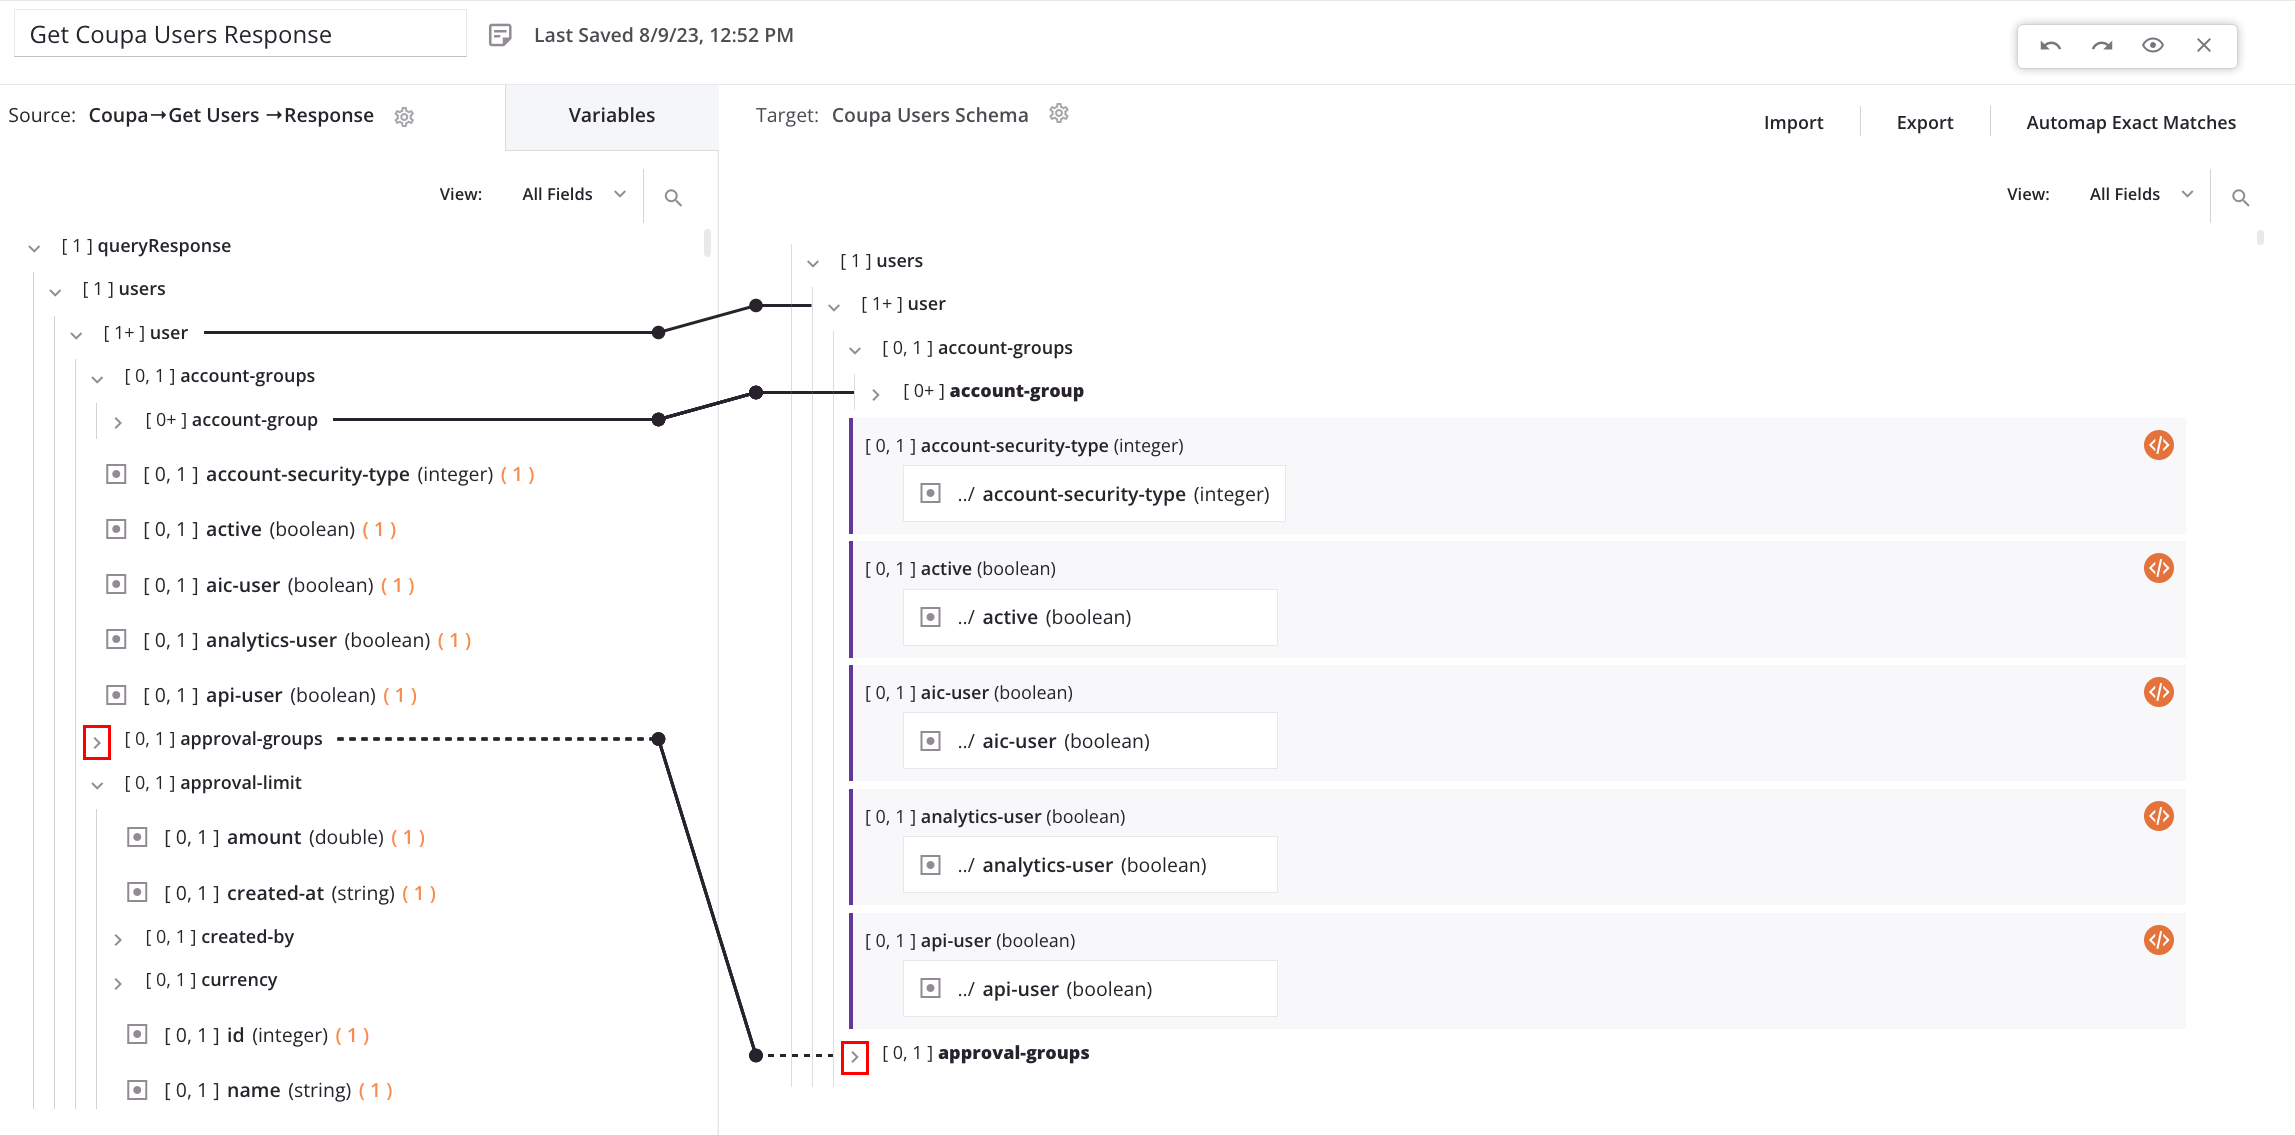
Collapsed nodes that contain loop node mappings are shown with a dotted iterator line. Click the disclosure triangle to expand child nodes until you find the looping node:
Manually adjust automatically generated loop nodes
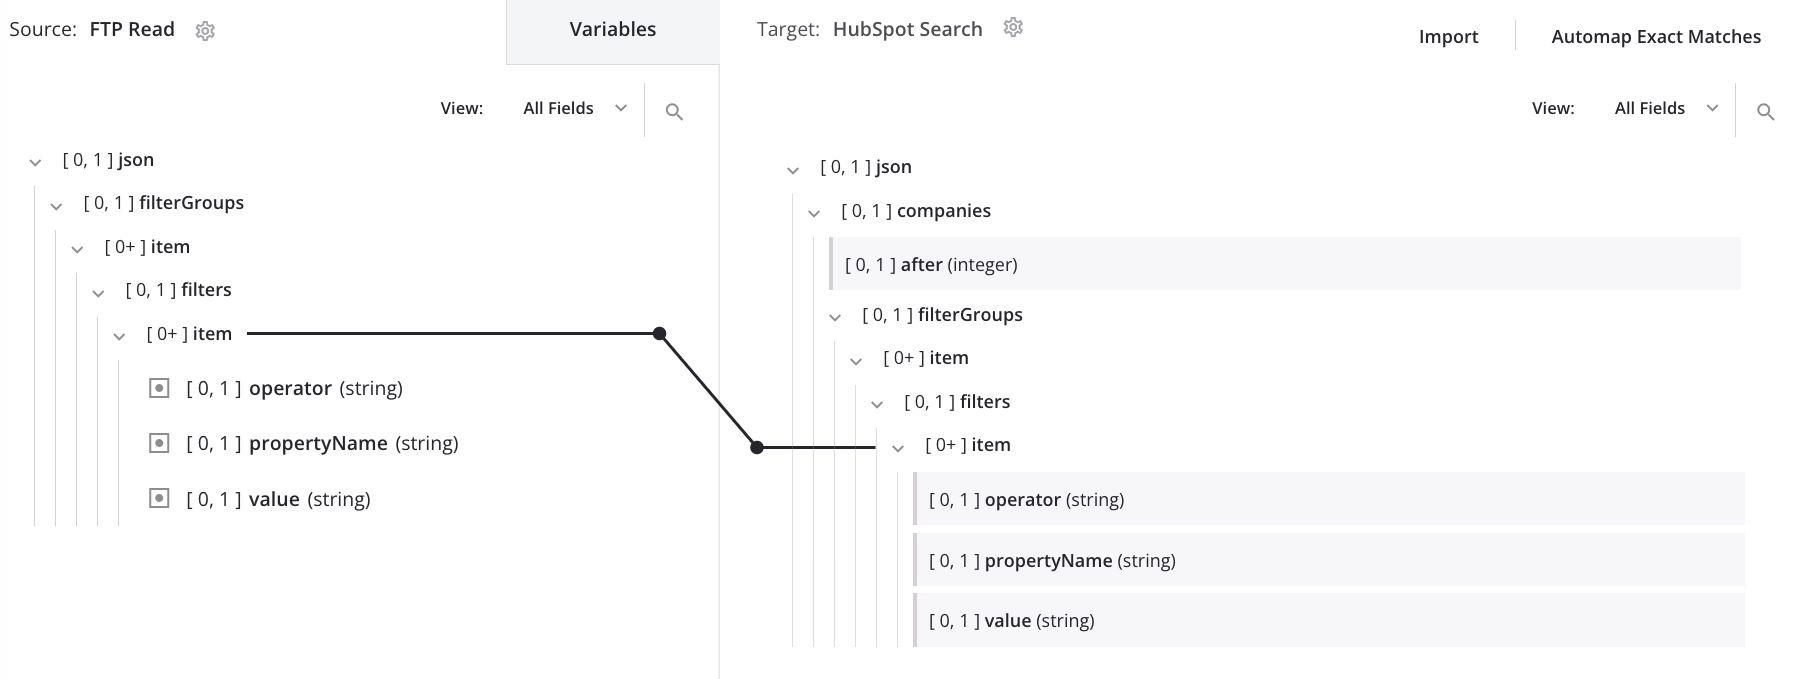
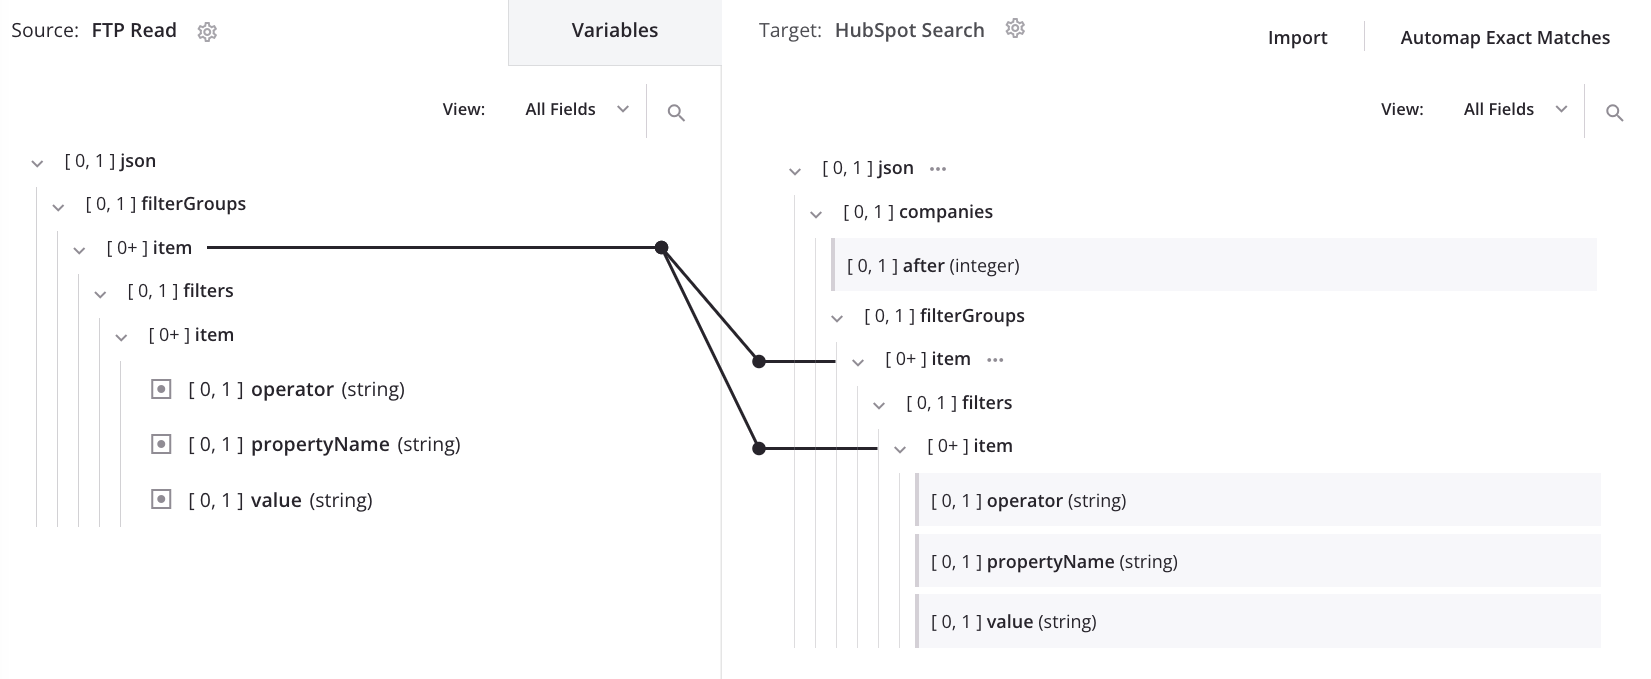
After loop nodes are automatically generated, you may need to adjust them manually. In the following example, a request transformation provides filters to use in a HubSpot Search activity to query company records. Below, we first show the output when using the automatically generated loop node and then show how the output changes when the loop node is manually redefined.
Automatic loop node generation
After automapping and automatic generation of a loop node, the transformation mapping shows data looping on the target's second item node:
When the mapping above is processed using the below input data, it results in this output, which flattens the input structure into a single list of filters:
{
  "filterGroups": [
    {
      "filters": [
        {
          "operator": "EQ",
          "propertyName": "name",
          "value": "AZ INC"
        }
      ]
    },
    {
      "filters": [
        {
          "operator": "EQ",
          "propertyName": "name",
          "value": "IQ services"
        },
        {
          "operator": "EQ",
          "propertyName": "hs_object_id",
          "value": "4403735338"
        }
      ]
    }
  ]
}
{
  "filterGroups": [
    {
      "filters": [
        {
          "operator": "EQ",
          "propertyName": "name",
          "value": "AZ INC"
        },
        {
          "operator": "EQ",
          "propertyName": "name",
          "value": "IQ services"
        },
        {
          "operator": "EQ",
          "propertyName": "hs_object_id",
          "value": "4403735338"
        }
      ]
    }
  ]
}
Manual loop node definition
To change the node on which the data is looping, drag the source's second item node onto the target's first item node and select Define loop node:
We now see the loop node iterator line on both the target's first and second item nodes:
When the mapping above is processed using the same input data as was used in the automatic loop node generation, it results in the desired output, which maintains the input structure:
{
  "filterGroups": [
    {
      "filters": [
        {
          "operator": "EQ",
          "propertyName": "name",
          "value": "AZ INC"
        }
      ]
    },
    {
      "filters": [
        {
          "operator": "EQ",
          "propertyName": "name",
          "value": "IQ services"
        },
        {
          "operator": "EQ",
          "propertyName": "hs_object_id",
          "value": "4403735338"
        }
      ]
    }
  ]
}
{
  "filterGroups": [
    {
      "filters": [
        {
          "operator": "EQ",
          "propertyName": "name",
          "value": "AZ INC"
        }
      ]
    },
    {
      "filters": [
        {
          "operator": "EQ",
          "propertyName": "name",
          "value": "IQ services"
        },
        {
          "operator": "EQ",
          "propertyName": "hs_object_id",
          "value": "4403735338"
        }
      ]
    }
  ]
}
Manually adjust a mapping in mismatched source and target loop nodes
A mapped source field may have an iterator line above it that is configured to generate new records at a level on the target from a lower level on the source (also indicated with an information icon next to the source node). This mapping configuration is valid, but may not result in the desired data in the target.
You may want to manually adjust the mapping if any of these is true for your use case:
- You don't want to create duplicate values in separate records in the target file.
- You don't want to omit any values from the records in the target file (due to a missing child record).
- You have source data where the desired child record is in a constant index or can be found by a lookup value in the child record array.
- You don't need values from any other child records in the child record array.
The following sub-sections walk through a use case where mapping adjustments are required to retain values from the source records in the target file. This animation provides an overview of the steps detailed below:
In this scenario, the source and target schemas have these characteristics:
| Source | Target |
|---|---|
|
|
Automatic loop node generation
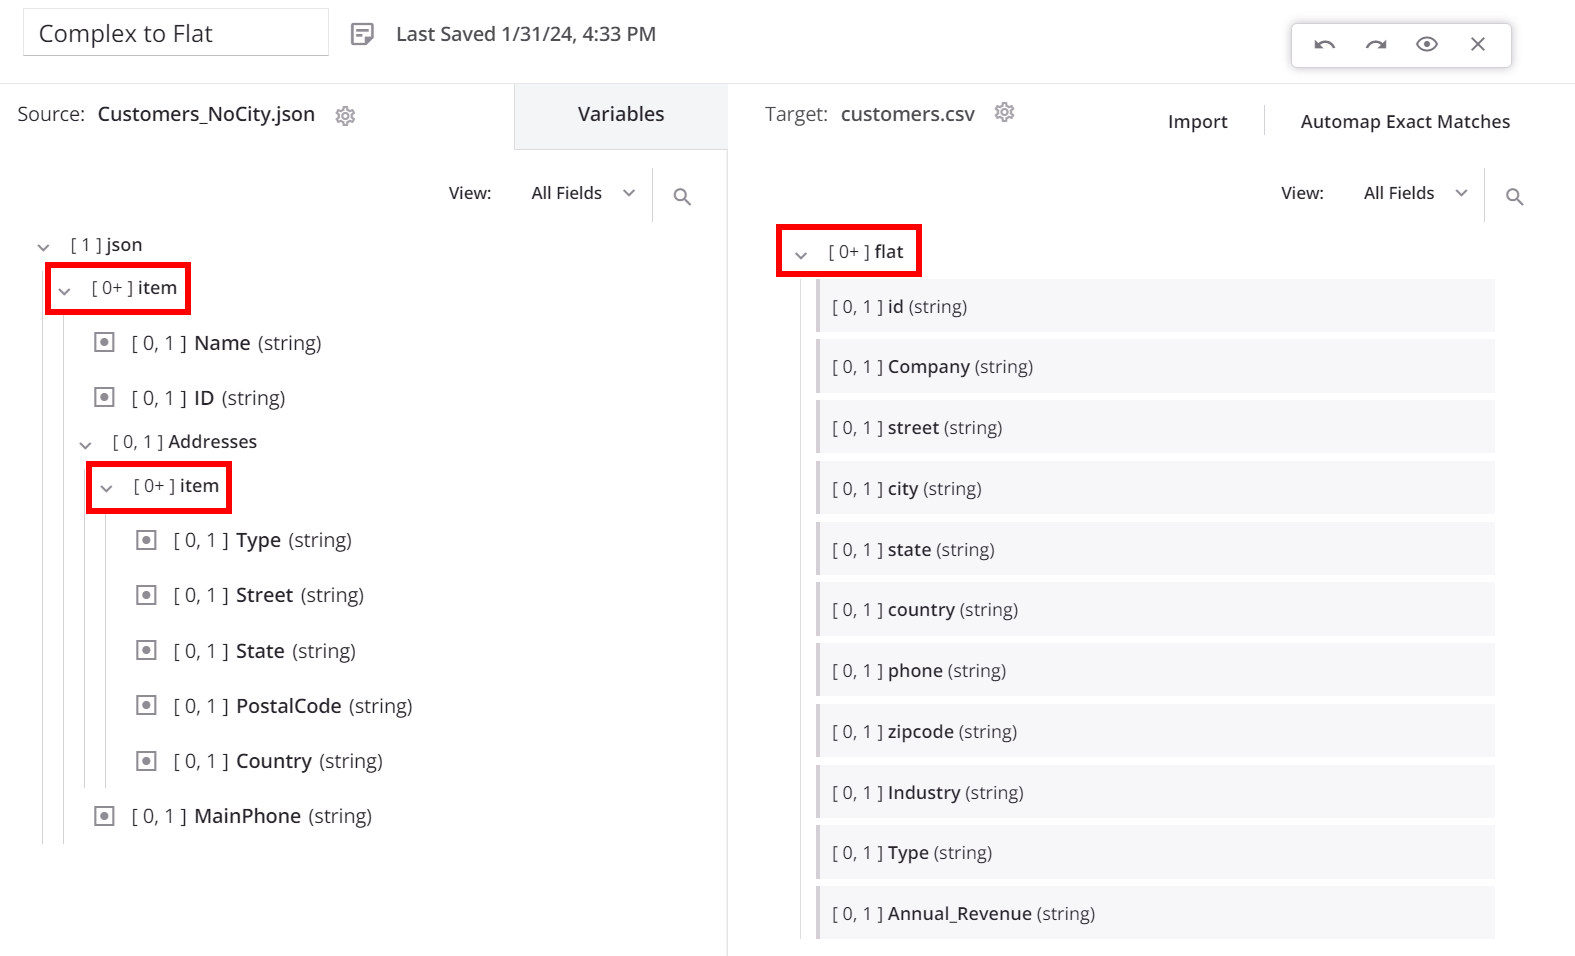
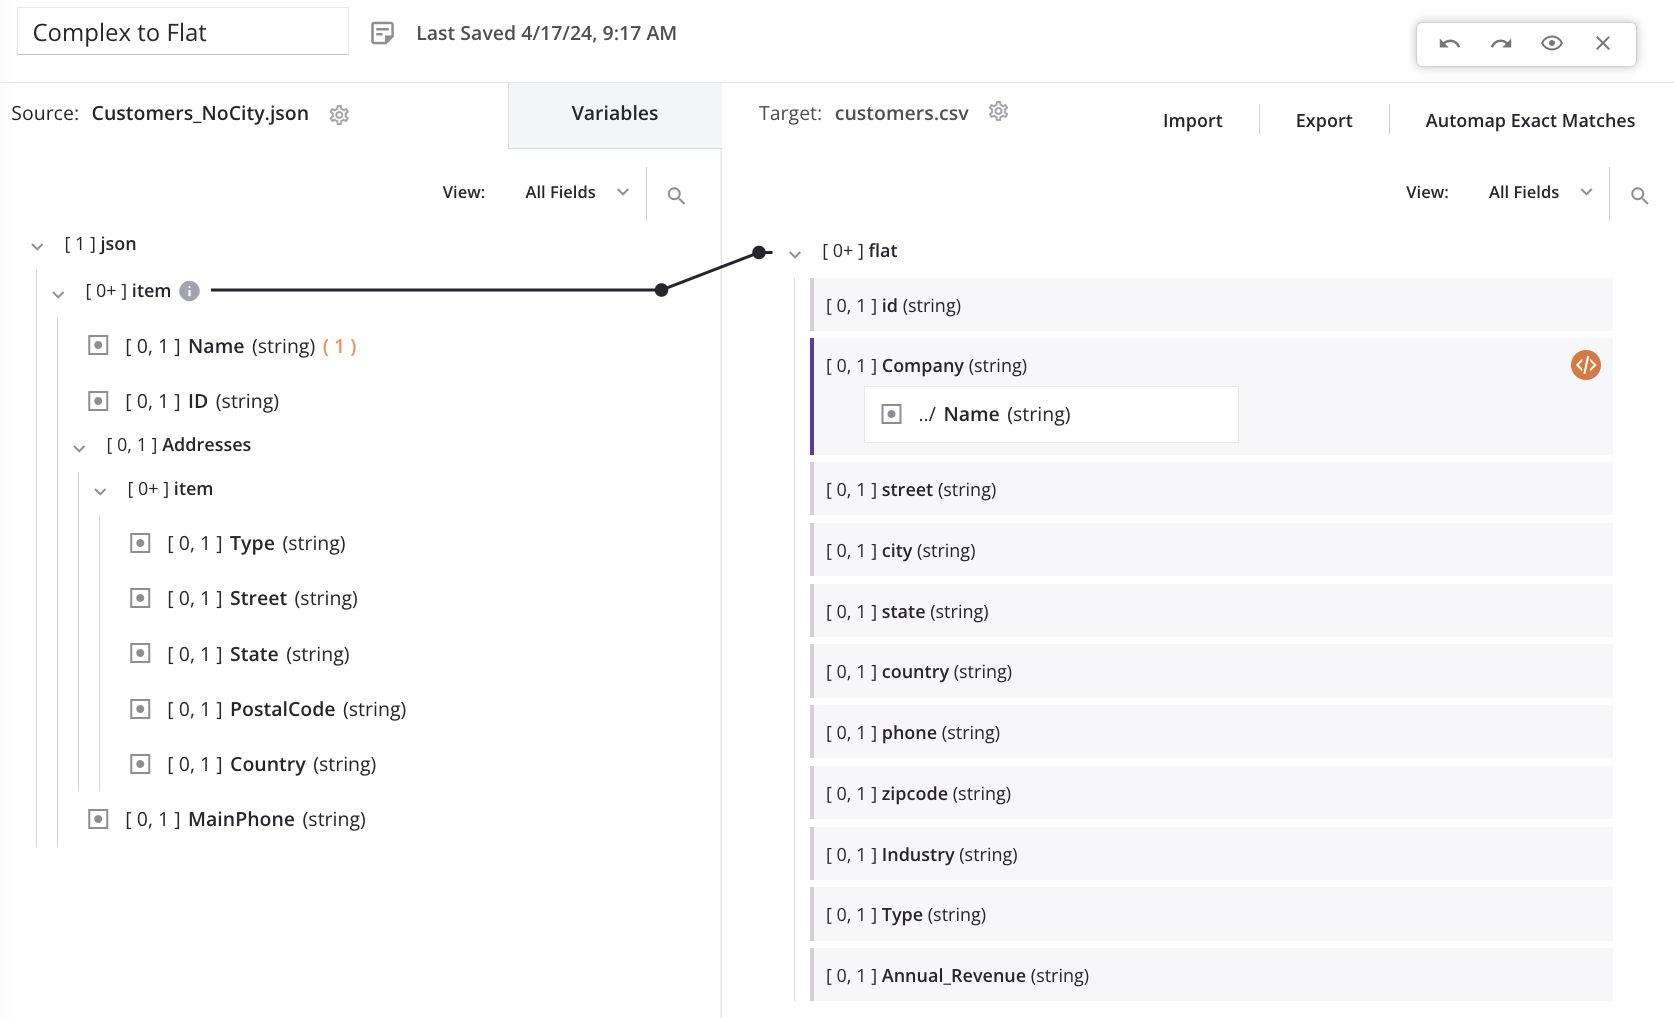
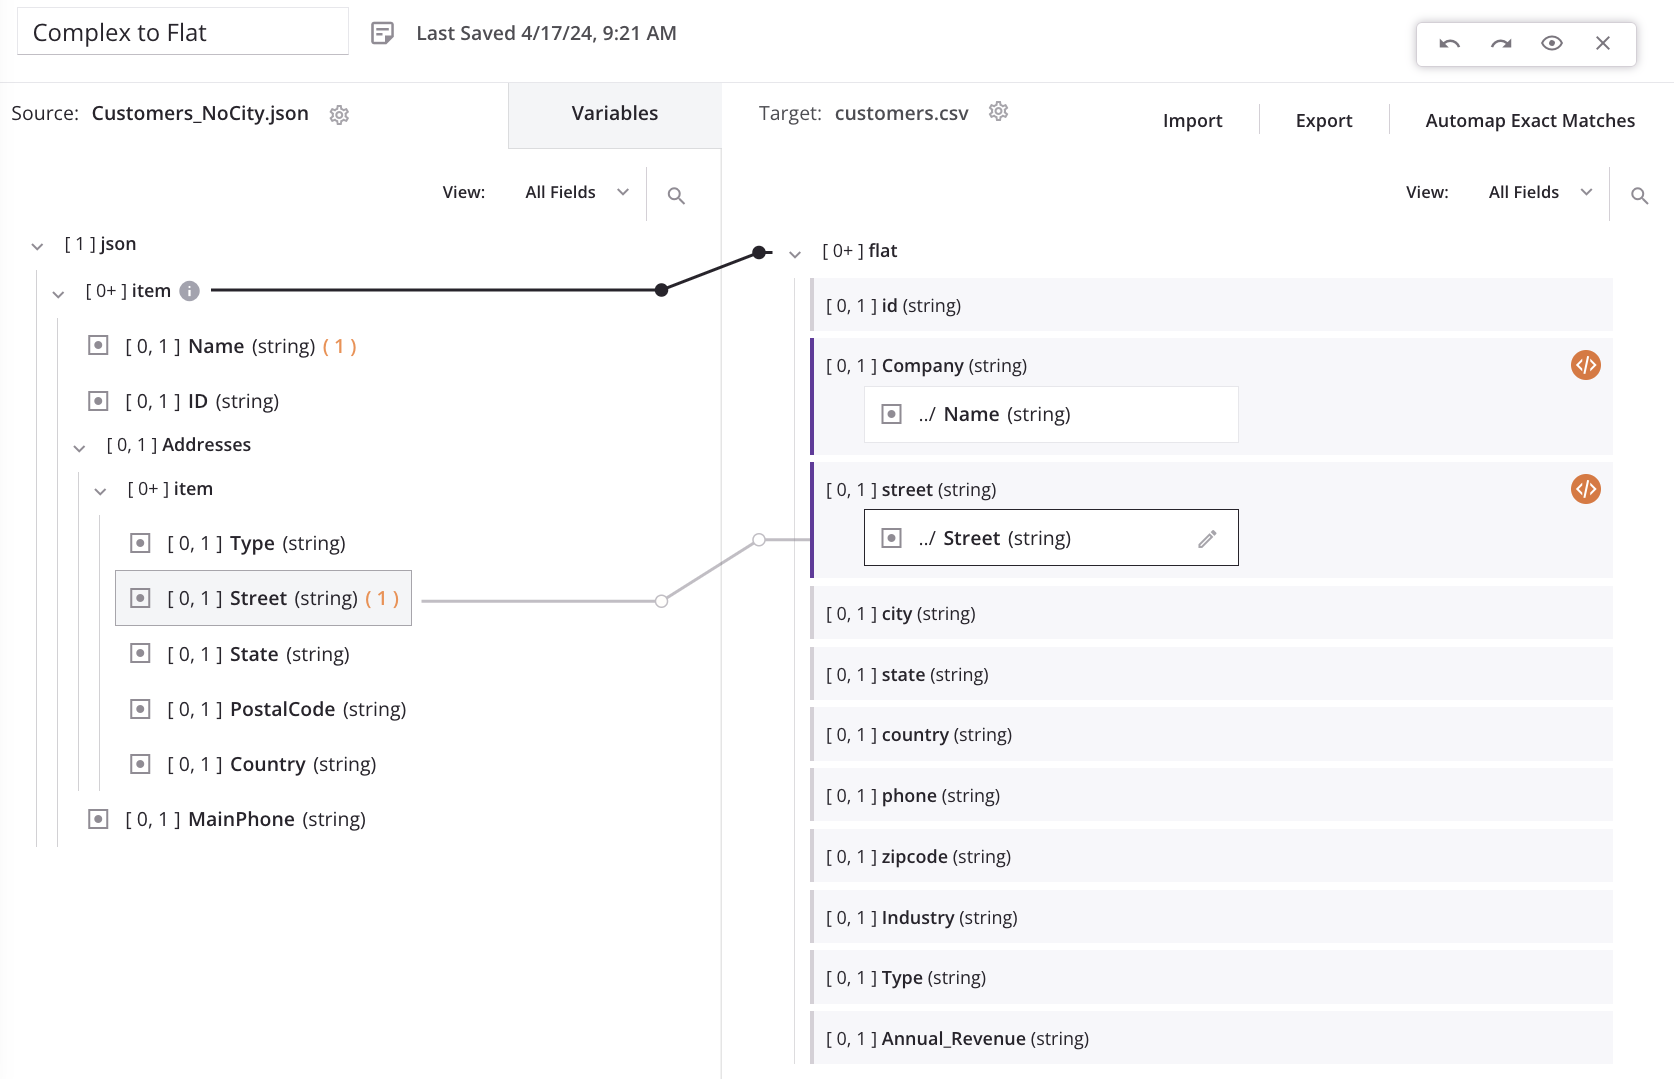
As we start mapping fields (such as Name) from the top-level source node to the top-level target node, a loop node iterator line is automatically generated from the source top-level customer/item array node to the target customer/flat array node. This indicates that for each new customer record in the source, a new customer record will be generated in the target:
When we map the first field in the repeating source address node (Street) to the corresponding target address field (street), a message is displayed to indicate that new target records will be generated from a lower level in the source:
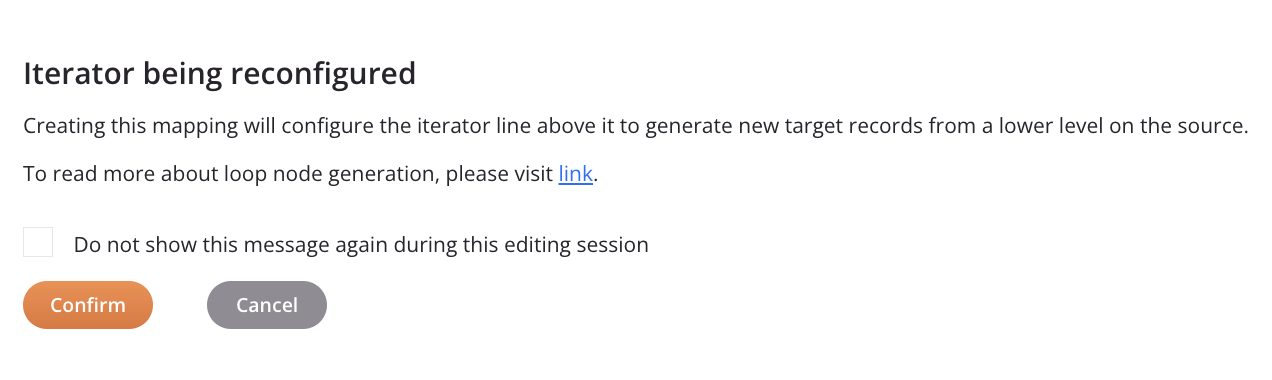
Clicking Confirm results in the source end of the loop iterator line automatically moving from the top-level customer/item array node down to the nested addresses/item array node (also indicated with an information icon next to the source node).
For this example scenario, this means that for each new address record in the source, a new customer record will be generated in the target:
This will result in a single source customer record appearing in the target file once for every address in the source address array for that customer. Each customer record will have the same top-level field values with unique values in the address fields. For example, if the first source customer record contains two addresses, then the target will contain two customer records: one with the first address, and one with the second address.
Important
With the automatic loop node generation in this scenario, a source customer record with no addresses will not generate a target customer record.
Manual mapping adjustment
Using the example scenario, we don't want to lose any customers records due to a missing address, so we need to manually adjust each field-level mapping of the child array. When each mapping is adjusted, the generated loop node iterator line automatically shifts to the correct location for the desired target output (based on the mapping adjustment).
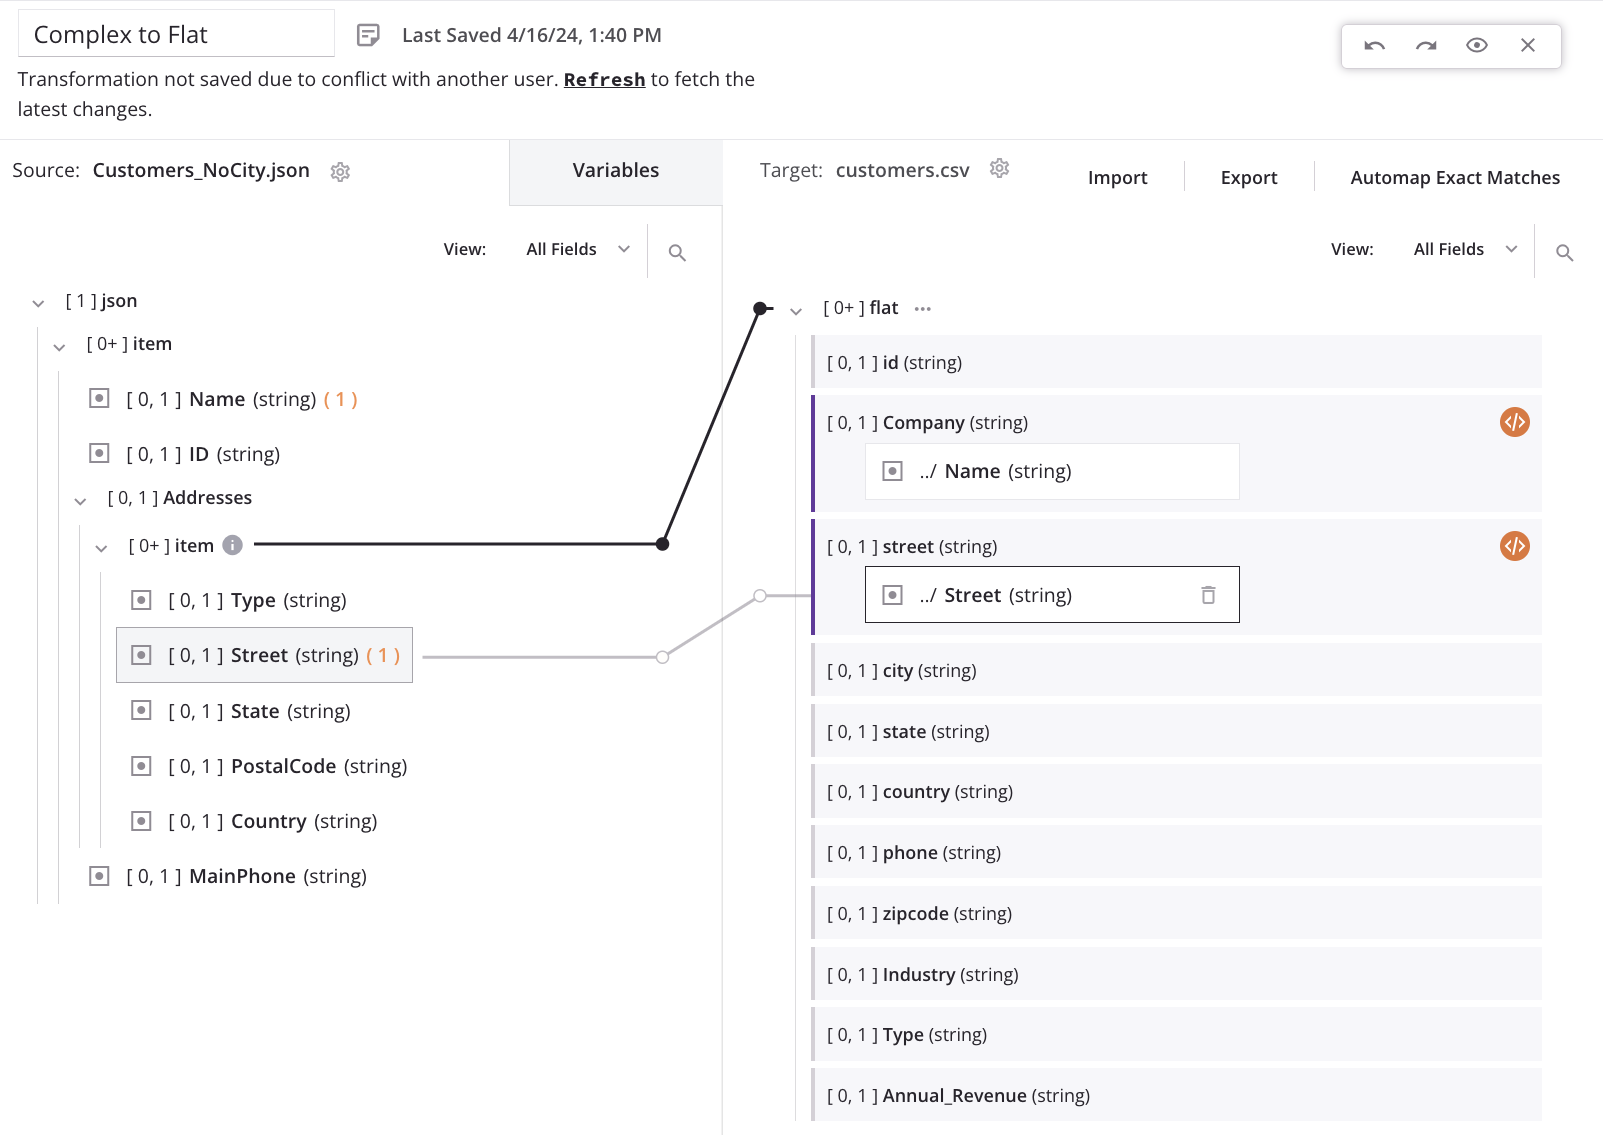
To adjust the mapping for each target field in the child array (such as street), we add a hash symbol followed by an integer to the addresses/item array in the mapping script. Adding the #1 reference returns the first item of an array, resulting in the creation of a single customer record in the target for each customer record in the source. With this configuration, each customer record created in the target contains only the first address from the source customer record's address array — the remaining addresses are not moved to the target.
Tip
This example uses the hash syntax described in Reference path notation.
To return the second or subsequent items of the array, specify #2, #3, and so forth. The FindValue function can also be used to search an array for a value and return the related field. For example, the mapping script for the target country field could be based on a Type of Billing:
<trans>
FindValue("Billing", json$item.Addresses$item#.Type$, json$item.Addresses$item#.Country$)
</trans>
Note that when you use Instance functions, the hash symbol is automatically inserted where required.
After adding the item reference (#1) into the field mapping script, the loop node iterator line automatically returns to the source top-level customer/item array node. This shows that for each new customer record in the source, a new customer record will be generated in the target:
As we map to additional fields in the child array, the loop node iterator line returns to the original position. The process of adding the item reference (#1) must be repeated as above for each field-level mapping in the array.
Remove a loop node and mappings
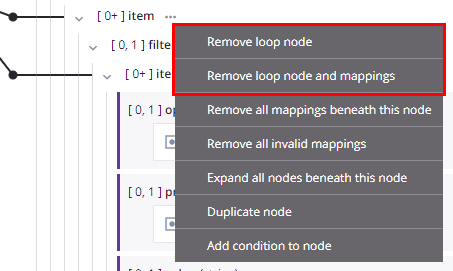
Options for removing a manually defined loop node or for removing any loop node and its mappings are available within a node's actions menu.
From either mapping mode or script mode, hover over a node name and click the actions menu icon ![]() to open the actions menu. From the menu, select one of these mapping removal options:
to open the actions menu. From the menu, select one of these mapping removal options:
| Menu Item | Description |
|---|---|
Remove loop node removes the loop node definition. This action is available only on nodes that have a manually defined loop node. To remove a loop node definition on an automatically generated loop node, remove all of its direct leaf mappings as described under Remove a mapping in Mapping source objects. Note If you remove all of the direct leaf mappings of a manually defined loop node, the loop node definition still exists. | |
Remove loop node and mappings removes the loop node definition due to mappings that are direct leaf children associated with the loop node, and removes those mappings. Any other mappings within child loop nodes beneath the parent loop node are preserved, and the node retains its loop node definition if at least one grandchild is mapped. This action is available only on nodes that have a loop node defined (either manually or by automatic generation). |