Install Design Studio on macOS
Installing Jitterbit Design Studio (also referred to as Jitterbit Studio) on the macOS is a simple process with these steps:
If you run into issues installing Jitterbit Studio on macOS, please refer to the Installation issues section:
Note
For the best experience with Design Studio, use the native colors of your browser and operating system. Using dark mode or a dark color theme could cause issues.
Installation steps
You will be prompted to enter the macOS login information at various times during the installation process. When prompted, you will need to supply credentials for an administrator-level user on the system. As many Macintosh users are an administrator on their machines, you may be able to use your own login credentials. If you are not administrator or do not have administrator credentials, you may need assistance from your network administrator, help desk, or other similar resource at your organization.
1. Download the Jitterbit Studio disk image
Log in to the Harmony portal at login.jitterbit.com.
After logging in, use the Harmony portal menu to select Downloads.
From the Jitterbit Studio section on the Downloads page, select Mac OS X to download the disk image (.dmg file) to your browser's download folder, typically your Downloads folder.
2. Open the downloaded disk image
When the download is complete, open the Jitterbit Studio Disk Image (.dmg) by double clicking the disk image, if it did not open on its own.
The download location of the disk image file may vary depending on your browser and browser settings. You may have to open a Finder window and navigate to the Downloads or download location.
3. Copy the Jitterbit Studio application from the disk image to the applications folder
After opening the disk image, you will see a window similar to (depending on the version):
![]()
Drag the Jitterbit Studio icon to your Applications folder, either to the alias as shown above or to the actual Applications folder. The application can be placed elsewhere, but we recommend the Applications folder.
Note
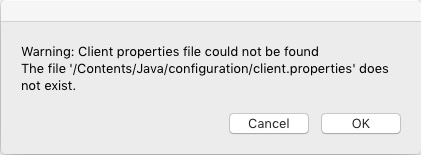
If you attempt to launch the Jitterbit Studio application without dragging it to your Applications folder, you may receive errors such as Client Properties Do Not Exist, as the application is not intended to be run from the disk image. See Installation issues for additional details on this error message.
You will be prompted to authenticate with your administrator credentials to confirm writing to the Applications folder (depending on the version):
![]()
Click "Authenticate", enter your administrator credentials, and the application will be copied. You can now close and unmount the disk image.
4. Launch Jitterbit Studio to check the installation
To complete the installation, open the Applications Folder and find the Jitterbit Studio application.
Control-click (hold down the control key and then click) on the application icon to open the contextual menu, and select "Open" (the first item); the menu items will depend on the version:
![]()
The application will be verified, and you will then see a dialog asking you to confirm that you wish to open it:
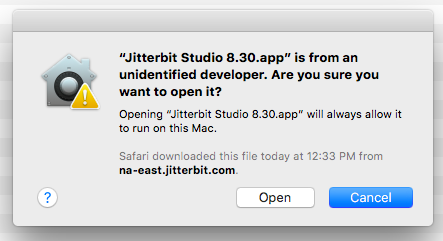
Click open, and you will be prompted to enter your administrator credentials to confirm that you want to run this application:
![]()
The first time you launch a newly downloaded version of Jitterbit Studio, you will receive this message asking to confirm opening it. Once you accept this, you won't be prompted for this again until you download and install a new version, or delete and reinstall the same version.
Note
If you receive a Java update notice of any type when you try to launch the Studio, see the "Installing Java Upgrades" section below.
Installation issues
Install Java upgrades
Jitterbit Studio requires Java, and the version of Java needed may change as Jitterbit Studio versions change. When launching Jitterbit Studio, you may receive a message stating that the Java is out-of-date. If this occurs, update your Java client using the Java control panel, which can be found under System Preferences → Java. The Java Control Panel will open in a separate window. Select the Update tab and then click Update Now.
![]()
![]()
Launch errors
If you receive errors such as these, it is likely because you are attempting to run the Jitterbit Studio application from the disk image:

To fix this, in the Finder, drag the Jitterbit Studio application icon from its current location in the disk image to the Applications folder. In the mounted disk image, it will appear as this:
![]()
This will copy the application from the disk image to the Applications folder. Authenticate as an administrator, it will be copied, and you can start it from the Applications folder. Close and unmount the disk image before continuing.
If you receive an error such as this:
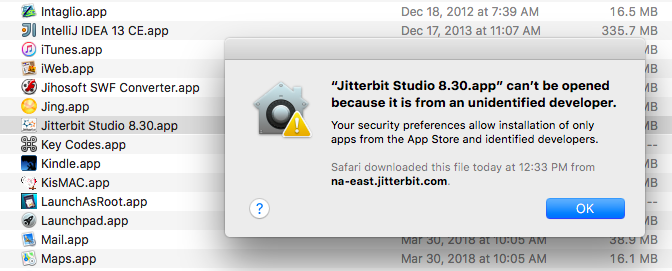
This means that you need to follow the instructions above to control-click and then open the application from the menu in order to trigger the security authentication.
Upgrade steps
Upgrading Design Studio to a later version can be done without uninstalling the prior Design Studio version, even when upgrading from a 10.x to an 11.x version.
The steps to upgrade Design Studio are the same as those used during initial installation. Follow the installation steps provided earlier on this page to complete the upgrade.