Set up a team collaboration project in Jitterbit Design Studio
Warning
Standard Edition does not support multiple developers working on the same project. The process outlined in this document is supported in the Professional Edition and Enterprise Edition.
Overview
Team Collaboration within Jitterbit projects requires a single designated individual to serve as the TEAM BUILD Manager. Collaboration within projects also requires that a specific daily process be instituted, every member of the development team to be provided with training to use the process, and for the process to be rigorously followed.
Designated team build manager process
- Responsible for consolidating the work of all team members into one TEAM PROJECT and managing the environment structure, project folder structure and migration processes required to do so.
- Setting up and modifying Team Configuration. Steps to accomplish this are detailed in the following Example.
- Set up the Agent Group and Agent.
- Set up TEAM-BUILD Environment
- Set up a separate and specifically assigned Environment for each Team Member.
- Set up a specific Role for each Team Member with the appropriate access to their specific assigned Environment.
- Create the TEAM PROJECT.
- Create separate and specifically assigned Folder for each Team Member in the Team Project.
- Create common and daily work folders as necessary.
- Deploy the Team Project to the TEAM-BUILD environment in Jitterbit Cloud and select the checkbox for Also store a backup in the Cloud.
- Provide a meaningful tag that will help to identify this version of your integration project (e.g. Project Name, Date Deployed, Version).
- Migrate the TEAM PROJECT separately to each Team Member's assigned environment.
- Ensure each Team Member Restores the Team Project to their instance of Jitterbit Studio.
- Ensure each team member understands the TEAM PROJECT folder configuration, the TEAM-BUILD environment configuration and the specific process to develop and deploy their work.
- Ensure that each team member follows the process rigorously.
- Ensure that all team members deploy their work at the end of each day to their specific assigned environment.
- Team Build Manager is the only person that will gather developer changes and migrate those changes into the TEAM - BUILD environment.
- Daily TEAM-BUILD Migration Steps:
- Ensure that all team members have deployed their changes to the cloud.
- Open the TEAM PROJECT.
- Change the environment to the environment assigned to the Team Member whose code changes you wish to incorporate into the TEAM - BUILD environment.
- Select File > Restore Project From Cloud to obtain the latest changes from the developer.
- Select File > Migrate Project
- Within the project migration wizard, select the TEAM - BUILD environment.
- Proceed through the steps of the wizard and select Finish to complete the migration. This will move the latest developer code changes into the TEAM - BUILD environment.
- Repeat Steps 1 through 7 of this block of instructions for each Team Member whose changes should be incorporated into the TEAM - BUILD environment.
- Deploy TEAM - BUILD environment project to the cloud and select the checkbox "Also store a backup in the Cloud".
- Provide a meaningful tag that will help to identify this version of your integration (e.g. Project Name, Date Deployed, Version).
-
Migrate TEAM - BUILD code to a team member's environment when necessary.
-
All objects located in a common folder should only be modified in the master project and then migrated to user environments.
- Notify team members prior to and after modifying a common object.
- Test and deploy any changes to a common object prior to notifying your team that changes have been completed.
- When notified of a change, allow the notifying team member to complete their change prior to making additional changes.
- Obtain the latest changes to any common object as soon as you are able.
- Remind the other team members that they are only to use the common objects and may not alter them. If changes need to be made to the objects, the original authoring team member must make the changes and then re-deploy their specific project.
- The TEAM BUILD manager will then migrate the common object change into the TEAM - BUILD environment.
- Ensure that the team member that will receive the changed common objects has deployed their latest code to the Cloud.
- Change to the each specific Team Member's environment.
- Select File > Restore Project From Cloud to obtain the latest version of the Team Member's code.
- Change to the TEAM - BUILD environment.
- Select File > Migrate Project
- Within the project migration wizard, select the same Team Member's environment.
- Proceed through the steps of the wizard, selecting the items that you wish to add to the team member's environment, and select Finish to complete the migration.
- This will move the latest common code changes into the Team Member's work environment.
- Change to the same Team Member's environment.
- Ensure that the changed common items from the TEAM - BUILD environment are present in the Team Member's project.
- Deploy the Team Member's project to the cloud.
- Notify the Team Member to restore their project from the cloud to obtain the latest changes.
- Repeat Steps 4 through 15 in this block of instructions for each Team Member.
Team member process
- Each Team Member is required to become familiar with the collaboration process and follow the process rigorously.
- Never make any change to any item located in any folder that is not the Team Member's own specific assigned folder.
- Each Team Member will perform work only in their specific assigned environment and only within their specific assigned folder.
- All changes developed in Jitterbit Studio will be placed into the Team Member's assigned folder within each category. Any new operation a Team Member adds to the project must be created within the Team Member's assigned folder prior to deploying the project to the Team Member's assigned environment in Jitterbit Cloud.
- Team Member will deploy all work to their own specific assigned environment in Jitterbit Cloud at the end of each day.
- When notified of a change to a TEAM - BUILD common object, the team member will perform the following steps:
- Change to the TEAM - BUILD environment.
- Select File > Restore Project From Cloud
- Select File > Migrate Project
- Within the project migration wizard, select Team Member's specific assigned environment.
- Proceed through the steps of the wizard, select all of the "Common" folders, and select Finish to complete the migration.
- This will move the latest common code changes into the Team Member's work environment.
Use case
This document assumes that the user has already downloaded and installed Jitterbit Studio onto their computing device of choice and that the user has Internet access and is able to access the Jitterbit Management Console (https://login.jitterbit.com).
For the purpose of this document we will be setting up a fictional corporation, World Of Wonder, LLC (WOW). WOW is in the beginning stages of a new integration project. WOW has assigned four employees to the project:
- Net Suite who is a NetSuite domain expert;
- Sales Force who is a Salesforce domain expert;
- SQL Server who is a SQL Server expert; and
- Jitterbit Admin, who has prior Jitterbit experience, has been designated as the Team Build Manager.
This team is better known within the WOW organization as the "WOW Integration Team" (WOW IT). Jitterbit Admin will be the designated person that will be responsible for setting up the project for the other team members.
Example
Steps to set up team collaboration in the Management Console
-
Jitterbit Admin logs in to the Jitterbit Management Console.
-
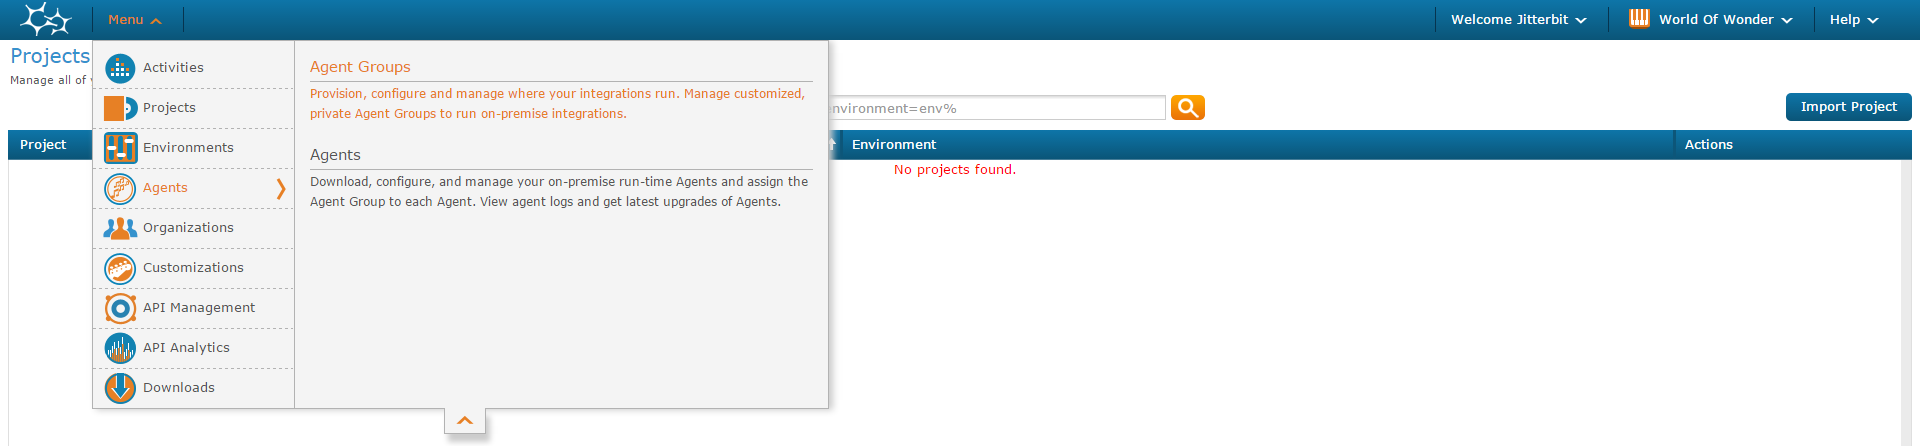
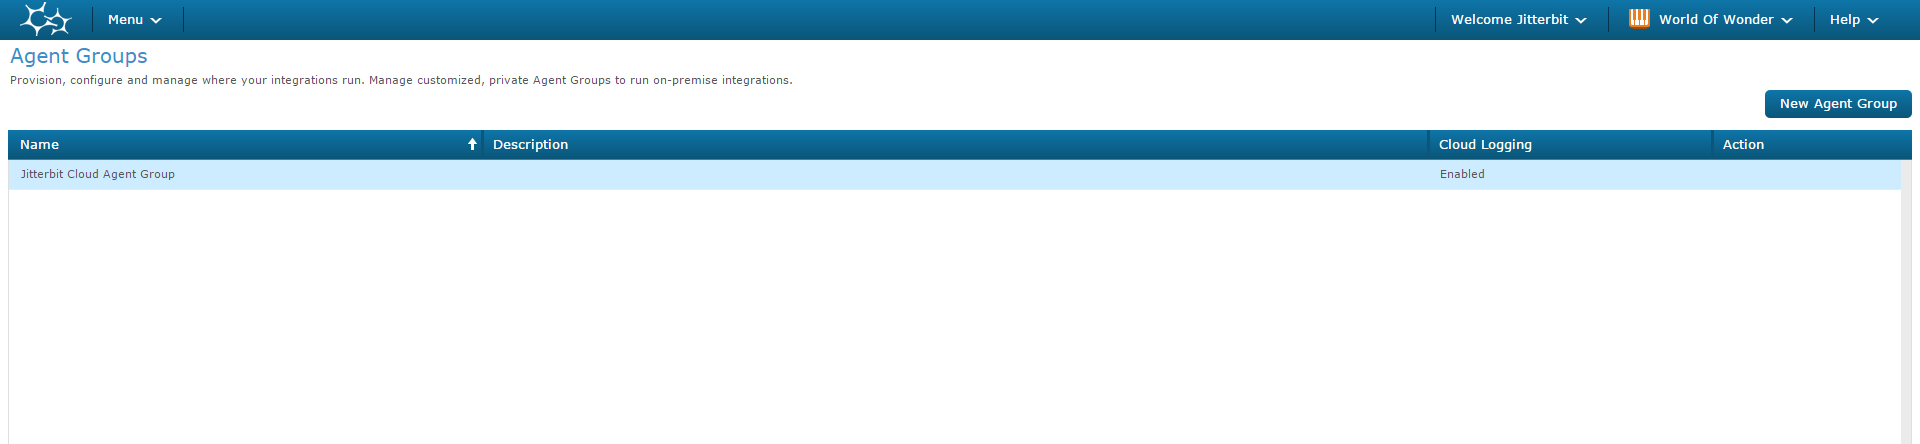
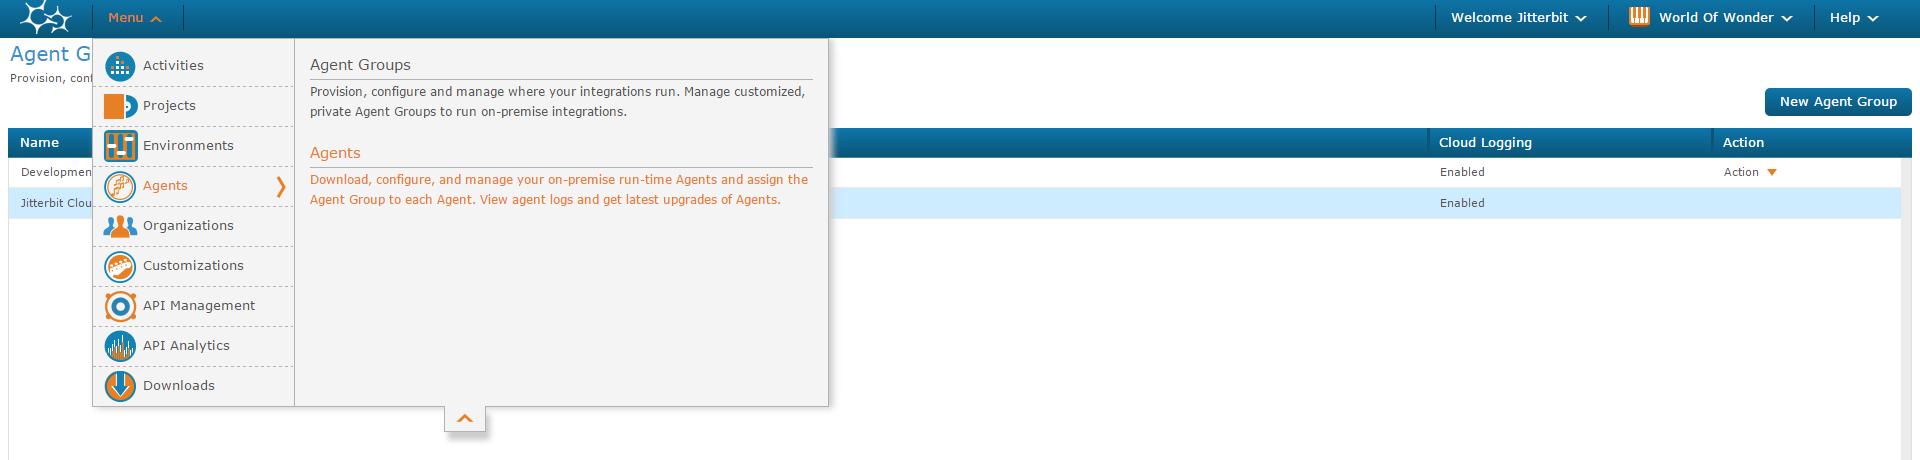
Select Menu > Agents > Agent Groups.
-
Click the New Agent Group button in the upper right corner
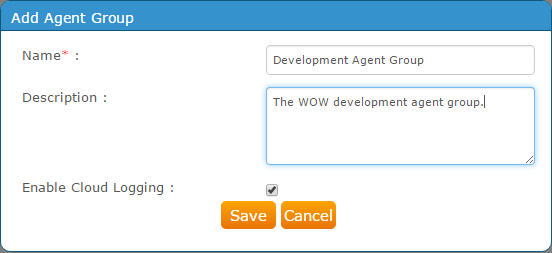
- Enter a meaningful Name for your new agent group in the Add Agent Group pop-up window.
-
Click the Save button.
-
The new agent group displays in the agent groups grid.

-
Select Menu > Agents > Agents.

-
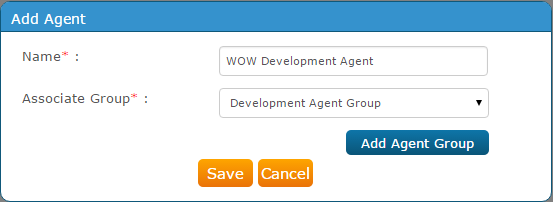
Click the New Agent button in the upper right corner.
- Enter a meaningful Name for your agent in the Add Agent pop-up window.
- Click the Associate Group drop-down arrow and select the Agent Group created in the previous steps to associate with the new agent.
-
Click Save.
-
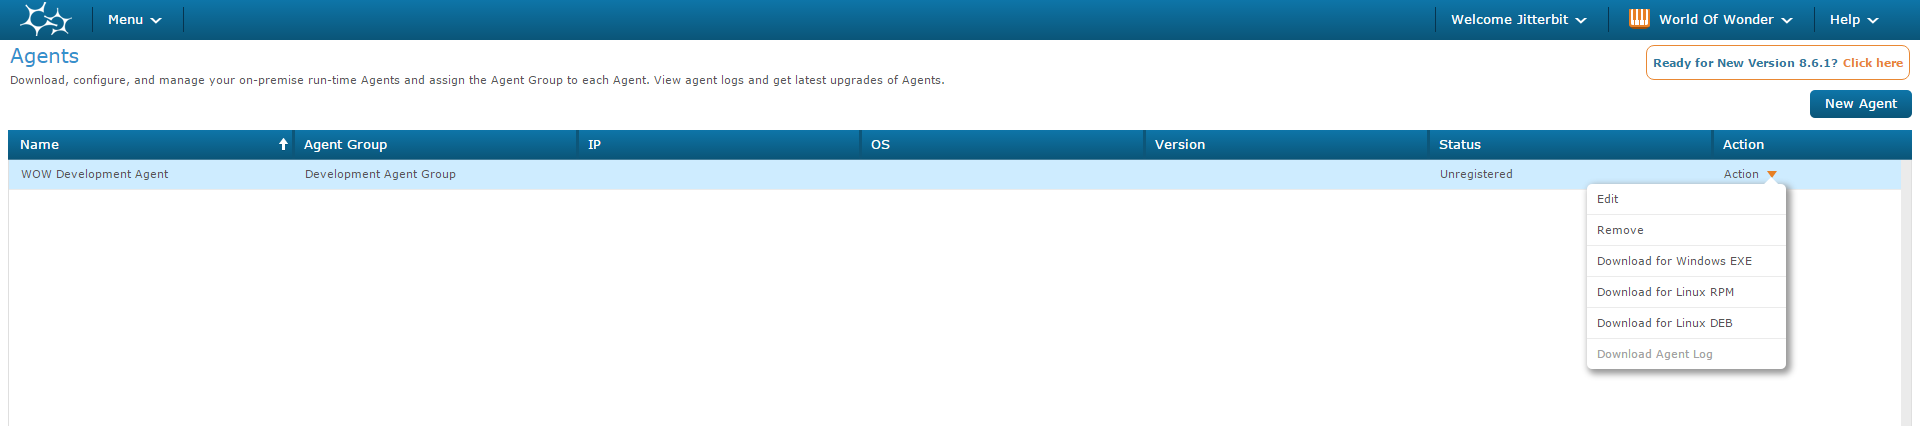
The WOW Development Agent is displayed in the Agents grid in the following screenshot.
- Select the WOW Development Agent in the grid.
- Click on Action. Select the appropriate operating system and download the Jitterbit agent.
- Install the agent on your device of choice.
-
During installation, be sure to select the agent that you have set up in the prior steps. In this example that would be WOW Development Agent.
-
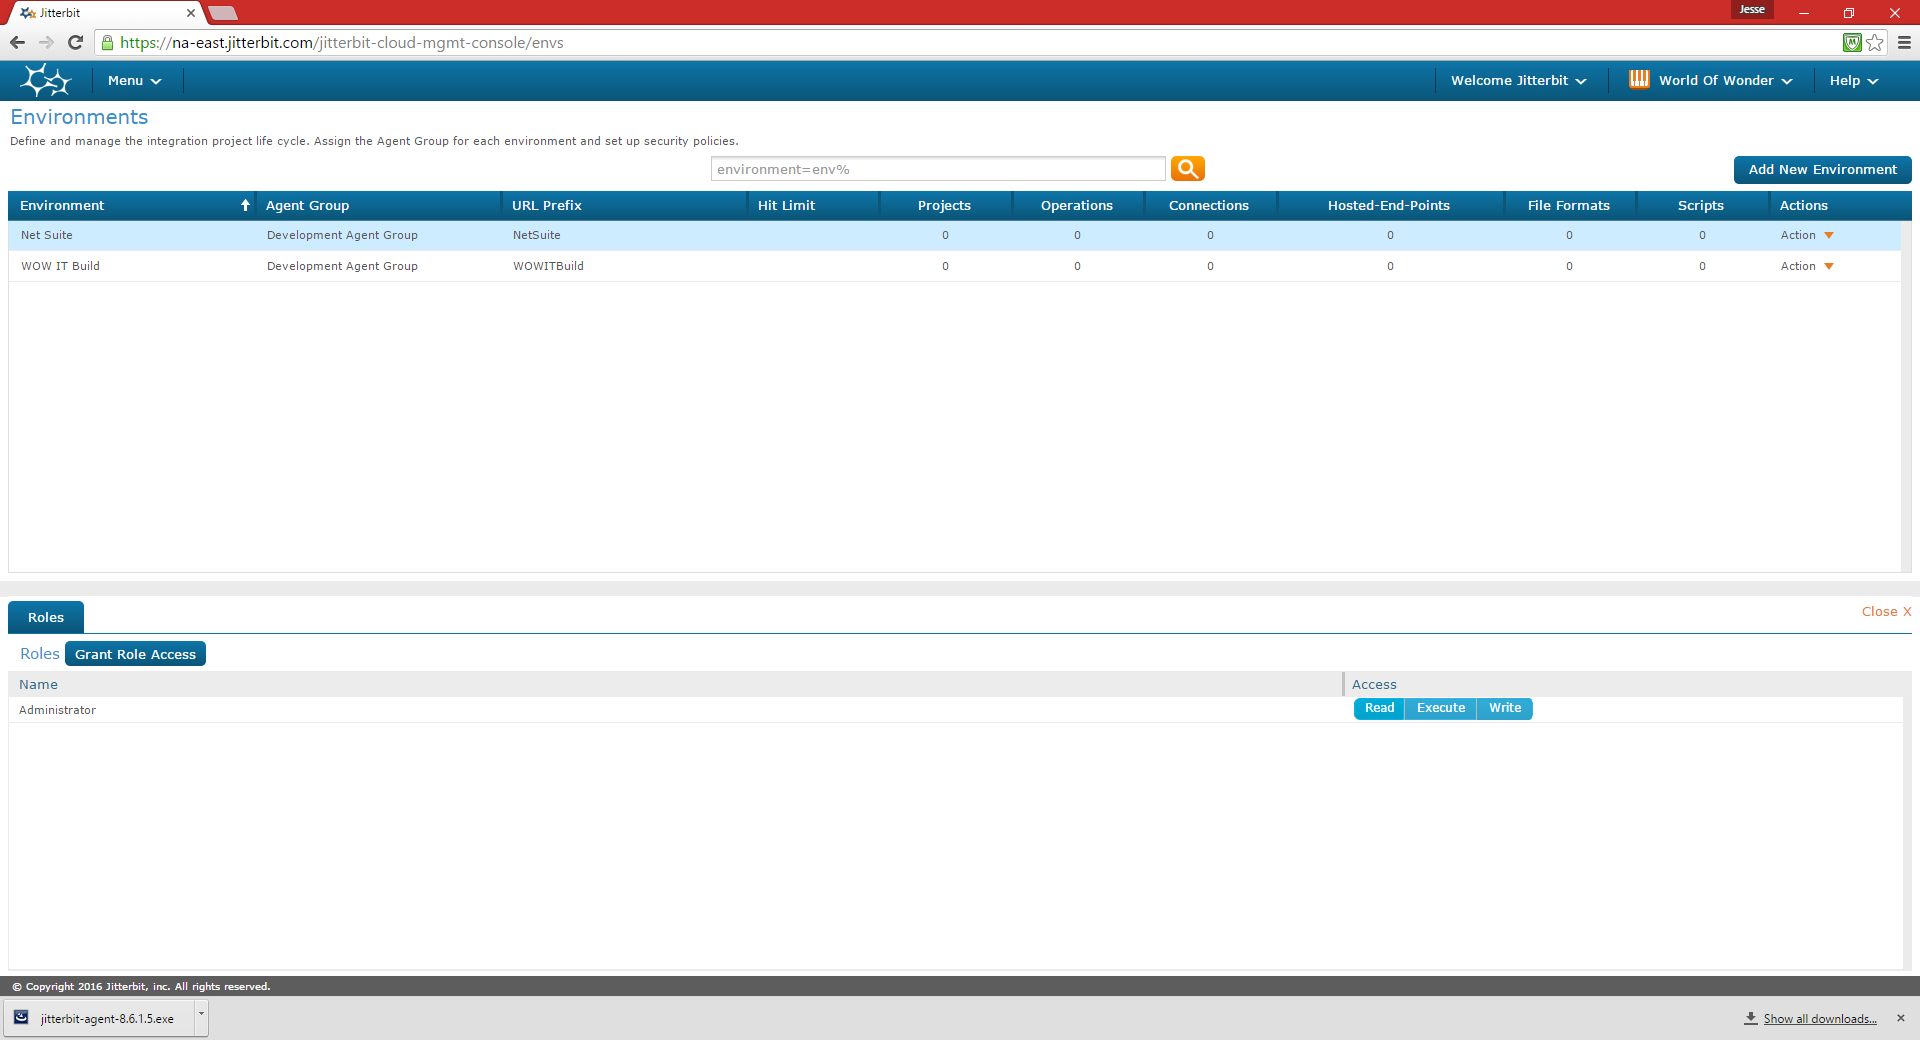
Select Menu > Environments.

-
Click the Add New Environment button in the upper right corner.
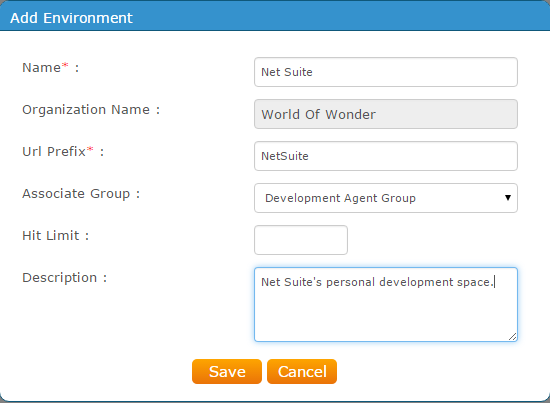
- Enter a meaningful Name in the Add Environment pop-up window to create a collaborative team environment in which to build your integration project.
- Click the Associate Group drop-down arrow and select the Agent Group created in the previous steps to associate with the new environment.
-
Click Save.

-
Click the Add New Environment button again and repeat steps 9.a. through 9.c. above to create an Environment for each of your team members. The following screenshot is the example for the Net Suite team member.
-
Click Menu > Organizations
-
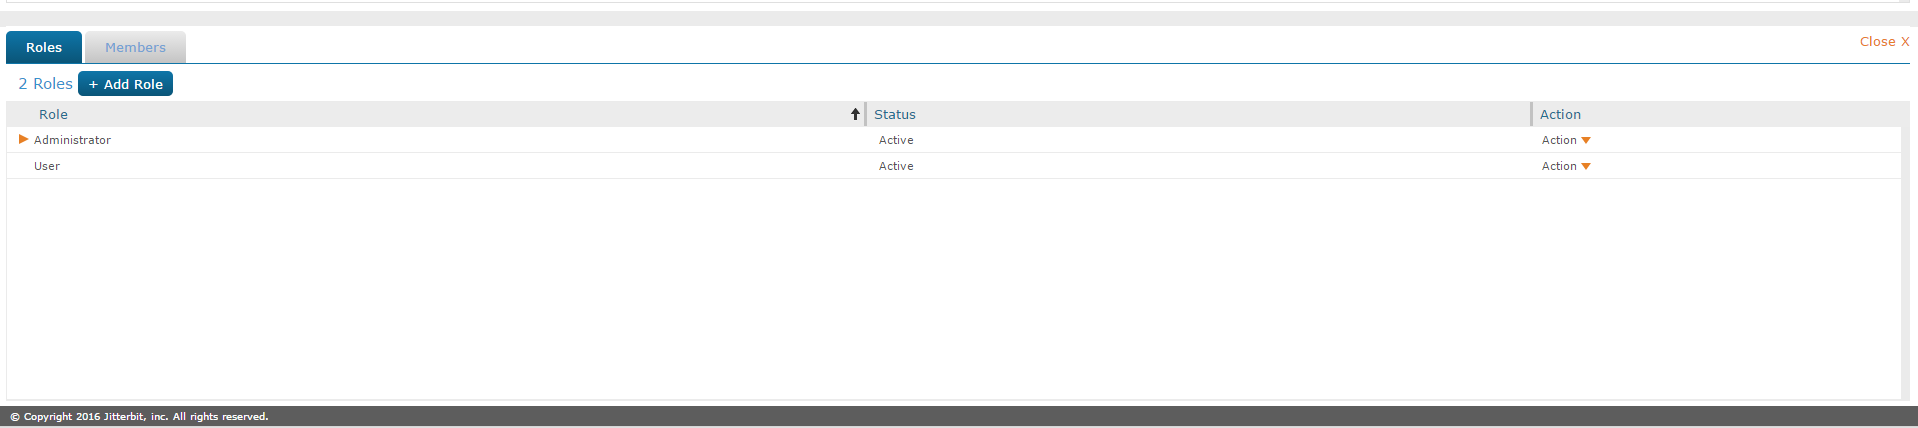
In the lower half of the page, Click the + Add Role button.
-
Create a role with the WOW IT Project name for each of your team members that will be doing development for this project. In this example, roles were created for WOW IT Jitterbit Admin, WOW IT Project Net Suite, WOW IT Project Sales Force and WOW IT Project SQL Server.

-
-
Select Menu > Environments.
-
Select the Net Suite environment.
-
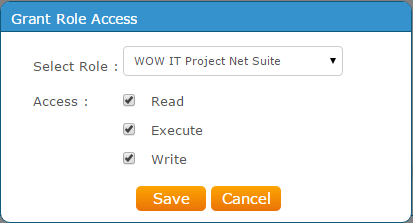
In the lower half of the page, click the Grant Role Access.button.
- Select WOW IT Project Net Suite from the Select Role drop-down in the Grant Role Access pop-up window.
-
As this is the role assigned for team member Net Suite and this is the development environment to be used by team member Net Suite, select all Access methods. Click Save.
-
Repeat steps 14, 15.a. and 15.b. for each team member environment and the associated team member role for all team members that are working on the WOW IT Project Except for Jitterbit Admin (in this example repeat for Sales Force and SQL Server).
- Jitterbit Admin is already an Admin for the organization, and as such, has full permissions to everything within the organization. If Jitterbit Admin was not the Organization Admin, it would then be necessary to set up a separate WOW IT Jitterbit Admin role to allow him/her to administer the project.
- Ensure that you only assign permissions for each member to be able to Read, Execute, and Write in their specific associated environment. Do not assign permissions for a developer to write to any other environment other than their own. Assigning permissions for a developer in an environment other then their own may allow a developer to overwrite another team member's work.
-
Now that all of the collaborative members of the team have a unique role, we can add each individual to their role within the WOW IT Project.
-
Click Menu > Organizations.
- In the Organization grid, ensure that World Of Wonder organization has been selected.
- In the bottom half of the page, under Roles / Members, select the first role that has been set up for your team members. In our example we would select WOW IT Project Net Suite.
- Click Action > Add Member.
- Username: Enter the e-mail address of the member that you wish to perform duties within the project using the WOW IT Project Net Suite role in the Net Suite environment.
-
Click Save.

-
This will add Net Suite to their new role and allow them to have access to the project within their environment.
Note
Since we only added their role to their environment, Net Suite will not have access to any other environment based on having followed the steps in this example.
This should be verified by Jitterbit Admin to reduce the likelihood of Net Suite accidentally overwriting another team member's work.
If you have more than one member of the team that will contribute to a specific area of the project, for example two SQL Server developers, you should create separate roles and environments for each of those members so that one may not accidentally open the other members environment and overwrite any of their work.
-
Keeping environments separate for each member of the team is of the utmost importance.
-
Repeat this process for each current member of the team. Repeat this process for each new team member at the time they are added to the team.
Steps to set up team collaboration in Jitterbit Studio
-
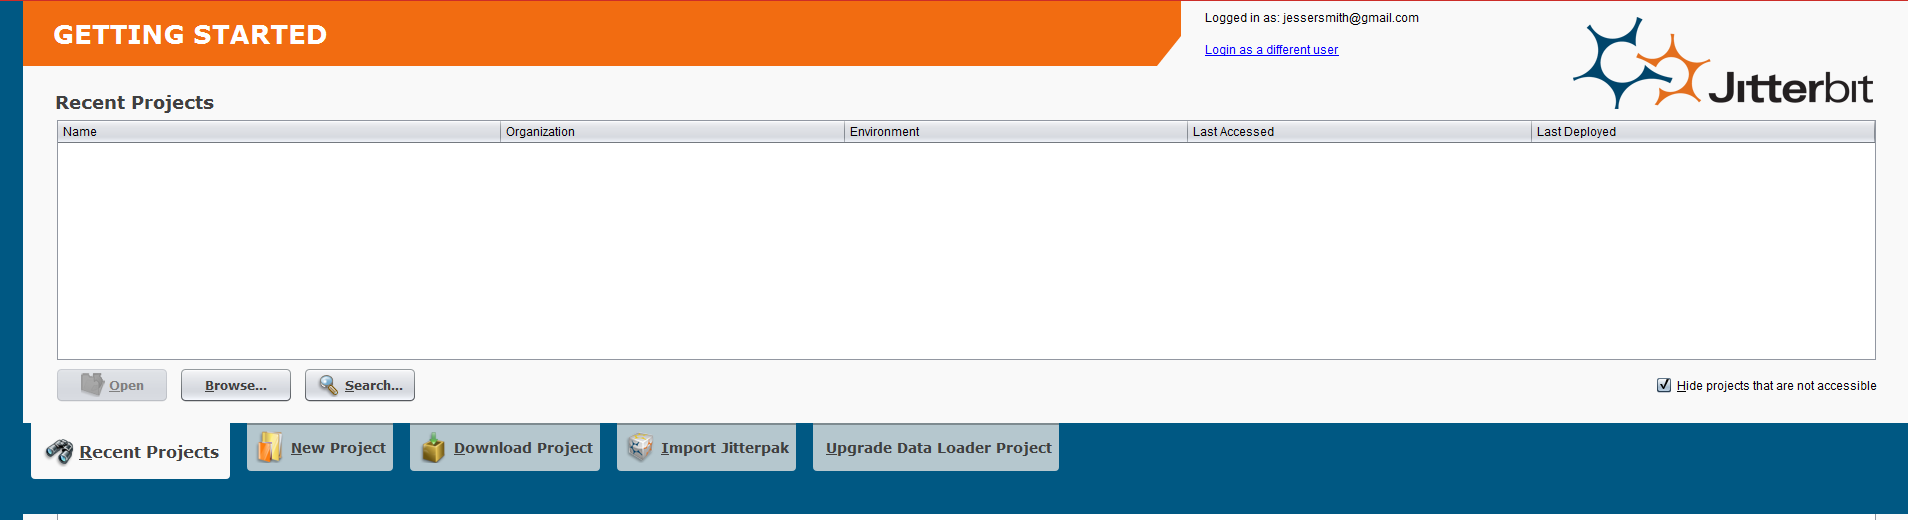
Jitterbit Admin launches Jitterbit Studio and logs in.
-
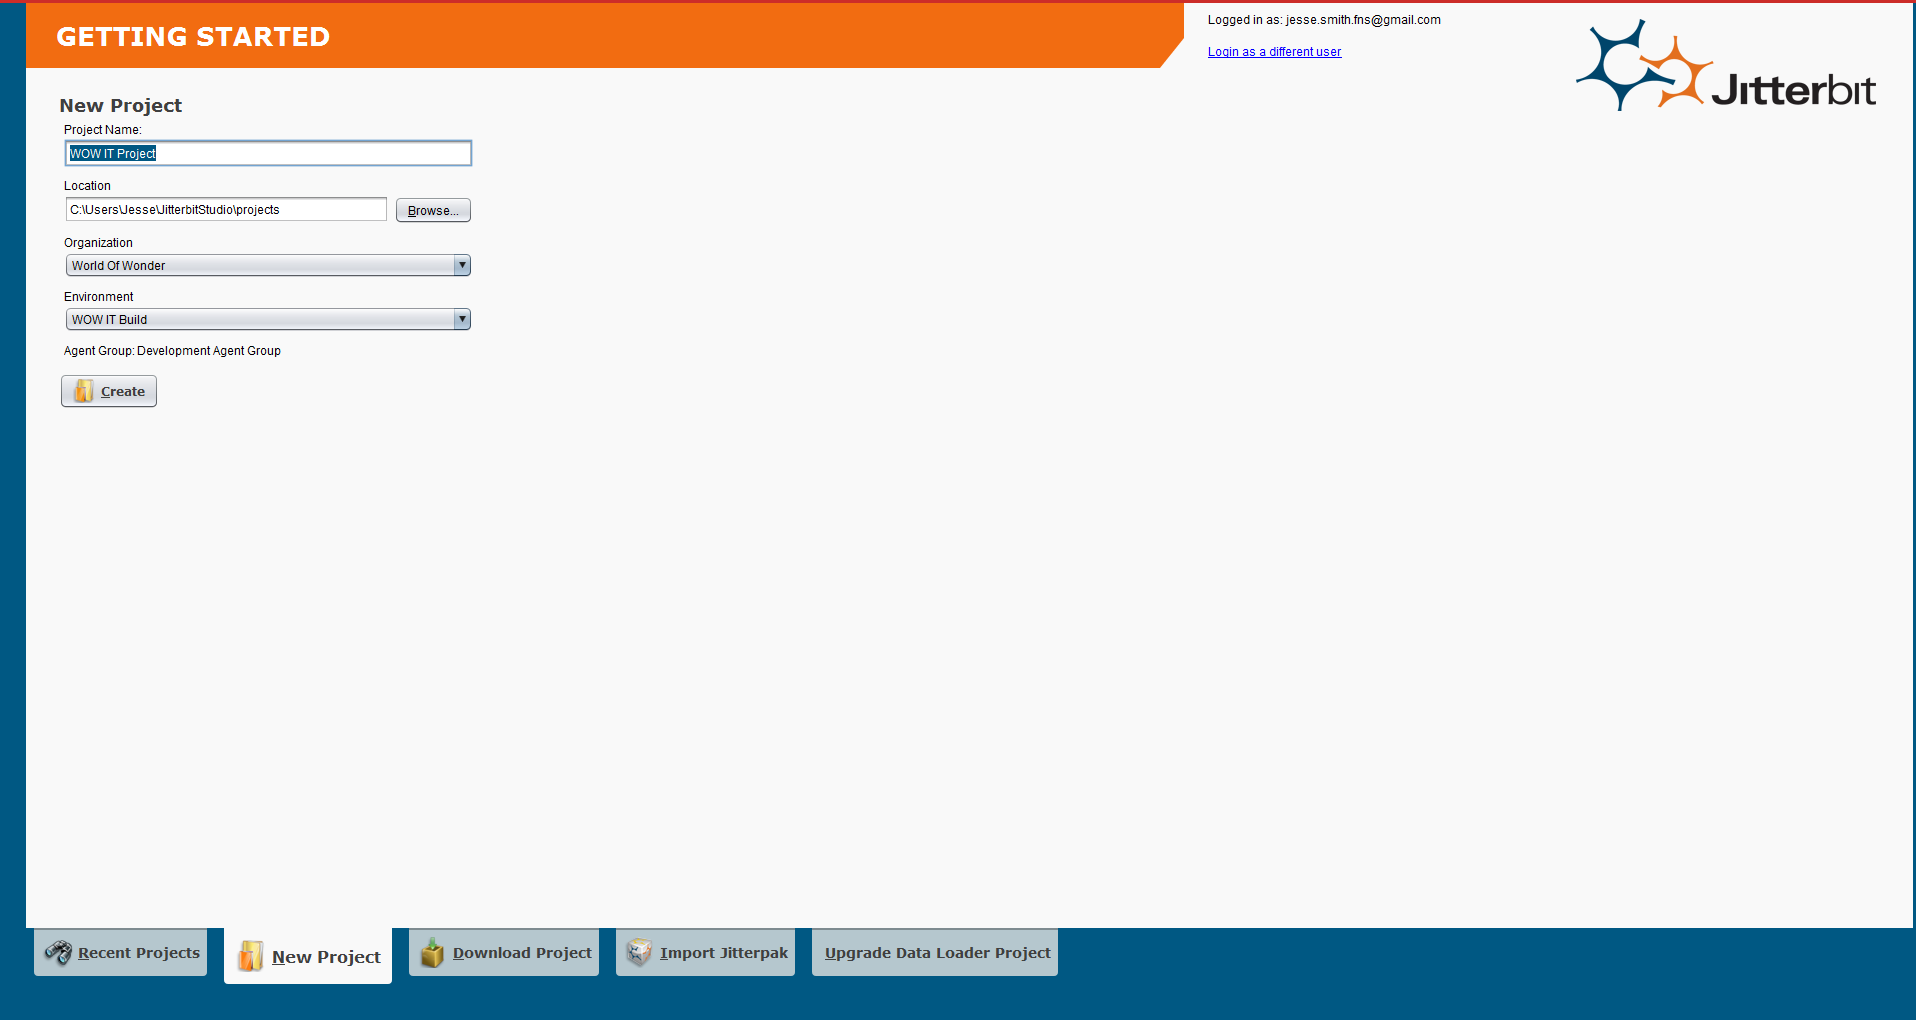
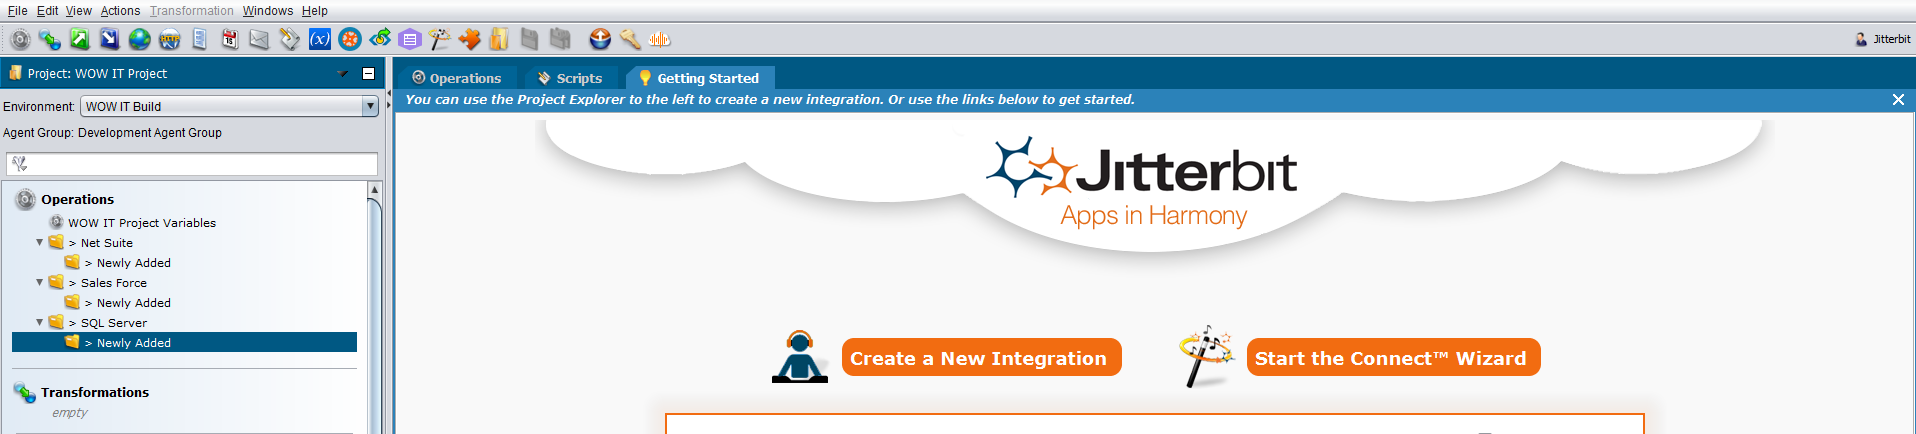
Click on the New Project tab.
- Enter an appropriate new Project Name.
- Verify the Location is correct. If not, click the Browse button and navigate to the correct location.
- Click the Environment drop-down and select WOW IT Build for the environment.
-
Click the Create button.
-
The WOW IT Project displays as an empty project.

-
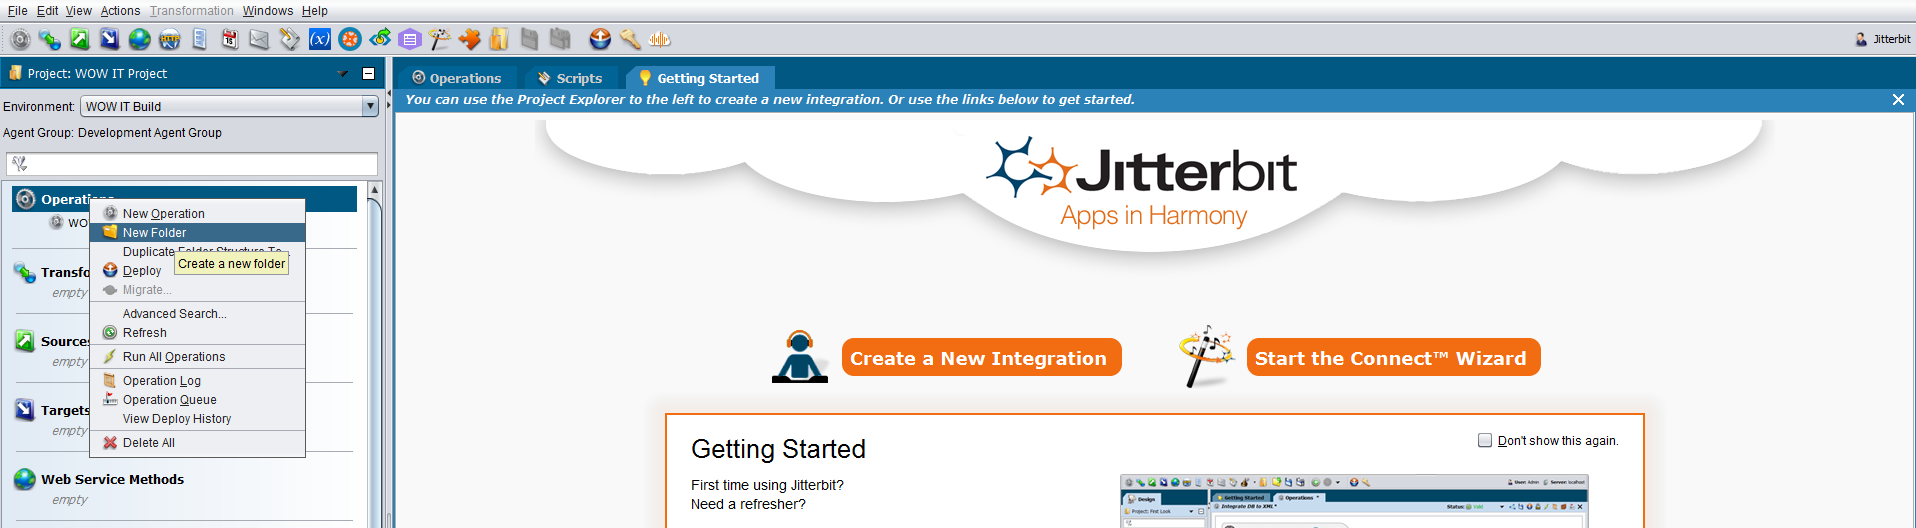
OPTIONAL: If you wish to create a standard template for your team folder structure you may do so at the Operation level. When done you may then right-click on Operations in the tree on the left and select Duplicate Folder Structure To… and then select each appropriate area in which you want to have the folder structure duplicated.
- HIGHLY RECOMMENDED: Create a folder under Operations that is named Common. Follow the instructions in Steps 6.a and 6.b to do so. This would be a location in which work would be intentionally shared among members of the team. A Global variable file that contains Project variables that are needed by all team members would be an example of why you may want to include a Common folder. In this example, the Common folder has been created. A generic Operation named Daily Work has also been created within the Common folder. The Daily Work operation will be used later in the this example in the Migrate team project to team member environments section.
-
REQUIRED: Create a folder structure for each member of the team under Operations.
-
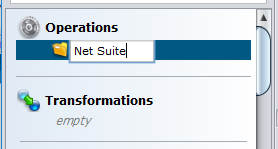
In the tree on the left, right-click on Operations and select New Folder.
-
Enter the new folder Name in the pop-up field and press Enter. In this example a folder is created for the team member Net Suite.
-
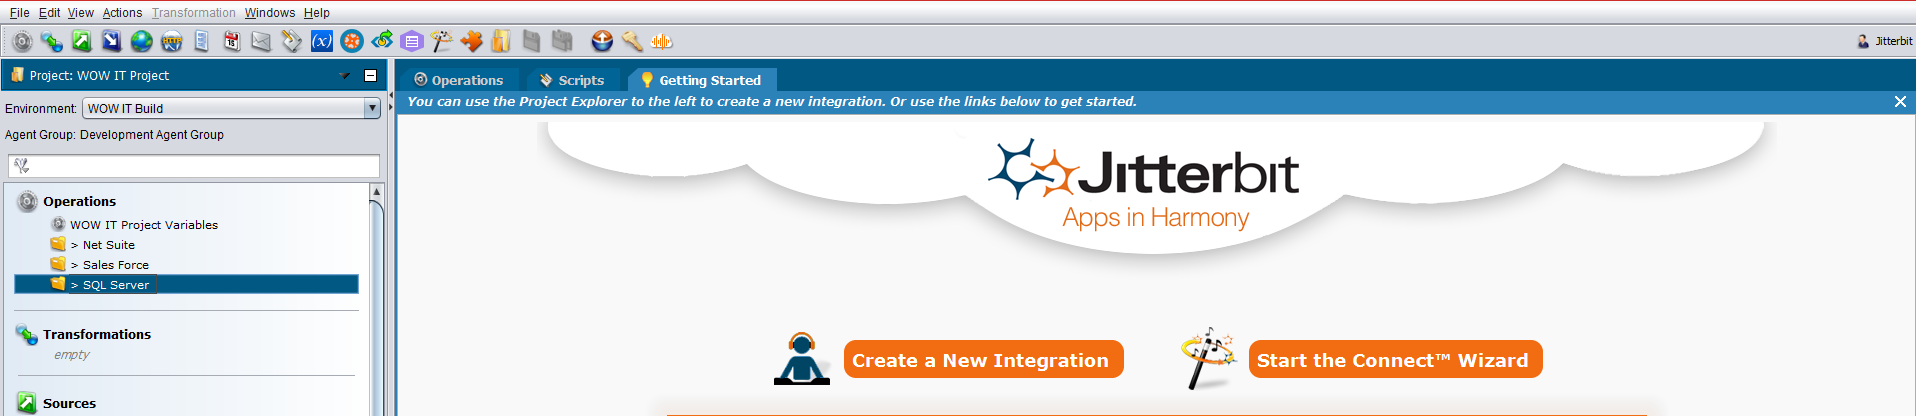
Repeat steps 6.a. and 6.b. for each team member .
-
The team member folders display underneath Operations in the tree on the left.
-
-
HIGHLY RECOMMENDED: Add a "Newly Added" work folder under each team member's folder. By doing so and asking each team member to place all of their new or modified work into this folder, it will be much easier for Jitterbit Admin to know what work needs to be incorporated into the WOW IT Build environment each day. This will aid substantially in making it less likely that any work may be lost or overwritten.
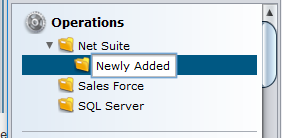
- Right-click on the Net Suite folder
- Enter Newly Added in the pop-up field and press Enter.
-
Repeat Steps 7.a. and 7.b. for each team member folder.
-
The Newly Added folder displays under each team member folder.
How to Copy a Folder Structure From One Project Destination Type to Additional DestinationTypes
-
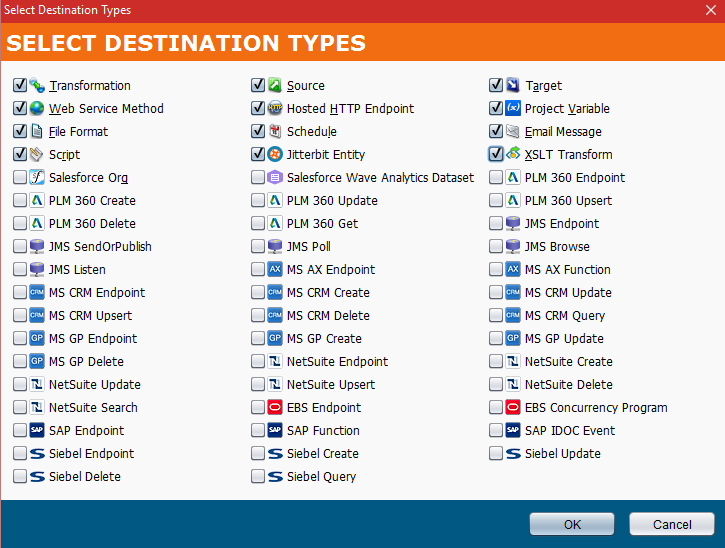
Once the folder structure for your project is completed, you may choose to copy that structure to other project element destination types within Jitterbit Studio. In the tree on the left, right-click on Operations and select Duplicate Folder Structure To… from the list.
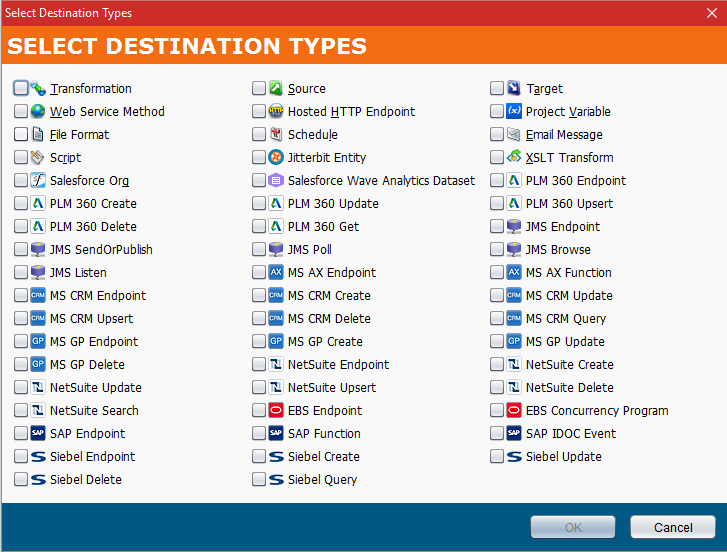
-
Click the associated checkbox to select each project element Destination Type within the project to copy the file structure into.
- You may select none, one, many, or all of the distinct areas within the project to copy your newly created folder structure to.
- You may always add additional destination types to copy the folder structure to later if needed.
- Once you have selected the appropriate destination types, click OK to have your Operations folder structure duplicated within the selected types.
Deploy project with team collaboration file structure to cloud
- Once the collaboration file structure is completed, it is recommended that the project administrator deploy all of the changes to the Jitterbit Cloud for safekeeping and version control.
-
Click on the Deploy
 icon from the top level menu bar, or right-click on the Project, as shown in the image below, and select Deploy.
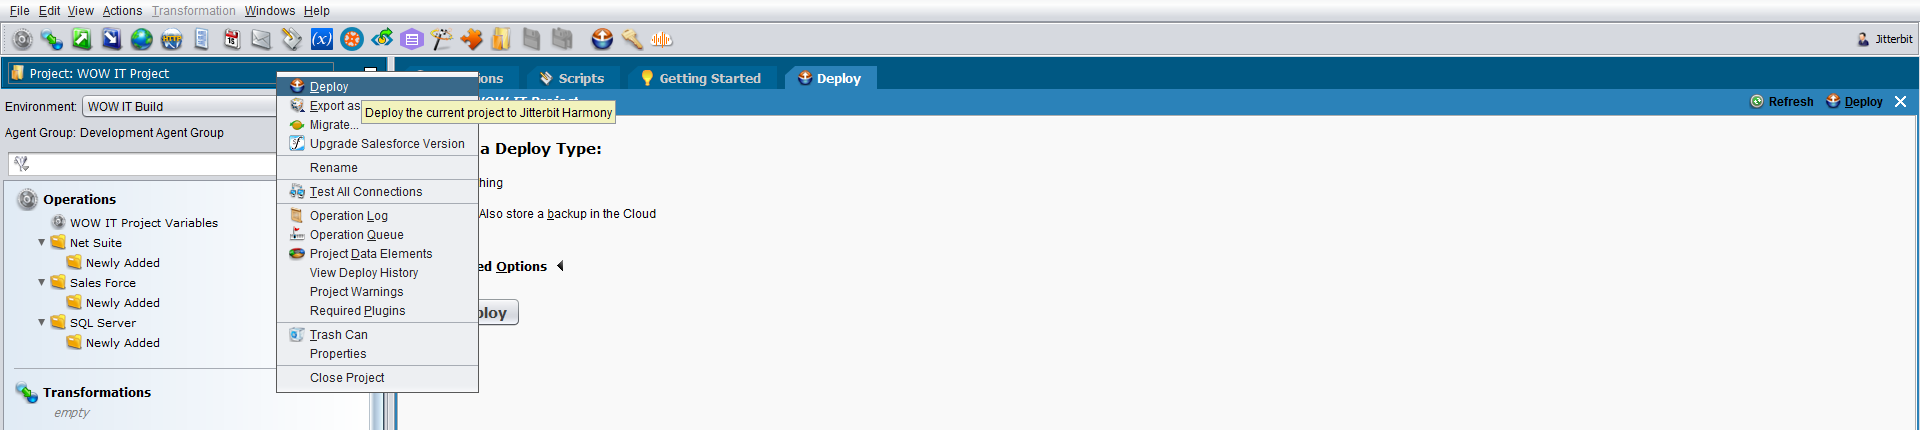 **
** -
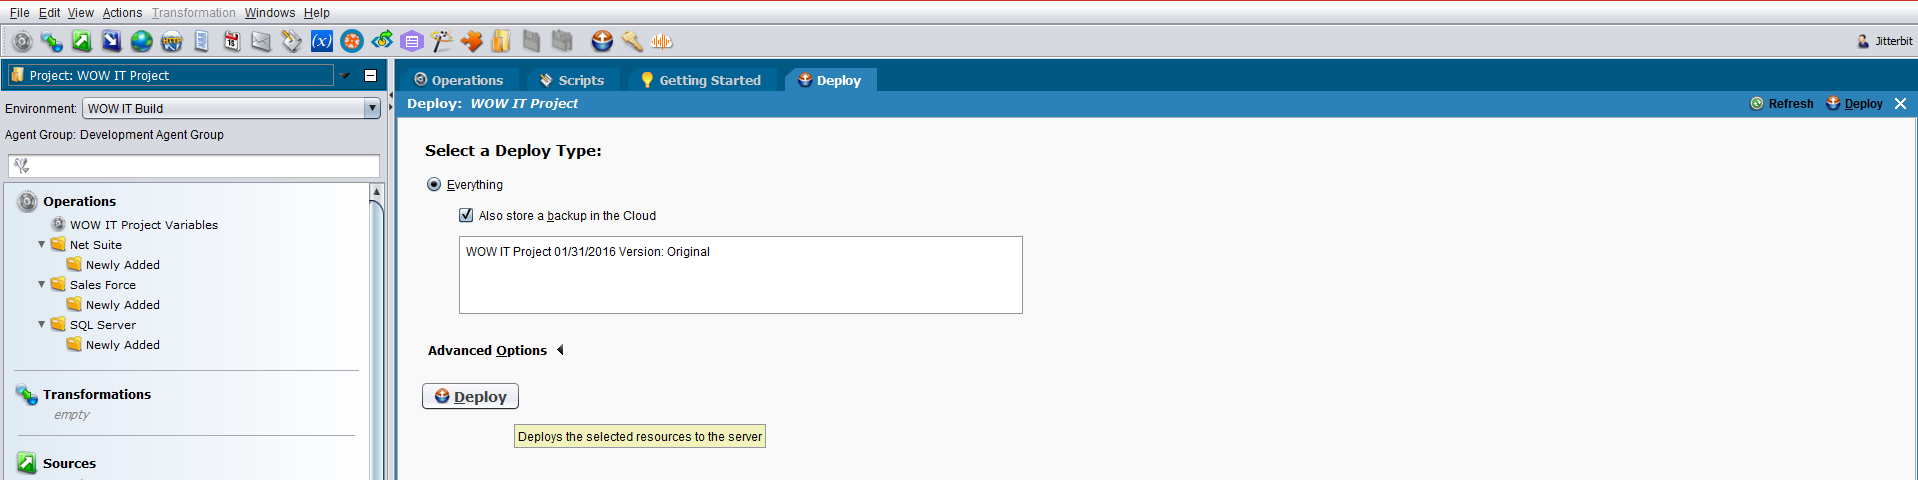
The Deploy: WOW IT Project screen displays.
- Select Everything.
- Select the Also store a backup in the Cloud checkbox.It is important to be able to roll back changes to the project from a backup.
-
Enter an appropriate label in the text box to identify what the specific backup contains, such as what, when and version. In this example, the label includes the project name (WOW IT Project), the date it is being deployed and backed up (01/01/2016) and a version value (Version Original) that will help to identify the state of the project that the backup contains.
-
Click the Deploy button.
Migrate team project to team member environments
- At this point, Jitterbit Admin has created a new team project. However, if any of the team members log in to Jitterbit Studio, they will not have the ability to open the WOW IT Project. That is because the project was deployed by Jitterbit Admin into his own assigned environment and the other team members do not have access to Jitterbit Admin's environment. In this example, the Jitterbit Admin environment is acting as the TEAM-BUILD Environment and Jitterbit Admin is acting as the Team Build Manager, as described in the Overview above. Only Jitterbit Admin should have access to the Jitterbit Admin environment and will be responsible for consolidating the work of all team members into one WOW IT Project within this environment. In order to get the other team members started, Jitterbit Admin needs to migrate the WOW IT Project to each team member's assigned environment.
- In the next step you will migrate the WOW IT Build project into each team member's environment. Before doing so, it will be necessary to drag and drop an operation into the team member's assigned folder. In this example, we have moved the Daily Work operation from the optional Operations > Common folder into the the Net Suite > Newly Added folder. By doing so you will force the migration to include your folder structure as part of the project migration. Folders that do not contain anything are excluded from the migration process. By moving the Daily Work operation into your folder stucture, you are forcing the migration process to include your folder structure.
-
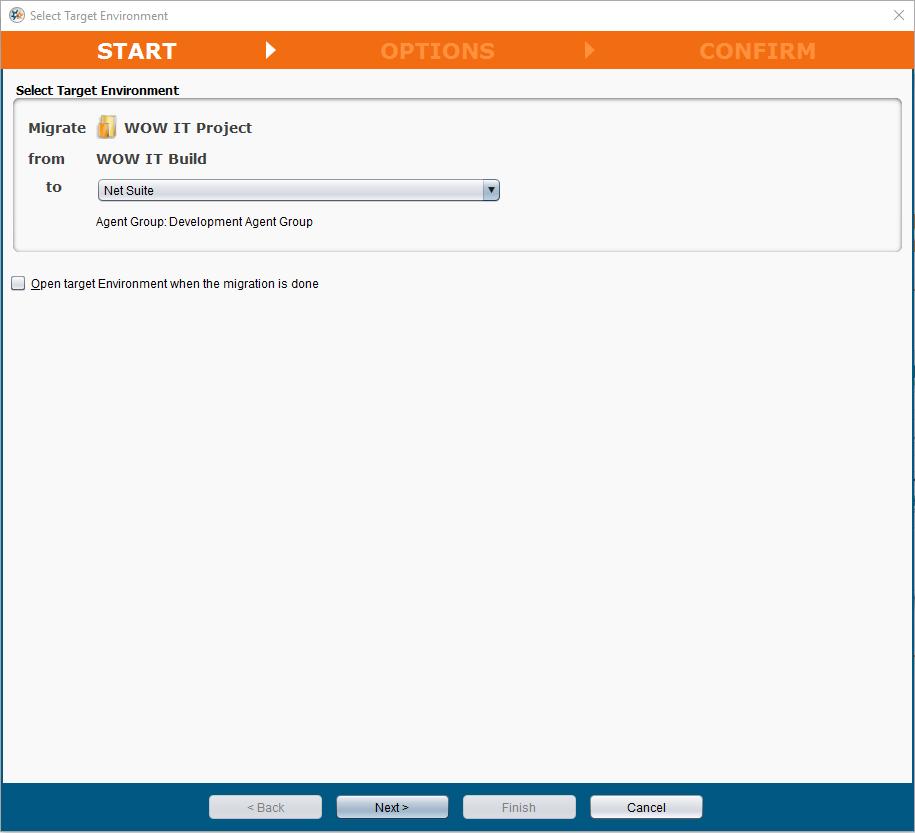
Right-click on the WOW IT Project and select Migrate from the drop-down list.

-
The Project Migration wizard dialog displays. Ensure that you are migrating from the correct environment (WOW IT Build) into the correct environment (Net Suite).
-
In this example, we are attempting to migrate the WOW IT Project from the WOW IT Build environment into the Net Suite environment that is using the agent group: Development Agent Group. As this all seems to be correct, click Next and proceed through the wizard until the Finish button becomes enabled.
-
The Confirmation Migration screen shows you what is about to happen. It shows what will be inserted in the top portion of the screen and it shows you what will be overwritten in the bottom portion of the screen.
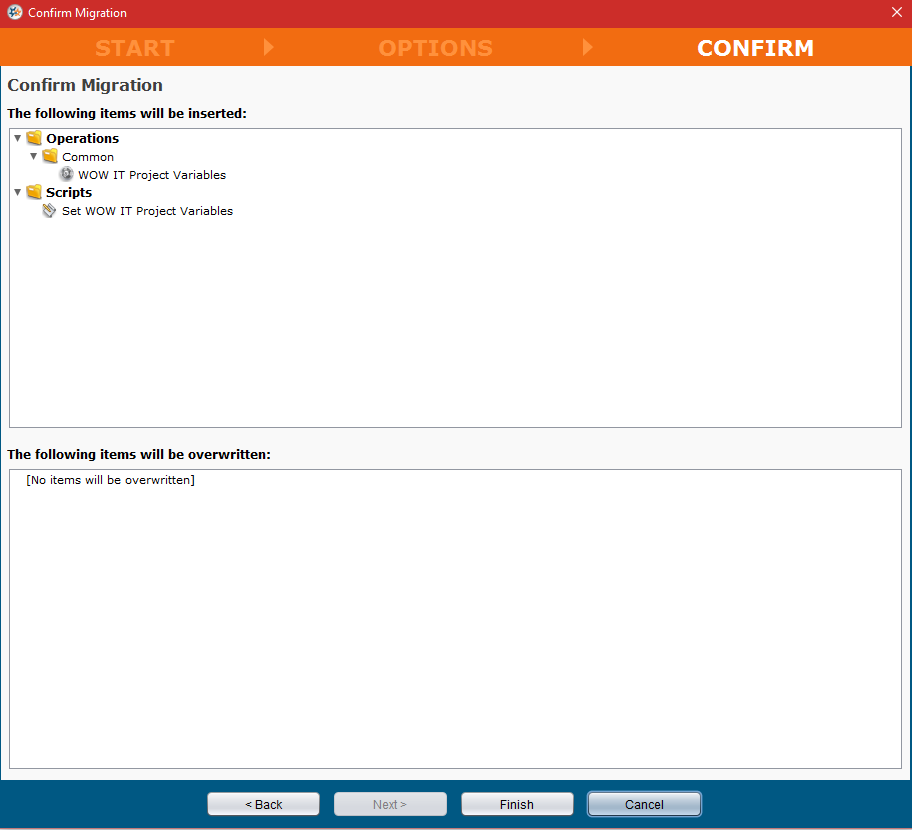
-
In this example the information is correct. Click the Finish. button
- Repeat Steps 2 through 7 in this section for the folder assigned to each member of the team (Sales Force, SQL Server). Now each member of the team will have access to the project within their assigned environment. Have each member of the team log in to Jitterbit Studio and verify that they are able to open the project within their environment.
Team member begins to develop in Jitterbit Studio
-
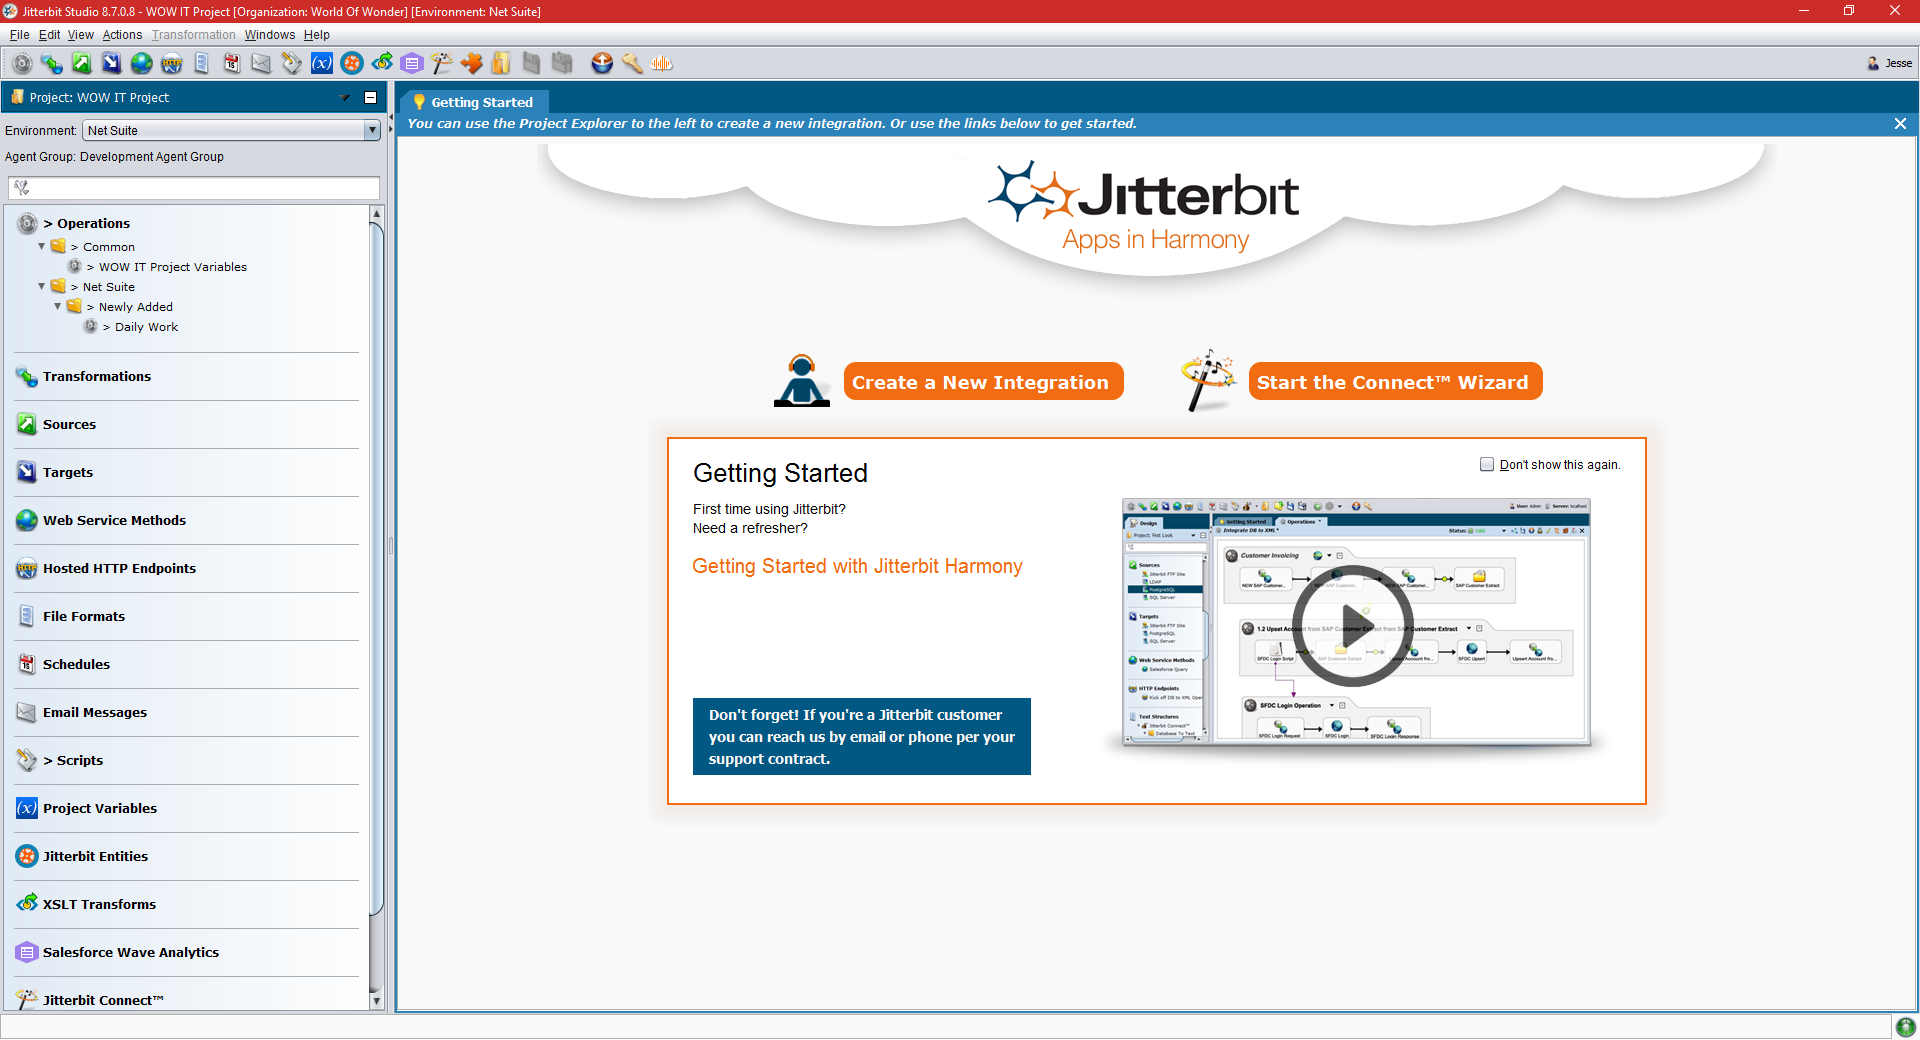
Team member Net Suite logs in to Jitterbit Studio, selects the WOW IT Project and clicks on the Open button.

-
Each member of the team should see the WOW IT Project in their specific context. The following would be the expected view for Net Suite.
-
Net Suite's first task is to copy the Operations folder structure to all other project element destination types within the environment.
-
Net Suite selects the checkbox for several destination types and clicks on the OK button.
-
The Common and Net Suite > Newly Added folders now display under the selected destination types in Net Suite's environment, as shown in the following image.
-
Net Suite is then tasked with creating a new operation that will create a file. The file will then be read and transformed into a new file.
- Net Suite right-clicks on the Net Suite > Newly Added folder and chooses New Operation of type Transformation and clicks Continue. Net Suite finishes creating the Create File and Modify User Name File operations, deploys the project to his assigned environment in the cloud, and finishes working for the day.
-
Jitterbit Admin wants to incorporate the changes Net Suite developed into the WOW IT Build environment.
- Jitterbit Admin logs in to Jitterbit Studio and selects Net Suite in the Environment drop-down list in the upper left corner.
- Select File > Restore Project From Cloud to obtain the latest changes from the developer.
-
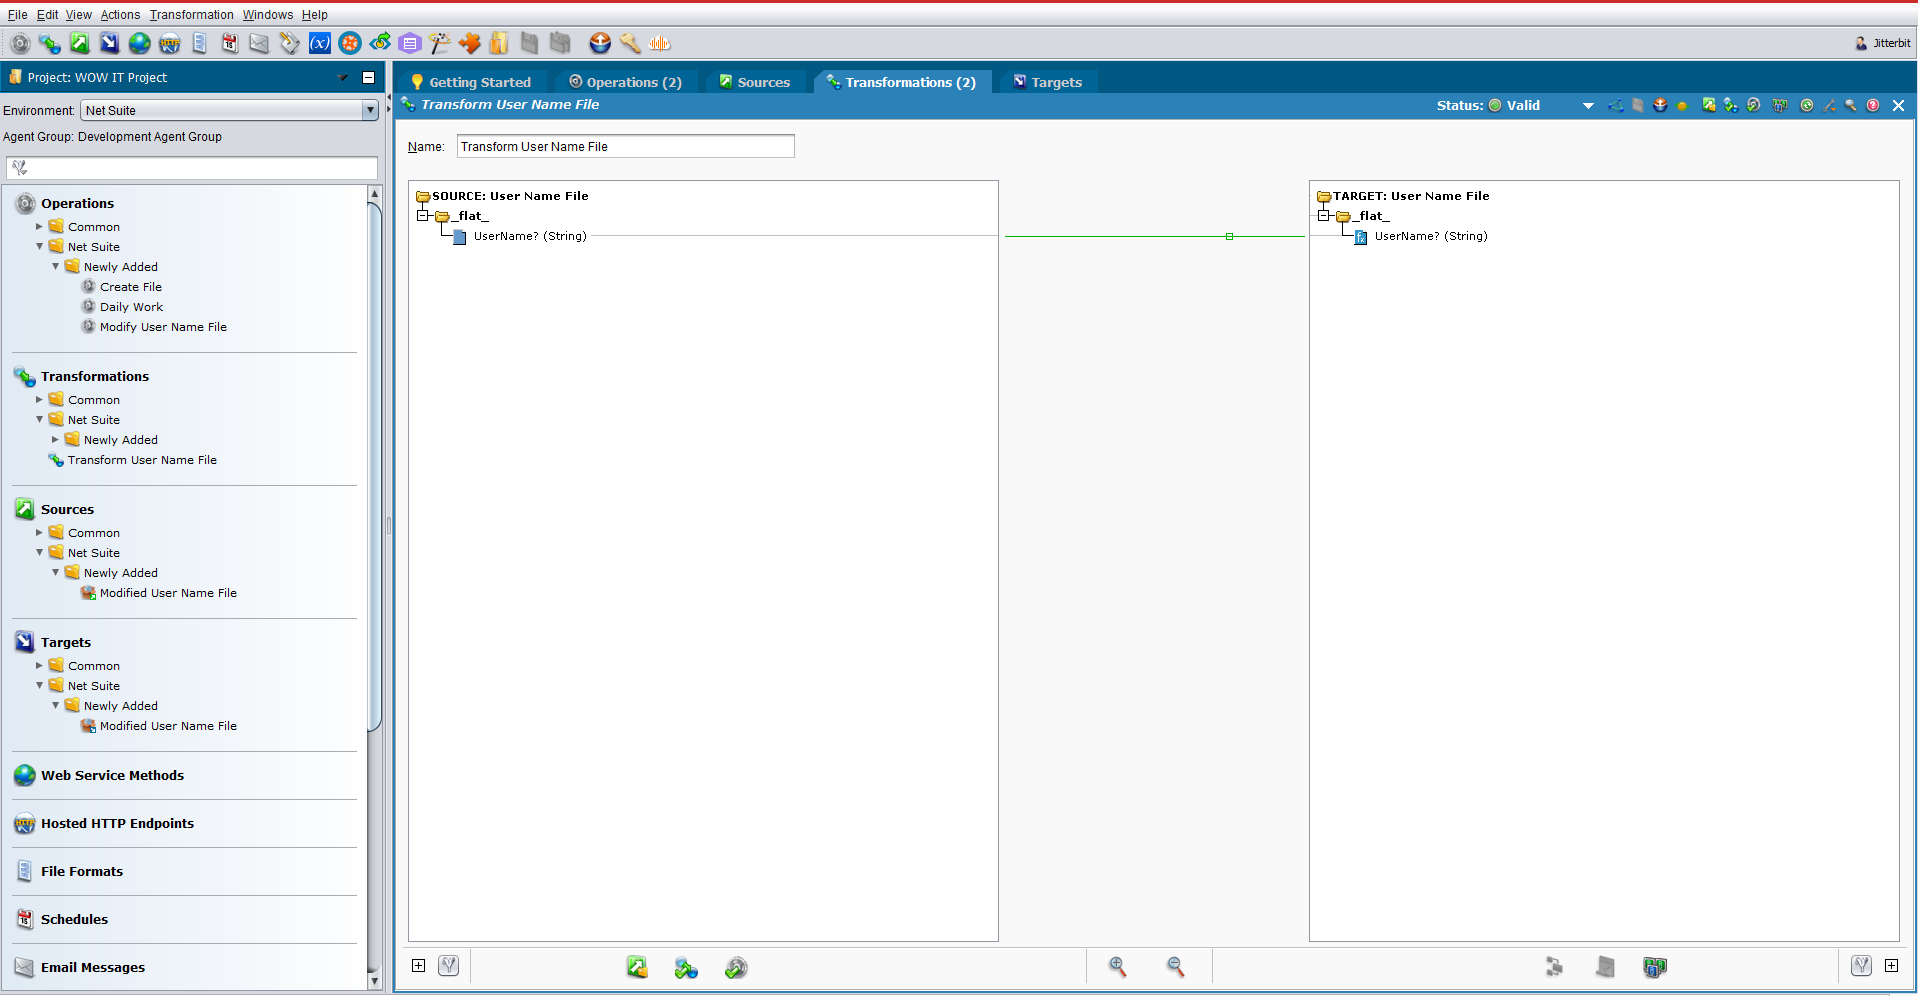
Jitterbit Admin reviews the Create File and Modify User Name File operations, the Transform User Name File transformation, the Modified User Name File source and the Modified User Name File target that Net Suite has completed. Jitterbit Admin can see all of the work completed by Net Suite, as shown in the following image.
-
Jitterbit Admin can see that Net Suite has made changes to the WOW IT Project in the Net Suite environment. In order to move and consollidate the changes into the WOW IT Project, Jitterbit Admin must now migrate the Net Suite environment into the WOW IT Build environment.
-
The safest and best method for moving work from a team member's working environment into the WOW IT Build environment and thereby consolidating the work into the WOW IT Project, is to migrate items from the Newly Added folders. Generally this can be achieved by right-clicking on each new Operation in the team member's Newly Added folder and choosing Migrate.
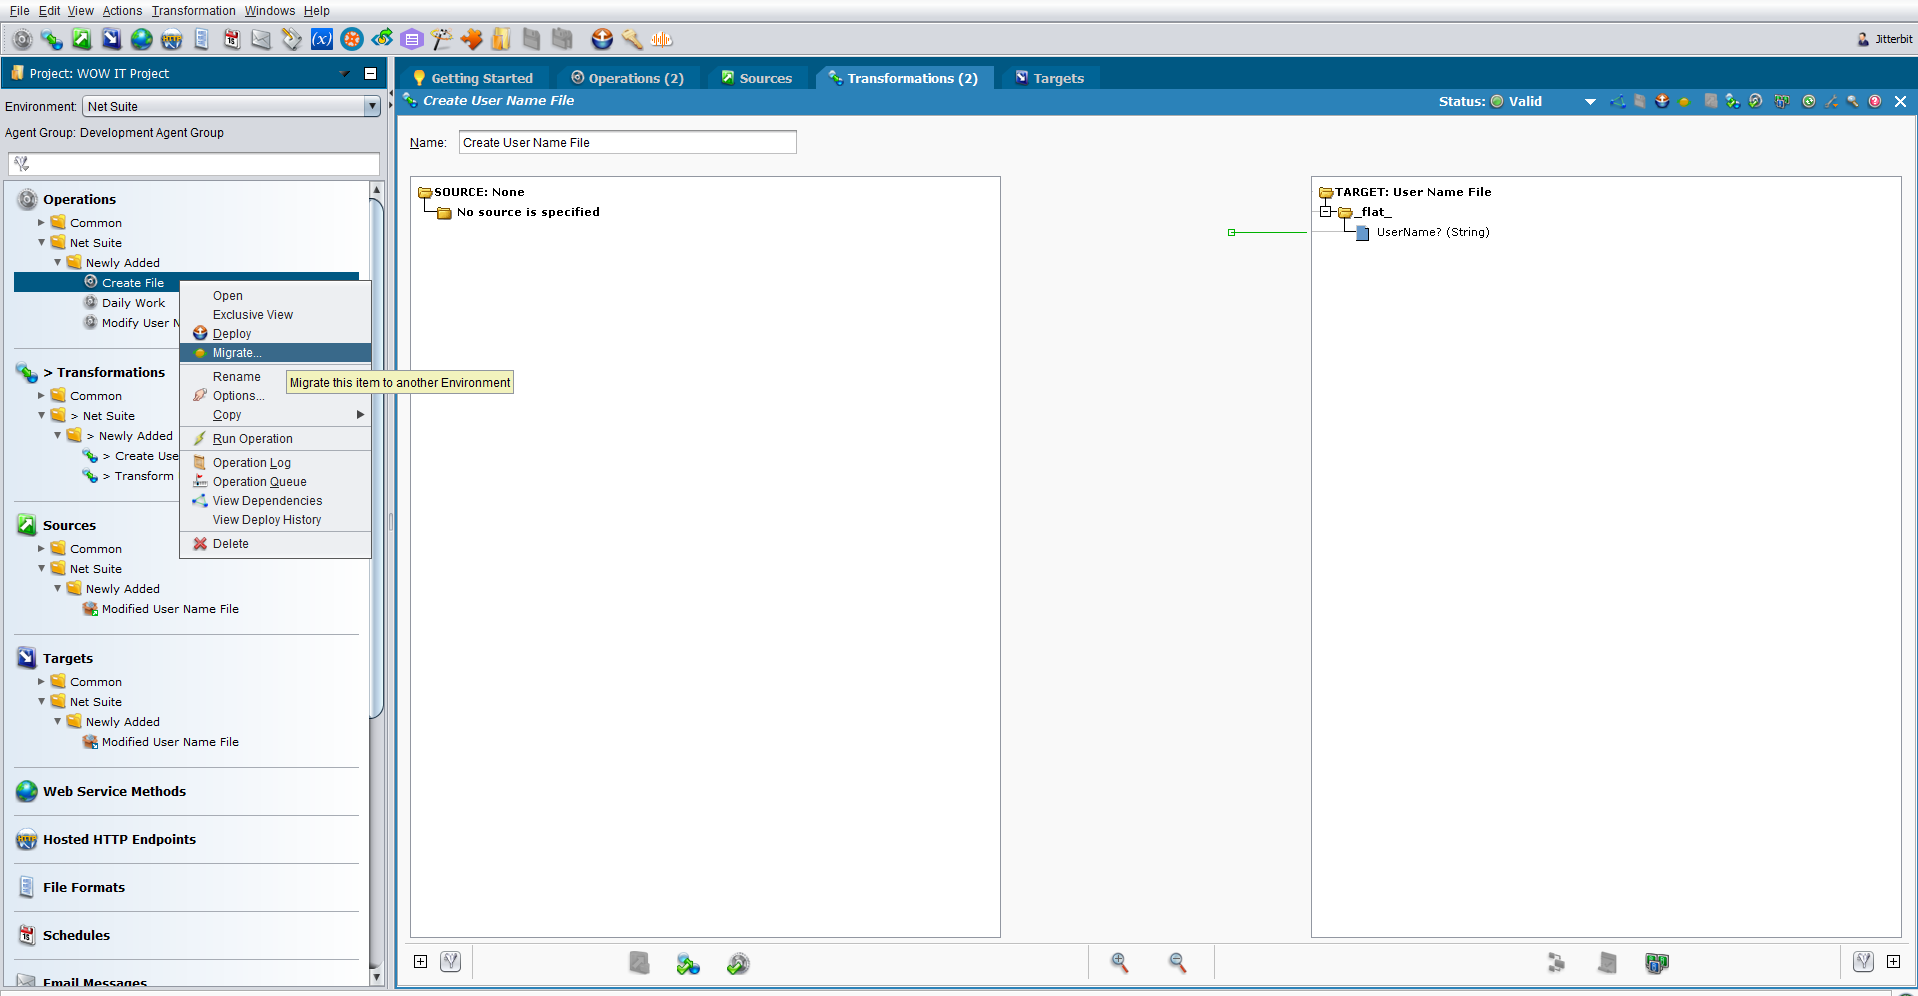
-
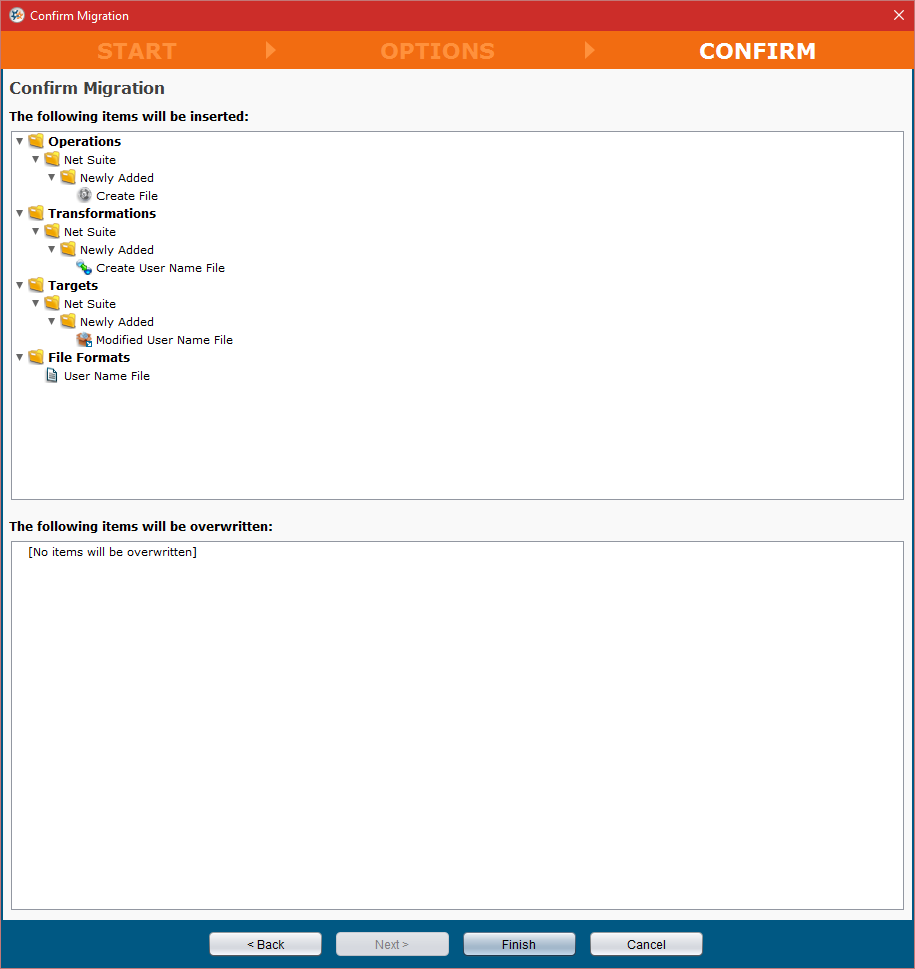
The Migration Wizard displays. Continue through the wizard until the Finish button becomes enabled. You should see the Confirm Migration window as shown in the following image..
-
The upper portion shows the changes that will be inserted into the WOW IT Project, while the bottom portion shows the changes that will be overwritten in the project.
- It is extremely important to fully review the information in this window to validate that these changes make sense and be absolutely certain that you are not about to overwrite existing work that should not be overwritten. This is the critical step in the process to avoid making a mistake and potentially losing work that has already been added to the build environment. In this case, since all of the work to be inserted is located under Net Suite's Newly Added folders and nothing is to be overwritten, we should be safe to complete the migration.
- Click Finish.
- Repeat this process for each of the operations in the Operations > Newly Added folder. It may be helpful to move each item from the Newly Added folder to the Net Suite folder once the migration has been completed for each operation. This process provides a way to track each operation that has already been moved and to know when you have finished migrating all of the changes.