Upsert Clarizen data with a chain of operations in Jitterbit Design Studio
Introduction
This integration pattern uses a chain of operations within Harmony Design Studio to upsert data into your connected Clarizen instance. Before you begin, you should already be familiar with how Jitterbit works, set up a Clarizen endpoint, and be able to use the native query, create, and update operations within the Design Studio Clarizen connector.
Summary
The purpose of an upsert operation is to update records that already exist, and insert records that do not. Although Clarizen's REST API does not explicitly support upsert operations, Jitterbit allows simple and flexible configurations of insert/update workflows.
In this pattern, a unique key field is used to determine the existence of a record by searching for a record in Clarizen whose unique key field has the same value. The unique key field must have a different value for every record and be the same in both systems. Any field that already maintains these properties can be used, and if none exists on the object, a custom field can be created in Clarizen to store the source system's record IDs.
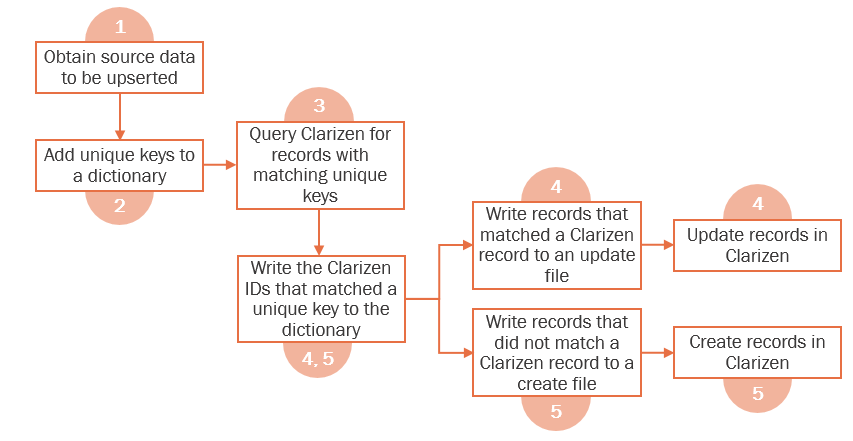
The following diagram shows the generalized workflow of a Clarizen upsert using this design pattern.
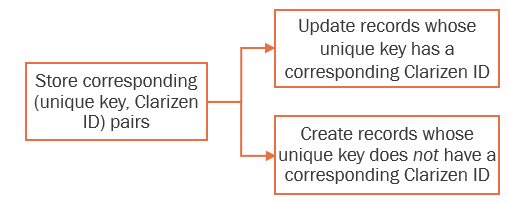
Specifically, upserting records in Clarizen requires maintaining (key, value) pairs of the unique key/values and matching those to Clarizen record IDs. Then, the records can be separated to into "create" or "update" based on whether their unique key has a corresponding Clarizen ID in the keystore.
There are numerous ways to implement the keystore and separation of records, with varying levels of efficiency. Below is the implementation we will be following in this pattern, which sacrifices efficiency for simplicity in certain places. The numbers correspond with steps included in the next section.
Implementation
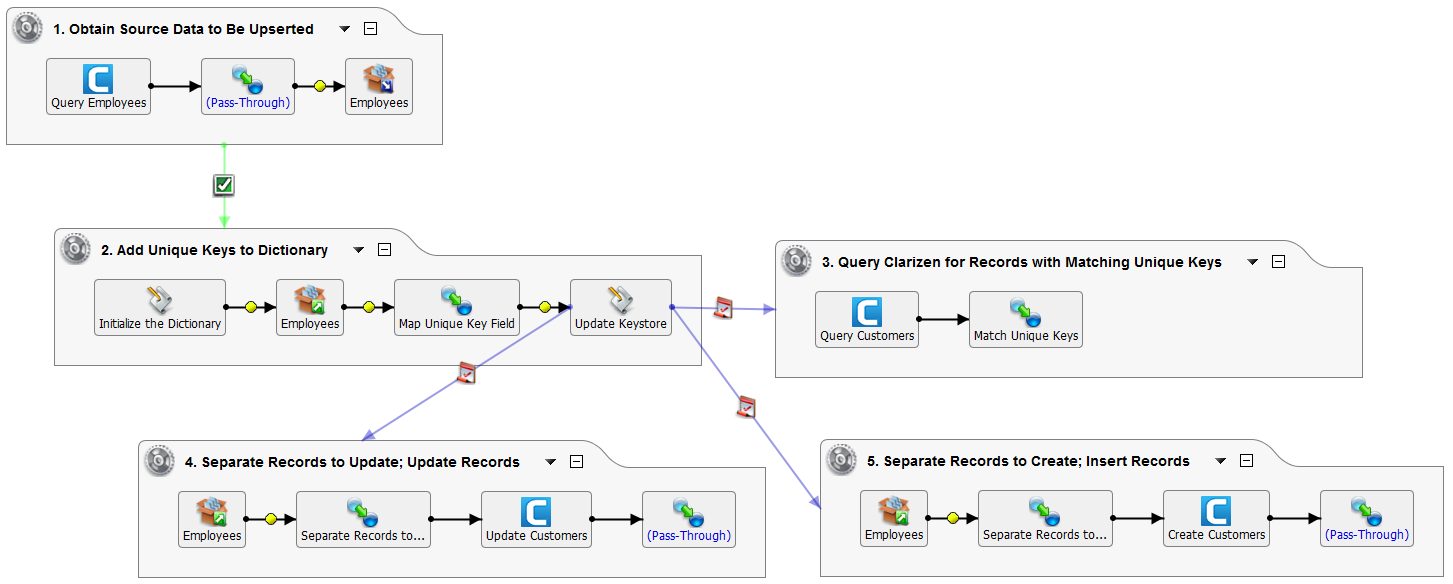
The following sections describe the major steps to implement this design pattern. As an example, we will upsert existing User object data in Clarizen to our Customer object data in Clarizen. This is the final setup:
Step 1 - Obtain source data to be upserted
First, bring in the data you wish to use for the upsert operation using the standard Jitterbit functionality. You can use a variety of sources of data.
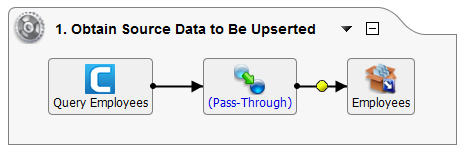
For this example, we will query all existing employees from the User object within our connected Clarizen instance, and then use this data as the source for our upsert. For the example, we set up our source data as follows:
-
Create a new Clarizen query operation for the User object and select all fields. The query is named "Query Employees."
-
Create an operation from this query (click the Create Operation button). The operation is named "1. Obtain Source Data to be Upserted."
-
Pass the data through the transformation without any changes (right-click on Response > Pass-Through). You could also set up a normal transformation to get data in the format you would like to use.
-
Set the target as temporary storage, named "Employees" (double-click on Target > Create New Target; type: "Temporary Storage"; filename: "employees").
-
Copy the "Employees" target to a source, also named "Employees" (within the tree on the left, right-click on the specific target > Copy to New Source). This will be used as the source for our upsert data in the next operation.
-
Run a new transformation operation upon success (right-click on operation background > On Success > Operation > Create New Operation > Transformation). This operation will be used in Step 2, next.
Step 2 - Add unique keys to a dictionary
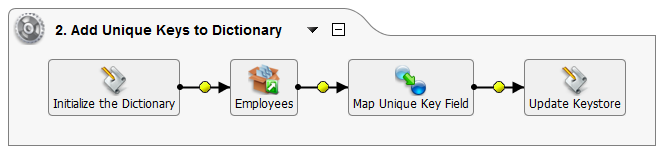
A dictionary is used in this pattern to maintain the (unique key, Clarizen ID) pairs. In this operation, we will insert a script before the source to initialize a global dictionary, and create a transformation to map the unique key field.
-
Depending on how you have configured your source, you should already have a new blank operation created from Step 1. If not, create a new transformation operation (New Operation > Transformation). The operation is named "2. Add Unique Keys to Dictionary."
-
Specify the source of your data. The source should contain all of the records to be upserted. In the example we use the "Employees" source created from Step 1 (double-click Source and select the existing "Employees" source).
-
No target is needed, so remove the target from the operation (right-click Target > Remove from Graph).
-
Insert a script before the source (right-click on Source > Insert Before This > Script), and create a new script (named "Initialize the Dictionary") as follows:
<trans> $UpsertIdDict = Dict(); </trans> -
Create a new transformation whose source and target structures are the same as your data (double-click on Transformation > Create New Transformation). The transformation in the example is named "Map Unique Key Field."
- For the source, select the same structure as your source data. In the example our source is the result of a Clarizen query, so we use "Clarizen Function Response." For target, we will choose "Text."
- For the source, follow the wizard prompts, in the example selecting "Query" and the specific query operation used as the source.
- For the target, we will manually create a new structure that has one field in it (Available File Format Definitions > Create New > Create Manually; under Define Segment Properties, click New and type in a field name for example "ID"). In the example the name of the file format is "Unique Keys."
- In the transformation, iterate over the unique key field by mapping it on the source side to the target side (in the example drag and drop the User > Entity > "id" field on the left to the "ID" field on the right).
-
Modify the transformation so that a new entry is added in the dictionary with the unique key field as the ID and '0' as the value. To do this, double-click on your ID field on the target side and enter the following:
<trans>
AddToDict($UpsertIdDict, Quote(<Your_Unique_Key>), 0)
</trans>
In the example, \<Your_Unique_Key> is replaced with OUTPUT\(User\)Entity.id$ by selecting the unique key field from the source side.
<trans> AddToDict($UpsertIdDict, Quote(OUTPUT$User$Entity.id$), 0) </trans> -
Insert a new script after after the transformation you just created (right-click on the transformation > Insert After This > Script), and create a new script called "Update Keystore." For now we will leave the script blank. This will be populated later during the next step to create a filter so that only Clarizen records with unique keys that match one in the dictionary will be queried.
Step 3 - Query Clarizen for records with matching unique keys
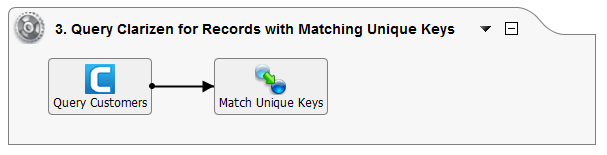
To populate the dictionary with associated Clarizen IDs, in this pattern you will need to create a new Clarizen query operation for the object you want to upsert to. The ID and unique key need to be queried, and a project variable should be added at the end to include a WHERE clause.
-
Create a new Clarizen query operation for your object (in the example, we use the Customer object) with a query string in the following format.
SELECT <Your_Unique_Key> FROM <Your_Object> Where <Your_Unique_Key> In [ClarizenWhereClause]In the example, we will use a custom field called "C_JB_External_Id" in our Customer object as our unique key, as follows:
SELECT C_JB_External_Id FROM Customer Where C_JB_External_Id In [ClarizenWhereClause]Note
The [ClarizenWhereClause] is a project variable we will define later in the "Update Keystore" script.
-
Create an operation from this query (click the Create Operation button). The operation is named "3. Query Clarizen for Records with Matching Unique Keys."
-
No target is needed, so remove the target from the operation (right-click Target > Remove from Graph).
-
Create a new transformation (double-click on Transformation > Create New Transformation). The transformation in the example is named "Match Unique Keys."
- In the example the source should already be defined as the response from the object query. For target, we will choose "Text."
- For the target structure, select the same file format created during Step 2 (in the example, named "Unique Keys").
- In the transformation, map the ID fields from the source side to the target side (in the example drag and drop both the User > Entity > "id" field and custom field "C_JB_External_Id" on the left to the "ID" field on the right).
-
Modify the transformation to write the Clarizen IDs to the dictionary values for the corresponding unique keys. This will set your unique key equal to your object ID. To do this, double-click on your ID field on the target side and enter the following:
<trans>
$UpsertIdDict[Quote(OUTPUT$<Your_Object>$Entity.<Your_Unique_Key>$)] = OUTPUT$<Your_Object>$Entity.id$;
</trans>
Remember you can double-click the fields under OUTPUT on the right-hand side to get the appropriate fields for your unique key and object. The example reads as follows:
<trans> $UpsertIdDict[Quote(OUTPUT$Customer$Entity.C_JB_External_Id$)] = OUTPUT$Customer$Entity.id$; </trans> -
Next, create a new script that constructs an IN clause from the dictionary keys. This can be created outside of the operation (in the tree on the left, right-click on Scripts > New Script). The script in the example is named "Construct InClause from Dict Keys." Paste the following into the script:
<trans> ArgumentList(Dictionary, start, end); keys = GetKeys(Dictionary); //keyIter = 0; inClause = ''; if(end > length(keys), //use length keys as condition while( start <length(keys)-1, inClause = inClause + keys[start] + ', '; start++;);, while( start < end , inClause = inClause + keys[start] + ', '; start++;); ); inClause + keys[start] </trans> -
Now that the IN clause script is created, we can use it within the "Update Keystore" script that was created at the end of the second operation in Step 2. This script loops through your key dictionary and searches Clarizen for a matching record. Once finished, it will then run the update and insert operations we will set up in the next steps. Double-click on this script and enter the following, substituting the names of your actual scripts and operations where needed.
<trans>
//Update cache
keys = GetKeys($UpsertIdDict);
//WriteToOperationLog(keys);
interval = 999;
batch = 0;

While(batch*interval < Length(keys),
$ClarizenWhereClause = '(' + RunScript("<TAG>Scripts/Construct InClause From Dict Keys</TAG>",$UpsertIdDict, batch*interval, (batch + 1)*interval - 1) + ')';
WriteToOperationLog($ClarizenWhereClause);
If(!RunOperation("<TAG>Operations/3. Query Clarizen for Records with Matching Unique Keys</TAG>",true),
RaiseError(GetLastError())
);
batch ++;
);

RunOperation("<TAG>Operations/4. Separate Records to Update; Update Records</TAG>",false);
RunOperation("<TAG>Operations/5. Separate Records to Create; Insert Records</TAG>",false)
</trans>
Note
The last part of this script connects the operations that will be created next in Steps 4 and 5. You may need to come back to this script at the end to update any operation names if needed.
Step 4 - Separate records to update, then update records in Clarizen
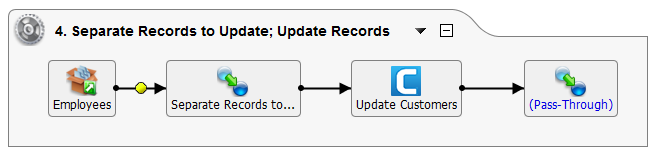
This step filters out records for a Clarizen update operation, and then performs the update of records in the Clarizen instance.
-
Create a new Clarizen update operation for the object you want to update (in the example, the Customer object).
-
Specify the source that contains all of the records to be upserted. In the example we use the "Employees" source created from Step 1 (double-click Source and select the existing "Employees" source).
-
No target is needed, so remove the target from the operation (right-click Target > Remove from Graph).
-
Create a new request transformation (double-click on Request > Create New Transformation). The transformation in the example is named "Separate Records to Update."
-
For the source, select the same structure as your source data. In the example our source is the result of a Clarizen query, so we use "Clarizen Function Response." The target should be defined as a request to the update operation.
-
For the example source, follow the wizard prompts, in the example selecting "Query" and the specific query operation used as the source. If you have a different type of source, select the appropriate options.
-
In the transformation, create a condition on the target object folder (in the example right-click on the Customer folder > Add condition). The condition should return true when the record is found in the dictionary, and false when it is not:
<trans>
if($UpsertIdDict[Quote(OUTPUT$<Your_Object>$Entity.id$)]!='0',
WriteToOperationLog('Found in Dict');
true,
WriteToOperationLog('Not Found In Dict');
false)
</trans>
In the example, the condition is set as follows:
<trans> if($UpsertIdDict[Quote(OUTPUT$User$Entity.id$)]!='0', WriteToOperationLog('Found in Dict'); true, WriteToOperationLog('Not Found In Dict'); false) </trans> -
Then, map the ID field by retrieving it from the dictionary using the unique key. That is, double-click on the ID on the target side and input the following:
<trans>
$UpsertIdDict[Quote(OUTPUT$<Your_Object>$Entity.id$)]
</trans>
In the example, this is set as follows:
<trans> $UpsertIdDict[Quote(OUTPUT$User$Entity.id$)] </trans> -
Proceed with mapping any remaining ID fields, as well as any other fields that should be mapped when updating. In the example, we also map the User > Entity > "id" field to the Customer > "C_JB_External_Id" (custom field) on the right. In the example the User > Entity > "DisplayName" field is also mapped to the Customer > "Name" field on the right.
-
-
For the remaining response transformation on the operation, you can pass the data through the transformation without any changes (right-click on Response > Pass-Through).
-
When your update operation is complete, double-check the "Update Keystore" script described at the end of Step 3 to make sure this operation is included to run within the script.
Step 5 - Separate records to create, then insert records in Clarizen

This step filters out records for a Clarizen create operation, and then performs the insertion of records in the Clarizen instance.
-
Create a new Clarizen create operation for the object you want to insert data to (in the example, the Customer object).
-
Specify the source that contains all of the records to be upserted. In the example we use the "Employees" source created from Step 1 (double-click Source and select the existing "Employees" source).
-
No target is needed, so remove the target from the operation (right-click Target > Remove from Graph).
-
Create a new request transformation (double-click on Request > Create New Transformation). The transformation in the example is named "Separate Records to Create."
-
For the source, select the same structure as your source data. In the example our source is the result of a Clarizen query, so we use "Clarizen Function Response." The target should be defined as a request to the create operation.
-
For the example source, follow the wizard prompts, in the example selecting "Query" and the specific query operation used as the source. If you have a different type of source, select the appropriate options.
-
In the transformation, create a condition on the target object folder (in the example right-click on the Customer folder > Add condition). The condition should return false when the record is found in the dictionary, and true when it is not:
<trans>
if($UpsertIdDict[Quote(OUTPUT$<Your_Object>$Entity.id$)]=='0',
WriteToOperationLog('Not Found in Dict. Creating CZ customer');
true,
WriteToOperationLog('Found In Dict. Customer already exists in CZ');
false)
</trans>
In the example, the condition is set as follows:
<trans> if($UpsertIdDict[Quote(OUTPUT$User$Entity.id$)]=='0', WriteToOperationLog('Not Found in Dict. Creating CZ customer'); true, WriteToOperationLog('Found In Dict. Customer already exists in CZ'); false) </trans> -
Proceed with mapping any remaining ID fields, as well as any other fields that should be mapped when updating. In the example, we also map the User > Entity > "id" field to the Customer > "C_JB_External_Id" (custom field) on the right. In the example the User > Entity > "DisplayName" field is also mapped to the Customer > "Name" field on the right.
-
-
For the remaining response transformation on the operation, you can pass the data through the transformation without any changes (right-click on Response > Pass-Through).
-
When your create operation is complete, double-check the "Update Keystore" script described at the end of Step 3 to make sure this operation is included to run within the script.
Optimization
The design pattern presented above uses a dictionary to maintain unique keys with their associated Clarizen IDs for the purpose of simplicity.
This is sufficient for many use cases, but because the dictionary is not persisted, Clarizen must be queried every time to create the keystore. This will add at least 1 extra API usage per upserted record.
Since a bulk query can be used to query 100,000 records per call, the expense is usually negligible for large data loads. However, for high-frequency real-time applications, this can quickly become an expensive addition.
One alternative is to use Jitterbit's cloud cache to store these IDs. There are some added complexities to using the cloud cache; since it allows for only 250 read/writes per second, the implementer must handle for the case that reading or writing fails.
Other alternatives are to use external persistence layers to maintain the keystore, or to use local storage if using a private agent.