Import a Jitterpak in Jitterbit Design Studio
To import a project that exists in the form of a Jitterpak, follow these steps:
-
Choose the Import Jitterpak option in the startup screen, or, if the client is already running, choose Import Jitterpak from the File menu. This opens the Jitterpak import wizard.
-
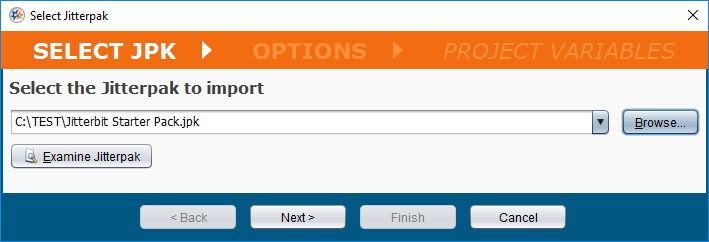
In the first step, Select JPK, you select the Jitterpak to import:
-
Enter the path to the location of the Jitterpak you want to import in the text field, or click the Browse button to browse to the location of the Jitterpak. You can also drag and drop the Jitterpak from Windows Explorer (if running on Windows) into the path field.
-
If you want to review the contents of the Jitterpak, click the Examine Jitterpak button. A pop-up window will show the location of the Jitterpak, the name of the project from which the Jitterpak was created, the date it was created, and the client version you must use to open the Jitterpak. Also shown are any additional comments that were specified when the Jitterpak was created.
-
If the Jitterpak is password protected, you must specify the correct password in order to open it or examine it. Check the Security checkbox to enable the password field.
Note
If you specified a password in the Security section, only those Jitterpaks that are protected by that password will be found.
-
-
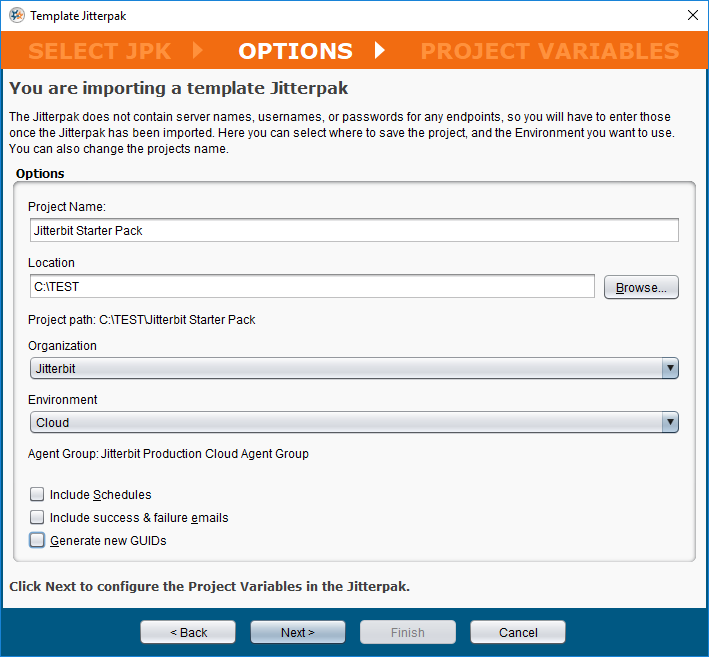
In the next step, Options, you set options that are configurable for the project:
-
Project Name: This is the name to give your project. It will be pre-populated with the name of the project from the Jitterpak, but you can change it.
Note
The Project Name cannot contain any of these special characters:
\ / : ? * " < > |.
-
-
Location: Select the folder in which to unpack the Jitterpak. Enter the location in the text field, or click the Browse button to browse to the location for the unpacked Jitterpak. This is pre-populated with the default project folder location. The complete Project path will be displayed beneath the Location.
-
Organization: Select the organization to which the project will belong.
-
Environment: Select the environment into which the project will be imported.
-
Agent Group: The agent group associated with the environment will be displayed beneath the selected environment.
-
Include Schedules: If the project contains schedules, you can choose to import them by checking this box. This option is not selected by default because any imported schedules will be active just as in the original project.
-
Include success & failure emails: If the project contains emails that are sent on success or failure of operations, you can choose to import them by checking this box.
-
Create new GUIDs: Selecting this option results in all project items in the Jitterpak, including the project itself, getting new GUIDs when you open the Jitterpak. This means that the unpacked project can be changed and deployed to the same server as the original project, without affecting the original project. With this option selected you can also rename the project. Leave the name field blank to keep the original name. Legacy (pre-Harmony) Jitterpaks will not have this option available.
-
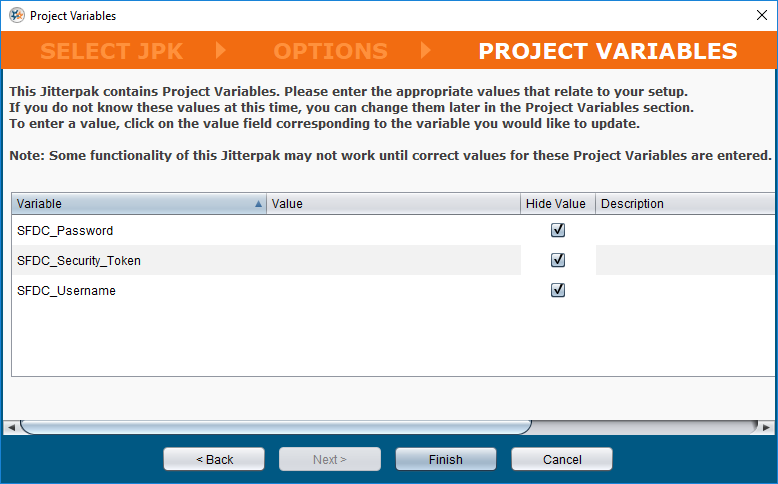
In the third step of the wizard, Project Variables, if the imported project has project variables, you can change them here. Project variables are often used to set environment-dependent values, such as host names, logins, or passwords.
Update the project variables as required for your project and environment. If you have downloaded a Jitterpak from Citizen Integrator, you will need to update endpoint credentials such as database, SMTP email server, username, and password to ones that you can access.
-
When you click Finish, the project will be imported into Jitterbit Studio and all its components will be accessible in the project items panel.
Note
The project must still be deployed before its operations can run. If you have not deployed the project prior to running an operation, you will be prompted to deploy the items in the project.