Autodesk Fusion Lifecycle connector Create
The Fusion Lifecycle Create function allows you to create new items in a Fusion Lifecycle workspace for use in Jitterbit integrations.
Note
All Fusion Lifecycle Connector Operations reside within a project. You will need to create a project before you can create an operation.
New Fusion Lifecycle Create
-
Click the Arrow to the right of the Connector icon in the top toolbar.

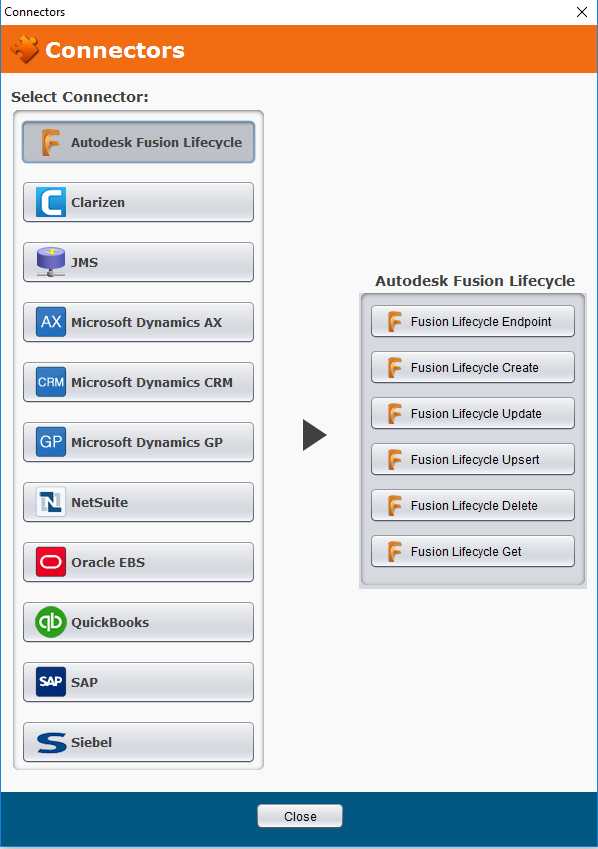
-
The pop-up menu displays all available connectors.
-
Click the Fusion Lifecycle Create function in the list.
-
The Fusion Lifecycle Create Wizard displays the Endpoint screen.
Fusion Lifecycle Create wizard
The Fusion Lifecycle Create Wizard guides you through the process of creating a new Create function. The first step is selecting a Fusion Lifecycle Endpoint.

-
Select the Fusion Lifecycle Endpoint.
-
Before you can create Fusion Lifecycle functions in Jitterbit, you must create at least one Fusion Lifecycle endpoint.
-
If you have not already created at least one Fusion Lifecycle Endpoint, Select Create New from the Available Fusion Lifecycle Endpoints drop-down list.
-
If you have already created one or more Fusion Lifecycle Endpoints, Select One Endpoint from the Available Fusion Lifecycle Endpoints drop-down list.

-
Click the Test Connection button.
-
If you have not already logged into your Jitterbit server, Type the Password in the Jitterbit Server Login pop-up window, and Click the Login button.
-
A pop-up window indicates the parameters were sent to the server and the test is in process followed by a pop-up window indicating the connection is successful. Click OK.
-
Click the Next button to display the Workspace screen and select a workspace.
-
To return to the previous screen, Click the Back button.
-
Click the Cancel button to close the wizard without saving your entries.
Select a workspace
The Workspace screen displays the list of all Fusion Lifecycle workspaces available to the tenant via the selected endpoint.

-
To filer, type the first few letters of the workspace description or the workspace ID number in the Filter box at the top of the screen to filter the list.
-
To refresh, Click the Refresh button in the lower right corner of the screen to restore the entire list of workspaces.
-
Click on the Name of the specific workspace to access. The selected workspace is the Object for the Fusion Lifecycle Create function.
-
Click the Finish button at the bottom of the screen to display the Fusion Lifecycle Create tab including the Request and Response XML structures.
-
To return to the previous screen, Click the Back button.
-
Click the Cancel button to close the wizard without saving your entries.
Request and response XML structures
The Request and Response XML structures are defined by the Fusion Lifecycle Create function and the structure of the specific workspace selected as the Object of the Create function. The Request XML structure is represented by a data tree of the fields available to create new items via the Fusion Lifecycle Create function. The Response XML structure is represented by a data tree of fields available within the new items to retrieve data values from.

-
The name of the Create function defaults to "Fusion Lifecycle Create" plus the name of the workspace selected as the Object (Item Categories(id:12) in this example).
- To rename the function, Type the Name in the Name field in the upper left corner of the screen.
-
Click the Save icon
 in the upper right corner of the screen.
 -
Click the Gray Arrows to the left of each folder or Double-Click on the Folder to expand and view the fields available in each structure.
-
To complete the Fusion Lifecycle Create function, Click one of the buttons in the "Use in an Integration" section in the upper right corner of the screen.
-
Create Operation: Displays the graphic workflow representation of the Create function, and allows access to the Create Request and Create Response wizards from within the workflow chart.
-
Create Request: Launches the Create Request Transformation Wizard.
-
Create Response: Launches the Create Response Transformation Wizard.
-
Create request transformation wizard
-
Click the Create Request button in the upper right corner of the tab.
-
The Transformation Wizard dialog displays.

-
The name of the Request Transformation automatically defaults to "Fusion Lifecycle Create", plus the name of the workspace object selected (Item Categories(id:12) in this example).
- Type the appropriate name in the Name field in the upper left corner of the screen.
-
Select the Source of the data for the Request from the drop-down list.
-
To create an item directly from the Jitterbit Studio, Select None. Selecting None activates the Finish button.
-
Selecting a different source type activates the Next button to continue defining the source structure.
-
-
Target: The target automatically defaults to the Fusion Lifecycle Create connector function and the workspace object (i.e. Item Categories(id:12)) selected in previous steps.
-
In this example we are creating the item directly from the Jitterbit Studio and selected None for the source.
-
Click the Finish button at the bottom of the screen to continue.
-
To return to the previous screen, Click the Back button.
-
Click the Cancel button to close the wizard without saving your entries.

-
-
Source data fields display in the left half of the screen. In this example a source was not selected.
-
Target data fields available in the selected workspace (i.e. Item Categories(id:12)) display in the right half of the screen.
-
Double-Click on the specific Target data field to be used for the Request.
-
For this example, the Category_Code field was selected.
-
The Formula Builder displays in the left half of the screen.

-
Type the formula or data value into the Formula Builder to create a specific item in the Fusion Lifecycle workspace.
-
In this example, the Fusion Lifecycle Create function will create an item category in which the CATEGORY_CODE field is set to a value of 955.
-
Click the Test button in the lower left corner to validate the script.
-
Click OK to complete the Request Transformation.

-
In this example we have also defined values in the new item category for the alias, versionID and CATEGORY.
-
A valid request to the specific data field is indicated by the presence of a green line and a blue square next to the field name.
-
Click the Save
icon in the toolbar in the upper right corner of the screen to save the Request Transformation. -
The Request Transformation is not active for use until it is deployed to the Jitterbit server. Click the Deploy
 icon in the toolbar in the upper right corner of the screen to deploy the Request Transformation to the Jitterbit Server.
 -
Click the Test Transformation
 icon in the lower left corner of the screen to test the Request Transformation.
 Note
This test function applies only to the Request, not the entire Operation. This test function is useful when a Source is part of the Request and the test identifies and displays the data available in the Source. In this example a Source is not used, and the test only displays the values entered in the Formula Builder.
-
If the Request Transformation has not been saved and deployed prior to testing, the following message will display:

-
Click the Continue button at the bottom of the pop-up message to deploy the Create function and the Request Transformation.

-
A message displays the progress of deploying the transformation to the Jitterbit server and testing the transformation.

-
The data values that will be used to create the new item category display to the right of the Target fields in the data tree.
-
In this example a Source is not used, and the test will only display the 1 set of values entered in the Formula Builder. In the cases where a Source file is part of the operation, you can toggle through a multi-entry item's values by clicking the appropriate folder's "1 of N" control. You can shift-click to go to a previous instance or right-click to go to an arbitrary instance.
Create response transformation wizard
-
Click on the Fusion Lifecycle Creates tab.
-
Click the Create Response button in the upper right corner of the tab.

-
The Transformation Wizard displays.

-
The name of the Response Transformation automatically defaults to "Fusion Lifecycle Create", plus the name of the workspace object selected in previous steps (Item Categories(id:12) in this example).
- Type the appropriate name in the Name field in the upper left corner of the screen.
-
The source automatically defaults to the Fusion Lifecycle Create Connector function and the workspace object selected in previous steps (Item Categories(id:12) in this example).
-
Select the Target for the response data from the drop-down list. This activates the Next button.
-
In this example we are sending the data to a Text file.
-
Click the Next button at the bottom of the screen to display the Target screen and define the file format.
-
To return to the previous screen, Click the Back button.
-
Click the Cancel button to close the wizard without saving your entries.

-
-
Available File Format Definitions: Select a file format from the drop-down list.
-
Select New File Format to create a new format. In this example, we are creating a new file format.
-
If you Select an existing file format from the drop-down list:
-
The file definition displays and the Finish button is activated.
-
Review the existing structure and edit the file segments/fields as necessary.
-
Click Finish to complete the file definition and continue creating the Response Transformation.
-
-
-
Type a name for the new file format definition in the Name field.
- In this example the file format definition is named Test Create Category.
-
If you are using an existing file as a template for the new file format:
-
Click the Create From File button in the bottom left corner of the screen.
-
A pop-window displays the dialog to create a new file format from an existing template file.
-
-
In this example, we are creating the new file format manually.
-
Click the appropriate radio button to select Simple or Complex text file.
-
Click the appropriate radio button to select Character Delimited or Fixed Field Widths.
-
Click the Create Manually button to Define Segment Properties.

-
-
Click the New button on the left side of the screen to start adding fields to the file format.
-
Type the Name of the field in the Field Name box.
-
The field type defaults to String.
- Select the appropriate Type from the drop-down list.
-
Field validation is optional for each field.
-
Click the Validation
 button to the far right of the field to display the validation pop-up window.
 -
Click the New button to add the next field, and repeat the Field Name and Type steps above to add all of the desired fields.
-
Click the Review Structure button in the lower left corner to review the file format.

-
Click OK to close the pop-up window.
-
Click the Finish button at the bottom of the Transformation Wizard tab to save the new file definition and display the Response Transformation screen.
-
To return to the previous screen, Click the Back button.
-
Click the Cancel button to close the wizard without saving your entries.

-
-
The Fusion Lifecycle Create XML structure displays in the left half of the screen as the data Source and the Response file format displays in the right half of the screen as the Target.
-
Double-Click (or Click on the + sign) to expand the jbresponse data tree on the left side of the screen.
-
Drill down in the data tree and select the Source fields to be mapped to the Target.

-
Click on the desired data Field in the Source (left column).
-
Drag-and-Drop the selected field onto the appropriate Field in the Target (right column).
- In this example, the Value of the Action field from the Source is mapped to the Action field in the Target text file.

-
Valid mapping is indicated by green lines between items in the Source and Target columns and, in addition, by the presence of a blue square next to each validly mapped field name.
-
A red line indicates invalid mapping.
-
A yellow line indicates that Jitterbit isn't sure if the mapping is valid, but will attempt the transformation with this mapping.

-
-
Complete the mapping on the Transformations tab by dragging and dropping from the Source on the left to the Target on the right. When you do so, a green line will connect each Source item and Target item, and a blue square will appear to the left of both the Source item and the Target item.
-
To exit this screen, Click the X in the upper right corner of the tab.
-
Click the Save
icon in the toolbar in the upper right corner of the screen to save the Response Transformation. -
The Response is not active for use until it is deployed to the Jitterbit server. Click the Deploy
icon in the toolbar in the upper right corner of the screen to deploy the Response Transformation to the Jitterbit Server. -
Click the Test Transformation
icon in the lower left corner of the screen to test the Response function.Note
This test function applies only to the Response, not the entire Operation. This test function may require you to load test data in order to complete the process.
-
If the Response Transformation has not been saved and deployed prior to testing, the following message will display:

-
Click the Continue button at the bottom of the pop-up message to deploy the Response Transformation and the Test Create Category file format.

-
A message displays the progress of deploying the transformation to the Jitterbit server and testing the transformation.
Create operation
Operations are used to define what your integration process will do and when it will be done. Operations can call one another based on events such as On Success or On Failure, based on defined conditions, or based on a time schedule.
-
Click on the Fusion Lifecycle Creates tab.

-
Click the Create Operation button in the upper right corner of the screen.
-
The Operations tab displays the workflow graphic representing the Fusion Lifecycle Create function.

Request
-
Double-Click on the Request box in the workflow chart.

-
The Select Transformation pop-up window displays a list of existing Request Transformations.
- To select an existing Request, Click on the Name of a Request in the list.
- In this example the My Fusion Lifecycle Create Item Categories(id:12) – Request is selected.
- Click on the OK button at the bottom of the pop-up window to continue creating the operation.
- Click the Cancel button at the bottom of the pop-up window to close the window.
- To create a new Request, Click the Create New Transformation button to launch the Create Request Transformation Wizard tab.
- The name of the selected Request displays in the Request workflow box.
- In this example, the My Fusion Lifecycle Create Item Categories(id:12) – Request was selected. This Request was created without a Source (None was selected as the Source). As a result, the Source box is automatically removed from the Operation workflow chart.
Response
-
Double-Click on the Response box in the workflow chart.

-
The Select Transformation pop-up window displays a list of existing Response Transformations.
-
To select an existing Response, Click on the Name of a Response in the list.
- In this example the My Fusion Lifecycle Create Items Categories(id:12) – Response is selected.
- Click on the OK button at the bottom of the pop-up window to continue creating the operation.
- Click the Cancel button at the bottom of the pop-up window to close the window.
-
To create a new Response, Click the CreateNew Transformation button to launch the Create Response Transformation Wizard tab.
-
The name of the selected Response, My Fusion Lifecycle Create Items Categories(id:12) – Response, displays in the Response workflow box.
Target
-
Double-Click on the Target box in the workflow chart.

-
The Select Target pop-up window displays a list of existing Files.
-
To select an existing File, Click on the Name of a File in the list.
- Click on the OK button at the bottom of the window to continue creating the operation.
- Click the Cancel button at the bottom of the window to close the window.
-
To create a new File, Click the CreateNew Target button to launch the Targets tab.

-
Name: Type a name for the new Target in the Name field. In this example the Target is named Test Create Category.
-
Type: Select the file type from the drop-down list. In this example, the file format created for the operation is a text file and type is Local File.
-
Folder: Click the Browse button. Browse to and select the appropriate folder.
-
Name File(s): Type the Name of the target file in the Name File box. In this example the file name is Test Create Category.txt.
-
The name of the Target, Test Create Category.txt, displays in the Target workflow box.

-
The name of the associated function displays in each component of the workflow chart:
- Request: My Fusion Lifecycle Create Item Categories(id:12) - Request
- Response: My Fusion Lifecycle Create Item Categories(id:12) - Response
- Target: Test Create Category
-
Click the Save
icon in the toolbar in the upper right corner of the screen to save the Operation. The Operation is not active for use until it is deployed to the Jitterbit server. -
Click the Deploy
icon in the toolbar in the upper right corner of the screen to deploy the Operation to the Jitterbit Server.
Test from response transformation
-
Click the Transformations tab.

-
A pop-up screen displays each of the associated transformations.
-
Click on the Response Transformation pop-up window to display full size window.
-
Click on the Test Operation that uses Transformation icon
 in the lower left corner of the screen.
-
The entire operation workflow is processed and the results display in the Target column on the Response screen.

-
The response data values display to the right of the Target fields in the data tree. In this example, the Action performed = Create and Success = True. The operation successfully created Category Code 955.
-
In this example a Source is not used, and the test will only display the 1 set of values. In the cases where a Source file is part of the operation, you can toggle through the list of multiple result values by clicking the appropriate folder's "1 of N" control. You can shift-click to go to a previous instance or right-click to go to an arbitrary instance.
-
The operation also created Test Create New Item.txt that contains the same results that display to the Transformation Response screen.
Test from operation
-
Click on the Operations tab.

-
Click the Lightning Bolt
 icon in the upper right corner of the screen to place the Operation in the queue for execution.
 -
The Operation monitor displays at the bottom of the screen.
-
A progress bar displays in the far right corner as the Operation is running.
-
The execution statistics also display in the Operation monitor: Status, Time Received, Time Started, Time Done and Duration.
-
Launch a Text Editor and Open the Test Create Category.txt to view the results of the operation.