Four51 connector Patch Update
The Four51 patch update activity available within the Four51 connector allows you to update existing data in Four51 via the OrderCloud API. Unlike the Four51 update activity, the Four51 patch update activity allows you to update only those fields you want to update, rather than all fields for the associated object.
Partially updating or fully updating object fields is an important difference between the Four51 patch update and Four51 update activities. If instead you want to replace all fields, or create a new record if none exists, refer to Four51 connector update.
Note
Before you set up a Four51 patch update operation, you will need to have a Four51 endpoint defined. For more information on creating an endpoint, see Four51 connector endpoint.
This page describes how to update several existing object fields in Four51 using an example of partially updating an existing buyer address using Jitterbit. This example updates the same buyer address that was created as an example within Four51 connector create and replaced within Four51 connector update.
Important
This example is used for demonstration purposes only and does not cover all options available in the product; please refer to Design Studio for more comprehensive documentation.
The following sections are divided up into beginning the patch update activity, defining the operation components, and deploying and executing the operation.
Creating a Four51 Patch Update operation
Note
If you are not already familiar with Jitterbit, see Get started or Design Studio for detailed information on how to use the product.
-
Within your project within Jitterbit Studio, there are several ways to begin a new Four51 patch update activity. Each of the following options will start the Four51 Patch Update Wizard to guide you through the process.
- Go to File > New > Connectors > New Four51 Patch Update.
- In the tree on the left under Connectors, right-click on the Four51 category, then select New Four51 Patch Update.
- In the tree on the left under Connectors, double-click on the Four51 category, then right-click on Four51 Patch Update Activities and select New Four51 Patch Update.
- In the top toolbar, click the connector icon (orange jigsaw piece)
 . In the popup, select Four51, then select Four51 Patch Update.
-
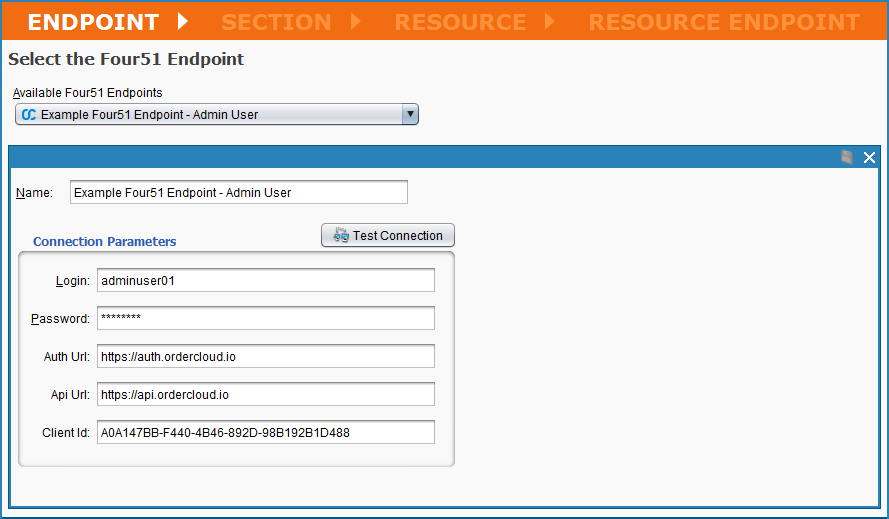
The Endpoint screen of the Four51 Patch Update Wizard should open in the main view of Studio. This screen asks to select the endpoint that you would like to get patch update data in. You should have already set up your endpoint in Four51 connector endpoint. Use the dropdown to select the appropriate endpoint. Click Next when finished.
-
The next screens in the Four51 Patch Update Wizard help you drill down to the specific object you want to patch update data in. The first of these screens, Section, asks you to select one of the listed top-level categories within Four51: "Authentication," "Buyer," "Ordering," "Organization," or "UserPerspective."
Note
You can figure out which selections to make by referencing the OrderCloud API. For example, these five top-level categories correspond directly with those listed on the left side of the OrderCloud API Console. The remaining object selection screens also follow the organization of the OrderCloud API.
In the example, we want to partially update an existing buyer address, so we select the "Buyer" section and click Next to continue.

-
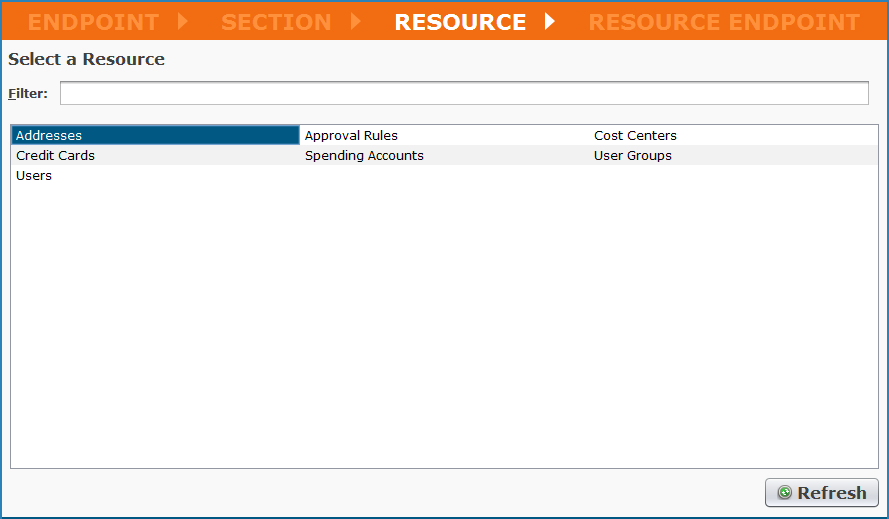
The next screen in the Four51 Patch Update Wizard, called Resource, displays the resources available within the selected section. In the example, since we want to partially update an existing address, we select "Addresses" and click Next to continue.
-
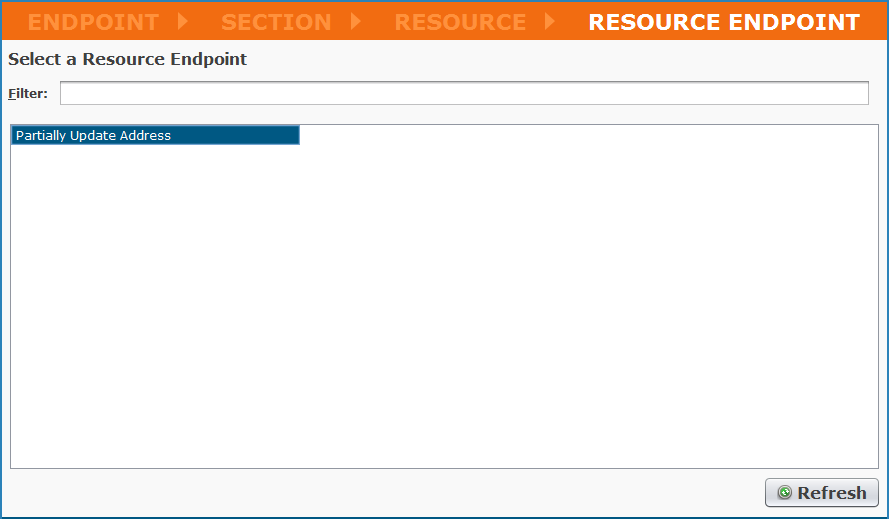
The final selection screen in the Four51 Patch Update Wizard, called Resource Endpoint, displays the final objects available for the selected resource. In the example, to partially update an existing address, we select the "Partially Update Address" option. Click Finish to continue.
Note
The resource endpoints available for each section resource depend on the type of Four51 activity selected for the operation (i.e. create, read, update, patch update, or delete activity).
-
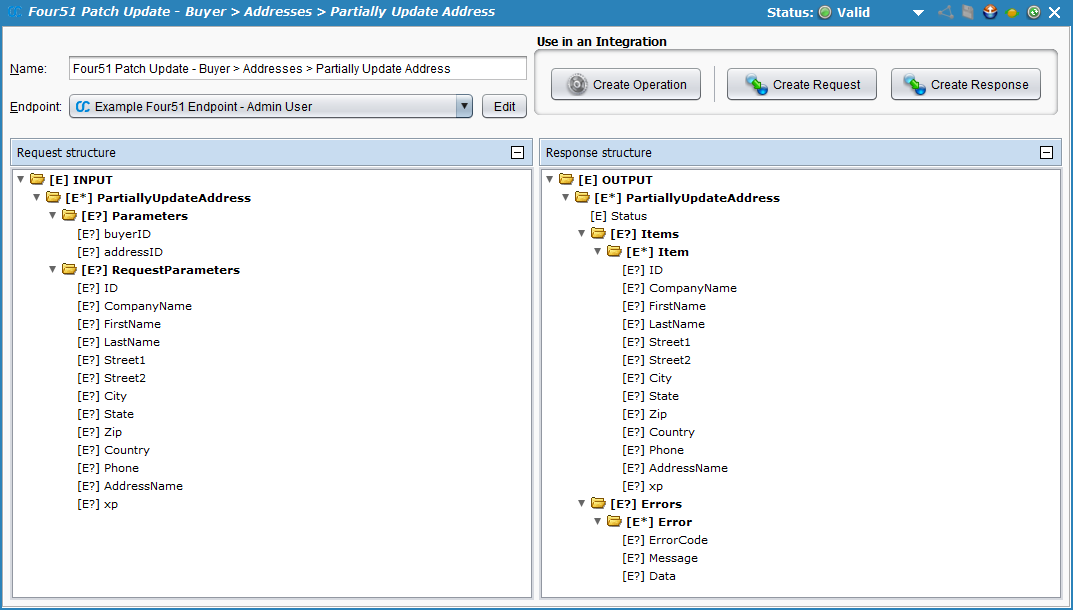
Jitterbit will then proceed with creating an API request and response structure that will allow data to be updated via the OrderCloud API. A new tab should appear in Studio called Four51 Patch Update Activities. You can rename your patch update activity here if desired; in the example ours is called "Four51 Patch Update - Buyer > Addresses > Partially Update Address." You can also use the + - buttons or arrows to expand all elements within each structure.
Note
The "xp" in the structure above stands for "Extended Properties" and is part of the OrderCloud API. This property allows you to add custom fields to most objects. To learn more about how to use the XP property, see Four51 connector advanced.
-
Next, on the same screen, click the button Create Operation located under Use in an Integration in the upper right corner. This will create the Jitterbit operation that will partially update an existing buyer address in Four51. The specified fields to update will be defined during the transformation part of the operation described in the next section below.
-
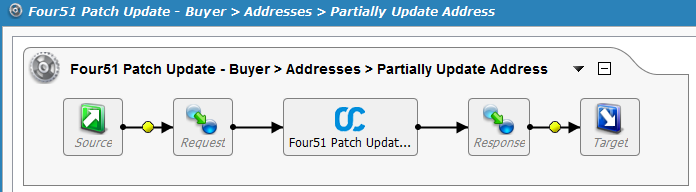
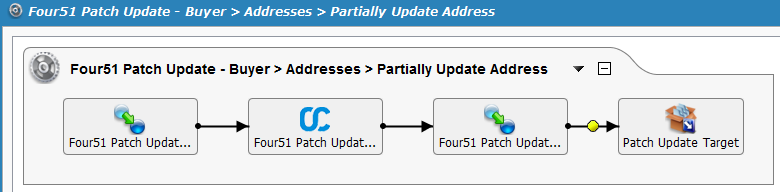
A new tab should open in Studio called Operations, containing a graphical representation of the patch update activity.
Note
The icons for Source, Request, Response, and Target in the image above are placeholders for the operation components, which we will define in the next section.
Save your operation by clicking either the single disk icon to save just this operation or the multiple disk icon to save all changes in your integration project. You should see the asterisk on the Operations tab and operation title disappear as your new patch update activity is now created and saved to your project.
Defining the operation components
Next we need to define the other components of the operation that appear within the graphical representation, including Source, Request, Response, and Target.
You can either return to the graphical representation of the operation you have created and double-click each icon to configure each component, or you can create the Source, Request, Response, and Target separately and then drag and drop them from the tree on the left directly onto the icons in the visual representation of your operation.
Many different types of data can be used for each component of the operation. To learn more about additional customization options, refer to the Design Studio section of our documentation.
-
Source: For purposes of simplifying this example, the source will be hard-coded. Therefore we will remove the source by right-clicking on the source icon in the operation graph and selecting Remove From Graph.
Note
A variety of source types are available in Jitterbit. See Sources for more.
-
Target: Double-click on the Target icon. In the example, we will record the response from the OrderCloud API to a temporary text file to provide information about success/failure. Click the Create New Target button, give your target a Name (e.g. 'Patch Update Target'). Next, for this example we want to write to the default temporary storage location on our private agent, so we select a Type of "Temporary Storage" and enter a Filename of 'Patch_File.txt' for the example.
Note
You can also output to a variety of different target types. The type does not have to be the same as the source type. See Targets for options.
-
Request: Double-click on the Request icon and select Create New Transformation. This will open the Transformation Wizard which will walk you through creating the request.
Note
Additional information on request structures is provided under Transformations.
-
On the first screen, Name, provide a Name for your transformation or leave as the default. Then use the Source dropdown to select the source for the transformation. In the example our source is hard-coded so we will select "None." Click Finish to continue.
-
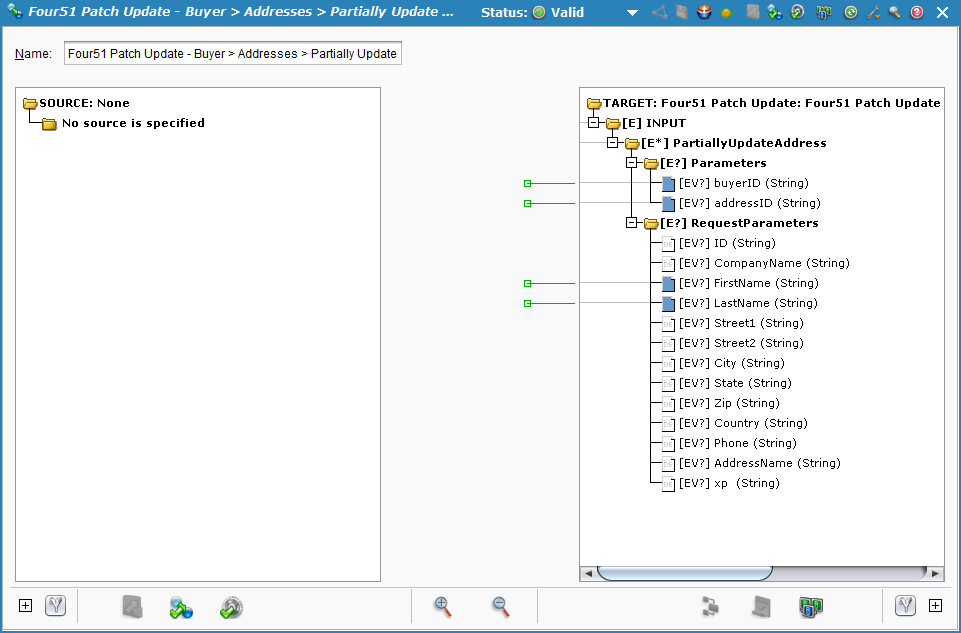
The Transformations tab should open where you can complete your mapping. Use the + to expand the items in the target tree on the right. In a standard transformation, you would drag and drop each field you would like to be mapped from one tree to the other. For this example, to hard-code the source, double-click each field in the target side and type the following values used in the example into the script:
TARGET: INPUT > PartiallyUpdateAddress > Parameters Script buyerID <trans>"TestBuyerID0001"</trans>addressID <trans>"TestAddressID0000"</trans>Note
The buyerID above is the existing ID of the Buyer Organization that the address is within, and the addressID above is the existing ID of the new address that was created during the Four51 connector create example.
TARGET: INPUT > PartiallyUpdateAddress > RequestParameters Script FirstName <trans>"Updated First"</trans>LastName <trans>"Updated Last"</trans>Note
The fields listed above, originally created during the Four51 connector create example and replaced during the Four51 connector update example, will be updated with the new provided values. The remaining fields for the object will not be updated.
After hard-coding the source, your transformation mapping should look similar to that shown below.
-
-
Response: Double-click on the Response icon and select Create New Transformation. This will open the Transformation Wizard which will walk you through creating the response.
Note
Additional information on response structures is provided under Transformations.
-
On the first screen, Name, provide a Name for your transformation or leave as the default. Then use the Target dropdown to select the target for the transformation. In the example we want to use the response from the OrderCloud API, so we select "Four51 Function Response." Click Next to continue.
-
On the next screen, Target, select the radio button for the type of activity you want to use the response from. In this case, we want to use the response from the patch update activity we have just set up, so choose "Patch_update." Click Next to continue.
-
The Target screen will now display a dropdown menu to select the activity. Choose the patch update activity you have just set up. The request and response structures associated with the selected patch update activity should now appear. Click Finish to continue.
-
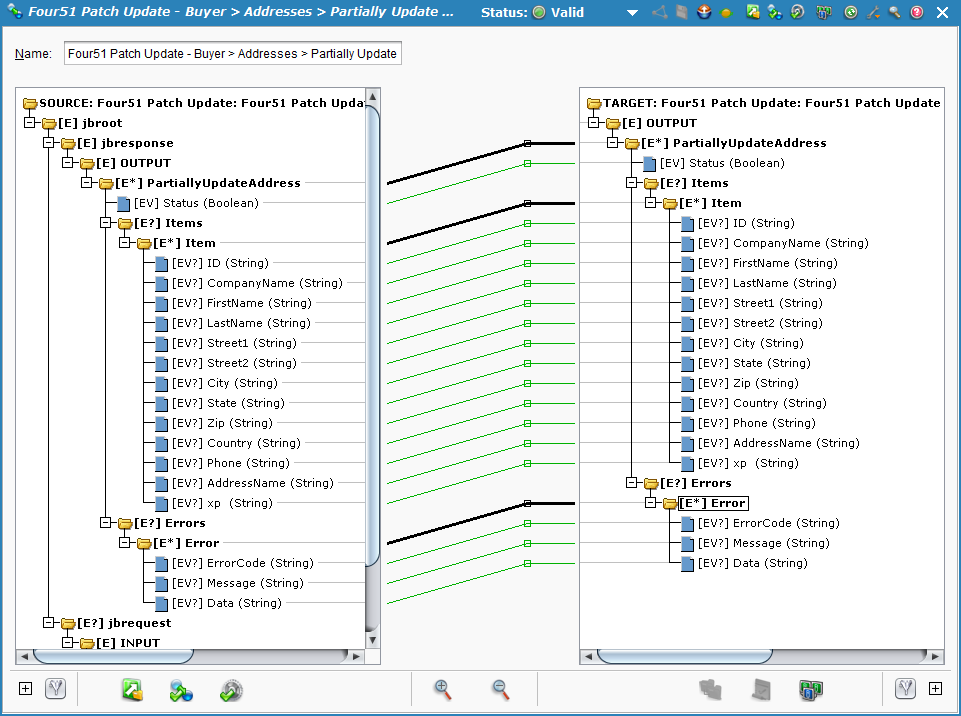
The Transformations tab should open where you can complete your mapping. Use the + to expand the source and target sides. Click and drag the "OUTPUT" folder from the left side (source side) to the "OUTPUT" folder on the right side (target side). Your mapping screen should now look similar to that below.
-
Your configured operation should look similar to the example shown below.
Deploying and executing the operation
With the Four51 patch update activity fully configured, we are ready to deploy and execute the operation.
-
From the Operations tab, click the deploy
 icon.
icon. -
Then click the execute
 icon to place the operation in the queue for execution.
 -
In the lower portion of the screen, the Operation monitor should indicate that your operation was run successfully. If not, you can double-click the Status icon to view any log messages.

-
You should also now see the output response that was mapped to your target file 'Patch_File.txt'. In the example, the file is now created in temp storage on the private agent (i.e. default '/tmp/jitterbit/TemporaryStorage' for Linux or 'C:\Windows\Temp\Jitterbit\' for Windows). The status of '1' indicates the operation was successful.
<?xml version="1.0" encoding="UTF-8"?> <ns:OUTPUT xmlns:ns="urn:F51oln-res:document:F51oln:oln:entities"> <PartiallyUpdateAddress> <Status>1</Status> <Items> <Item> <ID>TestAddressID0000</ID> <CompanyName>Test 2 Company</CompanyName> <FirstName>Updated First</FirstName> <LastName>Updated Last</LastName> <Street1>1234 Main Street</Street1> <City>Los Angeles</City> <State>CA</State> <Zip>654321</Zip> <Country>US</Country> <Phone>987654321</Phone> <AddressName>Test_2_Address</AddressName> </Item> </Items> </PartiallyUpdateAddress> </ns:OUTPUT> -
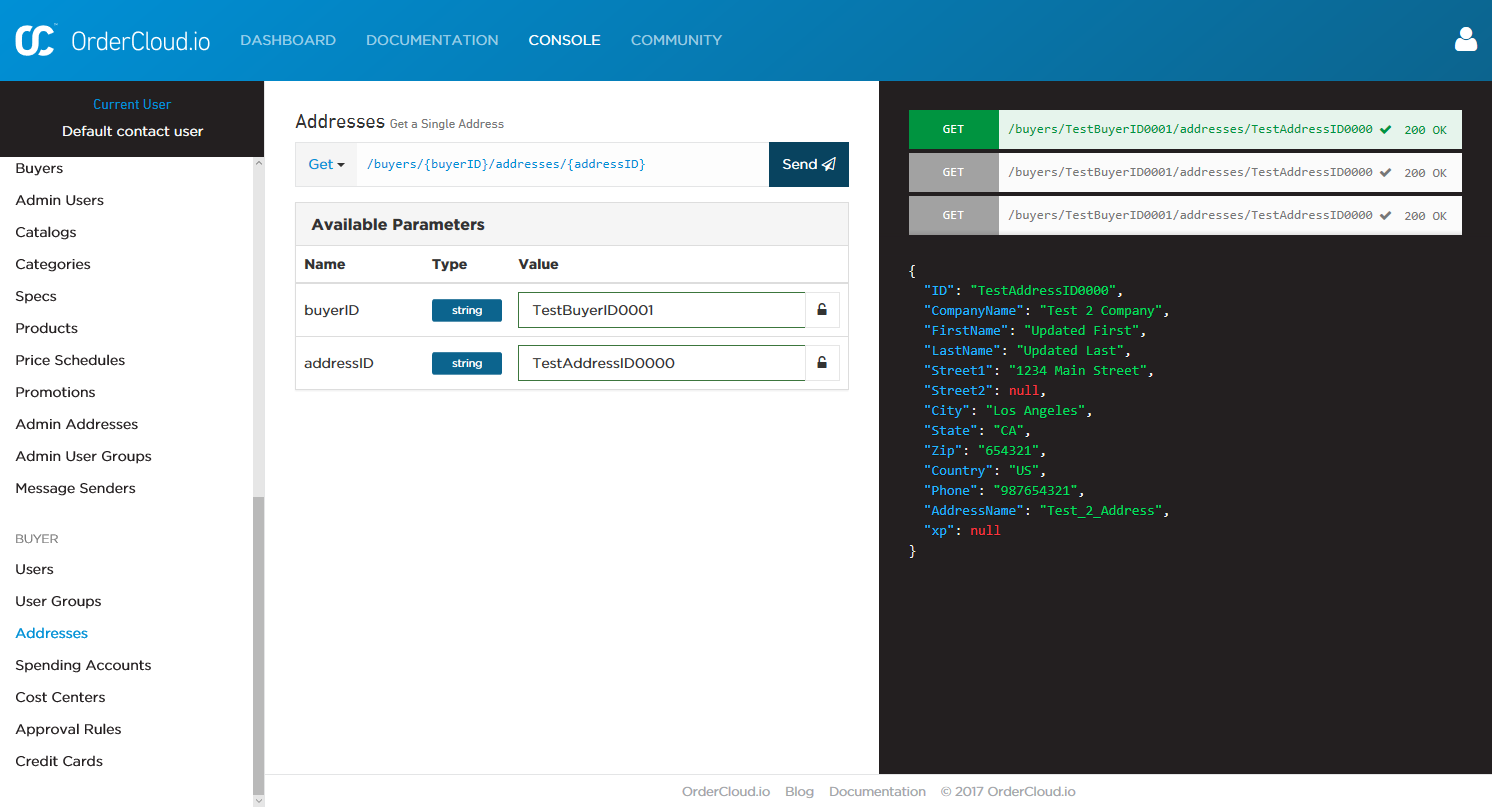
In addition, when you check the OrderCloud API Console under Buyer > Addresses, you should find the buyer address updated with the new information.