Enable RabbitMQ provider with JMS
Introduction
By default, the Harmony JMS Connector establishes access to JMS using ActiveMQ. Additional JMS providers can also be used. This page summarizes how to establish access to JMS using RabbitMQ.
Note
A RabbitMQ provider can be used only with projects that use Harmony private agents.
Prerequisites
These JAR files must be downloaded onto your private agent as described below:
amqp-client-5.8.0.jarfscontext-4.6-b01.jargeronimo-jms_1.1_spec-1.1.1.jarrabbitmq-jms-2.1.0.jarslf4j-api-1.7.30.jar
A .bindings file must be created with these definitions:
# Define the Connection Factory object
ConnectionFactory/ClassName=javax.jms.ConnectionFactory
ConnectionFactory/FactoryName=com.rabbitmq.jms.admin.RMQObjectFactory
ConnectionFactory/RefAddr/0/Content=jms/ConnectionFactory
ConnectionFactory/RefAddr/0/Type=name
ConnectionFactory/RefAddr/0/Encoding=String
ConnectionFactory/RefAddr/1/Content=javax.jms.ConnectionFactory
ConnectionFactory/RefAddr/1/Type=type
ConnectionFactory/RefAddr/1/Encoding=String
ConnectionFactory/RefAddr/2/Content=com.rabbitmq.jms.admin.RMQObjectFactory
ConnectionFactory/RefAddr/2/Type=factory
ConnectionFactory/RefAddr/2/Encoding=String

# Define the location of the broker, likely localhost, and the VirtualHost these resources will reside in
# Replace HOST_NAME with the host name for RabbitMQ
ConnectionFactory/RefAddr/3/Content=HOST_NAME
ConnectionFactory/RefAddr/3/Type=host
ConnectionFactory/RefAddr/3/Encoding=String
ConnectionFactory/RefAddr/4/Content=regression
ConnectionFactory/RefAddr/4/Type=virtualHost
ConnectionFactory/RefAddr/4/Encoding=String

# Define an example Queue
queue1/ClassName=javax.jms.Queue
queue1/FactoryName=com.rabbitmq.jms.admin.RMQObjectFactory
queue1/RefAddr/0/Content=jms/Queue
queue1/RefAddr/0/Type=name
queue1/RefAddr/0/Encoding=String
queue1/RefAddr/1/Content=javax.jms.Queue
queue1/RefAddr/1/Type=type
queue1/RefAddr/1/Encoding=String
queue1/RefAddr/2/Content=com.rabbitmq.jms.admin.RMQObjectFactory
queue1/RefAddr/2/Type=factory
queue1/RefAddr/2/Encoding=String
queue1/RefAddr/3/Content=queue1
queue1/RefAddr/3/Type=destinationName
queue1/RefAddr/3/Encoding=String
Enabling RabbitMQ with JMS
Follow these steps to enable RabbitMQ with JMS:
-
Navigate to Jitterbit Agent > Connectors > JMS > Providers. In the Providers directory, create a new folder named
RabbitMQ. To this folder add the.bindingsfile with the updatedHOST_NAMEand the JAR files listed in Prerequisites. -
Navigate to
<JITTERBIT_HOME>/Connectors/JMS, replacing<JITTERBIT_HOME>with your private agent root directory. Your private agent root directory is usually in one of these default locations:- Windows:
C:\Program Files\Jitterbit Agent - Linux:
/opt/jitterbit
- Windows:
-
Add a new
<Provider>element toJMS_ProviderInfo_User.confwith these entries:Field Description <name>The name of the provider. The name must be unique. This name will show up in the JMS Provider connection parameter when configuring a JMS endpoint. <java.naming.factory.initial>The value of this JNDI property must be the fully qualified class name of the factory class that will create an initial context. <java.naming.provider.url>The value of this JNDI property must be the path of the RabbitMQfolder created in step 1.<factoryName>The name of the connection factory that has been configured on the service provider. <pathOfProviderJars>The absolute path of the directory where the provider JAR files are placed in step 1. These are examples of the
<Provider>element to be added toJMS_ProviderInfo_User.conf:Windows Example<Provider> <Name>RabbitMQ</Name> <java.naming.factory.initial>com.sun.jndi.fscontext.RefFSContextFactory</java.naming.factory.initial> <java.naming.provider.url>C:\Program Files\Jitterbit Agent\Connectors\JMS\Providers\RabbitMQ</java.naming.provider.url> <factoryName>ConnectionFactory</factoryName> <pathOfProviderJars>C:\Program Files\Jitterbit Agent\Connectors\JMS\Providers\RabbitMQ</pathOfProviderJars> </Provider>Linux Example<Provider> <Name>RabbitMQ</Name> <java.naming.factory.initial>com.sun.jndi.fscontext.RefFSContextFactory</java.naming.factory.initial> <java.naming.provider.url>file://localhost/opt/jitterbit/Connectors/JMS/Providers/RabbitMQ</java.naming.provider.url> <factoryName>ConnectionFactory</factoryName> <pathOfProviderJars>/opt/jitterbit/Connectors/JMS/Providers/RabbitMQ</pathOfProviderJars> </Provider>Note
These entries should be placed at the bottom of
JMS_ProviderInfo_User.confbetween the arrow-->and</Providers>. -
Restart the agent:
- Linux: See Restart agent in Install a Harmony Linux agent.
- Windows: See Restart agent in Install a Harmony Windows agent.
-
Once the agent is running, you will be able to create a new JMS endpoint with the option to select RabbitMQ as the provider:
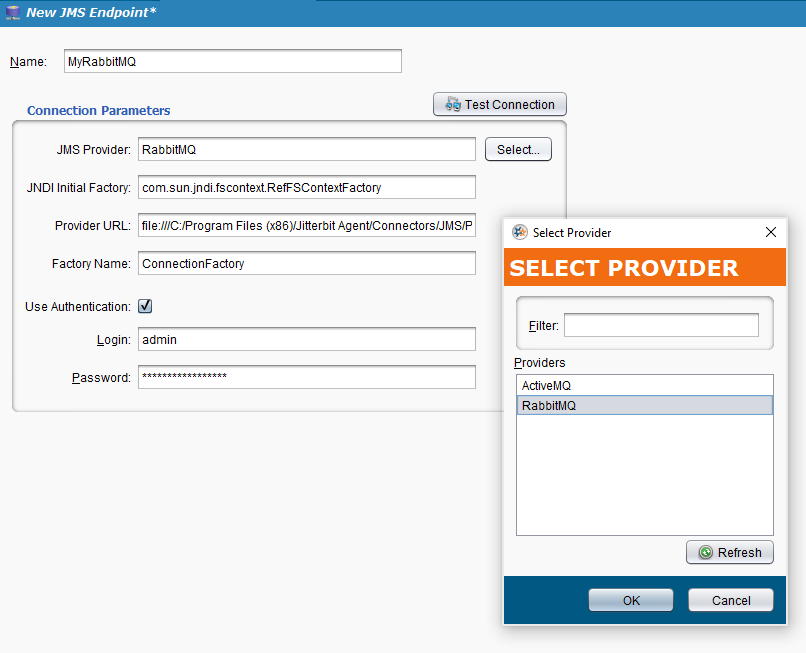
For more information on creating JMS endpoints, see JMS connector creating endpoints.