JMS connector installation and setup
Installing the JMS connector
Note
Currently, the JMS Connector may only be used with integrations that use Jitterbit private agents.
The JMS Connector was added to the Jitterbit private agents as of version 8.6.0.0. To use this connector, you must be using an agent version that is greater than or equal to version 8.6.0.0.
The JMS Connector is included in Jitterbit Design Studio as of Jitterbit agent version 8.12.
Configuration instructions differ depending on the version of the private agent you are using:
If you need to download and install either a Jitterbit private agent or Jitterbit Design Studio, see these instructions:
Setting up the JMS connector for Jitterbit version 8.6.0.0 through 8.11
In order for JMS providers to be available within the Jitterbit Design Studio versions 8.6.0.0 through 8.11, a configuration file JMS_ProviderInfo.confneeds to be created with the desired providers.
Note
If you are using a Jitterbit private agent version 8.12 or higher, see these instructions instead.
The file JMS_ProviderInfo.conf is to be located in the root of the private agent installation. If the file is not there, create a file with that name and these contents:
<ProviderConfig>
  <Providers>
    <Provider>
      <Name>ActiveMQ</Name>
      <java.naming.factory.initial>org.apache.activemq.jndi.ActiveMQInitialContextFactory</java.naming.factory.initial>
      <java.naming.provider.url>tcp://localhost:61616</java.naming.provider.url>
      <factoryName>ConnectionFactory</factoryName>
      <pathOfProviderJars>C:\Program Files (x86)\Jitterbit Agent\Connectors\JMS\Providers\ActiveMQ</pathOfProviderJars>
    </Provider>
  </Providers>
</ProviderConfig>
This will configure the JMS Connector to use Apache ActiveMQ as a provider, running on the local computer, with the provider JAR to be located in the directory provided by the property pathOfProviderJars.
The provider JAR file needs to be available in the location specified by the property pathOfProviderJars. Copy the required JAR files to that location, and restart the private agent.
If additional providers are required, they can be added to the same configuration file.
Setting up the JMS connector for Jitterbit version 8.12 and higher
As of Jitterbit private agent version 8.12, Apache ActiveMQ has automatically been set up as a JMS provider. Additional providers may be added by adding their configuration information to the file JMS_ProviderInfo_User.conf, which is placed in the ${JITTERBIT_HOME}/Connectors/JMS directory.
Note
Do not modify the file JMS_ProviderInfo.conf if using Jitterbit version 8.12 and higher. Modifying the file JMS_ProviderInfo.conf only applies to versions prior to Jitterbit version 8.12. Use the JMS_ProviderInfo_User.conf instead for your configurations.
To register a new JMS Provider with Jitterbit, follow these steps:
- Place the provider jar(s) in a location on the file system of the private agent(s).
-
Add a new
<Provider>element in theJMS_ProviderInfo_User.confwith this information:Name:The name of the provider. Must be unique. This name will show up in the provider selection UI. Changing the name will break existing JMS operations that use this provider in their endpoint page; to fix it, all the endpoints using this provider must be updated by re-selecting the provider, using its new name, and then re-deploying.java.naming.factory.initial:The value of this JNDI property must be the fully-qualified class name of the factory class that will create an initial context.java.naming.provider.url:The value of this JNDI property must be a URL string of the service provider to use.factoryName:The name of the connection factory that has been configured on the service provider.pathOfProviderJars:The absolute path of the directory where the provider jars were placed in step 1. Make sure that you do not place the JMS API JAR in this location. The Jitterbit agent already loads thejavax.jms-api-2.0.jaron start-up.destination: A list of semi-colon separated destinations that map a queue name or topic used in the Jitterbit project to external names at the provider service (optional; ignored if empty or missing). Available as of Jitterbit private agent version 9.0, the JMS Listen activity of the JMS Connector supports JNDI context lookup for JMS destinations. -
Restart the Jitterbit Tomcat Server of the private agent (or restart the private agent itself).
On Windows OS, you restart the corresponding service in the Windows OS Services control panel. To restart all services, you can use the "Stop…" and "Start Jitterbit Services" in the Windows Start Menu.
On Linux, the commands to restart the Tomcat Server are:
# /sbin/service jitterbit stop_tomcat# /sbin/service jitterbit start_tomcat
Configuration examples
Two configuration examples are provided:
Example: Adding Tibco messaging
To add a Tibco queueing provider that is running on the local machine, add these entries to the file JMS_ProviderInfo_User.conf:
<ProviderConfig>
  <Providers>
    . . .
    <Provider>
      <Name>Tibco EMS</Name>
      <java.naming.factory.initial>com.tibco.tibjms.naming.TibjmsInitialContextFactory</java.naming.factory.initial>
      <java.naming.provider.url>tcp://localhost:7222</java.naming.provider.url>
      <factoryName>ConnectionFactory</factoryName>
      <pathOfProviderJars>C:\Program Files (x86)\Jitterbit Agent\Connectors\JMS\Providers\Tibco</pathOfProviderJars>
    </Provider>
    . . .
  </Providers>
</ProviderConfig>
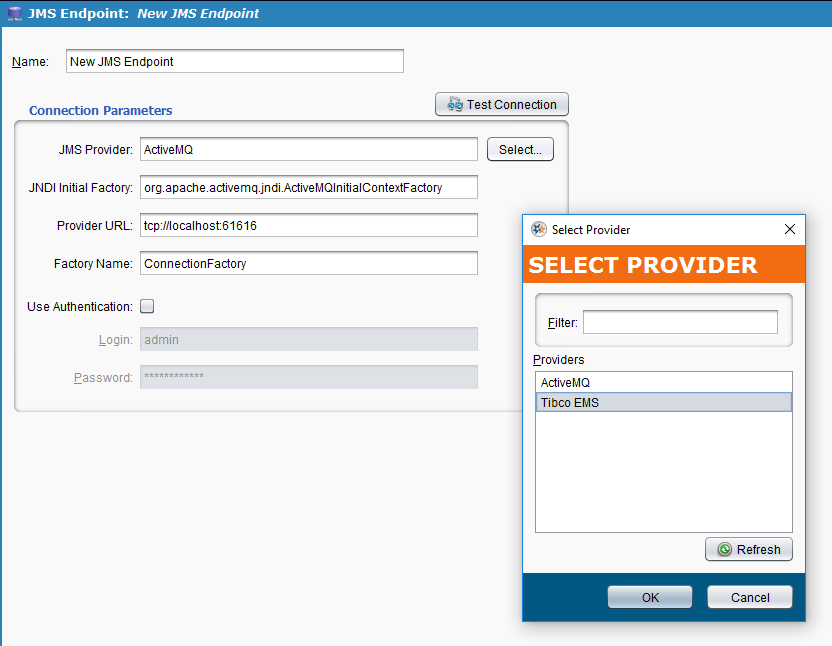
The user will now have the option, in the Jitterbit Design Studio, of selecting from two different providers for a JMS endpoint, either ActiveMQ or Tibco EMS:
Example: Adding ActiveMQ with context lookup for destinations
To add an Apache ActiveMQ provider that is running on the local machine with context lookup for destinations, add these entries to the file JMS_ProviderInfo_User.conf:
<ProviderConfig>
  <Providers>
    . . .
    <Provider>
      <Name>Mapped ActiveMQ</Name>
      <java.naming.factory.initial>org.apache.activemq.jndi.ActiveMQInitialContextFactory</java.naming.factory.initial>
      <java.naming.provider.url>tcp://localhost:61616</java.naming.provider.url>
      <factoryName>ConnectionFactory</factoryName>
      <pathOfProviderJars>C:\Program Files (x86)\Jitterbit Agent\Connectors\JMS\Providers\ActiveMQ</pathOfProviderJars>
      <destinations>queue.NewQueue=MyExampleQueue;topic.NewTopic=MyExampleTopic</destinations>
    </Provider>
    . . .
  </Providers>
</ProviderConfig>
In this example, the<destinations> element causes the queue "NewQueue" used in the Jitterbit project will be mapped to "MyExampleQueue" on the ActiveMQ instance; similarly, the topic "NewTopic" used in the Jitterbit project will be mapped to "MyExampleTopic". This allows the code of the project to be decoupled from the configuration.
You can use either "NewQueue" or "NewTopic" as the destination name in Jitterbit Design Studio and it will be translated to either "MyExampleQueue" or "MyExampleTopic". If everything is setup correctly, "MyExampleQueue" or "MyExampleTopic" should show up in the ActiveMQ management console. If you do end up with a queue or topic named "NewQueue" or "NewTopic", then something is incorrect with the setup. When a lookup fails, it will use these destination names as literals and attempt to create them.
JMS connector notes
-
Place all the relevant provider JARs in the
pathOfProviderJarslocation. -
Do not place the JMS API JAR in the
pathOfProviderJarslocation. The JMS API JAR is already shipped with and installed by the installer. -
Restart the private agent after any configuration file changes. Though changes to the JMS configuration will be picked up dynamically for JMS Poll, Browse, and Publish activities, a private agent restart is required for JMS Listener activities to see the modified configuration.
-
Adding the Tibco EMS provider (or any other provider) to the private agent user configuration file
JMS_ProviderInfo_User.confdoes not change the assigned provider for any existing endpoints. You will need to manually update any existing endpoints and assign Tibco EMS as the JMS provider. -
The JMS Listener will not auto re-connect to a different JMS destination if the lookup context changes.