Microsoft Dynamics CRM connector Delete
Introduction
A Microsoft Dynamics CRM Delete activity, using its Microsoft Dynamics CRM endpoint, deletes an object record from Microsoft Dynamics CRM and is intended to be used as a target in an operation.
Creating a Microsoft Dynamics CRM Delete activity
An instance of a Microsoft Dynamics CRM Delete activity is created from a Microsoft Dynamics CRM endpoint using its Delete activity type.
To create an instance of an activity, follow one of these options:
- Navigate to File > New > Connectors > New MS CRM Delete.
- In the tree on the left under Connectors, expand Microsoft Dynamics CRM, then right-click on MS CRM Deletes and select New MS CRM Delete.
- In the top toolbar, click the connectors icon. In the dialog, select Microsoft Dynamics CRM, then select MS CRM Delete.
Configuring a Microsoft Dynamics CRM Delete activity
Follow these steps to configure a Microsoft Dynamics CRM Delete activity:
-
Step 1: Select or create an endpoint
Select or create a Microsoft Dynamics CRM endpoint. -
Step 2: Select an object
Select the object containing the record to be deleted. -
Step 3: Review the data structures
Any request or response structures generated from the endpoint are displayed.
Step 1: Select or create an endpoint
In this step, select or create an endpoint from the Available MS CRM Endpoints dropdown:
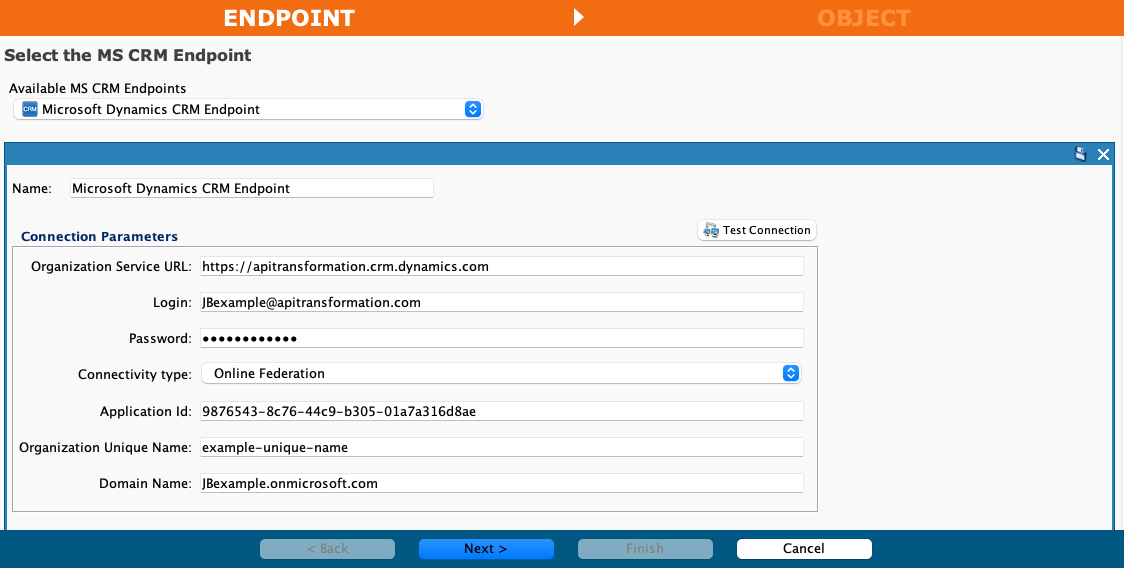
- Name: After selecting an existing endpoint, you can change the name of the endpoint here.
- Connection Parameters: After selecting an existing endpoint, its connection parameters are displayed and you can change these parameters here. For more information on each connection parameter, see Microsoft Dynamics CRM connector endpoint.
- Next: Click to navigate to the next screen.
- Cancel: Click to close the activity configuration without saving.
Step 2: Select an object
In this step, select the object containing the record to be deleted. Each user interface element of this step is described below.
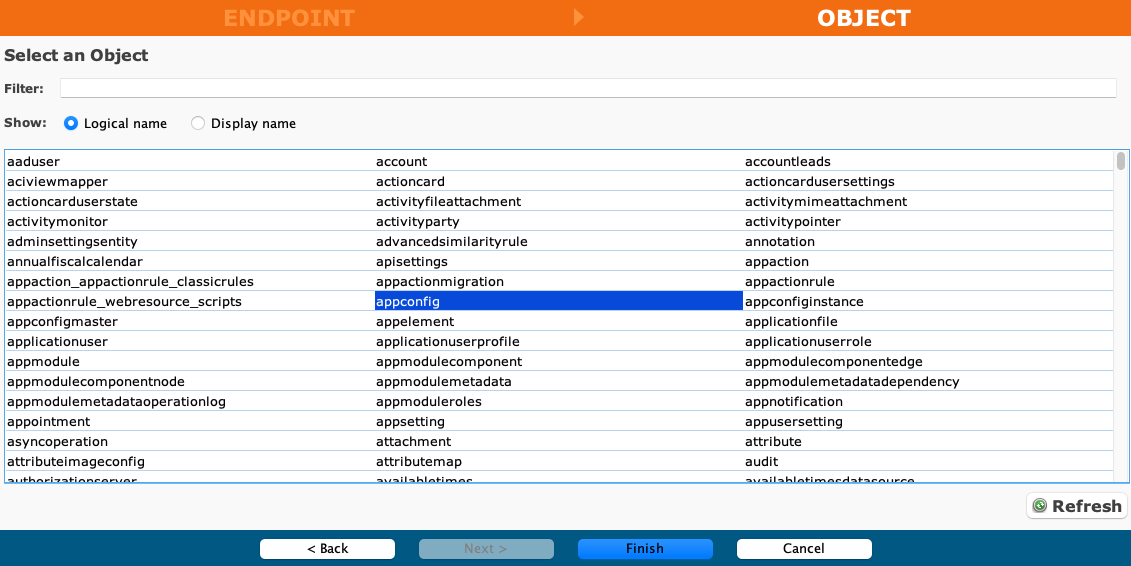
- Filter: Enter any part of the object name into the search box to filter the list of objects. The search is not case-sensitive. If objects are already displayed within the table, the table results are filtered in real time with each keystroke. To reload objects from the endpoint when searching, enter search criteria and then refresh, as described below.
- Show: Select one of Logical Name or Display Name to change the display of the object names.
- Selecting an Object: Within the table, click anywhere on a row to select an object. Only one object can be selected. The selected object is highlighted in blue.
- Refresh: Click to reload objects from the Microsoft Dynamics CRM endpoint. This may be useful if objects have been added to Microsoft Dynamics CRM. This action refreshes all metadata used to build the table of objects displayed in the configuration.
- Back: Click to return to the previous step.
- Finish: Click to review the data structures and to complete the activity configuration.
- Cancel: Click to close the activity configuration without saving.
Step 3: Review the data structures
Any request or response structures generated from the endpoint are displayed. Each user interface element of this step is described below.
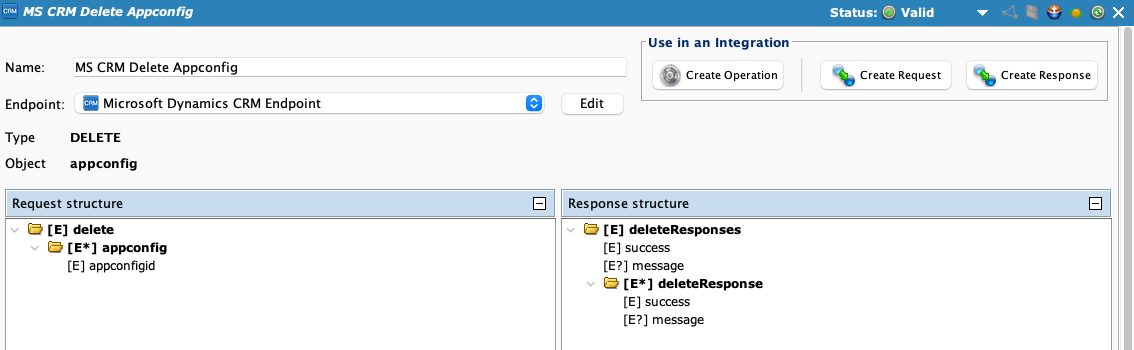
- Name: Enter a name to identify the activity. The name must be unique for each Microsoft Dynamics CRM Delete activity.
- Endpoint: Select or create a new endpoint to be used for the Delete activity.
- Edit: Click to edit the selected Microsoft Dynamics CRM connector endpoint.
- Type: The activity type is displayed here.
- Object: The previously selected object from Step 2: Select an object is displayed here.
- Use in an Integration: Select one of Create Operation, Create Request, or Create Response.
- Create Operation: Click to create an operation using the configured Delete activity.
- Create Request: Click to navigate to the Transformation wizard screen, where you can configure a request transformation for the configured Delete activity.
- Create Response: Click to navigate to the Transformation wizard screen, where you can configure a response transformation for the configured Delete activity.
Next steps
For information on using configured activities in an operation, see these resources: