Enable TBA in NetSuite
Introduction
This page summarizes how to enable token-based authentication (TBA) in NetSuite and obtain the values needed for configuring Harmony to authenticate with NetSuite using TBA.
Note
Those using two-factor authentication (2FA or TFA) in NetSuite are required to use TBA with Harmony. Learn more in NetSuite 2018.2 token-based authentication.
Jitterbit recommendations for switching to TBA
If you are currently using username/password (SSO) authentication with NetSuite in Harmony, there are several recommended options for the path forward to switching to TBA:
- Option 1: TBA for Existing Role / Existing User
Option 1 involves enabling TBA on the role used by your existing NetSuite user account that you use in Harmony. This is the recommended option, except in cases where your existing NetSuite account in Harmony is assigned to an Administrator role (if you are using an Administrator role, we recommend creating a new role with Options 2 or 3). With Option 1, follow these steps on this page: - Option 2: TBA for New Role / Existing User
Option 2 involves creating a new TBA-enabled role and assigning it to your existing NetSuite account in Harmony. This is an alternative to Option 1 if you cannot or do not want to enable TBA on an existing role held by the existing NetSuite user account that you use in Harmony. With Option 2, follow these steps on this page: - Option 3: TBA for New Role / New User
Option 3 involves creating a new TBA-enabled role and a new NetSuite user account to be used by Harmony. This is an alternative if neither Option 1 nor Option 2 is possible or desired. With Option 3, follow these steps on this page:
Tip
For additional information, refer to the following NetSuite documentation:
Enable token-based authentication
Enabling TBA for NetSuite is the first step, and is applicable to all options (Options 1, 2, and 3) described under Jitterbit recommendations for switching to TBA. This is done at the organization level.
- Log in to your NetSuite organization.
- From the top menu bar, navigate to Setup > Company > Enable Features.
- On the Enable Features screen, go to the SuiteCloud tab.
- Under the SuiteScript section, select Client SuiteScript and Server SuiteScript.
- Under the Manage Authentication section, select Token-Based Authentication.
- Click Save.
Create a new role
This step is applicable only for Options 2 and 3 described under Jitterbit recommendations for switching to TBA. If you are using Option 1, you can skip this step, as you will be using your existing role assigned to the Harmony NetSuite user.
Install the custom administrator bundle
We recommend using Jitterbit's customization bundle available through NetSuite to add an Administrator-like role. This will help in making sure that Harmony has the most elevated access to items that were formerly accessed through a highly privileged role such as Administrator.
If you do not want to use this bundle and instead add permissions individually, you can skip this part. Keep in mind that you must know which record types you are using in your Harmony integration, including any custom records, fields, or lists, so that you are able to add the appropriate permissions.
To install the customization bundle and add the role:
-
From the NetSuite's top menu bar, navigate to Customization > SuiteBundler > Search & Install Bundles. (Do not click on List.)
-
On the Search & Install Bundles page, in the Keywords search box, enter "377895" and click Search.
-
From the search results, select the bundle Jitterbit_Custom_Admin_Role.
-
On the Bundle Details page, click Install. Then from the next page, Preview Bundle Install, click Install Bundle.
-
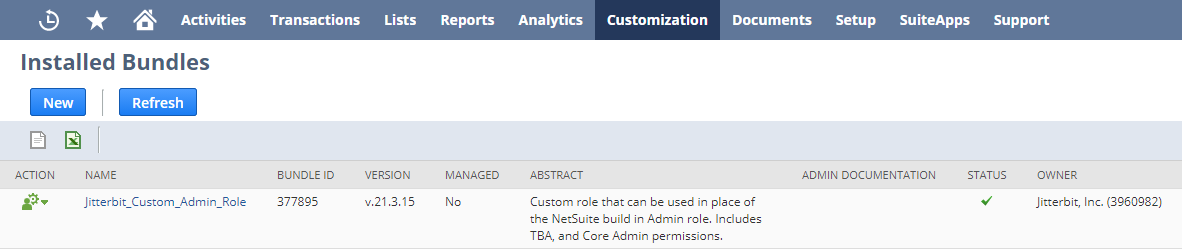
On the Installed Bundles page, the Status will show "Pending..." Installation may take awhile. You can click Refresh to see the progress.
-
When installation is successful, the Status will show a green checkmark:
-
After installation is successful, from NetSuite's top menu bar, navigate to Setup > Users/Roles > Manage Roles. (Do not click New or Search).
-
On the Manage Roles page, on the row for the Custom Administrator role, click Edit.
-
Navigate to the Permissions tab > Setup subtab to review the permissions granted for the role and make any edits if necessary. At a minimum, add permissions for Access Token Management, User Access Tokens, and Web Services.
Add a new role
An alternative to using the customization bundle is to add a new role and permissions individually. Before doing this, you should know which record types you are using in your Harmony integration, including any custom records, fields, or lists, so that you are able to add the appropriate permissions.
To add a new role:
- From NetSuite's top menu bar, navigate to Setup > Users/Roles > Manage Roles > New.
-
On the Role screen, fill out these fields:
- Enter a Name, such as "Jitterbit TBA."
- Select the desired Center Type. This selection depends on what actions you will be taking. If you don't know which one to select, you can keep the default selection as Accounting Center.
-
Near the bottom of the Role screen, navigate to the Permissions tab > Setup subtab. Use the Permission dropdown to select each type of record that you will need access to in Harmony and click Add one at a time. At a minimum, add permissions for:
- Access Token Management
- User Access Tokens
- Web Services
You may also want to add custom fields. For example:
- Custom Body Fields
- Custom Column Fields
- Custom Entity Fields
- Custom Event Fields
- Custom Fields
- Custom Item Fields
- Custom Item Number Fields
- Custom Lists
- Custom Record Types
- Custom Transaction Fields
- Other Custom Fields
- Other Lists
-
Navigate to the Permissions tab > Lists subtab. Use the Permission dropdown to select each type of custom list that you will need access to in Harmony. Use the Level dropdown to select Full for each and click Add one at a time. For example:
- Employees
- Customers
-
Click Save.
Add a new user to role
This step is applicable only for Option 3 described under Jitterbit recommendations for switching to TBA. If you are using Options 1 or 2, you can skip this step, as you will be using your existing NetSuite user that you are currently using in Harmony.
To add a new user:
-
From NetSuite's top menu bar, navigate to Lists > Employees > Employees > New.
-
On the Employee screen, fill out these fields:
- Under Primary Information, enter a Name, such as "Jitterbit" for the first name and "TBA" for the last name.
- Under Email | Phone | Address, provide an Email.
- In the Access section, select Give Access and set the Password and Confirm Password.
- In the Access section under Roles, use the Role dropdown to select the role you created above. Then click Add.
- Click Save.
Assign a role to an existing user
This step is applicable only for Option 2 described under Jitterbit recommendations for switching to TBA. If you are using Option 1, you can skip this step, as you will be using your existing role assigned to the Harmony NetSuite user. If you are using Option 3, you should have already assigned the role when you created the new user, as described above.
To assign a role to an existing user:
- From NetSuite's top menu bar, navigate to Lists > Employees > Employees.
- On the Employees page, on the row for the user you are currently using for your Harmony integration, click Edit.
- On the Employee page, in the Access section under Roles, use the Role dropdown to select the role you created above. Then click Add.
- Click Save.
Gather values for configuring TBA in Jitterbit
After TBA is enabled and you know which role and user you are using in Harmony, you can gather the values needed for configuring TBA in Harmony. This is required for all options (Options 1, 2, and 3) described under Jitterbit recommendations for switching to TBA.
Consumer key and consumer secret
-
From the top menu bar, navigate to Setup > Integration > Manage Integrations > New.
-
On the Integration screen, fill out these fields:
-
Enter a Name, such as "Jitterbit TBA."
-
From the State dropdown, select Enabled.
-
Under the Authentication tab, select Token-Based Authentication.
Note
The selection for User Credentials is used only if you want the user to also be able to log in with standard username/password authentication.
-
Click Save.
-
-
A confirmation message will be displayed, along with values for the following fields that you will need later when configuring TBA in Harmony.
Caution
Be sure to copy or save these values, as you will not be able to return to this screen.
- Application ID: Save this value.
- Consumer Key: Save this value. It will not be displayed again.
- Consumer Secret: Save this value. It will not be displayed again.
Token ID and token secret
-
Search for "tokens" using the search bar at the top. You should arrive at the page Access Tokens.
-
Click the button New Access Token.
-
On the Access Token screen, fill out these fields:
- Enter an Application Name such as "Jitterbit TBA."
- From the User dropdown, select the user you created above.
- From the Role dropdown, select the role you created above.
- Make any edits to the Token Name as desired.
- Click Save.
-
A confirmation message will be displayed, along with the values for the following fields that you will need later when configuring TBA in Harmony.
Caution
Be sure to copy or save these values, as you will not be able to return to this screen.
- Token ID: Save this value.
- Token Secret: Save this value.
Account ID
- From the top menu bar, navigate to Setup > Integration > Web Services Preferences.
- On the Web Services Preferences screen, save the value of the Account ID to use later when configuring TBA in Harmony.