NetSuite connector endpoint in Jitterbit Design Studio
Introduction
Before you can create NetSuite operations in Jitterbit using the NetSuite Connector, you must configure at least one NetSuite endpoint.
Each endpoint represents the URL and login credentials for a specific NetSuite account. Creating the endpoint allows Jitterbit to access the account to perform the requested operations. If your organization uses multiple NetSuite accounts, you will need to create an endpoint for each account.
Other ways to connect to NetSuite using Jitterbit Studio include calling a RESTlet, using a web service method, or using the Oracle NetSuite JDBC driver:
- Call a RESTlet from a local file source
- Calling a RESTlet from an HTTP source or target
- Using a Web service method
- Using the Oracle NetSuite JDBC driver with a Database source or target
Prerequisites
To successfully use the Jitterbit NetSuite Connector for NetSuite integrations, these criteria must be met:
-
Jitterbit has verified support for up to NetSuite WSDL version 2023.2. NetSuite supports the six latest versions of their WSDL at any time. Therefore, we recommend that the NetSuite instance use one of these WSDL versions:
- 2024.2
- 2024.1
- 2023.2
- 2023.1
- 2022.2
- 2022.1
Jitterbit has verified prior support for older available WSDL versions 2017.1 through 2021.2, which are no longer supported by NetSuite. Older WSDL versions are listed on the official NetSuite documentation. Even though these versions remain technically available, using any WSDLs more than a year old is a discouraged practice, and we strongly recommend that you upgrade to a supported WSDL version.
-
The WSDL URL must be provided in the format of an account-specific WSDL URL. Instructions for obtaining the WSDL URL are provided in NetSuite account-specific WSDL URL.
- NetSuite WSDL 2021.2, 2022.1, 2022.2, 2023.1, 2023.2, 2024.1, and 2024.2 require Harmony Cloud or private agents version 10.33 or later.
- NetSuite WSDL 2020.2 and 2021.1 require Harmony Cloud or private agents version 10.26 or later.
- NetSuite WSDL 2020.1 requires Harmony Cloud or private agents version 10.18 or later.
- NetSuite WSDL 2019.1 and 2019.2 require Harmony Cloud or private agents version 10.4 or later.
- NetSuite WSDLs up to 2018.2 require Harmony Cloud or private agents version 9.9 or later.
-
To use token-based authentication (TBA):
-
You must be using SuiteTalk version 2015.2 or later.
-
You must have TBA enabled for your NetSuite account.
-
To configure a new TBA endpoint, you must be using Jitterbit Design Studio and Agent versions 9.2 or later.
-
To convert an existing SSO endpoint to use TBA, you must be using Jitterbit Design Studio version 9.3.1 or later and Agents version 9.2 or later.
-
Tip
For additional information, refer to the following NetSuite documentation:
- NetSuite – SuiteTalk (Web Services) Integration
- NetSuite – Managing Users & Roles
- NetSuite – Getting Started with Token-based Authentication
Create an endpoint
Note
If you are not already familiar with Jitterbit, see Get started or Design Studio for detailed information on how to use the product.
Within your project within Jitterbit Studio, there are several ways to start a new NetSuite endpoint:
- Go to File > New > Connectors > New NetSuite Endpoint.
- In the tree on the left under Connectors, right-click on the NetSuite category, then select New NetSuite Endpoint.
- In the tree on the left under Connectors, double-click on the NetSuite category, then right-click on New NetSuite Endpoint and select New NetSuite Endpoint.
- In the top toolbar, click the connector icon (orange jigsaw piece)
 . In the popup, select NetSuite, then select NetSuite Endpoint.
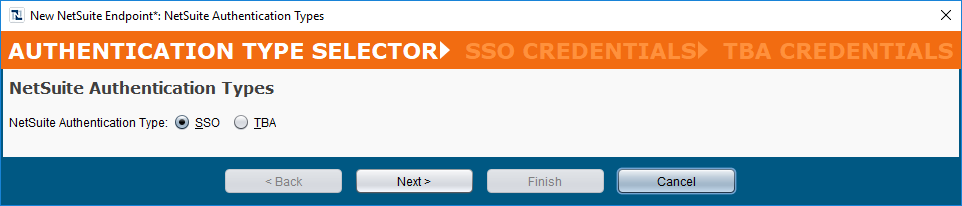
Select authentication type
In the first screen of the NetSuite endpoint wizard, choose how you would like Jitterbit to authenticate with your NetSuite instance using the credentials provided in the next screen. Each option is explained below.
-
SSO: SSO (Single Sign-on) is the traditional method used by Jitterbit for authenticating with NetSuite and is available in all Harmony versions where the NetSuite connector is available. The SSO authentication type has been deprecated by NetSuite and is no longer supported with NetSuite WSDL versions 2020.1 and later. It is now recommended for all users to use TBA.
Caution
With the SSO authentication type, Jitterbit users whose NetSuite subscription is limited to a single thread of processing may experience issues with throughput. These users should use TBA. NetSuite users with a SuiteCloud Plus license can use either type of authentication, as this license type allows greater concurrency of threads.
Warning
Those using NetSuite two-factor authentication (TFA or 2FA) should not use the SSO authentication type. Doing so may cause your NetSuite endpoint to fail. Instead, use TBA.
-
TBA: TBA (Token-Based Authentication) is available to those using Jitterbit Design Studio and Agent versions 9.2 and later. In Jitterbit, using TBA facilitates using multiple processing threads thereby resolving throughput issues that may be experienced by NetSuite users limited by their NetSuite subscription.
Note
Those using NetSuite two-factor authentication (TFA or 2FA) in NetSuite are required to use TBA with Harmony. Learn more in NetSuite 2018.2 token-based authentication.
Enter credentials
Click Next to continue. The next screens depend on whether you have selected SSO or TBA.
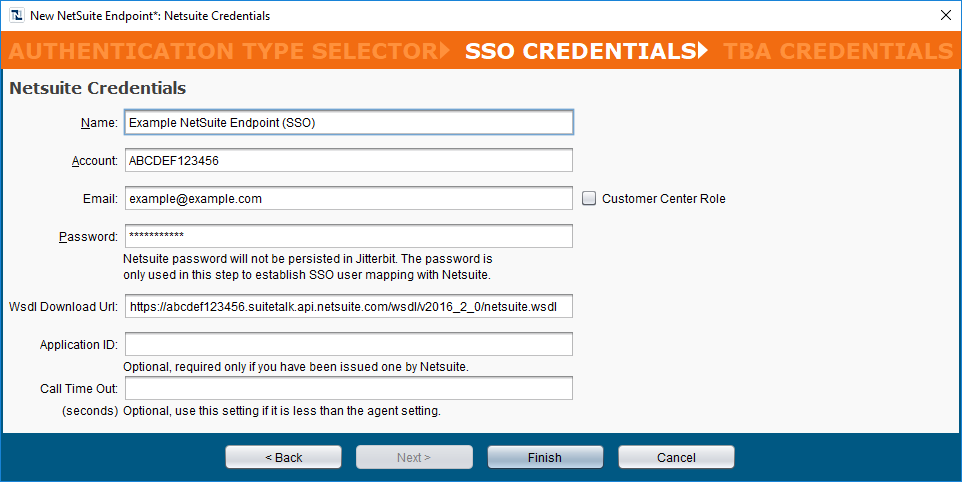
SSO
Enter the SSO credentials for your new NetSuite endpoint. An example is provided below. Each configurable option is explained as follows.
-
Name: Enter an appropriate name for your new NetSuite endpoint. If you are creating endpoints for multiple NetSuite accounts, it is a good idea to distinguish them here by name.
-
Account: Enter the NetSuite account ID associated with your NetSuite account.
Note
If you are using NetSuite's sandbox environment, this is now indicated by the NetSuite account ID. For example, the account ID may be appended with _SB1, _SB2, etc.
Because NetSuite no longer uses separate sandbox URL and sandbox is now indicated by account ID, the Sandbox checkbox has been removed in Design Studio versions 9.2 and later.
More information can be found in NetSuite's documentation About Sandbox Accounts on the NetSuite Domain.
-
Email: Enter the email address you use to log in to your NetSuite account.
-
Customer Center Role: Check this box if you are using NetSuite Customer Center role to control permissions.
-
Password: Enter the password you use to log in to your NetSuite account.
-
Wsdl Download Url: Enter the account-specific URL of the NetSuite WSDL used by the NetSuite instance. Jitterbit supports the WSDL versions listed in Prerequisites earlier on this page. Instructions for obtaining the account-specific WSDL URL are provided in NetSuite account-specific WSDL URL.
-
Application ID: Optionally enter your Application ID, if you have been issued one by NetSuite. If not, leave this field blank.
Tip
To generate a new Application ID for Jitterbit or to locate one that already exists, see Getting a NetSuite application ID.
-
Call Time Out: Optionally enter the call timeout value in seconds, if you want to the timeout value to be less than the agent setting.
Note
The default agent setting for timeout of NetSuite calls is 300 seconds.
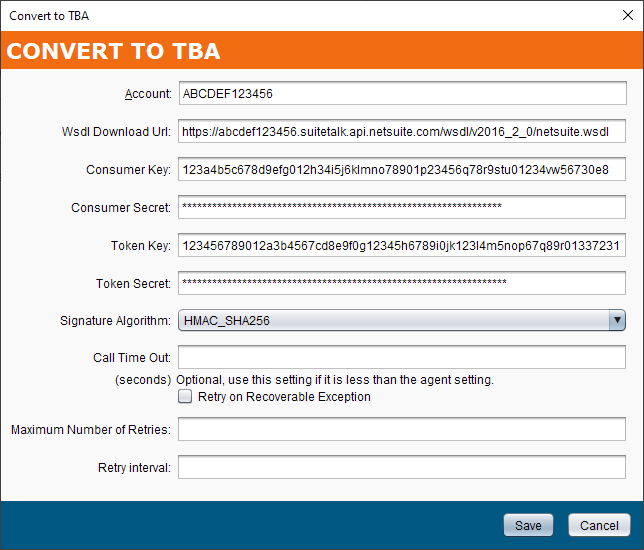
TBA
To obtain the values needed for this screen, you must have enabled TBA for your NetSuite account. After configuring TBA in NetSuite, enter the TBA credentials for your new NetSuite endpoint. An example is provided below. Each configurable option is explained as follows.

-
Name: Enter an appropriate name for your new NetSuite endpoint. If you are creating endpoints for multiple NetSuite accounts, it is a good idea to distinguish them here by name.
-
Account: Enter the NetSuite account ID associated with your NetSuite account.
Note
If you are using NetSuite's sandbox environment, this is now indicated by the NetSuite account ID. For example, the account ID may be appended with _SB1, _SB2, etc.
Because NetSuite no longer uses separate sandbox URL and sandbox is now indicated by account ID, the Sandbox checkbox has been removed in Design Studio versions 9.2 and later.
More information can be found in NetSuite's documentation About Sandbox Accounts on the NetSuite Domain.
-
Wsdl Download Url: Enter the account-specific URL of the NetSuite WSDL used by the NetSuite instance. Jitterbit supports the WSDL versions listed in Prerequisites earlier on this page. Instructions for obtaining the account-specific WSDL URL are provided in NetSuite account-specific WSDL URL.
-
Consumer Key and Consumer Secret: Enter the NetSuite Consumer Key and Consumer Secret values obtained from NetSuite. For instructions on obtaining these values, see Enable TBA in NetSuite .
-
Token Key and Token Secret: Enter the NetSuite Token ID and Token Secret values obtained from NetSuite. For instructions on obtaining these values, see Enable TBA in NetSuite.
Caution
If you are using a NetSuite sandbox account, each time the sandbox is refreshed, you will need to create new tokens.
-
Signature Algorithm: Use the dropdown to select the signature algorithm to be used to sign the request, one of HMAC-SHA1 or HMAC-SHA256. The signature algorithm determines how the payload is encrypted.
Note
NetSuite has deprecated HMAC-SHA1 as a valid signature method in favor of HMAC-SHA256 as of these versions:
- Non-Production Accounts: NetSuite version 2021.2 and later.
- Production Accounts: NetSuite version 2023.1 and later.
The deprecation of HMAC-SHA1 is independent of which WSDL version you specify in the configuration of the NetSuite endpoint.
-
Call Time Out: Optionally enter the call timeout value in seconds, if you want to the timeout value to be less than the agent setting.
Note
The default agent setting for timeout of NetSuite calls is 300 seconds.
-
Retry on Recoverable Exception (labeled Enable Retry Option in versions 10.36 and 10.37): This option is present in Design Studio versions 10.36 and later, and is functional only when using an environment associated with a private agent group whose agents are version 10.24 or later. Its behavior depends on the private agent version. When selected, this setting is used to retry a rejected request to NetSuite when either of these criteria is met:
- Private agents 10.24 and later: NetSuite's governance limit for concurrent requests is reached and the error
WS_REQUEST_BLOCKEDis returned. - Private agents 10.36 and later: NetSuite does not return a response in the expected timeframe and a timeout exception occurs.
To check your NetSuite account's concurrency limits, in the NetSuite UI, go to Setup > Integration > Integration Governance. For more information, see NetSuite's documentation on Concurrency Governance Limits Based on Service Tiers and SuiteCloud Plus Licenses.
In order for this setting to take effect, the Jitterbit variable
jitterbit.netsuite.asyncmust not be set totrueupstream of the operation.With private agents version 10.23 or earlier, on cloud agents, or if the Jitterbit asynchronous variable is enabled, this setting will be ignored.
Select the Retry on Recoverable Exception checkbox to enable additional configuration options:

-
Maximum Number of Retries (labeled Max Retry in versions 10.36 and 10.37): Enter the number of times (maximum of 5 retries) that a rejected request will be resent to NetSuite. If the request is still rejected after the maximum number of retries, an exception with an error message will be returned in the operation log. In addition, the private agent will log each retry in the
jitterbit-agent.loglog file.Each retry is treated as part of the same operation run, where only a single record appears in the operation log. Any On Success or On Failure conditions configured to run downstream operations are triggered based on the end status of the operation after retrying up to the maximum number of retries.
-
Retry Interval: Enter the number of seconds (maximum of 5 seconds) to wait between resending a rejected request to NetSuite.
- Private agents 10.24 and later: NetSuite's governance limit for concurrent requests is reached and the error
Verify credentials (sso)
Note
This step is not present for TBA. Instead those using TBA can verify credentials using the Test Connection button as described in the next section, Edit or test an endpoint.
For the SSO authentication type only, upon clicking Finish, Jitterbit will verify the provided credentials.
- If successful, your new NetSuite endpoint will be created. The endpoint configuration screen will open in the main view of Studio. You can get back to the configuration screen at any time by double-clicking the endpoint in the tree on the left under Connectors > NetSuite > NetSuite Endpoints.
- If unsuccessful, a message will appear indicating a problem with the credentials. You can still choose to create the endpoint and modify credentials later.
Edit or test an endpoint
After your endpoint is created, you can get back to the configuration screen at any time by double-clicking the endpoint in the tree on the left under Connectors > NetSuite > NetSuite Endpoints.
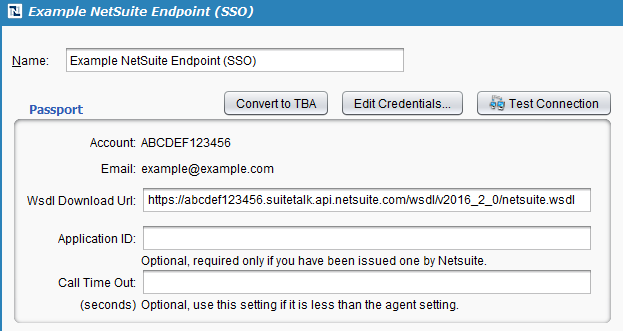
SSO
For the SSO authentication type, the configuration screen will look similar to that below.
-
Name: Rename your existing NetSuite endpoint. If you are creating endpoints for multiple NetSuite accounts, it is a good idea to distinguish them here by name.
-
Passport: This section contains the information entered when the endpoint was created. The Account and Email are listed here. You can also edit the Wsdl Download Url and optional Application ID and Call Time Out fields here. These fields are the same as those described above on this page.
-
Convert to TBA: This option is available in Design Studio version 9.3.1 and later.
Click the Convert to TBA button to open a popup window to enter credentials for changing the authentication type from SSO to TBA. The value used for each field is documented earlier on this page under Enter credentials in the TBA section.
-
Edit Credentials: Click the Edit Credentials button to edit the Account, Email, Password, or Customer Center Role settings. These options are the same as those described above on this page.
-
Test Connection: Click the Test Connection button to verify the connection to your NetSuite account. A message will indicate if the connection is successful. If the connection is not successful, make sure you meet the prerequisites and double check the values you provided on this screen. If you receive an error testing the connection, refer to troubleshooting information.
TBA
For the TBA authentication type, the configuration will look similar to that below.
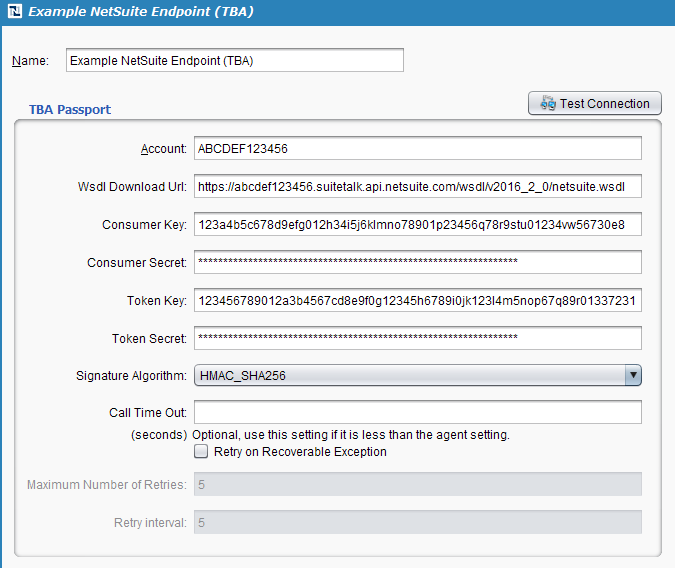
- Name: Rename your existing NetSuite endpoint. If you are creating endpoints for multiple NetSuite accounts, it is a good idea to distinguish them here by name.
- TBA Passport: This section contains the information entered when the endpoint was created. You can edit any of the fields available from the original configuration, as described above on this page.
- Test Connection: Click the Test Connection button to verify the connection to your NetSuite account. A message will indicate if the connection is successful. If the connection is not successful, make sure you meet the prerequisites and double check the values you provided on this screen. If you receive an error testing the connection, refer to troubleshooting information.