NetSuite connector Update in Jitterbit Design Studio
The NetSuite update activity available within the NetSuite connector allows you to update existing records in a connected NetSuite instance using Jitterbit.
Note
Before you set up a NetSuite update operation, you will need to have a NetSuite endpoint defined. For more information on creating an endpoint, see NetSuite connector endpoint.
This page describes how to update existing NetSuite records using an example of updating the phone number of an existing customer record in NetSuite from source data provided in a CSV file through Jitterbit.
Example
For reference, see the Jitterpak NetSuiteExample.jpk and accompanying files in NetSuiteSampleFiles.zip. Unzip the NetSuiteSampleFiles.zip to your "C:\" drive, or if you unzip to another directory make sure to edit the source and target directories in the operations. If this is your first time using a Jitterpak see Importing a Jitterpak.
This example demonstrates an update of a customer record that was created as an example during the NetSuite connector create walkthrough. This example is used for demonstration purposes only and does not cover all options available in the product; please refer to Design Studio for more comprehensive documentation.
The following sections are divided up into beginning the update activity, defining the operation components, and deploying and executing the operation.
Creating a NetSuite Update operation
Note
If you are not already familiar with Jitterbit, see Get started or Design Studio for detailed information on how to use the product.
-
Within your project within Jitterbit Studio, there are several ways to begin a new NetSuite update activity. Each of the following options will start the NetSuite Update Wizard to guide you through the process.
- Go to File > New > Connectors > New NetSuite Update.
- In the tree on the left under Connectors, right-click on the NetSuite category, then select New NetSuite Update.
- In the tree on the left under Connectors, double-click on the NetSuite category, then right-click on New NetSuite Update and select New NetSuite Update.
- In the top toolbar, click the connector icon (orange jigsaw piece)
 . In the popup, select NetSuite, then select NetSuite Update.
-
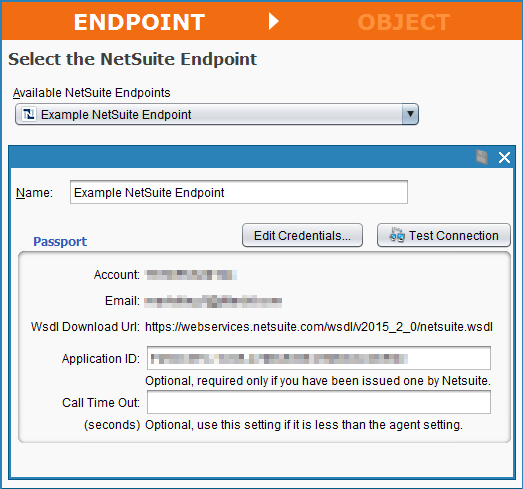
The Endpoint screen of the NetSuite Update Wizard should open in the main view of Studio. This screen asks to select the endpoint that you would like to update existing data in. You should have already set up your endpoint in NetSuite connector endpoint. Use the dropdown to select the appropriate endpoint. Click Next when finished.
-
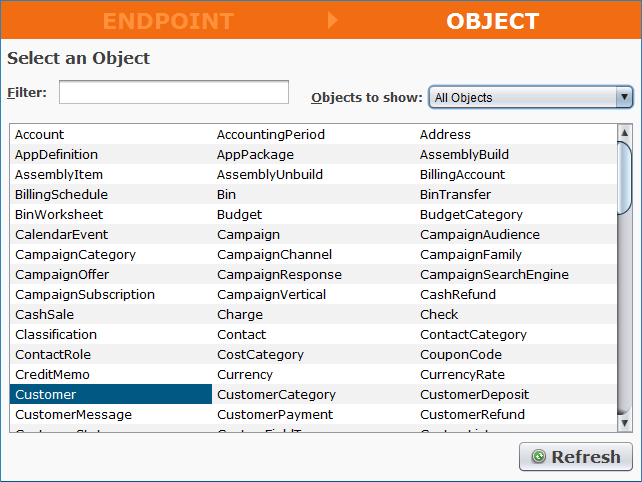
The Object screen of the NetSuite Update Wizard asks you to select the object that you would like to update existing data in. In this example we want to update an existing customer record in Netsuite, so we select the "Customer" object, then click Finish to continue.
Note
If you have a lot of objects available in your NetSuite account, you may need to wait a moment for them to load. You can also enter an object name into the Filter field or use the Objects to show dropdown to limit the results to "Standard Objects" or "Custom Objects." Try the Refresh button if the results are not what you expect.
-
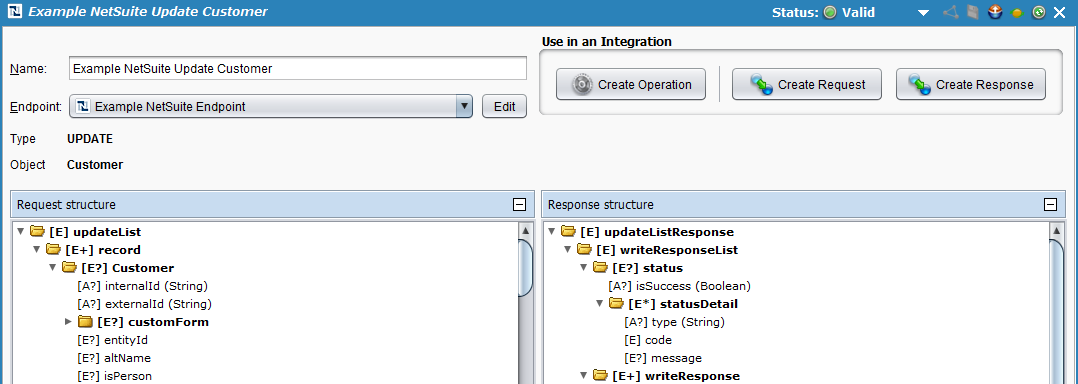
Jitterbit will then proceed with creating a NetSuite API request and response structure that will allow existing data to be updated within your connected NetSuite account. A new tab should appear in Studio called NetSuite Updates. You can rename your update activity here if desired; in the example ours is called "Example NetSuite Update Customer." You can also use the + - buttons or arrows to expand all elements within each structure.
-
Next, on the same screen, click the button Create Operation located under Use in an Integration in the upper right corner. This will create the Jitterbit operation that will update existing customer data in NetSuite.
-
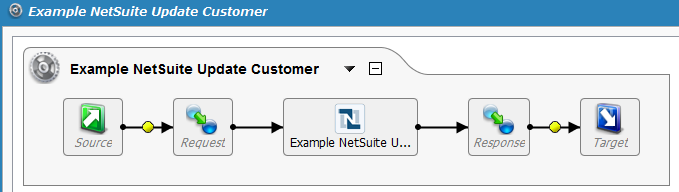
A new tab should open in Studio called Operations, containing a graphical representation of the update activity.
Note
The icons for Source , Request , Response , and Target in the image above are placeholders for the operation components, which we will define in the next section.
Save your operation by clicking either the single disk icon to save just this operation or the multiple disk icon to save all changes in your integration project. You should see the asterisk on the Operations tab and operation title disappear as your new update activity is now created and saved to your project.
Defining the operation components
Next we need to define the other components of the operation that appear within the graphical representation, including Source , Request , Response , and Target.
For each, the instructions below direct you to return to the graphical representation of the operation you have created and double-click each icon to configure each component. As an alternative, you could also create the Source , Request , Response , and Target separately and then drag and drop them from the tree on the left directly onto the icons in the visual representation of your operation.
For purposes of this walkthrough, we provide the following examples for reference above: Jitterpak NetSuiteExample.jpk and accompanying files in NetSuiteSampleFiles.zip. Many different types of data can be used for each component of the operation. To learn more about additional customization options, refer to the Design Studio section of our documentation.
-
Source: In the example, we use a CSV file as the input request to update the existing customer with the provided field values below. The following table displays the contents of the example file CustomerUpdateRequest.csv.
ID Name Email Phone Address City State Zip Test Cust 1 Test Customer 1 test1@example.com 1-999-999-9999 1234 Main St. Denver CO 80250 Note
A NetSuite update must always include either (1) an ID field that maps to the customer ExternalID in NetSuite, or (2) the InternalID of the customer record in NetSuite. This example uses the ExternalID created during NetSuite connector create. However, if you would like to use an InternalID, you can find this within NetSuite or within Jitterbit through a NetSuite connector search.
Note
The existing customer was originally created with a phone number of 1-111-111-1111 in the example used for NetSuite connector create. In the source file for the update operation, we include the changed phone number along with the other original fields because we're using the same file format definition. However, you could omit the other fields if you want to create a new file format with just those fields.
Note
A variety of source types are available in Jitterbit. See Sources for more.
To use the CSV file, first double-click on the Source icon, then click the button Create New Source and give your source a Name (e.g. CustomerUpdateRequest.csv). Next, for this example, we are using a private agent with local files enabled, and thus select a Type of "Local File" and then Browse to the location. If you are using the example files, the Folder is 'C:\NetSuiteSampleFiles' and the Get Files is 'CustomerUpdateRequest.csv'. We will also expand the Options and set Ignore Lines to First: '1' since our CSV file uses a header row.
-
Target: Double-click on the Target icon. In the example, we will record the response from NetSuite to a CSV file to provide information about success/failure. Click the Create New Target button, give your target a Name (e.g. CustomerUpdateResponse.csv), and again select a Type of "Local File" and Browse to a location on the private agent where we want to save the data. In the example, the Folder is 'C:\NetSuiteSampleFiles' and the Filename is 'CustomerUpdateResponse.csv'.
Note
You can also output to a variety of different target types. The type does not have to be the same as the source type. See Targets for options.
-
Request: Double-click on the Request icon and select Create New Transformation. This will open the Transformation Wizard which will walk you through creating the request.
Note
Additional information on request structures is provided under Transformations.
-
On the first screen, Name, provide a Name for your transformation or leave as the default. Then use the Source dropdown to select the source type. For the example we used a CSV file, which is considered "Text." Click Next to continue.
-
On the next screen, Source, use the Available File Format Definitions dropdown to select the same source file format definition created during NetSuite connector create (i.e. "Example Customer Flat File").
Or, if you are creating from scratch, you can select Create New. This will open up additional options for defining a new file format. Provide a Name for the new file format (in the example we call ours "Example Customer Flat File"). To create the text definition based off of our existing CSV file, select Create From File, then in the popup browse to the local 'CustomerUpdateRequest.csv' file.
Click Finish to continue.
-
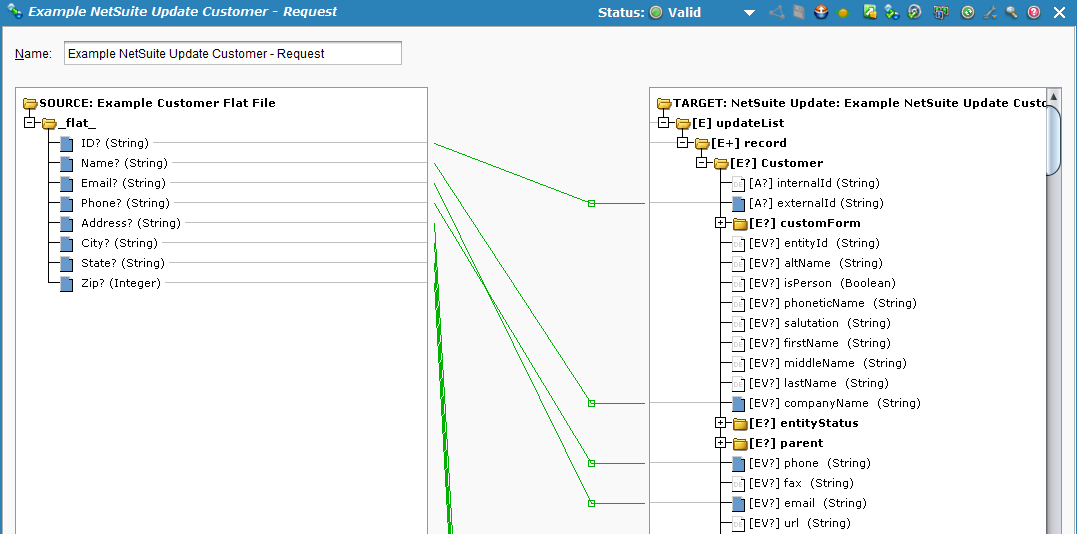
The Transformations tab should open where you can complete your mapping. Use the + to expand the source and target items in each tree. Then drag and drop each field you would like to be mapped from one tree to the other.
Note
A NetSuite update must always include either (1) an ID field that maps to the customer ExternalID in NetSuite, or (2) the InternalID of the customer record in NetSuite. This example uses the ExternalID created during the NetSuite connector create example. If you were using InternalID, you would instead map to the NetSuite internalId field.
Your transformation mapping should look similar to that shown below:
-
-
Response: Double-click on the Response icon and select Create New Transformation. This will open the Transformation Wizard which will walk you through creating the response.
Note
Additional information on response structures is provided under Transformations.
-
On the first screen, Name, provide a Name for your transformation or leave as the default. Then use the Target dropdown to select the target type. For the example we used a CSV file, which is considered "Text." Click Next to continue.
-
On the next screen, Target, use the Available File Format Definitions dropdown to select the same target file format definition created during NetSuite connector create (i.e. "NetSuite Response Structure").
Or, if you are creating from scratch, you can select Create New. In the example we set up a typical response structure that will write the external ID, status, and message to the response so we get back feedback if the update operation fails. In the first screen, set the Name of the new file format (in the example ours is called "NetSuite Response Structure"), then click the button to Create Manually. In the next screen, click New and add three new fields called "ExternalID," "Status," and "Message."
Click Finish to continue.
-
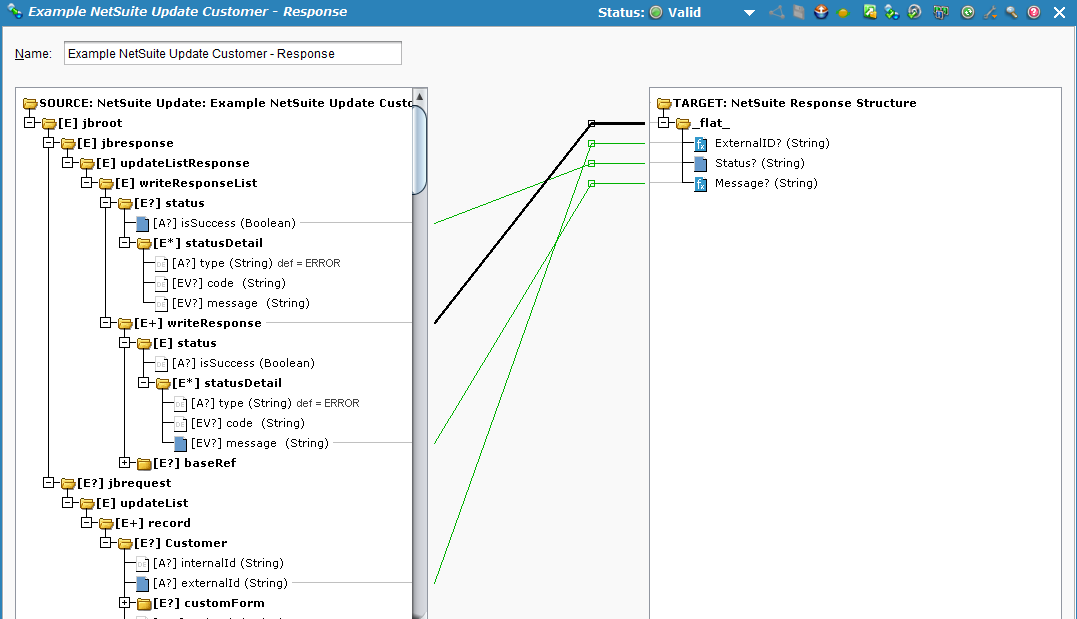
The Transformations tab should open where you can complete your mapping. Use the + to expand the source and target sides. In this example we will add scripts to get the external ID in NetSuite so that if the operation fails, we now know the ID of failed record to troubleshoot. To do this:
-
Drag and drop the "isSuccess" field from the source side to the new "Status" field on the target side.
-
Double-click the "ExternalID" field on the target side to open the Formula Builder and add the following functions to the script, then click OK.
<trans>
FindByPos(SourceInstanceCount(),jbroot$jbrequest$updateList$record#.Customer$externalId)
</trans>
The FindByPos function finds the instance in the requesting data that corresponds to the response.
-
Double-click the "Message" field on the target side to open the Formula Builder and add the following functions to the script, then click OK.
<trans>
SumString(jbroot$jbresponse$updateListResponse$writeResponseList$writeResponse.status$statusDetail#.message$,"|",true)
</trans>
The SumString function will concatenate an element that may have more than one instance into a single string.
Note
Find additional script functions to use during your Transformation mapping or separately as Scripts under the Formula builder section. In addition there are several NetSuite-specific functions documented in Connector functions that can be used for more complex mapping or scripts.
Your transformation mapping should look similar to that shown below:
-
-
-
Optional Scripts: You can find additional script functions to use during your Transformation mapping or separately as Scripts under the Formula builder section. For additional information, see NetSuite connector advanced.
Deploying and executing the operation
With the NetSuite update activity fully configured, we are ready to deploy and execute the operation.
-
From the Operations tab, click the deploy
 icon.
icon. -
Then click the execute
 icon to place the operation in the queue for execution.
 -
In the lower portion of the screen, the Operation monitor should indicate that your operation was run successfully. If not, you can double-click the Status icon to view any log messages.

-
You should also now see the output response that was mapped to your target file. In the example, the file is now created in 'C:\NetSuiteSampleFiles\CustomerUpdateResponse.csv'. Since the operation was run successfully, we see the ID field followed by a status of '1', indicating success. If the operation failed, we would see a '0' along with a third column showing the log error message.
ExternalID Status Message Test Cust 1 1 -
In addition, when you check your NetSuite account, you should find the customer information updated with the new phone number.
Note
You can find more information about the API call to NetSuite within the Web Services Usage Log available in NetSuite under Setup > Integration > Web Services Usage Log. This provides detailed information about success/failure as well as the request and response that was sent to Jitterbit.