QuickBooks connector Create activities
Warning
All existing QuickBooks users are required to migrate to OAuth 2.0 authentication by December 17, 2019. See the Intuit developer blog post april 10, 2019 and the Intuit OAuth blog for additional information. after your QuickBooks account is migrated to OAuth 2.0, follow the steps to create a new endpoint at QuickBooks connector OAuth 2.0 - create endpoint.
Prior to being able to create new QuickBooks data from Jitterbit, you will need to have created a QuickBooks endpoint within Jitterbit Studio (see QuickBooks connector OAuth 1.0a - create endpoint or QuickBooks connector 2.0 - create endpoint). Now that Jitterbit has access to your QuickBooks Online instance, you can perform four main activities with your QuickBooks data: Query, Create, Update, or Delete.
This page focuses on creating new QuickBooks data, using an example of creating a new QuickBooks customer via an XML file through Jitterbit. These steps are broken up into beginning the Create activity, defining the Operation components, and deploying and executing the Operation.
Example
For reference, see the Jitterpak QuickBooksExample.jpk and accompanying files in QuickBooksSampleRequestFiles.zip needed to execute the Jitterpak operations. Unzip the QuickBooksSampleRequestFiles.zip to your "C:\" drive, or if you unzip to another directory make sure to edit the source and target directories in the operations. If this is your first time using a Jitterpak see Importing a Jitterpak.
Creating a QuickBooks Create operation
Note
If you are not already familiar with Jitterbit, see Get started or Design Studio for detailed information on how to use the product.
-
Within your project within Jitterbit Studio, there are several ways to begin a new QuickBooks Create activity. Each of the following options will start the QuickBooks Create Wizard to guide you through the process.
- Go to File > New > Connectors > New QuickBooks Create.
- In the tree on the left under Connectors, right-click on the QuickBooks category, then select New QuickBooks Create.
- In the tree on the left under Connectors, double-click on the QuickBooks category, then right-click on QuickBooks Create Activities and select New QuickBooks Create.
- In the top toolbar, click the connector icon (orange jigsaw piece)
 . In the popup, select QuickBooks, then select QuickBooks Create.
-
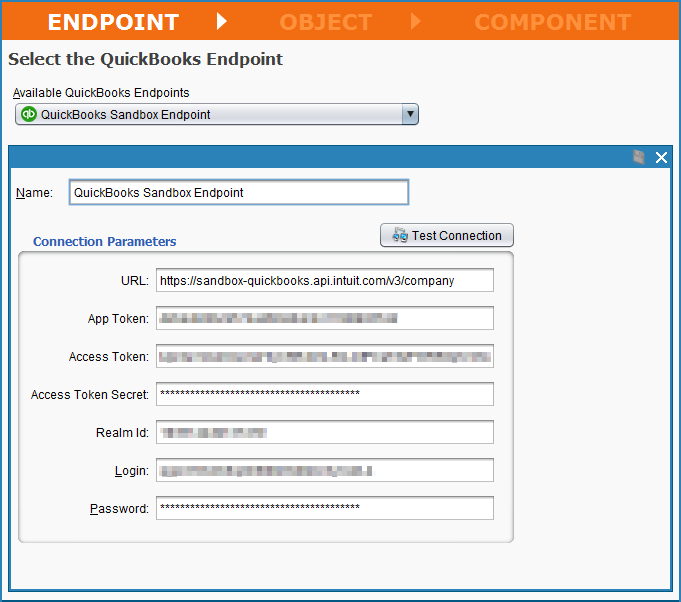
The Endpoint screen of the QuickBooks Create Wizard asks you to select the endpoint that you would like to create new data in. You should have already set up endpoints in QuickBooks connector OAuth 1.0a - create endpoint or QuickBooks connector 2.0 - create endpoint. Select the appropriate endpoint, for example a sandbox or production endpoint. Click Next when finished.
Note
The example used in this documentation creates a new Customer in a QuickBooks sandbox account. To access your sandbox, go to https://developer.intuit.com/ and sign into your QuickBooks Online account. Once logged in, go to Docs & Tools > Sandbox > Go to company for the sandbox you want to use.
-
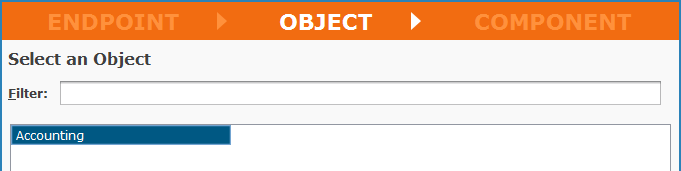
The Object screen of the QuickBooks Create Wizard asks you to select the Object that you would like to create new data in. In this example we used the Accounting API during creation of the QuickBooks Online app and thus have have only one Object to select: Accounting. Click on the Object and then click Next to continue.
-
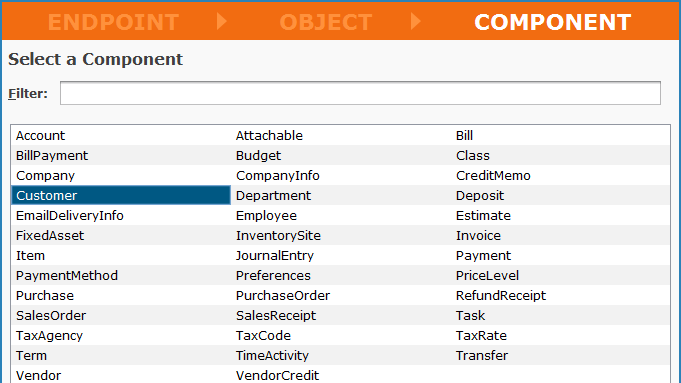
The Component screen of the QuickBooks Create Wizard displays all of the Components that are available for new data to be created within your connected QuickBooks instance. For purposes of this walkthrough, we will create a new Customer and therefore select the Customer component. Then click the Finish button.
-
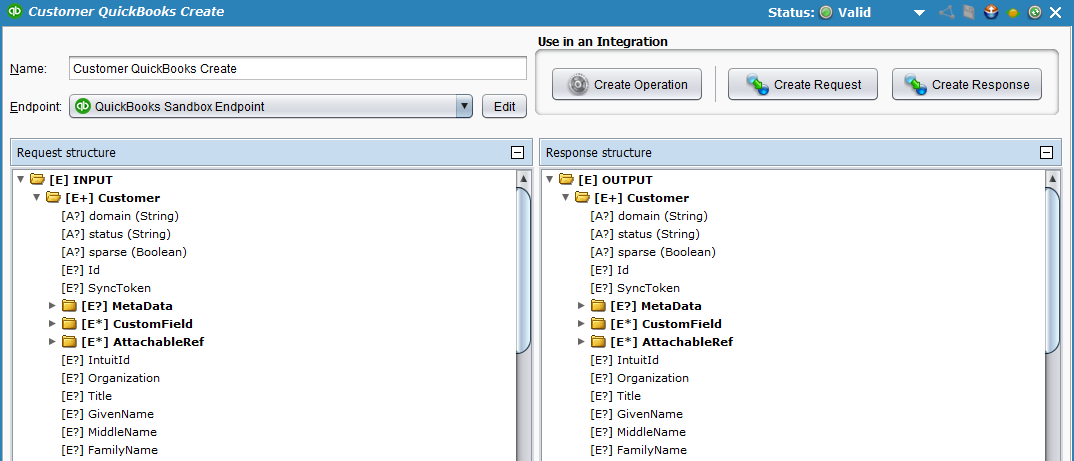
Jitterbit Studio will then proceed with creating a QuickBooks API Request and Response structure that will allow data to be created within your connected QuickBooks Online instance. A new tab should appear in Studio called QuickBooks Create Activities. You can rename your create activity here if desired; in the example ours is called "Customer QuickBooks Create."
Click the + icon on the far right of both the Request and Response structure views in order to expand all elements within each structure. With each side now expanded, you should now see a screen that is similar to the image shown below.
-
Next, on the same screen, click the button Create Operation located under Use in an Integration in the upper right corner. This will create the Jitterbit operation that will create new Customer data in QuickBooks.
-
A new tab should open in Studio called Operations, containing a graphical representation of the Create activity. Save your Operation by clicking either the single disk icon to save just this Operation or the multiple disk icon to save all changes in your integration project. You should see the asterisk on the Operations tab and Operation title disappear as your new Create activity is now created and saved to your project.

Defining the operation components
Now we need to define the other components of the Operation that appear within the graphical representation, including Source, Request, Response, and Target. For purposes of this walkthrough, we provide the following examples for reference above: Jitterpak QuickBooksExample.jpk and accompanying files in QuickBooksSampleRequestFiles.zip .
Note
There are many different types of data that can be used for each component of the Operation. To learn more about additional customization options, please refer to the Design Studio section of our documentation.
-
Source: In the example, the following XML is an input request to create a new Customer with the provided field values below:
CustomerCreateRequest.xml<?xml version="1.0" encoding="utf-8"?> <ns:INPUT xmlns:ns="urn:qboln-res:document:qboln:oln:functions"> <Customer> <GivenName>Peter1</GivenName> <MiddleName></MiddleName> <FamilyName>Hynes1</FamilyName> <CompanyName>Soft Tech1</CompanyName> <DisplayName>Soft Tech1</DisplayName> <PrintOnCheckName>SoftTech LLC</PrintOnCheckName> <Active>true</Active> <PrimaryPhone> <FreeFormNumber>7678907676</FreeFormNumber> <Default>true</Default> </PrimaryPhone> <Mobile> <FreeFormNumber>8678907676</FreeFormNumber> </Mobile> <Fax> <FreeFormNumber>9678907676</FreeFormNumber> <Default>true</Default> </Fax> <PrimaryEmailAddr> <Address>softtech@test.com</Address> <Default>true</Default> </PrimaryEmailAddr> <WebAddr> <URI>http://stech.com</URI> <Default>true</Default> </WebAddr> <BillAddr> <Line1>456 Chinna Street</Line1> <City>Tracy</City> <Country>USA</Country> <CountryCode>011</CountryCode> <CountrySubDivisionCode>767</CountrySubDivisionCode> <PostalCode>95391</PostalCode> <PostalCodeSuffix>7878</PostalCodeSuffix> <Note>Billing Address</Note> </BillAddr> <ShipAddr> <Line1>456 Chinna Street</Line1> <City>Tracy</City> <Country>str1234</Country> <CountryCode>USA</CountryCode> <CountrySubDivisionCode>767</CountrySubDivisionCode> <PostalCode>95391</PostalCode> <PostalCodeSuffix>7878</PostalCodeSuffix> <Note>Shipping Address</Note> </ShipAddr> </Customer> </ns:INPUT>To use the XML file, first double-click on the Source icon, then select a new Source type. For this example, we are using a private agent with local files enabled, and thus select a Type of "Local File" and then Browse to the location. If you are using the example files, the Folder is 'C:\projects\quickbooks' and the Get Files is 'CustomerCreateRequest.xml'.
-
Target: Double-click on the Target icon. In the example, we will output the new data from QuickBooks to an XML file to make sure it has been created. To do this, we will again select a Type of "Local File" and Browse to a location on the private agent where we want to save the data. In the example, the Folder is 'C:\projects\quickbooks' and the Filename is 'CustomerCreateResponse.xml'.
-
Request: Double-click on the Request icon and select Create New Transformation. Or click the Create Request button from the QuickBooks Create Activities tab. This will open the Transformation Wizard which will walk you through creating the Request.
- On the first screen, Name, select the Source type used above. For the example we chose XML. Leave the Target as default.
- On the next screen, Source, choose the button to Select an existing XML structure. In the dropdown select "QuickBooks Schemas." Then select 'QuickBooksCreateRequest.xsd' to use as your structure file. On the next screen, click Finish.
-
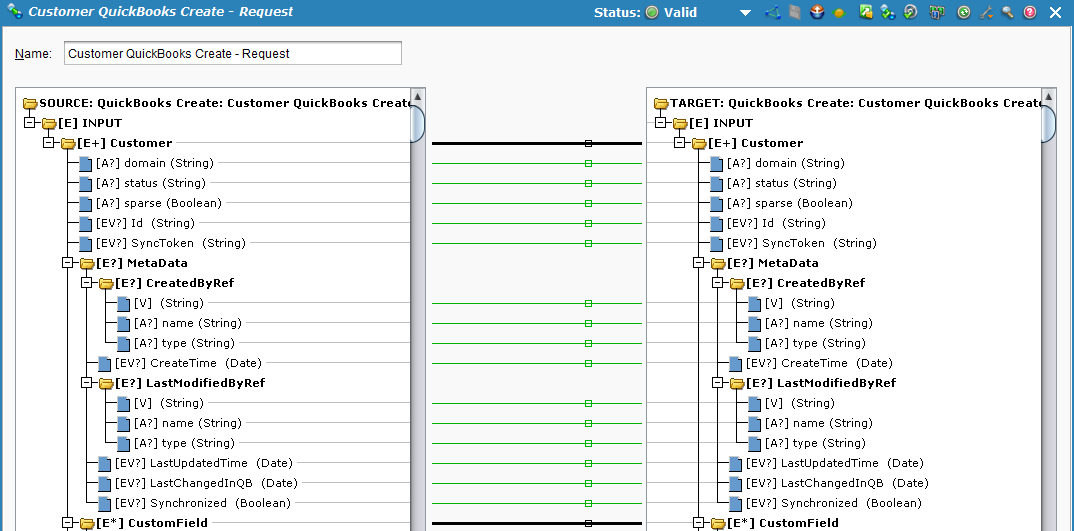
The Transformations tab should open where you can complete your mapping. Click the + at the bottom of each of the Source side and the Target side to expand then items in each tree. Then click the Auto Map icon the appears below the Target side of the tree:

Your mapping screen should now look similar to that below:
-
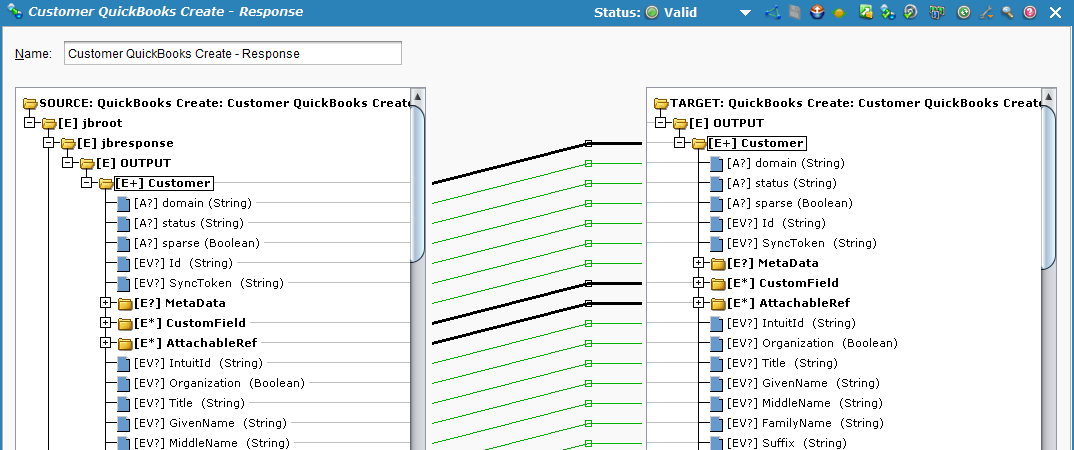
Response: Double-click on the Response icon and select Create New Transformation. Or click the Create Response button from the QuickBooks Create Activities tab. This will open the Transformation Wizard which will walk you through creating the Response.
- On the first screen, Name, select the Target type used above. For the example we chose XML. Leave the Source as default.
- On the next screen, Source, choose the button to Select an existing XML structure. In the dropdown select "QuickBooks Schemas." Then select 'QuickBooksCreateResponse.xsd' to use as your structure file. On the next screen, click Finish.
-
The Transformations tab should open where you can complete your mapping. Click the + at the bottom of each of the Source side and the Target side to expand then items in each tree. Click and drag the "OUTPUT" folder from the left side (Source side) to the "OUTPUT" folder on the right side (Target side). Your mapping screen should now look similar to that below.
Deploying and executing the operation
With the QuickBooks Create activity all set up, we are ready to deploy and execute the Operation.
From the Operations tab, click the Deploy  icon. Then click the Execute icon to place the Operation in the queue for execution.
In the lower portion of the screen, the Operation monitor should indicate that your Operation was run successfully. If not, you can double-click the Status icon to view any log messages. 
You should also now see the newly created data from QuickBooks output to the Target you specified. For the example, the file is now created in 'C:\projects\quickbooks\CustomerCreateResponse.xml':
<ns:OUTPUT xmlns:ns="urn:qboln-res:document:qboln:oln:functions">
    <ns:Customer>
        <ns:Id>58</ns:Id>
        <ns:SyncToken>0</ns:SyncToken>
        <ns:MetaData>
            <ns:CreateTime>2016-10-04T13:44:06-06:00</ns:CreateTime>
            <ns:LastUpdatedTime>2016-10-04T13:44:06-06:00</ns:LastUpdatedTime>
        </ns:MetaData>
        <ns:GivenName>Peter1</ns:GivenName>
        <ns:FamilyName>Hynes1</ns:FamilyName>
        <ns:FullyQualifiedName>Soft Tech1</ns:FullyQualifiedName>
        <ns:CompanyName>Soft Tech1</ns:CompanyName>
        <ns:DisplayName>Soft Tech1</ns:DisplayName>
        <ns:PrintOnCheckName>SoftTech LLC</ns:PrintOnCheckName>
        <ns:Active>1</ns:Active>
        <ns:PrimaryPhone>
            <ns:FreeFormNumber>7678907676</ns:FreeFormNumber>
        </ns:PrimaryPhone>
        <ns:Mobile>
            <ns:FreeFormNumber>8678907676</ns:FreeFormNumber>
        </ns:Mobile>
        <ns:Fax>
            <ns:FreeFormNumber>9678907676</ns:FreeFormNumber>
        </ns:Fax>
        <ns:PrimaryEmailAddr>
            <ns:Address>softtech@test.com</ns:Address>
        </ns:PrimaryEmailAddr>
        <ns:WebAddr>
            <ns:URI>http://stech.com</ns:URI>
        </ns:WebAddr>
        <ns:DefaultTaxCodeRef>2</ns:DefaultTaxCodeRef>
        <ns:Taxable>1</ns:Taxable>
        <ns:BillAddr>
            <ns:Id>96</ns:Id>
            <ns:Line1>456 Chinna Street</ns:Line1>
            <ns:City>Tracy</ns:City>
            <ns:Country>USA</ns:Country>
            <ns:CountrySubDivisionCode>767</ns:CountrySubDivisionCode>
            <ns:PostalCode>95391</ns:PostalCode>
        </ns:BillAddr>
        <ns:ShipAddr>
            <ns:Id>97</ns:Id>
            <ns:Line1>456 Chinna Street</ns:Line1>
            <ns:City>Tracy</ns:City>
            <ns:Country>str1234</ns:Country>
            <ns:CountrySubDivisionCode>767</ns:CountrySubDivisionCode>
            <ns:PostalCode>95391</ns:PostalCode>
        </ns:ShipAddr>
        <ns:Job>0</ns:Job>
        <ns:BillWithParent>0</ns:BillWithParent>
        <ns:Balance>0</ns:Balance>
        <ns:BalanceWithJobs>0</ns:BalanceWithJobs>
        <ns:CurrencyRef name="United States Dollar">USD</ns:CurrencyRef>
        <ns:PreferredDeliveryMethod>Print</ns:PreferredDeliveryMethod>
    </ns:Customer>
</ns:OUTPUT>
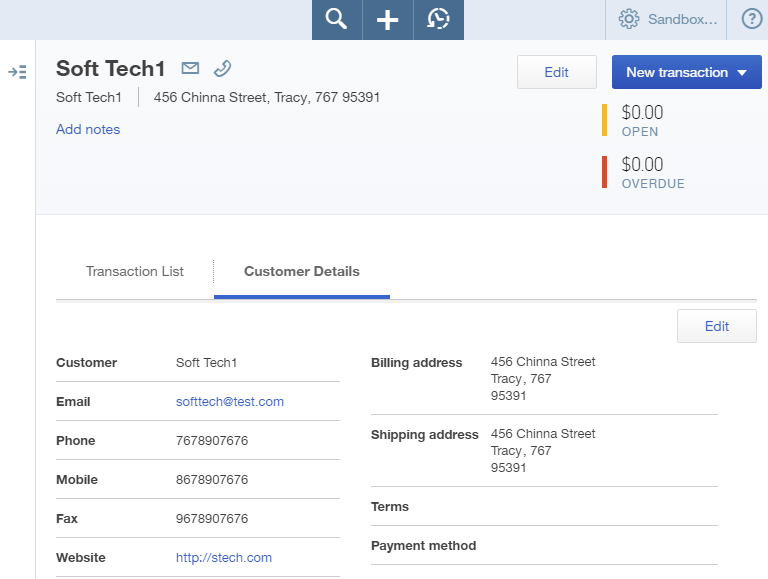
In addition, when you check your QuickBooks account, you should find the new Customer created.