Guide to using RFC_READ_TABLE to query SAP tables
Introduction
This guide for the Harmony SAP connector in Design Studio covers querying SAP tables using the RFC function RFC_READ_TABLE. To demonstrate the querying of SAP data, we use the standard SAP table KNA1 (General Data in Customer Master) to query IDs and addresses of customers in Philadelphia.
This page is organized into three parts:
-
Part 1: Creating the SAP Operation
First, we use the Design Studio SAP Connector to create an SAP endpoint and an associated SAP function. Using the SAP Function, we create a request transformation and a response transformation and then build an operation using those structures. (The details of the transformation mappings still need to be completed.)
-
Part 2: Modeling the Query in the SAP Instance
Next, for purposes of modeling the query that we want to create in Design Studio, we use SAP's Function Builder to test the RFC function in the SAP instance.
-
Part 3: Completing the SAP Operation
Finally, we map the fields of the request and response transformations, test the operation to preview the data that will be retrieved, and execute the operation to retrieve the data from SAP.
At the end of this guide, we also provide tips for querying SAP data, including considerations such as limitations of using this RFC and an alternative of using a BAPI.
Part 1: Creating the SAP operation
First, we use the Design Studio SAP Connector to create the structure of an SAP Operation using the RFC function RFC_READ_TABLE.
The details of the transformation mappings will be completed in Part 3: Completing the SAP operation.
Follow these steps to create the structure of the SAP Operation:
- Create the SAP endpoint
- Create the SAP function
- Create the request transformation
- Create the response transformation
- Create the operation
Create the SAP endpoint
Create an SAP endpoint with the information that will allow Harmony to connect to the SAP instance.
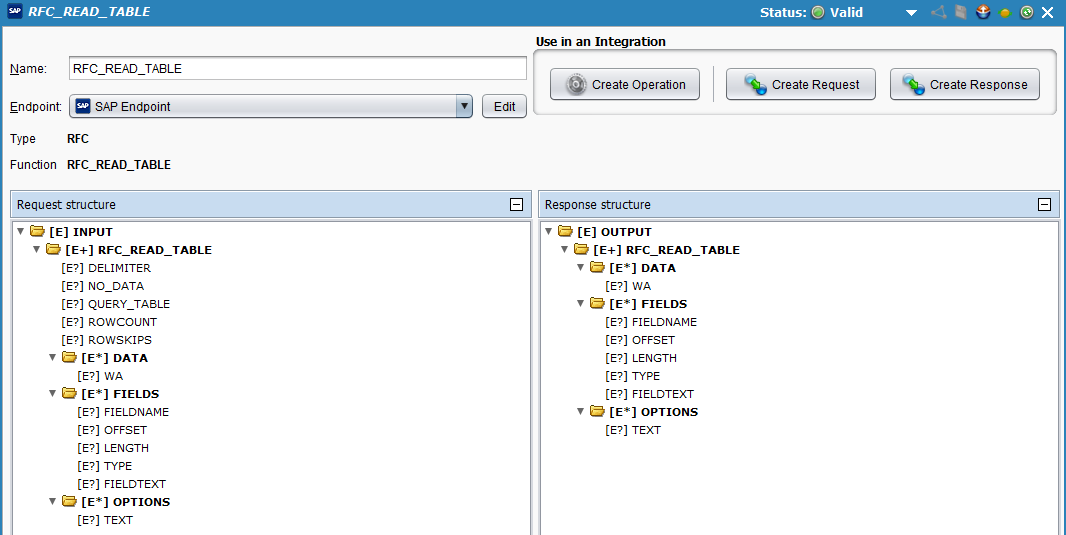
Create the SAP function
Create an SAP function with this configuration:
-
In the Type step, select RFC.
-
In the Function step, select
RFC_READ_TABLE.
After clicking Finish, the SAP Function's configuration screen displays the generated request and response structures, shown in the next step.
Create the request transformation
-
On the SAP Function configuration screen, click Create Request:
-
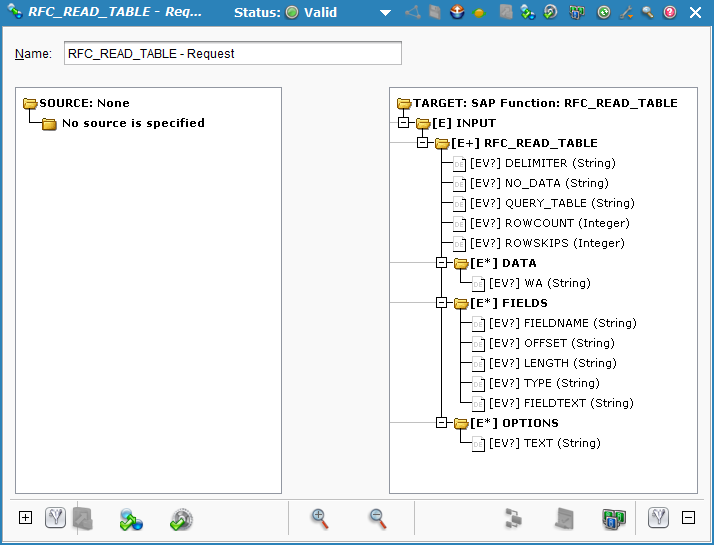
On the next screen, use the Source dropdown to select the source of the transformation. For this guide, select (None) as the source, as you will use hard-coded values later when you configure the transformation in Part 3: Completing the SAP operation. Click Finish to create the request transformation:

-
The request transformation configuration screen is displayed:
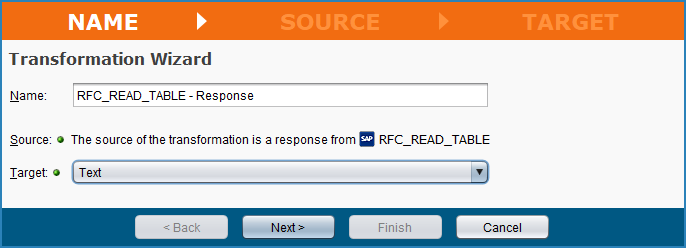
Create the response transformation
-
In the project tree on the left under Connectors > SAP > SAP Functions > RFC_READ_TABLE, locate the SAP Function you created in Create the SAP function. Right-click the function and select Create Response Transformation.
-
On the next screen, use the Target dropdown to select the target of the transformation. For this guide, select Text as the target, as you will create a flat text file to use as the target. Click Next:
-
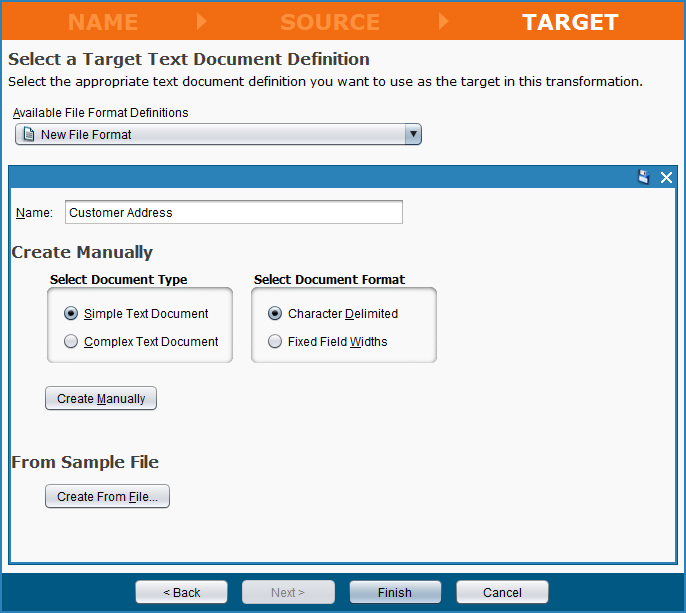
On the next screen, use the Available File Format Definitions dropdown to select Create New:

-
An area for creating a new file format is displayed. To create a new text file for the purposes of this guide, enter a Name of Customer Address. Under Create Manually, select Simple Text Document as the document type and Character Delimited as the document format, and then click Create Manually:
-
Under Define Segment Properties, add fields one at a time by clicking New and entering the Field Name (Customer, Name, City, Region, and Street). Click Finish to create the response transformation:

-
The response transformation configuration screen is displayed:
Create the operation
-
Locate the SAP Function you created earlier in the project tree on the left under Connectors > SAP > SAP Functions > RFC_READ_TABLE. Right-click the function and select Create Operation.
-
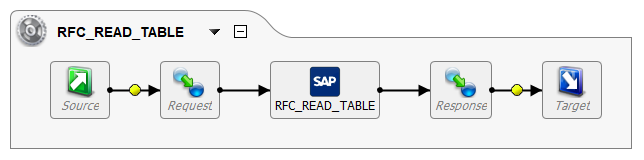
An operation using the SAP Function is created with placeholders for other parts of the operation:
-
Right-click the Request placeholder and select Select Existing Transformation. In the dialog, select the request transformation you created earlier (RFC_READ_TABLE - Request) and click OK.
Note
The Source placeholder is automatically removed, as the request transformation was defined earlier to have a source of (None) since hard-coded values will be configured in a later step.
-
Right-click the Response placeholder and select Select Existing Transformation. In the dialog, select the response transformation you created earlier (RFC_READ_TABLE - Response) and click OK.
-
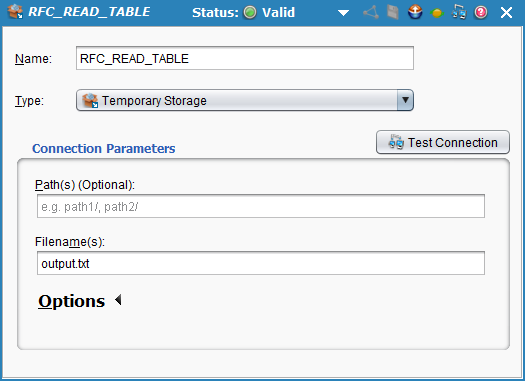
Right-click the Target placeholder and select Create New Target. Enter a Name of RFC_READ_TABLE and select a Type of Temporary Storage. Under Connection Parameters, provide a Filename such as output.txt. Save the new target:
-
-
Return t o the operation in the project tree on the left under Operations > RFC_READ_TABLE. If necessary, you can reset the layout of the operation using
Control+F5(Windows) orCommand+F5(macOS).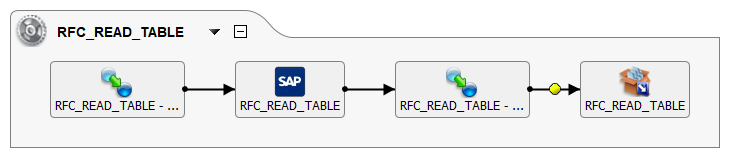
Part 2: Modeling the query in the SAP instance
Next, for purposes of modeling the query that we want to create in Design Studio, we use SAP's Function Builder to test the RFC_READ_TABLE function.
-
Log in to the SAP GUI.
-
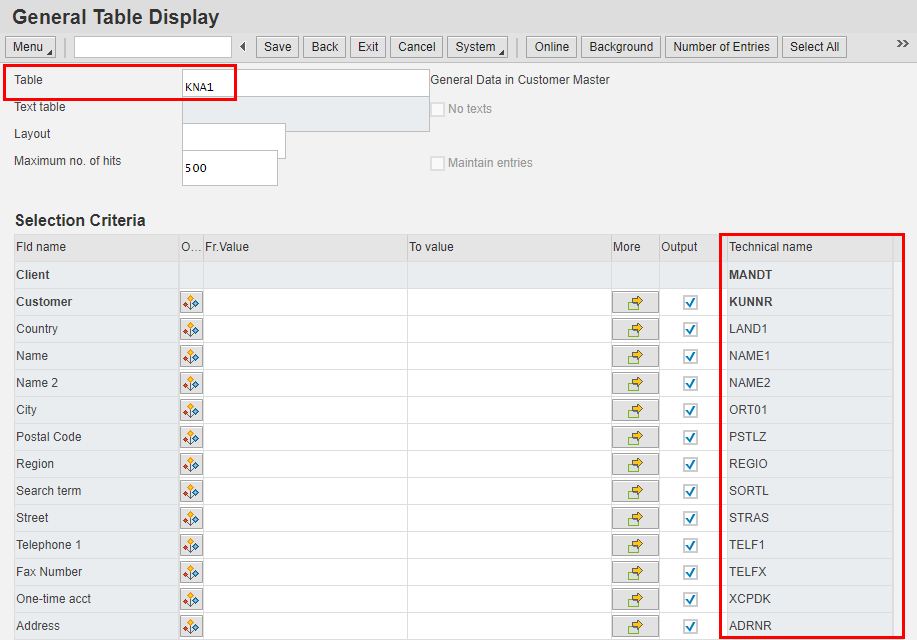
In the search box, enter the SAP transaction code SE16N.
-
The General Table Display screen is displayed. Provide a Table name of KNA1 to display the table and its fields. The names in the column Technical Name are used by the RFC:
-
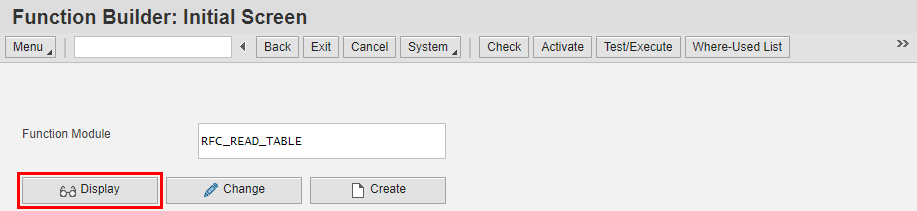
In the search box, enter the SAP transaction code SE37.
-
The Function Builder: Initial Screen is displayed. Enter a Function Module of RFC_READ_TABLE. Then click Display:
-
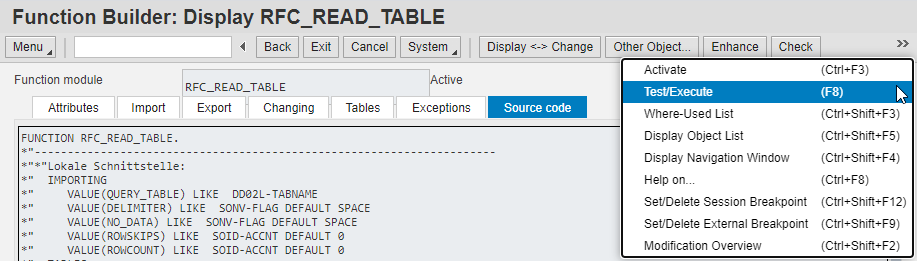
The Function Builder: Display RFC_READ_TABLE screen is displayed. Use the menu to select Test/Execute:
-
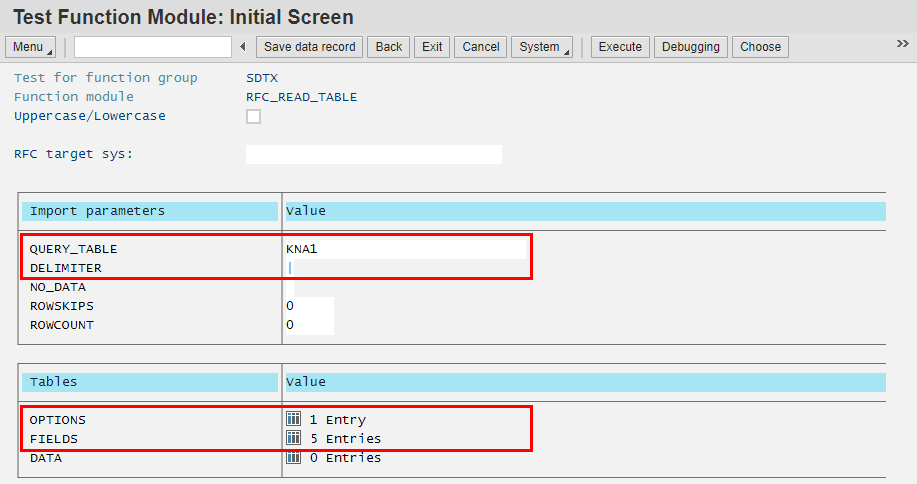
The Test Function Module: Initial Screen screen is displayed. Once configured as described below, the screen looks like this:
-
In the first table, enter these values in the Value column:
-
QUERY_TABLE: KNA1 -
DELIMITER: |Note
The pipe delimiter is needed since the response from this RFC is unstructured.
-
-
In the second table, follow these steps to configure the Value column for these fields:
-
OPTIONS: Click the value cell (0 Entries) to display the Structure Editor: Change OPTIONS from Entry 1 screen. In theTEXTarea, enter the conditions of the query using SAP's version of SQL (see Tips for querying SAP data at the end of this page for operator information):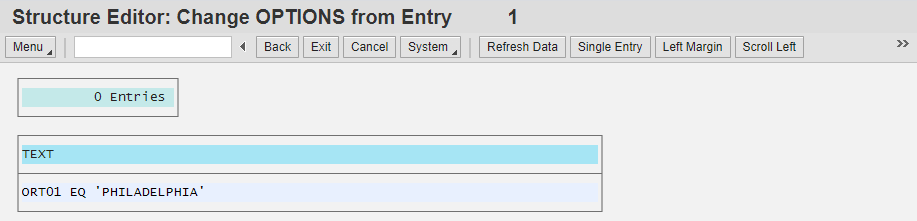
-
FIELDS: Click the value cell (0 Entries) to display the Structure Editor: Change FIELDS from Entry 1 screen. Add these entries in theFIELDNAMEcolumn, using the menu to select New Line for each new row: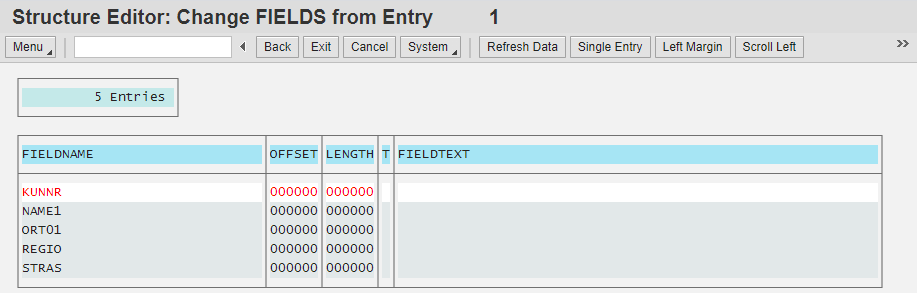
Note
The field names use the technical names as shown in Part 2, step 1.
-
-
-
On the Test Function Module: Initial Screen screen, click the Execute button:

-
The Test Function Module: Result Screen screen is displayed. Click the
DATAtable's value cell to view the results of the query: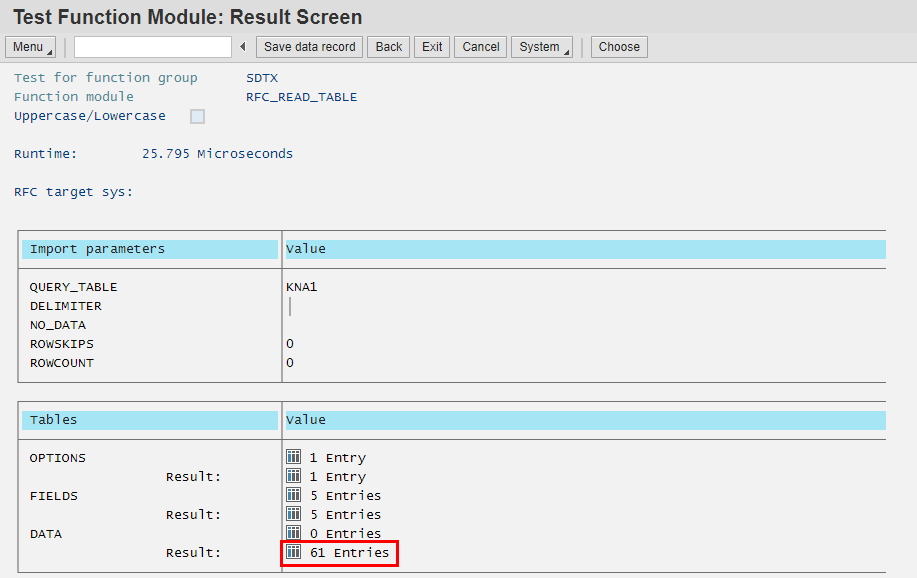
-
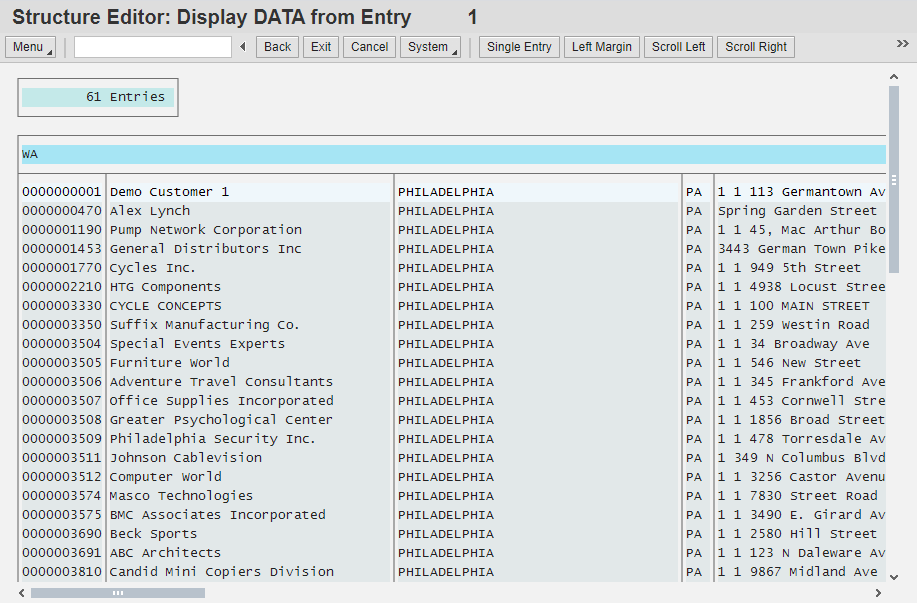
The Structure Editor: Display DATA from Entry 1 screen is displayed, showing the IDs and address information for customers in Philadelphia:
Part 3: Completing the SAP operation
In this step, we complete the details of the SAP operation that we created in Creating the SAP operation and execute the operation to retrieve the SAP data:
- Configure the request transformation
- Configure the response transformation
- Deploy the project
- Test the operation
- Execute the operation
Configure the request transformation
-
In the project tree on the left under Transformations > RFC_READ_TABLE - Request, double-click to open the request transformation you created earlier.
-
Complete the transformation mapping as follows:
-
In the target structure, under
INPUT>RFC_READ_TABLE, double-click to open theDELIMITERfield. Enter this script to hardcode the delimiter:<trans> "|" </trans> -
In the target structure, under
INPUT>RFC_READ_TABLE, double-click to open theQUERY_TABLEfield. Enter this script to use the KNA1 table:<trans> "KNA1" </trans> -
In the target structure, under
INPUT>RFC_READ_TABLE > FIELDS, double-click to open theFIELDNAMEfield. Enter this script for the first field name:<trans> "KUNNR" </trans> -
As there are more fields to add but only one folder, add additional folders by right-clicking
FIELDSand selecting Create Extra Folder for Mappings. Do this for each additional field and enter the script for eachFIELDNAMEfollowing the same format as in the previous step: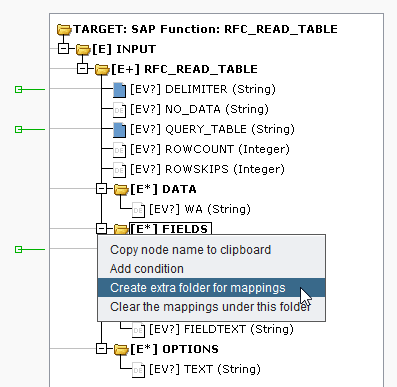
-
In the target structure, under
INPUT>RFC_READ_TABLE > OPTIONS, double-click to open theTEXTfield. Enter this script for the query:<trans> "ORT01 EQ 'PHILADELPHIA'" </trans>Tip
The
RFC_READ_TABLEfunction has a limit of 75 characters per option line, so if your query exceeds that, you can add additional folders as described in the previous step.
-
-
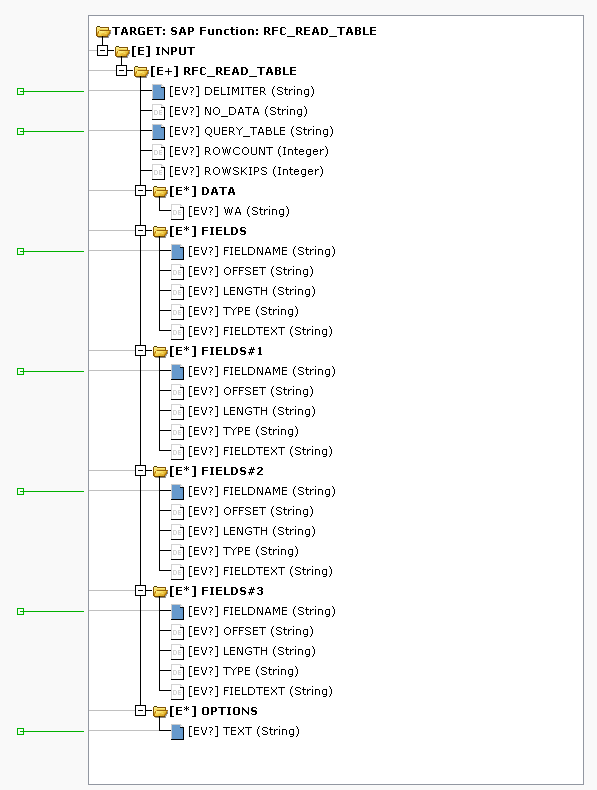
When the mappings are complete, the request structure should look similar to this:
Configure the response transformation
-
In the project tree on the left under Transformations > RFC_READ_TABLE - Response, double-click to open the response transformation you created earlier. Complete the transformation mapping as follows:
-
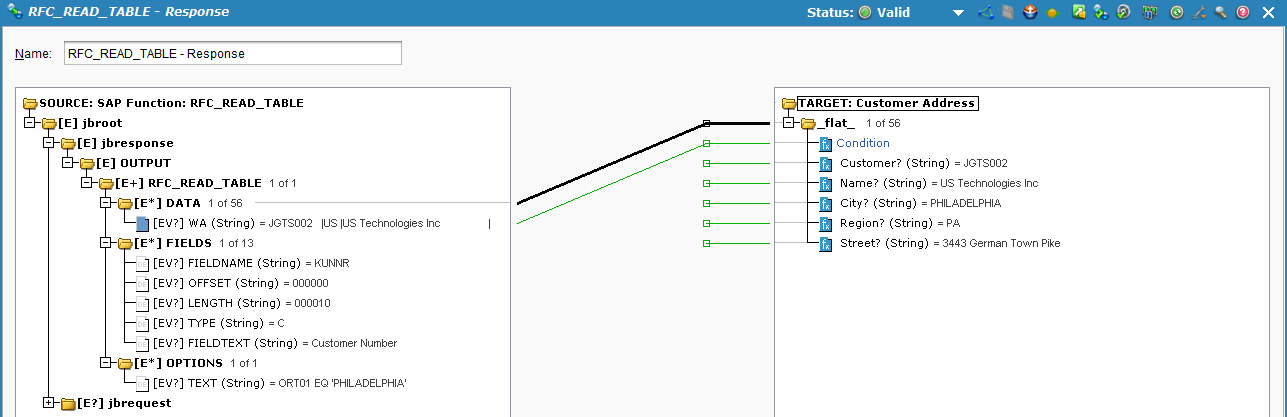
In the target structure, right-click the
_flat_node and select Add Condition to add data element calledConditionas the first element under the node: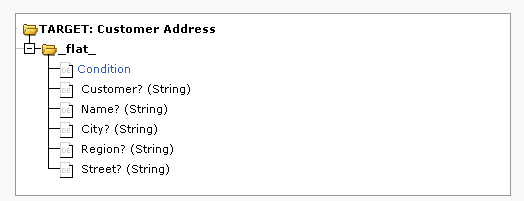
-
Double-click the
Conditiondata element and enter this script to split the output into individual fields:<trans> $arr=Split(jbroot$jbresponse$OUTPUT$RFC_READ_TABLE.DATA.WA$, "|"); true </trans> -
Double-click each remaining field of the response structure and populate each script with the array positions:
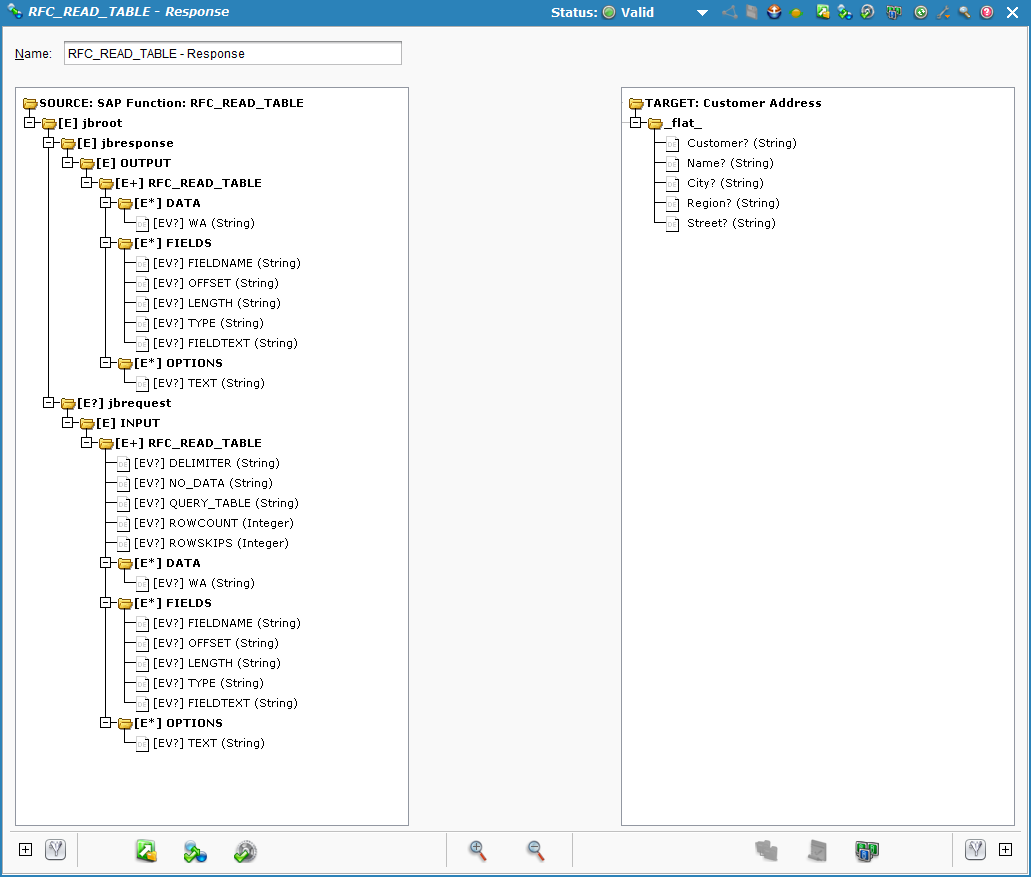
Customer<trans> $arr[0] </trans>Name<trans> $arr[2] </trans>City<trans> $arr[4] </trans>Region<trans> $arr[6] </trans>Street<trans> $arr[8] </trans>
-
-
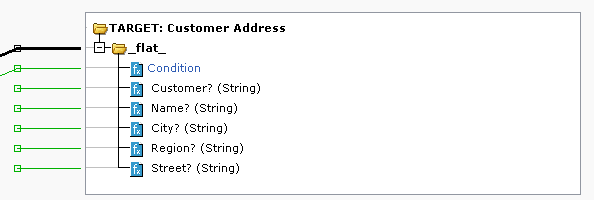
When the mappings are complete, the response structure should look similar to this:
Deploy the project
In the top toolbar, click the deploy icon ![]() and deploy everything in the project.
and deploy everything in the project.
Test the operation
In the lower right of the response transformation, click the operation test icon ![]() to test the operation.
to test the operation.
Data from the SAP tables is displayed on each line in the response transformation, showing how data would be populated if the operation were to be executed:
Execute the operation
Open the operation and click the execute icon ![]() in the upper right.
in the upper right.
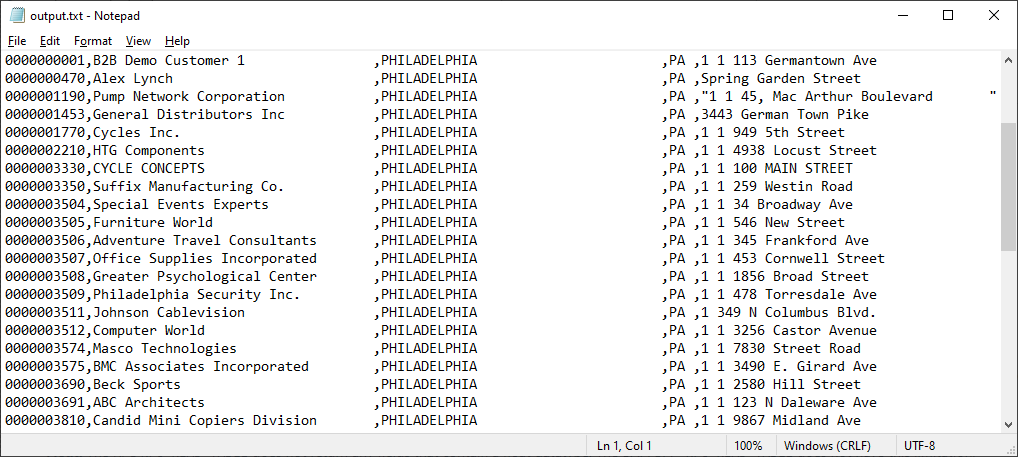
The Operation Monitor should indicate that the operation ran successfully. We can now check the output file and see that the queried data has been written to the file:
Tips for querying SAP data
This section provides tips for querying SAP data:
-
RFC or BAPI: If you run into limitations using the RFC
RFC_READ_TABLE, there are other options such as using the BAPIBBP_RFC_READ_TABLEor using a custom RFC. The steps to use a BAPI or custom RFC are similar in Design Studio to the steps presented for the RFCRFC_READ_TABLE. -
Row Limit: The RFC
RFC_READ_TABLEhas a 512-character row limit. That is, each row of data cannot exceed 512 characters. -
Float: The RFC
RFC_READ_TABLEdoes not return any fields that contain a float datatype. The BAPIBPP_RFC_READ_TABLEdoes not have this limitation. -
ROWSKIPSandROWCOUNT: The RFCRFC_READ_TABLEreturns a maximum of 999999 records at once. As this may exceed the limitations of the number of records that can be processed by an endpoint in a downstream operation, you may want to use the fieldsROWSKIPSandROWCOUNTto implement a form of chunking.ROWSKIPSis the beginning row number, andROWCOUNTis the number of rows to fetch. For example,ROWSKIPS = 0, ROWCOUNT = 500fetches the first 500 records,ROWSKIPS = 501, ROWCOUNT = 500gets the next 500 records, and so on. If left at0, then no chunking is implemented. The maximum value for either of these fields is999999. -
OPTION: TheOPTIONfield holds the query condition. There is a 75-character limit to the length of the query, so if the query exceeds that limit, additional folders must be created to hold the entire query string. -
Error Handling: The RFC
RFC_READ_TABLEdoes not return error messages. Errors when using the BAPIBPP_RFC_READ_TABLEare returned through the SAP Connector:-
If the table name is invalid:
(126) TABLE_NOT_AVAILABLE: TABLE_NOT_AVAILABLE Message 029 of class SV type E, Par[1]: DD5T -
If there is an invalid condition:
JCO_ERROR_SYSTEM_FAILURE: A condition specified dynamically has an unexpected format. -
If a field name is invalid:
(126) FIELD_NOT_VALID: FIELD_NOT_VALID
-
-
Views: Creating views in SAP can be helpful for dealing with joined tables.
-
Query Operators: The SAP query language uses these operators:
Operator Description EQequal to NEnot equal to LTless than LEless than or equal to GTgreater than GEgreater than or equal to LIKEas in LIKE `Emma%`