Define a file format
Jitterbit allows you to use simple or complex file types as sources or targets during the data transformation process. Simple files have the same data row type throughout the text document, while complex files contain multiple file row types such as header or summary rows.
As part of the transformation process, you need to define the File Format so that Jitterbit knows how to process the data. Typically, File Formats are generated as part of the Wizard walkthrough when creating your integration. After a File Format is created, you can modify it under the File Formats section in the tree on the left side of Studio. If you need to define a custom file format, you can create a new File Format from the same section.
This page covers how to define the File Format of a text document to be used as a source or target.
Create a new file format
Typically, File Formats are generated as part of the Wizard walkthrough when creating your integration. You can also generate a new File Format separately via one of the following methods:
- Go to File > New > New File Format.
- Click the
 icon in the toolbar.
 - Right-click on File Formats in the left pane of Studio, then choose New File Format from the menu.
Your new File Format will be listed under the File Formats section in the left pane of Studio. In addition, a screen to configure your new File Format will open in the right pane of Studio. Here you choose whether to specify the structure manually or from a sample file:
-
Create Manually: Manually type in the names and types of the fields while configuring your File Format.
-
From Sample File: Use a sample file if available, as described in Creating a text document definition from a sample file.
Note
This option is available only for creation of a simple (flat) file format.
For File Formats being created manually, you will also need to select the document type, as well as the format.
- Simple Text Document: Simple files have the same data row type throughout the text document.
- Complex Text Document: Complex files contain multiple file row types such as header or summary rows.
Both simple and complex document types allow character delimited and fixed field width formats.
Click the  button to continue to the next configuration screen.
You can also get back to the existing configuration at any time from the left pane of Studio under File Formats.
Configure fields manually
After choosing to create your File Format manually, another configuration screen will be used to define each field in your document. This next step depends on the type of text structure you selected – simple or complex – as well as the format you selected – character-delimited or fixed field width.
Simple text document – character-delimited
If you have selected a simple text document that is character-delimited, your configured screen should look similar to that below. Following is an explanation for each configurable section.
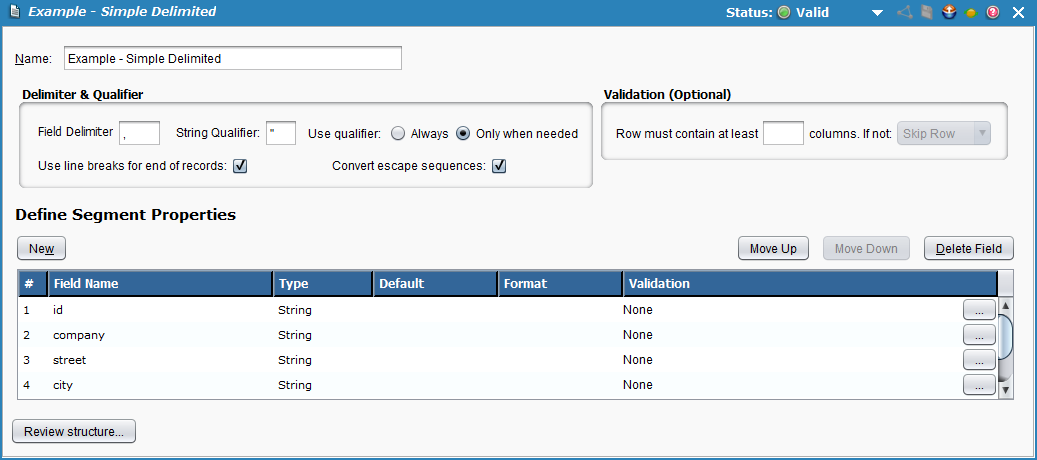
Delimiter & qualifier
-
Field Delimiter: Enter the character(s) to use as field delimiter(s) that specify the boundary between data fields. The default is a comma. You can also use multiple-character delimiters, such as a double pipe
||. To use a tab as a delimiter, enter \t. -
String Qualifier & Use qualifier: Enter the character to be used as a wrapper, indicating a string of text that is to be treated as a single unit of data. The default is a double quote character. If left empty, no string qualifier is used.
When using a String Qualifier, select a corresponding business rule, either Always or Only when needed, to indicate when the qualifier should be used. The default, Only when needed, is recommended, so that if the character(s) specified as the Field Delimiter occurs within the string, then the string is wrapped by the specified string qualifier character. If the delimiter does not occur, then the string is not wrapped.
During processing of sources, the string qualifier is stripped away. During processing of targets, the string qualifier is added.
-
Use line breaks for end of records: As of version 8.19, this checkbox is used to toggle on or off the use of line breaks as a separation between records. By default, end of records are denoted by line breaks so that each record exists on one line (unless using a qualifier). When disabled, line breaks are ignored and new records begin after the total number of fields are reached.
Note
This flag is relevant only for source file formats. For target files, line breaks are always used to denote end of records.
-
Convert escape sequences: As of version 8.23, this checkbox is used to convert or ignore escape sequences, as indicated by a backslash (\). By default, escape sequences are converted in accordance with Java standards. When disabled, text conversion occurs with no interpretation of escape sequences.
Note
This flag is relevant only for source file formats.
Validation (optional)
-
Row must contain at least 'X' columns: If you want to use text validation (optional), you can enter a number of columns here that each row must contain, in order for the action specified next to occur.
Note
You must have at least one row of data defined first in order to enable the validation options.
-
If not: After entering a number of columns, a dropdown will become available, where you can select to "Skip Row" or "Raise Error." More information on validation is available at Flat file field validation.
Define segment properties
Click the New button to define the document's first field. You must enter the following (required):
-
Field Name: Enter a name for this field.
-
Type: Select a type from the dropdown menu. Options include String, Integer, Date, Long, Float, Double, Boolean.
Note
If in doubt about the field type, it is recommended to choose String, since this type allows any data type to be included as a string.
The following are optional:
-
Default: If you want this field to have a default value, enter the value here.
-
Format: If you want this field to have a specific format, such as for date or currency, enter the format here.
-
Validation: Double-click in this column or use the
 button on the far right to open additional options for field validation. More information on validation is available at Flat file field validation.
Repeat the previous steps for each additional data field you need to define.
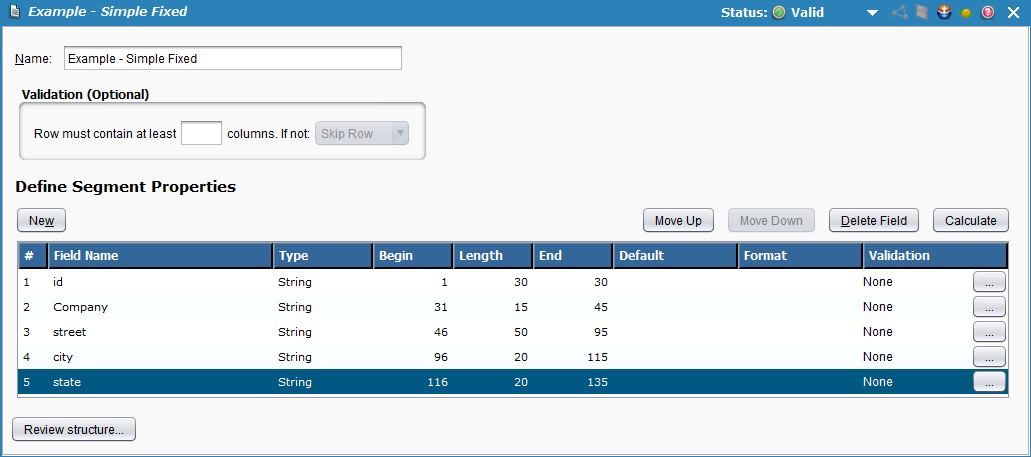
Simple text document – fixed field widths
If you have selected a simple text document that has fixed field widths, your configured screen should look similar to that below. Following is an explanation for each configurable section.
Validation (optional)
-
Row must contain at least 'X' columns: If you want to use text validation (optional), you can enter a number of columns here that each row must contain, in order for the action specified next to occur.
Note
You must have at least one row of data defined first in order to enable the validation options.
-
If not: After entering a number of columns, a dropdown will become available, where you can select to "Skip Row" or "Raise Error." More information on validation is available at Flat file field validation.
Define segment properties
Click the New button to define the document's first field. You must enter the following (required):
-
Field Name: Enter a name for this field.
-
Type: Select a type from the dropdown menu. Options include String, Integer, Date, Long, Float, Double, Boolean.
Note
If in doubt about the field type, it is recommended to choose String, since this type allows any data type to be included as a string.
-
Begin: Enter the starting character position (1 is considered to be the position for the beginning of the file). Note that the default value for subsequent rows will always be the next character after the previous field's ending position.
-
Length: Enter the number of characters that are reserved for this field.
Note
Fixed-length text files always specify a certain number of characters that are reserved for each field. For example, you may identify a field called LastName that always has 30 characters reserved for it. (If the actual value is Smith, only 5 characters are used; the remaining characters have nothing in them.)
If you have changed any field's character length value, use the
 button to recalculate all the fields' starting positions.
Warning
The Calculate button resets all the Begin and End field values, based on the Length values you specified. Do not use this button if your file's field positions have gaps or overlaps, as they will be deleted.
-
End: Enter the ending character position.
Note
By default, fixed-length segments are terminated with a newline character.
The following are optional:
-
Default: If you want this field to have a default value, enter the value here.
-
Format: If you want this field to have a specific format, such as for date or currency, enter the format here.
-
Validation: Double-click in this column or use the
button on the far right to open additional options for field validation. More information on validation is available at Flat file field validation.
Repeat the previous steps for each additional data field you need to define.
Complex text document – character-delimited
If you have selected a complex text document that is character-delimited, your configured screen should look similar to that below. Following is an explanation for each configurable section.
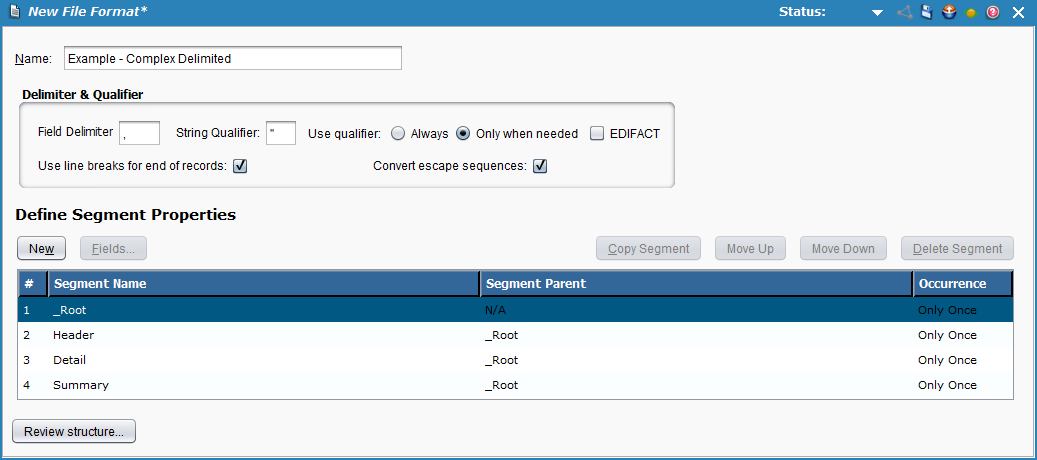
Delimiter & qualifier
-
Field Delimiter: Enter the character(s) to use as field delimiter(s) that specify the boundary between data fields. The default is a comma. You can also use multiple-character delimiters, such as a double pipe
||. To use a tab as a delimiter, enter/t. -
String Qualifier & Use qualifier: Enter the character to be used as a wrapper, indicating a string of text that is to be treated as a single unit of data. The default is a double quote character. If left empty, no string qualifier is used.
When using a String Qualifier, select a corresponding business rule, either Always or Only when needed, to indicate when the qualifier should be used. The default, Only when needed, is recommended, so that if the character(s) specified as the Field Delimiter occurs within the string, then the string is wrapped by the specified string qualifier character. If the delimiter does not occur, then the string is not wrapped.
During processing of sources, the string qualifier is stripped away. During processing of targets, the string qualifier is added.
-
EDIFACT: Check this box if you are using EDIFACT syntax rules within your file. If you do not know what this option is, leave unchecked.
-
Use line breaks for end of records: As of version 8.19, this checkbox is used to toggle on or off the use of line breaks as a separation between records. By default, end of records are denoted by line breaks so that each record exists on one line (unless using a qualifier). When disabled, line breaks are ignored and new records begin after the total number of fields are reached.
Note
This flag is relevant only for source file formats. For target files, line breaks are always used to denote end of records.
-
Convert escape sequences: As of version 8.23, this checkbox is used to convert or ignore escape sequences, as indicated by a backslash (\). By default, escape sequences are converted in accordance with Java standards. When disabled, text conversion occurs with no interpretation of escape sequences.
Note
This flag is relevant only for source file formats.
Define segments
Click the New button to define the document's first segment. You must enter the following (required):
- Segment Name: Enter a name for the segment.
- Segment Parent: Identify the parent of this segment from the dropdown menu.
-
Occurrence: Specify how the segment will occur in your complex document by choosing one of the options from the dropdown menu:
- Choose Only Once if this segment must occur once but only once in the document.
- Choose One or More if this segment must occur at least once, but can also be repeated.
- Choose Zero or One if this segment may not occur, but if it does, it can only occur once.
- Choose Zero or More if this segment may not occur, but if it does, it can occur one or more times.
Repeat the previous steps for each additional segment you need to define.
Define segment properties
Now that all the segments have been created, you will need to define each segment's fields.
Either double click on the desired segment's # column, or with the segment highlighted click the  button. The Segment: Detail popup will appear.
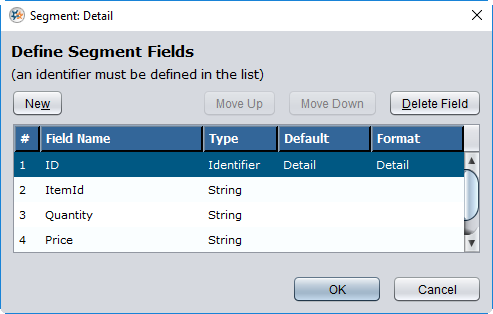
For each segment, click the New button to define the segment's fields. You must enter the following (required):
-
Field Name: Enter a name for this field.
-
Type: Select a type from the dropdown menu. Options include String, Integer, Date, Long, Float, Double, Boolean.
Note
If in doubt about the field type, it is recommended to choose String, since this type allows any data type to be included as a string.
The following are optional:
- Default: If you want this field to have a default value, enter the value here.
- Format: If you want this field to have a specific format, such as for date or currency, enter the format here.
Note
Each segment must include one and only one Identifier field. Make sure that you have one field whose data type is set to this.
Repeat the previous steps for each additional data field you need to define.
Complex text document – fixed field widths
If you have selected a complex text document that has fixed field widths, your configured screen should look similar to that below. Following is an explanation for each configurable section.
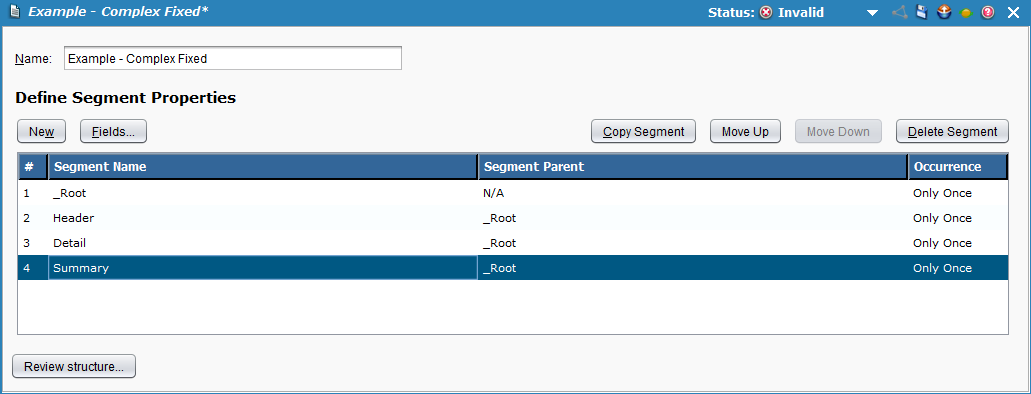
Define segments
Click the New button to define the document's first segment. You must enter the following (required):
- Segment Name: Enter a name for the segment.
- Segment Parent: Identify the parent of this segment from the dropdown menu.
-
Occurrence: Specify how the segment will occur in your complex document by choosing one of the options from the dropdown menu:
- Choose Only Once if this segment must occur once but only once in the document.
- Choose One or More if this segment must occur at least once, but can also be repeated.
- Choose Zero or One if this segment may not occur, but if it does, it can only occur once.
- Choose Zero or More if this segment may not occur, but if it does, it can occur one or more times.
Repeat the previous steps for each additional segment you need to define.
Define segment properties
Now that all the segments have been created, you will need to define each segment's fields.
Either double click on the desired segment's # column, or with the segment highlighted click the button. The Segment: Detail popup will appear.
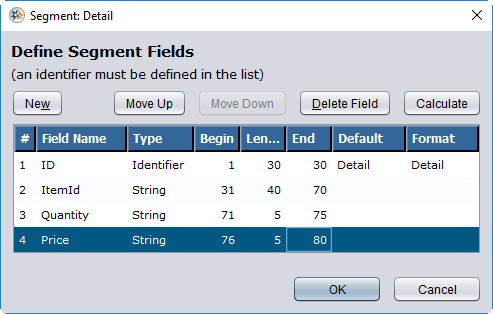
For each segment, click the New button to define the segment's fields. You must enter the following (required):
-
Field Name: Enter a name for this field.
-
Type: Select a type from the dropdown menu. Options include String, Integer, Date, Long, Float, Double, Boolean.
Note
If in doubt about the field type, it is recommended to choose String, since this type allows any data type to be included as a string.
-
Begin: Enter the starting character position (1 is considered to be the position for the beginning of the file). Note that the default value for subsequent rows will always be the next character after the previous field's ending position.
-
Length: Enter the number of characters that are reserved for this field.
Note
Fixed-length text files always specify a certain number of characters that are reserved for each field. For example, you may identify a field called LastName that always has 30 characters reserved for it. (If the actual value is Smith, only 5 characters are used; the remaining characters have nothing in them.)
If you have changed any field's character length value, use the
button to recalculate all the fields' starting positions.Warning
The Calculate button resets all the Begin and End field values, based on the Length values you specified. Do not use this button if your file's field positions have gaps or overlaps, as they will be deleted.
-
End: Enter the ending character position.
Note
By default, fixed-length segments are terminated with a newline character.
The following are optional:
-
Default: If you want this field to have a default value, enter the value here.
-
Format: If you want this field to have a specific format, such as for date or currency, enter the format here.
Note
Each segment must include one and only one Identifier field. Make sure that you have one field whose data type is set to this.
Repeat the previous steps for each additional data field you need to define.
Configure fields from sample file
To create fields from a sample file, rather than manually, please refer to Creating a text document definition from a sample file.