Create a hosted HTTP endpoint
Overview
A Hosted HTTP Endpoint represents a URL with one or more operations associated with it. When the URL is accessed the configured operations are triggered with the request data as input (if any). The endpoint can be configured to return a target file or the contents of a data element as response.
Note
Hosted HTTP Endpoint may be implemented only on private agents. If you are running on cloud agents, you need to use the custom API feature to call an operation. To configure a custom API, refer to API Manager for additional information.
Create a hosted HTTP endpoint
Follow these steps to create a Hosted HTTP Endpoint:
- If you have not already done so, log in to Jitterbit Studio.
- Make sure you have opened the appropriate project in which you want to create the new Hosted HTTP Endpoint.
- Create and test the operations you want to trigger with the Hosted HTTP Endpoint.
-
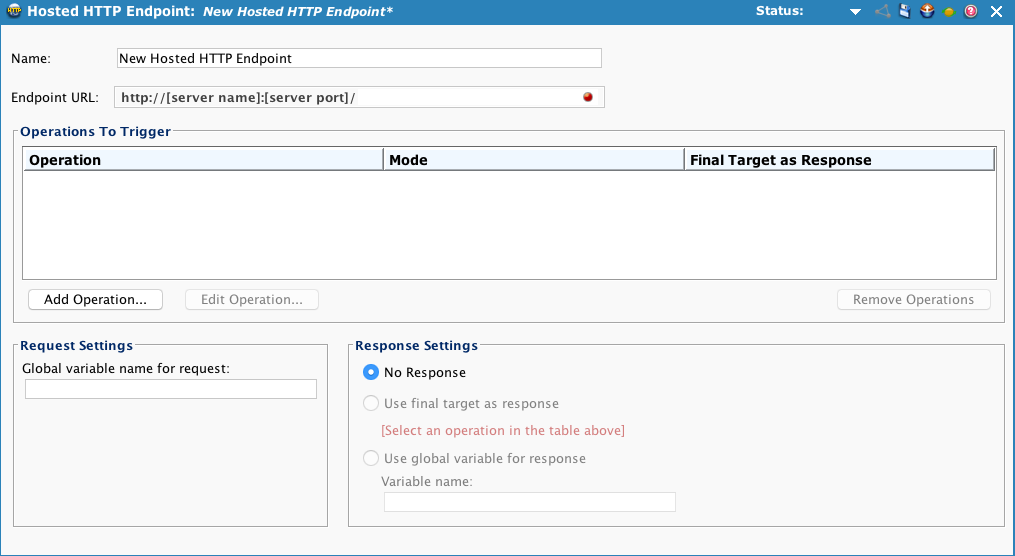
Right-click on the Hosted HTTP Endpoints node in the Project Tree and choose New Hosted HTTP Endpoint or select New from the File Menu and choose New Hosted HTTP Endpoint from the sub-menu. A new tab entitled "New Hosted HTTP Endpoint" will appear in the right pane:
-
Fill-in the properties of the HTTP Endpoint:
-
The Name of your endpoint must be unique within your project.
-
Endpoint URL is the URL you want this endpoint to listen on. For example, if you enter "
company/po_import", the endpoint will be triggered when the URL "http://[server name]:[server port]/company/po_import" is requested.-
The server name is the server on which the private agent is installed. If you have a load balancer or firewall in front of your private agent, then this is the IP/hostname that is configured to communicate with the private agent.
-
The server port for HTTP is 46908.
-
If you are creating an HTTPS URL (instead of HTTP), then you will need to configure SSL on Jitterbit Apache on the Jitterbit private agent. Please refer to these links for additional information:
-
The server port for HTTPS is 46909.
-
-
Operations To Trigger is a list of the operations you want to trigger with this endpoint. At least one operation must be specified. To add an operation, click the Add Operation button. A list of available operations will be presented. Select one or more operations and click OK. If you select an existing operation and click Edit Operation, the selected operation will appear in a new window or tab. In order to remove one or several operations from the list of operations to trigger, select the operation(s) and click Remove Operations.
-
Each operation can be triggered either synchronously or asynchronously. For each operation, select the appropriate mode from the drop-down. If you want to use the result of an operation as the response, it must run synchronously. Asynchronous operations are just added to the operation queue for future processing.
-
If you want the final target of an operation to be returned as the response, check the Final Target As Response check-box for the operation you wish to use. Only one operation can have this option checked.
-
In Request Settings, you can optionally choose to have the request data written to a global variable. If not required, leave this field empty. For example, if you enter the string
requestin this field, the request data will be accessible in scripts and mappings as$requestorGet("request").In Response Settings, the response behavior is configured. The default is No Response. If you need to return data as part of the response, you can use either the final target of an operation or data written to a global data element as the response. Check the appropriate radio button and either select an operation or enter the name of a global data element.
-
-
By default, a Hosted HTTP Endpoint requires an authenticated user. The user authenticates using HTTP authentication and all triggered operations must have the execute permission flag set for the authenticated user. If you want anyone to be able to trigger the endpoint or if you are implementing authentication yourself, the Anonymous user must have execute permission on the operation. The operations always run as the owner of the operation.
-
Deploy your project. As soon as the Hosted HTTP Endpoint is deployed it will listen for incoming requests on the configured URL.
Global data elements
These global data elements are populated when a Hosted HTTP Endpoint is accessed:
-
jitterbit.networking.http.request.header.HeaderNameContains the HTTP headers included in the request. For example, the Content-Type header is written to the global data element
$jitterbit.networking.http.request.header.content_type. NOTE: Use either$jitterbit.networking.http.request.header.content_typeorGet("jitterbit.networking.http.request.header.content-type")to retrieve the value. -
jitterbit.networking.http.query.ParameterNameContains the URL query parameters, if any. If the accessed URL is
http://server:port/company/po_import?po_id=dlsho394&uid=arcade, then$jitterbit.networking.http.query.po_idwill have the value"dlsho394"and$jitterbit.networking.http.query.uidwill have the value"arcade". -
jitterbit.networking.peer.ipContains the IP address of the calling machine.
These global data elements can be set to modify the behavior of a Hosted HTTP Endpoint:
-
jitterbit.networking.http.response.content_typeOverrides the default Content-Type response header. The default Content-Type header is set following these rules: If an operation target is the response, the Content-Type header is set to "text" for a text target and "text/xml" for an XML target. If the endpoint returns the contents of a data element as the response, the Content-Type header is set to "text/html". If the endpoint is not configured to return response data, the Content-Type header is not set. Set this global data element to override these defaults.